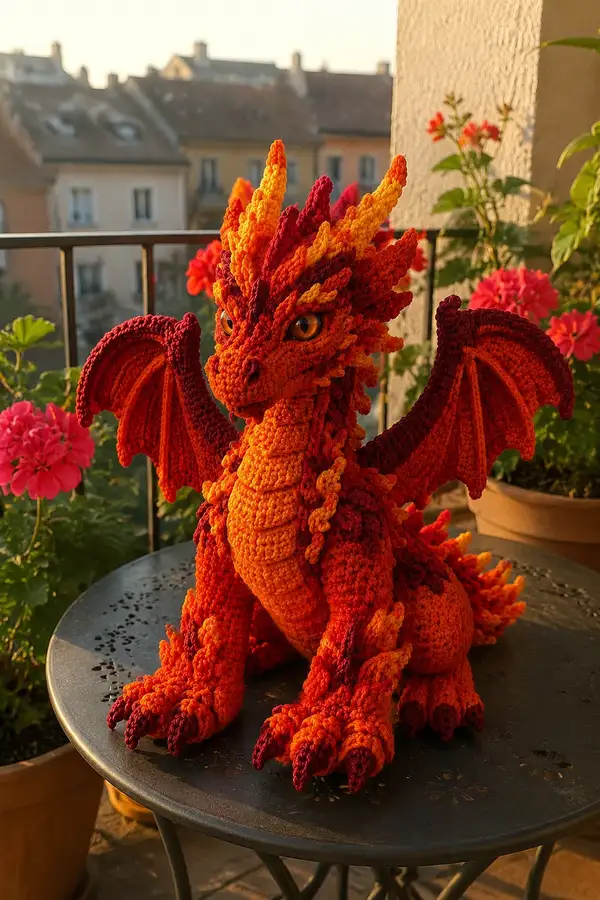
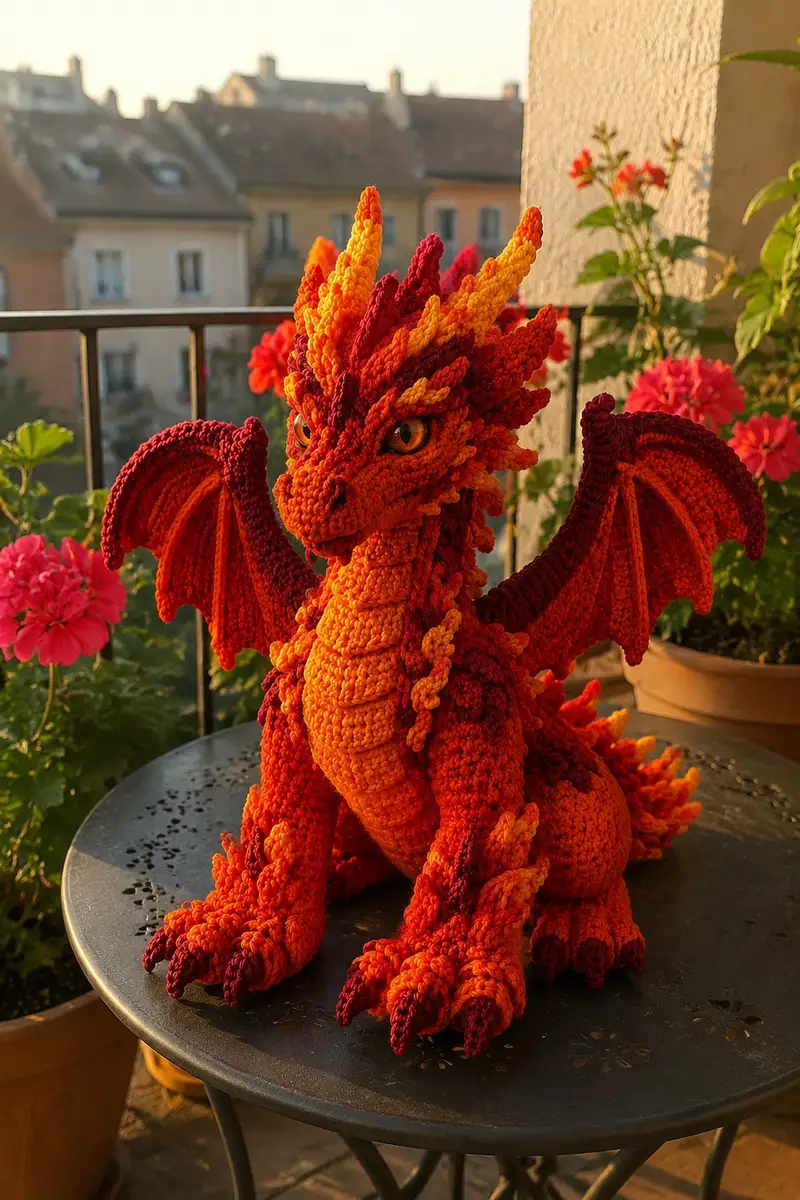
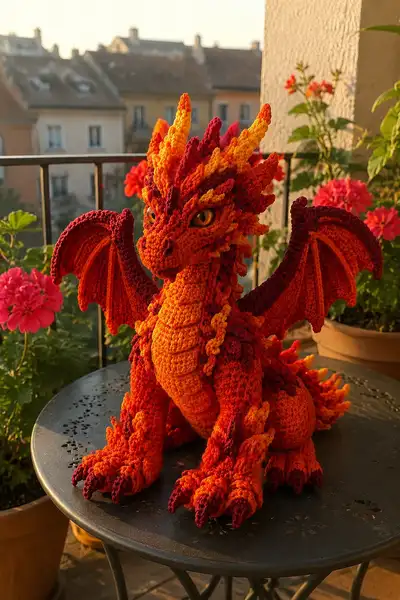
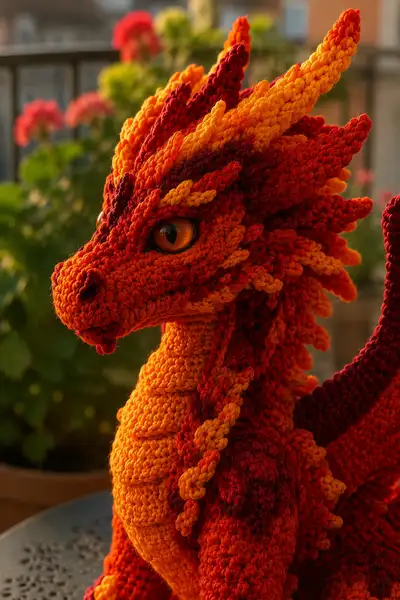
A dramatic, sculpted lava dragon amigurumi with layered flame scales, amber glass-like eyes, articulated wings and chunky clawed feet. Worked in warm gradient oranges, reds and yellows to mimic molten fire. This detailed pattern teaches shaping, textured ridges and many small decorative flame scales to create a bold display piece.
Progress Tracker
0% Complete
— Head :
Round 1 :
6 sc in magic ring (6)
Round 3 :
(1 sc, 1 inc) x 6 (18)
Round 4 :
(2 sc, 1 inc) x 6 (24)
Round 5 :
(3 sc, 1 inc) x 6 (30)
Round 6 :
(4 sc, 1 inc) x 6 (36)
Round 7 :
(5 sc, 1 inc) x 6 (42)
Round 8 :
(6 sc, 1 inc) x 6 (48)
Round 9 :
1 sc in each st (48)
Round 10 :
1 sc in each st (48)
Round 11 :
1 sc in each st (48)
Info :
Place safety eyes between rounds 13-14, approximately 6-8 stitches apart depending on desired expression. Mark the first stitch of each round with a stitch marker to avoid losing your place.
Round 12 :
1 sc in each st (48)
Round 13 :
1 sc in each st (48)
Round 14 :
1 sc in each st (48)
Info :
Attach 10-12mm amber safety eyes now if using. Insert them at the marked positions and secure washers. After eyes are secure, continue to build the muzzle. Add a thin layer of stuffing behind eyes to create a rounded eye bulge before continuing.
Round 15 :
1 sc in each st (48)
Round 16 :
(6 sc, 1 inc) x 6 (54)
Info :
We increase slightly around the brow to shape the forehead and support the flame crest base. Keep tension slightly firmer around the eyes to prevent gaps.
Round 17 :
1 sc in each st (54)
Round 18 :
1 sc in each st (54)
Round 19 :
(7 sc, 1 dec) x 6 (48)
Round 20 :
(6 sc, 1 dec) x 6 (42)
Info :
Start shaping toward the snout. Begin stuffing the head firmly but leave room at the base to attach the neck later. Use small amounts of stuffing at a time and push into the brow and cheek contours with a blunt tool or pencil if needed.
Round 21 :
(5 sc, 1 dec) x 6 (36)
Round 22 :
(4 sc, 1 dec) x 6 (30)
Round 23 :
(3 sc, 1 dec) x 6 (24)
Round 24 :
(2 sc, 1 dec) x 6 (18)
Info :
Define nostrils and muzzle then use a few surface slip stitches or embroidery to add nostril rims later. Do not stuff the snout too firmly — maintain a little flexibility for shaping.
Round 25 :
(1 sc, 1 dec) x 6 (12)
Info :
Fasten off leaving a long tail for sewing if you plan to close and attach directly to the neck opening. Alternatively, leave head open and work a neck tube into the opening — both techniques are provided below.
Round 27 :
Optional small muzzle finishing: join contrasting darker yarn to tip area and work 6 sc around to finish muzzle tip if desired. Fasten off and weave tail through to close (6)
Info :
Make eyelid ridges: using the same main color, embroider 6-8 short stitches over the top of the eye to form a heavy brow. For a fiercer expression add sharper angles with a darker yarn.
— Neck (Make 1) :
Info :
You can either crochet the neck as an extension of the head (by reversing the last decrease rounds and continuing), or make it as a separate tube and sew it into the head opening. This pattern uses a separate neck tube for control of shaping and stuffing.
Round 1 :
6 sc in magic ring (6)
Round 3 :
(1 sc, 1 inc) x 6 (18)
Round 4 :
(2 sc, 1 inc) x 6 (24)
Round 5 :
1 sc in each st (24)
Round 6-11 :
1 sc in each st (24) — work 6 rounds to lengthen the neck (24)
Info :
To make the neck have a slight curve, stuff the top more firmly and leave the bottom slightly softer. If you plan to insert a wire for poseability, thread it through the neck before stuffing fully, ensuring the wire is padded and ends folded back or taped to avoid poking.
Round 12 :
(2 sc, 1 dec) x 6 (18)
Round 13 :
1 sc in each st (18)
Round 14 :
Fasten off leaving long tail for sewing. Stuff neck moderately so it holds upright but still joins smoothly to the body opening (18)
Info :
Sew the neck tube into the head opening using the tail from the head or neck. Use ladder stitch/whip stitch to create a seamless join, stuffing a final bit through the seam for a smooth transition.
— Body :
Round 1 :
6 sc in magic ring (6)
Round 3 :
(1 sc, 1 inc) x 6 (18)
Round 4 :
(2 sc, 1 inc) x 6 (24)
Round 5 :
(3 sc, 1 inc) x 6 (30)
Round 6 :
(4 sc, 1 inc) x 6 (36)
Round 7 :
(5 sc, 1 inc) x 6 (42)
Round 8 :
(6 sc, 1 inc) x 6 (48)
Round 9 :
(7 sc, 1 inc) x 6 (54)
Round 10-14 :
1 sc in each st (54)
Info :
If you would like a lighter belly plate, change to the golden yellow yarn now for the front lower rounds and work the belly plates separately as strips to sew on later. To create a ridged belly, work the next 4 rounds in BLO to form a subtle ridge edge.
Round 15 :
1 sc in each st BLO (54)
Round 16 :
1 sc in each st (54)
Round 17 :
1 sc in each st (54)
Round 18 :
(8 sc, 1 dec) x 6 (48)
Info :
Begin stuffing the body firmly from the bottom upward. Use a dense fill for the lower belly to provide stability for the seated pose, leaving the top slightly softer to shape the chest.
Round 19 :
1 sc in each st (48)
Round 20 :
1 sc in each st (48)
Round 21 :
(6 sc, 1 dec) x 6 (42)
Round 22 :
(5 sc, 1 dec) x 6 (36)
Round 23 :
1 sc in each st (36)
Round 24 :
1 sc in each st (36)
Round 25 :
(3 sc, 1 dec) x 6 (30)
Round 26 :
(2 sc, 1 dec) x 6 (24)
Round 27 :
(1 sc, 1 dec) x 6 (18)
Info :
Stop stuffing when the body opening reaches this size — you will attach legs and the neck here. Keep the stuffing firm enough to hold the dragon upright but not overstuffed so seams are hard to close.
Round 28 :
1 sc in each st (18)
Round 29 :
1 sc in each st (18)
Round 30 :
Fasten off leaving long tails for attaching to legs and for closing any small openings. If you prefer a slightly squat body shape, add two rounds before decreasing.
Info :
Keep the top of the body slightly open while attaching the neck; sew the neck securely with the head positioned to the desired tilt. Use pins to hold the head and neck before sewing.
— Front Legs / Arms (Make 2) :
Round 1 :
6 sc in magic ring (6)
Round 3 :
(1 sc, 1 inc) x 6 (18)
Round 4 :
1 sc in each st (18)
Info :
Work the paw and lower “finger” shaping. These legs are chunky with three forward toes. Keep the bottom rounds firmer when stuffing so the dragon can sit balanced.
Round 5 :
(2 sc, 1 inc) x 6 (24)
Round 6 :
1 sc in each st (24)
Round 7 :
(3 sc, 1 inc) x 6 (30)
Round 8 :
1 sc in each st (30)
Info :
Start forming toes: mark three groups of stitches on the last round to make three toe caps. You will work short rows or small rounds to create each toe.
Round 9 :
Split into three toe sections: work next 6 sts as Toe A, next 6 sts Toe B, next 6 sts Toe C, remaining 12 sts as heel/ankle padding. Continue working evenly around for a smooth ankle (30)
Round 10 :
Work 6 sc for Toe A then fasten off with long tail and stuff small amount; repeat for Toe B and Toe C by joining yarn at each 6-st toe section and working 6 sc, then dec to 4 sc and fasten off leaving tail (three toes each)
Round 11 :
With main yarn rejoined at heel area, 1 sc in each remaining 12 sts (12)
Round 12 :
1 sc in each st (12)
Round 13 :
(1 sc, 1 inc) x 6 (18) — work up the lower arm length
Round 14 :
1 sc in each st (18)
Round 15 :
1 sc in each st (18)
Round 16 :
1 sc in each st (18)
Round 17 :
1 sc in each st (18)
Round 18 :
Fasten off leaving a long tail for sewing. Stuff toes firmly, lower arm medium fill, top of arm slightly softer so it sits tightly against body when attached.
Info :
Use a darker yarn for claw tips: embroider or attach small claw caps to the front three toes. For color transitions, crochet the top rounds in deep red for a scorched look.
— Back Legs (Make 2) :
Round 1 :
6 sc in magic ring (6)
Round 3 :
(1 sc, 1 inc) x 6 (18)
Round 4 :
(2 sc, 1 inc) x 6 (24)
Round 5 :
(3 sc, 1 inc) x 6 (30)
Round 6 :
1 sc in each st (30)
Info :
Make the back legs stronger: add an extra increase round compared to arms for a chunky thigh. These legs support the seated posture and are therefore filled more firmly.
Round 7 :
(4 sc, 1 inc) x 6 (36)
Round 8 :
1 sc in each st (36)
Round 9 :
1 sc in each st (36)
Round 10 :
(3 sc, 1 dec) x 6 (30)
Round 11 :
1 sc in each st (30)
Round 12 :
(2 sc, 1 dec) x 6 (24)
Round 13 :
1 sc in each st (24)
Round 14 :
1 sc in each st (24)
Round 15 :
(1 sc, 1 dec) x 6 (12)
Round 16 :
6 sc in each st around for ankle finishing and to form foot base (12)
Round 17 :
Work three toes similar to front legs: divide 12 sts into three toes of 4 sts each, make small toe caps of 4 sc each then fasten off leaving tails for sewing (three toes)
Round 18 :
Rejoin yarn at heel and work 1 sc in remaining 12 sts to finish foot sole (12)
Round 19 :
Fasten off leaving long tail for sewing. Stuff foot firmly and shape toes so the dragon can sit balanced without toppling forward.
Info :
Sew legs to body at round 28-30 of the body piece; space them widely to create a stable seated position. Reinforce stitching with extra passes through the body.
— Wing (Make 2) :
Info :
Each wing is worked flat as a fan-shaped membrane with a thicker top ridge for attachment. You may insert a wire or small dowel inside the wing ridge for poseability. Work wings in deep red with orange membrane highlights.
Round 1 :
Ch 18, sc in 2nd ch from hook and across to end (17)
Round 2 :
Turn and ch1, 1 sc in each st across (17)
Round 3 :
Ch1, sc across but at 2nd and 16th stitch work (sc, inc) to create a slight flare (19)
Round 4 :
Ch1, 1 sc in each st (19)
Round 5 :
Ch1, (3 sc, inc) repeat until end to widen wing (23)
Round 6 :
Ch1, 1 sc in each st (23)
Round 7 :
Ch1, (4 sc, inc) repeat (27)
Round 8 :
Ch1, 1 sc in each st (27)
Round 9 :
Work wing ribs: change to BLO and make 1 sc in each st for 3 rows to create a ridge along the membrane (27)
Round 10 :
Switch to FLO and work 2 rounds of sc to make a raised rib for the top edge (27)
Info :
Add a row of slip stitches along the top edge to create the thick wing bone. If inserting wire, leave an opening at the top ridge and thread wire through, then close securely with slip stitches.
Round 11 :
Decrease shaping for wing tip: (5 sc, dec) x 4 + (2 sc) to finish (23)
Round 12 :
1 sc in each st (23)
Round 13 :
(4 sc, dec) x 4 + (3 sc) (19)
Round 14 :
1 sc in each st (19)
Round 15 :
(3 sc, dec) x 4 + (2 sc) (15)
Round 16 :
1 sc in each st (15)
Round 17 :
(2 sc, dec) x 4 + (1 sc) (11)
Round 18 :
Fasten off leaving long tail for sewing. Block wing flat and sew the thicker top ridge to the corresponding side seams of the body at rounds 12-16 to make wings stand proud.
Info :
To create webbing ridges, surface stitch three parallel FPDC ribs from the top ridge down the membrane—this simulates the wing struts seen in the reference photo.
— Tail :
Round 1 :
6 sc in magic ring (6)
Round 3 :
(1 sc, 1 inc) x 6 (18)
Round 4-8 :
1 sc in each st (18) — work 5 rounds to lengthen tail (18)
Round 9 :
(2 sc, 1 inc) x 6 (24)
Round 10-14 :
1 sc in each st (24)
Round 15 :
(3 sc, 1 dec) x 6 (18)
Round 16 :
1 sc in each st (18)
Round 17 :
(2 sc, 1 dec) x 6 (12)
Round 18 :
1 sc in each st (12)
Round 19 :
(1 sc, 1 dec) x 4 + 1 sc x 0 (8)
Round 20 :
Fasten off leaving long tail for sewing. Attach the tail to the rear center of the body at rounds 10-12, shaping a slight curve by stuffing one side firmer and sewing the tail at an angle.
Info :
Sew multiple flame scales along the top of the tail in alternating colors (see 'Flame Scales' section). Pin their positions before you attach to make a balanced flame crest.
— Flame Scales / Spikes (Make 30-40 assorted) :
Info :
These small sculpted scales create the lava effect. Make many in three sizes and three colors (deep red, bright orange, golden yellow). Stitch counts below are for three sizes; mix colors to reproduce the fiery gradient shown.
Small Scale - Round 1 :
6 sc in magic ring (6)
Small Scale - Round 2 :
(1 sc, inc) x 3 (9)
Small Scale - Round 3 :
(2 sc, inc) x 3 (12) — fasten off leaving long tail for sewing
Medium Scale - Round 1 :
6 sc in magic ring (6)
Medium Scale - Round 2 :
(1 sc, inc) x 3 (9)
Medium Scale - Round 3 :
(2 sc, inc) x 3 (12)
Medium Scale - Round 4 :
(3 sc, inc) x 3 (15) — fasten off leaving long tail for sewing
Large Scale - Round 1 :
6 sc in magic ring (6)
Large Scale - Round 2 :
(1 sc, inc) x 3 (9)
Large Scale - Round 3 :
(2 sc, inc) x 3 (12)
Large Scale - Round 4 :
(3 sc, inc) x 3 (15)
Large Scale - Round 5 :
(4 sc, inc) x 3 (18) — fasten off leaving long tail for sewing
Info :
Make about 12 small, 12 medium and 6-10 large scales. Sew them in overlapping rows from the forehead down the neck, across the spine and tail. Use odd numbers per row to keep the organic look.
— Horn Crest Pieces (Pair per larger spike) :
Round 1 :
6 sc in magic ring (6)
Round 2 :
(1 sc, 1 inc) x 3 (9)
Round 3 :
(2 sc, 1 inc) x 3 (12)
Round 4 :
(3 sc, 1 inc) x 3 (15) — fasten off leaving long tail for sewing
Info :
Pair two smaller horn crest pieces and sew them back-to-back to make a slightly thicker spike for the major crest along the head and neck. Alternate colors to simulate heat concentration.
— Belly Plates (Optional — Make 7 long strips) :
Info :
These are worked as long strips in golden yellow to sew to the front belly, creating the segmented ridged chest. Work them flat in rows and sew them on centered down the chest.
Round 1 :
Ch 12, sc in 2nd ch from hook and across (11)
Round 2-8 :
Turn ch1, 1 sc in each st for 7 rows (11)
Round 9 :
Fasten off leaving long tail for sewing. Make 6-8 plates in graduated lengths (shortest at top near throat, longest mid-belly).
Info :
Sew plates to the belly in overlapping fashion; sew the top edge only so plates can sit as ridges. Stiffen slightly with a tiny dab of fabric glue if you want plates to hold more shape.
— Finishing Details and Assembly :
Info :
Sew the neck into the body opening first, then attach the head to the neck. Ensure the head is centered and slightly tilted forward. Use pins to check the final posture before sewing fully.
Round 1 :
Attach front legs to body: position each front leg on body at rounds 14-18 area, about 6-8 stitches in from the side seam; use a ladder stitch to sew and reinforce with at least 8-12 passes.
Round 2 :
Attach back legs to body: place at bottom sides of body at rounds 1-6 area; use long tails to make strong stitches through the body core for durability and seating stability.
Round 3 :
Sew wings to sides of the body at approximately rounds 12-16 on both left and right sides. If wing bones contain wire, make sure ends are well padded and sewn inside the ridge to avoid eyeing out over time.
Round 4 :
Sew flame scales onto the head, neck and spine in layered rows. Start by positioning big scales along the crest and fill gaps with medium and small scales. Vary color order randomly to achieve the molten look.
Round 5 :
Sew belly plates along the front center from throat to lower belly. Make sure the plates overlap evenly and the bottom-most one sits just above the tail attachment point.
Round 6 :
Sew small dark colored yarn stitches on the toes and nostrils to emphasize details. Add embroidery for a small mouth line if desired. Use black or brown for subtle contrast.
Info :
After assembly, go over seams and reinforce any weak spots with additional stitching. Tidy stray ends by weaving them into the nearest seam or stuffing area and snip close to the fabric.
This fiery lava dragon pattern is a true labor of love — every scale and ridge adds dramatic personality! The detailed shaping and layered flame pieces make it a striking display piece and a rewarding, creative challenge. With careful sewing and patience, you'll have a plush sculpture that glows with handmade warmth. 🧶🔥 Proudly display your dragon or gift it to someone who loves mythical creatures — every stitch tells a story. ✨