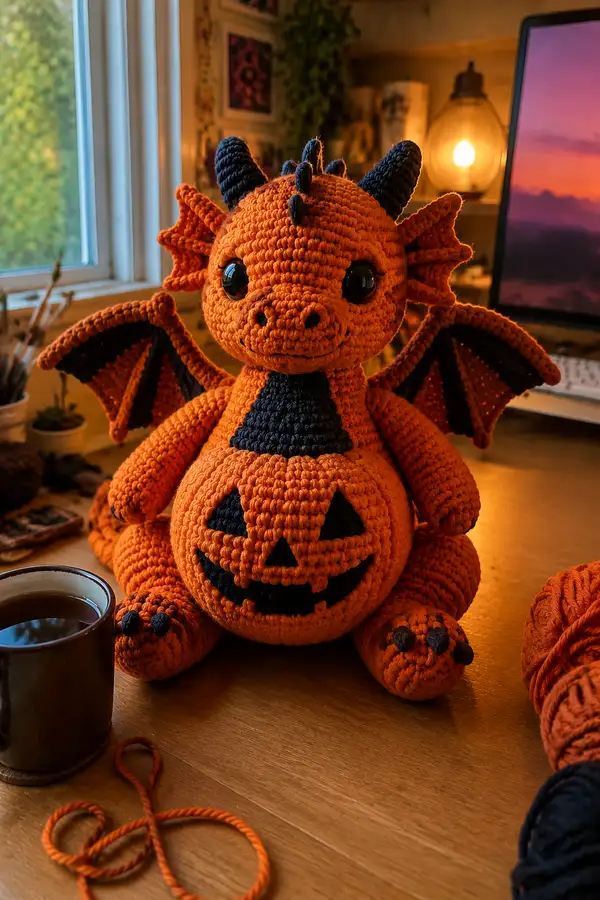
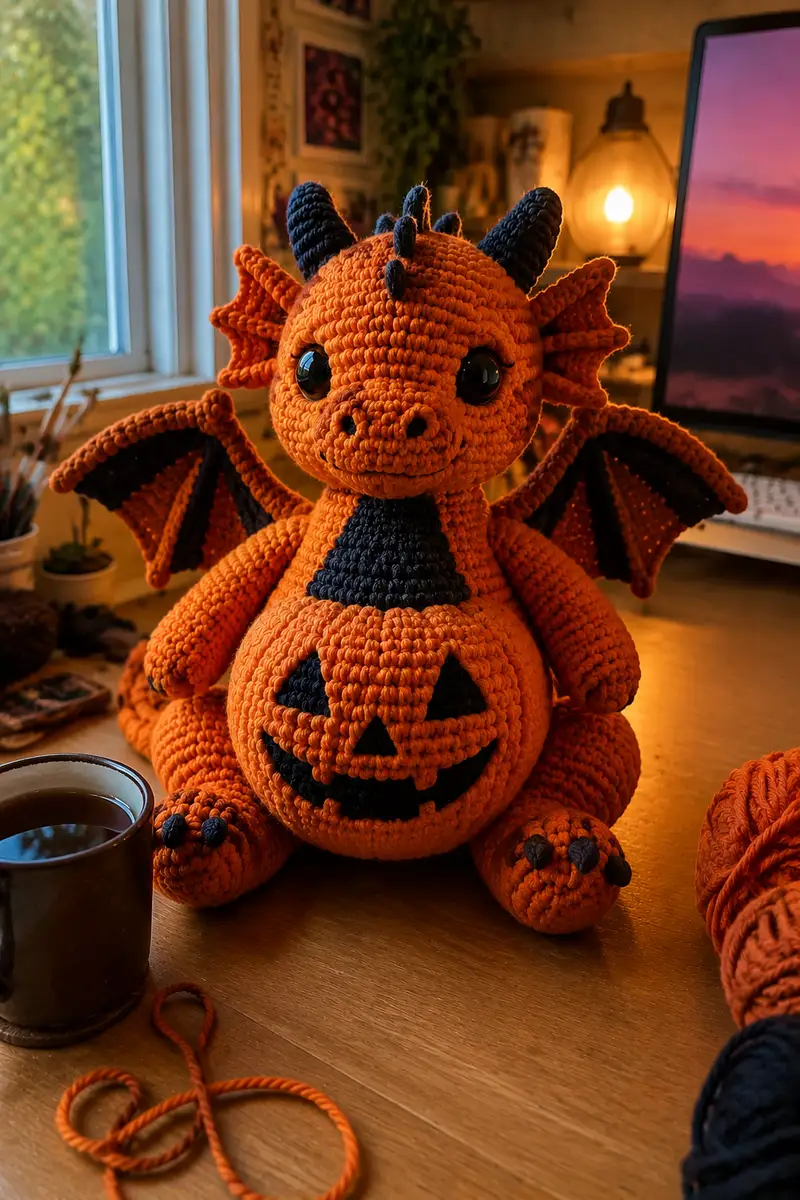
Create an adorable jack-o-lantern dragon plush with a carved pumpkin belly, signature black details, curled tail and posable wings. This richly detailed amigurumi features a large pumpkin torso, expressive safety eyes, curled horns and textured wing membranes. The finished dragon is perfect as a Halloween centerpiece or a seasonal gift and sits upright with a very cuddly, sculpted silhouette. Detailed stitch-by-stitch instructions guide you through every part of the build.
Progress Tracker
0% Complete
— Head :
Round 1 :
6 sc in magic ring (6)
Round 3 :
(1 sc, 1 inc) x 6 (18)
Round 4 :
(2 sc, 1 inc) x 6 (24)
Round 5 :
(3 sc, 1 inc) x 6 (30)
Round 6 :
(4 sc, 1 inc) x 6 (36)
Round 7 :
(5 sc, 1 inc) x 6 (42)
Round 8 :
(6 sc, 1 inc) x 6 (48)
Round 9 :
(7 sc, 1 inc) x 6 (54)
Round 10-18 :
1 sc in each st (54)
Info :
Place safety eyes between rounds 13 & 14, approximately 9-10 stitches apart for the wide, friendly look. Attach washers firmly and position eyes slightly below the centerline of the head. Mark first stitch of each round with a stitch marker.
Round 19 :
(7 sc, 1 dec) x 6 (48)
Round 20 :
(6 sc, 1 dec) x 6 (42)
Round 21 :
(5 sc, 1 dec) x 6 (36)
Info :
Begin stuffing the head lightly now, adding fiberfill gradually as the piece firms. Ensure the cheeks around the eyes are plump to keep the eye sockets smooth and round.
Round 22 :
(4 sc, 1 dec) x 6 (30)
Round 23 :
(3 sc, 1 dec) x 6 (24)
Round 24 :
(2 sc, 1 dec) x 6 (18)
Round 25 :
(1 sc, 1 dec) x 6 (12)
Round 26-30 :
1 sc in each st (12) — work 5 rounds to form a short neck tube (12)
Info :
After Round 30, continue stuffing until head feels firmly filled but still squeezable. Leave the neck opening slightly open with the long tail for sewing to the body later. If you prefer a longer neck, work additional even rounds (12) to desired length.
Round 31 :
1 sc in each st BLO (12) — work this round in BLO to create a subtle ridge at the neck for better sewing grip
Round 32 :
1 sc in each st (12)
Round 33 :
1 sc in each st (12)
Round 34 :
1 sc in each st (12)
Round 35 :
Fasten off leaving a 30-40 cm tail for sewing; weave tail through front loops and pull to tighten the neck opening slightly if needed
Info :
Embroider nostrils and smile lines before final attachment: using black yarn and a yarn needle, embroider two small nostrils between the lower part of the eyes and the mouth area — follow the reference photo for placement and make small satin stitch ovals.
— Head Details & Horns :
Horn (Make 2 large) Round 1 :
6 sc in magic ring (6)
Round 3 :
(1 sc, 1 inc) x 6 (18)
Round 4-6 :
1 sc in each st (18)
Round 7 :
(2 sc, 1 dec) x 6 (12)
Round 8-10 :
1 sc in each st (12) — work in BLO if you want a ribbed spiral effect
Round 11 :
(1 sc, 1 dec) x 4 then fasten off leaving long tail for sewing (8)
Info :
Stuff horns very lightly — just enough to keep shape. For a spiral, work rounds in BLO every second round so ridges appear. Sew horns symmetrically to top of head using the long tail; reinforce by sewing through head a couple of times for sturdy hold.
Small Spike (Make 3) Round 1 :
4 sc in magic ring (4)
Round 3 :
1 sc in each st (8)
Round 4 :
4 dec (4) — Stuff lightly and fasten off leaving tail for sewing
Info :
Sew small spikes along the center top of the head between the horns to create a dorsal ridge. Space evenly among rounds 10-14 of the head to match the picture reference.
— Ear Frills (Make 2) :
Round 1 :
6 sc in magic ring (6)
Round 3 :
(1 sc, 1 inc) x 6 (18)
Round 4 :
1 sc in each st (18)
Round 5 :
BLO: 1 sc in each st (18) — this creates a cusp ridge
Round 6 :
Edge shaping: (3 sc, 1 dec) x 4 + 2 sc at end (14)
Round 7 :
Working along edge, sc evenly and perform 3 small picot points: *ch 3, sl st in 1st ch, sl st into next edge stitch* repeat 3 times
Round 8-12 :
1 sc in each st (14) — fasten off leaving long tail for sewing
Info :
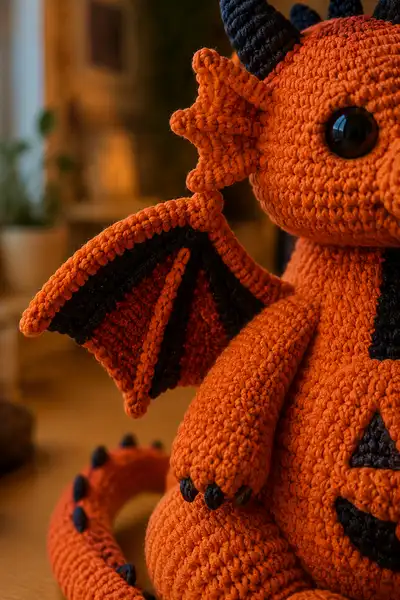
Sew ear frills on either side of the head slightly behind the eyes; curve them forward so they frame the face. Use pins to test placement before sewing. The picot points give the scalloped fin look seen in the picture.
— Body (Back & Sides) :
Round 1 :
6 sc in magic ring (6)
Round 3 :
(1 sc, 1 inc) x 6 (18)
Round 4 :
(2 sc, 1 inc) x 6 (24)
Round 5 :
(3 sc, 1 inc) x 6 (30)
Round 6 :
(4 sc, 1 inc) x 6 (36)
Round 7 :
(5 sc, 1 inc) x 6 (42)
Round 8 :
(6 sc, 1 inc) x 6 (48)
Round 9-12 :
1 sc in each st (48)
Info :
If you are attaching the pumpkin belly as a separate piece, stop after Round 12 and set body aside for belly insertion. This body section will form the back and sides of the dragon; the pumpkin front covers the chest and belly area and is sewn into the body opening.
Round 13 :
(6 sc, 1 dec) x 6 (42)
Round 14 :
(5 sc, 1 dec) x 6 (36)
Round 15 :
(4 sc, 1 dec) x 6 (30)
Round 16 :
1 sc in each st (30)
Round 17 :
1 sc in each st (30) — this round is the lower back where legs will attach
Info :
Stuff the back lightly as you go; leave a large opening at the front for the pumpkin belly. When joining belly, you will stitch through both body and belly edges for a secure seam. Pin belly in place first to ensure symmetry.
Round 18 :
(3 sc, 1 dec) x 6 (24)
Round 19 :
(2 sc, 1 dec) x 6 (18)
Round 20 :
(1 sc, 1 dec) x 6 (12)
Round 21 :
Fasten off leaving long tail for sewing to pumpkin belly (12)
Info :
When sewing body to belly, align the belly so the carved face is centered. Use ladder stitch with the long tail to create an invisible seam. Stuff the lower back and hips firmly to give the dragon a stable seated posture.
— Pumpkin Belly (Carved) :
Round 1 :
6 sc in magic ring (6)
Round 3 :
(1 sc, 1 inc) x 6 (18)
Round 4 :
(2 sc, 1 inc) x 6 (24)
Round 5 :
(3 sc, 1 inc) x 6 (30)
Round 6 :
(4 sc, 1 inc) x 6 (36)
Round 7 :
(5 sc, 1 inc) x 6 (42)
Round 8 :
(6 sc, 1 inc) x 6 (48)
Round 9-12 :
1 sc in each st (48)
Info :
To create pumpkin ribbing, you will use surface slip stitches later to mark vertical ridges; keep the sphere even and stop stuffing until after the ridges are added. Decide now where the face will be centered relative to stitch markers.
Round 13 :
(6 sc, 1 inc) x 6 (54) — increase slightly to make the belly rounder
Round 14-18 :
1 sc in each st (54)
Round 19 :
(6 sc, 1 dec) x 6 (48)
Round 20 :
(5 sc, 1 dec) x 6 (42)
Round 21 :
(4 sc, 1 dec) x 6 (36)
Round 22 :
(3 sc, 1 dec) x 6 (30)
Round 23 :
(2 sc, 1 dec) x 6 (24)
Round 24 :
(1 sc, 1 dec) x 6 (18)
Info :
Stuff the belly fairly firmly now — the pumpkin needs a solid round shape so the carved face reads well. Avoid overstuffing which will distort the face appliques later.
Round 25 :
(1 sc, 1 dec) x 6 (12)
Round 26 :
6 dec (6) — do not fasten off; leave tail for sewing to body after you add ribs and face appliques
Info :
Create pumpkin ribs by working surface slip stitches (sl st) in vertical lines from top center to bottom. Mark the top stitch and use 6 evenly spaced ribs for a classic pumpkin look. Work the sl st lines with the same orange yarn to keep them subtle, or with a slightly darker orange for contrast.
Pumpkin Face — Left Triangle :
With black yarn, make an applique: ch 4, sl st into 2nd ch from hook, sc next ch, 3 sc into last ch, turn and work down the other side: 1 sc, sl st to join; Fasten off leaving tail for sewing. Embroider to fit a triangle approx 10-12 stitches wide on belly center.
Pumpkin Face — Right Triangle :
Make mirror triangle as above and sew to the right side of the belly, spacing equal from center line.
Pumpkin Face — Nose :
Ch 3, sc in 2nd ch, sc in next ch, sl st to join, fasten off; position in center above mouth and sew tightly.
Pumpkin Face — Mouth :
Create a crescent mouth applique: With black yarn ch 20, 1 sc in 2nd ch from hook and across (19 sc), turn and sc back across in front loops only for a curved crescent; fasten off leaving long tail. Shape gently and sew into position forming a carved smile with small teeth points made by folding and stitching small points along top edge, then sew securely around the mouth edge.
Info :
Once face appliques are attached, hide tails by weaving into the belly stitches. Stitch the belly into the front of the body opening using the long tail from Round 21 of the body. Match center lines precisely so the carved face sits centered on the torso. Reinforce with extra passes if the piece will be handled frequently.
— Arms (Make 2) :
Round 1 :
6 sc in magic ring (6)
Round 3 :
(1 sc, 1 inc) x 6 (18)
Round 4 :
1 sc in each st (18)
Round 5 :
1 sc in each st (18) — this is the hand/paw base
Info :
Stuff the hand area firmly for a rounded paw. Place minimal stuffing into the arm shaft itself; arms should be slightly softer than the legs so they rest naturally at the sides.
Round 6 :
(4 sc, 1 dec) x 3 (15)
Round 7 :
1 sc in each st (15)
Round 8 :
(3 sc, 1 dec) x 3 (12)
Round 9-12 :
1 sc in each st (12) — form the wrist and lower arm (work 4 rounds)
Round 13 :
(2 sc, 1 inc) x 4 (16)
Round 14 :
(3 sc, 1 inc) x 4 (20)
Round 15-20 :
1 sc in each st (20) — work 6 rounds to lengthen upper arm for shoulder attachment
Info :
Leave a long tail at the end of Round 20 for sewing the arm to the body. Sew arms to the body at rounds 16-20 on the body piece so the hands sit just forward of the pumpkin belly. Use ladder stitch to create an invisible seam. Add small black claws.
Claw (Make 6) Round 1 :
3 sc in magic ring (3)
Round 3 :
sl st, fasten off leaving tail for sewing
Info :
Sew three claws to the front of each paw, spaced evenly. Use a little dab of stuffing under each claw before attaching to give them a slightly raised look.
— Legs (Make 2) :
Round 1 :
6 sc in magic ring (6)
Round 3 :
(1 sc, 1 inc) x 6 (18)
Round 4 :
(2 sc, 1 inc) x 6 (24)
Round 5 :
(3 sc, 1 inc) x 6 (30)
Round 6-8 :
1 sc in each st (30) — work 3 rounds for foot base
Info :
Stuff the foot quite firmly to provide a stable base for the dragon to sit. Use extra stuffing at the toes to keep the foot round and supportive.
Round 9 :
(3 sc, 1 dec) x 6 (24)
Round 10 :
(2 sc, 1 dec) x 6 (18)
Round 11 :
1 sc in each st (18)
Round 12 :
(2 sc, 1 inc) x 6 (24)
Round 13 :
1 sc in each st (24)
Round 14 :
(3 sc, 1 inc) x 6 (30)
Round 15-18 :
1 sc in each st (30) — work 4 rounds to lengthen leg
Round 19 :
(4 sc, 1 dec) x 5 (25)
Round 20 :
(3 sc, 1 dec) x 5 (20)
Round 21 :
(2 sc, 1 dec) x 5 (15)
Round 22 :
Fasten off leaving long tail for sewing to lower body; add 3 small black claws to the front of each foot (see Claw directions above)
Info :
Sew legs to the bottom front of the body, slightly angled outward so the dragon sits upright. Place legs symmetrically using pins and check from front and side views before sewing.
— Tail :
Round 1 :
6 sc in magic ring (6)
Round 3 :
(1 sc, 1 inc) x 6 (18)
Round 4-6 :
1 sc in each st (18)
Round 7 :
(2 sc, 1 dec) x 6 (12)
Round 8-12 :
1 sc in each st (12) — work 5 rounds to create a long tail tube
Round 13 :
(2 sc, 1 inc) x 4 (16)
Round 14-18 :
1 sc in each st (16)
Round 19 :
(2 sc, 1 dec) x 4 (12)
Round 20-24 :
1 sc in each st (12) — add stuffing gradually as you go; bend tail into a gentle curl for a playful look
Round 25 :
(1 sc, 1 dec) x 4 (8)
Round 26 :
1 sc in each st (8)
Round 27 :
Fasten off leaving long tail for sewing; sew tail to center back of body at lower rounds so the curl sits behind the legs
Tail Spikes (Make 6) Round 1 :
4 sc in magic ring (4)
Round 3 :
sl st, fasten off leaving tail for sewing
Info :
Sew 6 spikes along the top of the tail spaced evenly; the top of the tail should have a tapered look so larger spikes appear near the base and smaller ones toward the tip.
— Wing Structure & Membrane (Make 2) :
Wing Arm Bone — Base (Make 2) Round 1 :
6 sc in magic ring (6)
Round 3-6 :
1 sc in each st (12) — work 4 rounds to form a sturdy wing arm
Info :
Insert flexible floral wire through the wing arm to give the wing poseability. Wrap wire with leftover yarn tail and secure by sewing into the stuffing. End wires should be folded back and taped to avoid sharp edges.
Wing Membrane (Flat worked in rows) Row 1 :
With orange yarn ch 28, 1 sc in 2nd ch from hook and across (27)
Row 2-4 :
Ch 1, turn, 1 sc in each st (27) — create a rectangular membrane center
Info :
Change to black yarn now for the inner edge contrast where the wing meets the body. Carry orange yarn along the edge or weave it in later. The membrane pictured has a central black spine rib and black edge.
Row 5 :
Change to black: ch 1, turn, 1 sc in each st (27)
Row 6 :
Switch back to orange: ch 1, turn, 1 sc in each st (27)
Row 7 :
Make shaping: sc2tog at the start and end of the next 2 rows to create tapered wing tip — Row 7: ch 1, turn, sc2tog, 1 sc in each st across until last 2 sts, sc2tog (25)
Row 8 :
Repeat taper: ch 1, turn, sc2tog, 1 sc in each st to last 2 sts, sc2tog (23)
Row 9 :
Edge finish in black: change to black yarn, 1 sc in each st around the entire perimeter of the membrane to form a neat ridge (work in rounds if you prefer)
Wing Spine Ribs (Make 3 per wing) :
With orange yarn, ch 15, 1 sc in 2nd ch from hook across (14), fasten off leaving long tail; fold under to position as internal ribs across membrane and sew down both ends so ribs form triangular bat-like sections (3 ribs per wing). Use black yarn to outline ribs for more contrast if desired.
Info :
Sew the membrane to the wing arm bone with an even seam. Pin membrane over arm and shape so the outer edge is flared and the inner edge attaches to the body. Add wire in the arm for shaping, then close seam carefully to hide tails.
Wing Edge Finishing :
With orange yarn, sc around entire wing edge in rounds, making 3 sc in corners for smooth curves. Fasten off and weave in ends. Repeat mirror image for second wing.
— Chest Triangle Applique :
Round 1 :
Ch 6, sl st to first ch to form loop, sc 6 into loop (6)
Round 2 :
Ch 1, work increases at base: (1 sc, inc) across 3 times to form triangular muzzle shape (9)
Round 3 :
1 sc in each st, flatten triangle and finish with a neat edge using sl st around; fasten off leaving tail for sewing
Info :
Position the black chest triangle centered under the neck on the orange body front. Sew with tight, even stitches. The contrast gives a dragon-like belly pattern that complements the carved pumpkin front.
— Assembly Instructions :
Info :
Pin all major pieces in place before sewing: head, pumpkin belly, arms, legs, wings and tail. Check symmetry from multiple angles to achieve the cuddly, balanced look pictured.
This big Jack-o-Lantern dragon is a wonderful mix of spooky and sweet — the carved pumpkin belly steals the show while the dragon details lend so much personality. Sewing the parts together is a truly satisfying final stage, and the finished plush sits proudly as a seasonal centerpiece or a special handmade gift. 🧶🎃 I hope you enjoy every stitch of this cozy, Halloween-ready friend. Happy crocheting! ✨