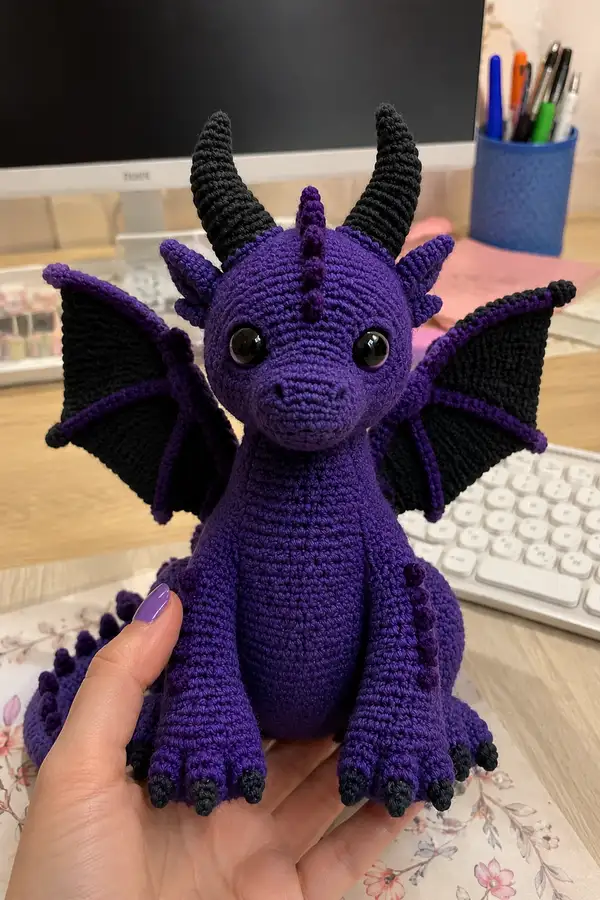
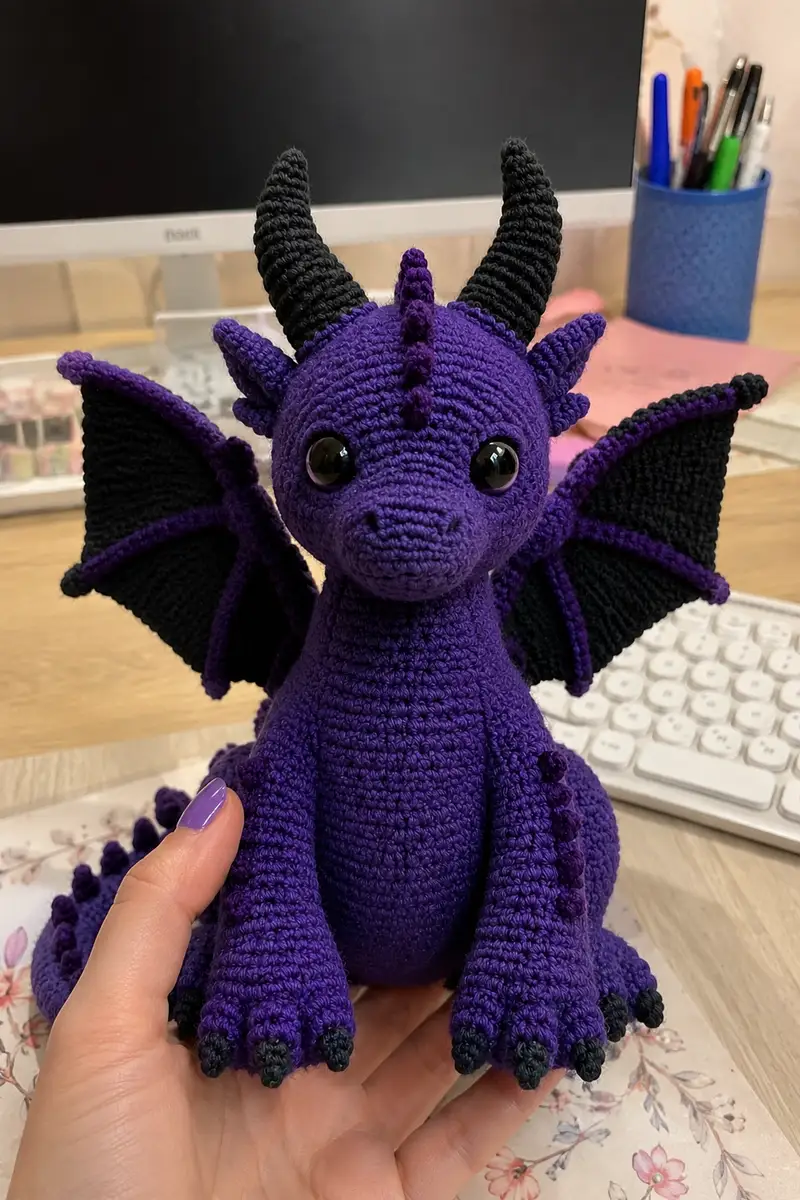
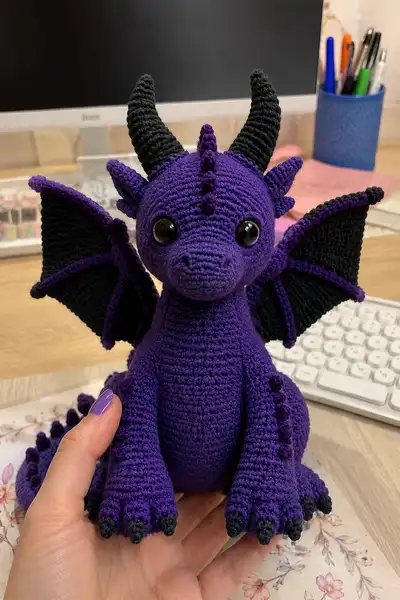
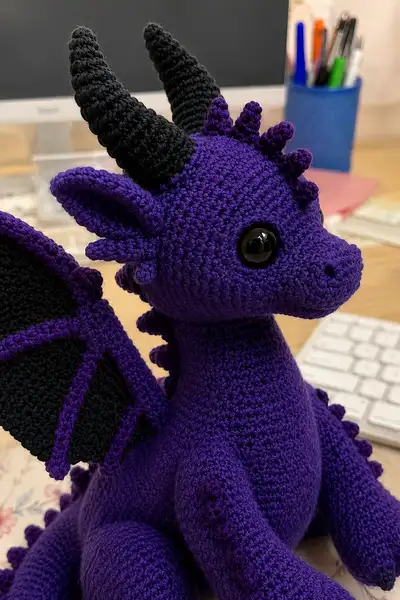
Create a majestic, giant midnight purple dragon with expressive glassy eyes, black contrasting horns and wing membranes, and a cupped seated pose. This pattern includes detailed step-by-step round counts for the head, body, limbs, wings, tail and decorative spikes so you can recreate the exact plushie pictured. Perfect for a dramatic Halloween centerpiece or a cuddly fantasy companion.
Progress Tracker
0% Complete
— Head :
Round 1 :
6 sc in magic ring (6)
Round 3 :
(1 sc, inc) x 6 (18)
Round 4 :
(2 sc, inc) x 6 (24)
Round 5 :
(3 sc, inc) x 6 (30)
Round 6 :
(4 sc, inc) x 6 (36)
Round 7 :
(5 sc, inc) x 6 (42)
Round 8 :
(6 sc, inc) x 6 (48)
Round 9 :
(7 sc, inc) x 6 (54)
Round 10 :
1 sc in each st (54)
Info :
Insert safety eyes between Rounds 13 and 14 later; mark exact eye spacing now by holding a couple of pins across round 13 to test expression. Recommended spacing is 10 stitches apart for a large 14mm eye to maintain cute, rounded look.
Round 11-12 :
1 sc in each st (54)
Round 13 :
(7 sc, dec) x 6 (48)
Round 14 :
1 sc in each st (48)
Info :
Place safety eyes between rounds 12-14, approximately 10 stitches apart measured on round 13. Use pins to check symmetry. If you prefer a squinting expression move one stitch inwards on each side; for wider eyes increase spacing to 12 stitches.
Round 15 :
(6 sc, dec) x 6 (42)
Round 16 :
1 sc in each st (42)
Round 17 :
(5 sc, dec) x 6 (36)
Round 18 :
1 sc in each st (36)
Info :
Start stuffing the top of the head lightly now to keep shape. Add small amounts of polyfill between each couple of rounds. Continue adding more as you progress towards the muzzle shaping below; head should be firm but slightly yielding.
Round 19 :
(4 sc, dec) x 6 (30)
Round 20 :
1 sc in each st (30)
Round 21 :
(3 sc, dec) x 6 (24)
Round 22 :
1 sc in each st (24)
Round 23 :
(2 sc, dec) x 6 (18)
Round 24 :
1 sc in each st (18)
Round 25 :
(1 sc, dec) x 6 (12)
Info :
At this point the basic rounded head has been formed but the muzzle requires separate shaping. Hold the head so the opening faces you; you will crochet the muzzle in-place to shape the face forward. Keep stuffing to maintain fullness near the top and center of the skull.
— Muzzle (worked in the round, attached to head) :
Round 1 :
Pick up 12 stitches evenly around the front opening of the head where the snout will sit. (12)
Round 2 :
Inc in each st around (24)
Round 3 :
(1 sc, inc) x 12 (36)
Round 4 :
(2 sc, inc) x 12 (48)
Round 5 :
1 sc in each st (48)
Round 6 :
(6 sc, dec) x 6 (42)
Round 7 :
(5 sc, dec) x 6 (36)
Info :
Begin stuffing the front of the muzzle firmly to create a defined snout. Use small amounts and tamp down tightly with a blunt tool to achieve the smooth rounded nose shape seen in the photo.
Round 8 :
(4 sc, dec) x 6 (30)
Round 9 :
(3 sc, dec) x 6 (24)
Round 10 :
(2 sc, dec) x 6 (18)
Round 11 :
(1 sc, dec) x 6 (12)
Info :
Fasten off leaving a long tail. Use tail to sew muzzle opening closed if any small gap remains, then weave tail into head for secure finish. Adjust stuffing through small gaps before final closure.
— Eye Details & Face Embroidery :
Info :
To give the large glossy eyes a purple rim like the photo, you can embroider a subtle round of purple yarn just outside the safety eye washer after the eyes are attached. Use a long sewing needle and wrap yarn once around a few stitches to create a rim. Alternatively, use felt glued underneath eyes for color contrast. Embroider nostrils by making two tiny French knots or embroider small 'v' shapes just above the muzzle tip with black yarn.
Info :
If using safety eyes: insert eyes before finishing the muzzle's final decreases. Position eyes between the junction of head and muzzle and secure with washers. Check symmetry and alignment from above and front before locking washers.
— Neck & Shoulder Join :
Round 1 :
Working from the base of the head, pick up 18-20 stitches evenly around the neck opening to form a short neck tube (20)
Round 2 :
1 sc in each st (20)
Round 3 :
(3 sc, inc) x 5 (25)
Round 4-6 :
1 sc in each st (25)
Info :
Stuff the neck lightly so it holds upright but remains slightly flexible. Neck stuffing should be firmer near base where it joins the body and lighter through the top to allow head tilt.
Round 7 :
(4 sc, inc) x 5 (30)
Round 8-10 :
1 sc in each st (30)
Info :
Leave the neck opening raw for sewing onto body later; you will position and sew the neck to the body opening from the inside for a secure join.
— Body :
Round 1 :
6 sc in magic ring (6)
Round 3 :
(1 sc, inc) x 6 (18)
Round 4 :
(2 sc, inc) x 6 (24)
Round 5 :
(3 sc, inc) x 6 (30)
Round 6 :
(4 sc, inc) x 6 (36)
Round 7 :
(5 sc, inc) x 6 (42)
Round 8-11 :
1 sc in each st (42)
Info :
These rounds set the body width. Work evenly and maintain a tight gauge so stuffing does not show. If you prefer a chunkier body increase hook by 0.25mm and re-evaluate stitch counts for proportion.
Round 12 :
(6 sc, inc) x 6 (48)
Round 13-18 :
1 sc in each st (48)
Info :
Begin marking attachment points for legs and arms: front legs will be sewn on at approximately rounds 13-16 on each side; hind legs will attach to the bottom at rounds 1-4 once the body is finished. Use pins to test placement before sewing.
Round 19 :
(6 sc, dec) x 6 (42)
Round 20 :
1 sc in each st (42)
Round 21 :
(5 sc, dec) x 6 (36)
Round 22 :
1 sc in each st (36)
Round 23 :
(4 sc, dec) x 6 (30)
Round 24-25 :
1 sc in each st (30)
Info :
Begin stuffing the body from the bottom up. Add medium-firm stuffing so the body sits upright. Keep the belly rounded but not overstuffed. Leave the last few rounds open for sewing the base closed after leg attachments are sewn in place.
Round 26 :
(3 sc, dec) x 6 (24)
Round 27 :
(2 sc, dec) x 6 (18)
Round 28 :
(1 sc, dec) x 6 (12)
Info :
Fasten off leaving a long tail for closing. Weave tail through remaining 6 stitches and pull tight to close. Use tail to sew neck opening to body later inside out for a seamless join. Keep body weighted toward the bottom with a small amount of poly pellets if desired (not necessary but helps stability).
— Front Legs/Arms (Make 2) :
Round 1 :
6 sc in magic ring (6)
Round 3 :
(1 sc, inc) x 6 (18)
Round 4 :
(2 sc, inc) x 6 (24)
Round 5 :
1 sc in each st (24)
Info :
These first rounds form the paw. Stuff the paw firmly to keep a rounded tip and define the toe base before working the lower leg.
Round 6 :
(3 sc, inc) x 6 (30)
Round 7-9 :
1 sc in each st (30)
Round 10 :
(4 sc, dec) x 5 + 1 sc (25)
Round 11-13 :
1 sc in each st (25)
Info :
Switch to slightly smaller hook for tighter fabric if you want the arms slimmer. Keep stuffing the paw portion firmer and the upper arm lightly stuffed so the limbs sit naturally when sewn to the body.
Round 14 :
(3 sc, dec) x 5 (20)
Round 15-18 :
1 sc in each st (20)
Round 19 :
(2 sc, dec) x 5 (15)
Round 20 :
1 sc in each st (15)
Info :
Leave a long tail for sewing to the body. Use tail to attach arms to the front shoulder area at approximately body rounds 14-16. Sew through both arm opening and body stitches neatly and evenly to create a stable seam that supports the weight of the limb.
— Paw Claws (Make 6 per paw) :
Round 1 :
3 sc in magic ring with black yarn (3)
Round 2 :
1 sc in each st (3)
Round 3 :
1 sc in next st, sl st next two into base and fasten off leaving a tail to sew. Make 6 and sew evenly spaced along paw tip.
Info :
Sew claws firmly into place and stitch into a couple of paw rows for secure attachment. Hide ends inside paw with yarn needle.
— Hind Legs (Make 2) :
Round 1 :
6 sc in magic ring (6)
Round 3 :
(1 sc, inc) x 6 (18)
Round 4 :
(2 sc, inc) x 6 (24)
Round 5 :
(3 sc, inc) x 6 (30)
Round 6-8 :
1 sc in each st (30)
Info :
Hind feet are slightly longer and broader for seated stability. Stuff firmly in the foot pads. Position hind legs so they flare slightly outwards when sewing to the base of the body to create the stable seated posture pictured.
Round 9 :
(4 sc, inc) x 6 (36)
Round 10-14 :
1 sc in each st (36)
Round 15 :
(4 sc, dec) x 6 (30)
Round 16 :
1 sc in each st (30)
Round 17 :
(3 sc, dec) x 6 (24)
Round 18-21 :
1 sc in each st (24)
Round 22 :
(2 sc, dec) x 6 (18)
Round 23 :
(1 sc, dec) x 6 (12)
Info :
Fasten off leaving a long tail. Sew hind legs to bottom of body so feet rest flat on surface. Use extra stitches near top of leg to anchor firmly into body and create a smooth junction. For added weight and stability add a small pellet bag inside the foot before final sewing.
— Horns (Make 2) :
Info :
Horns are worked in tapering conical spirals in black yarn. Use a slightly smaller hook for tighter fabric. You may insert wire for poseable horns but hide ends well in stuffing.
Round 1 :
6 sc in magic ring (6)
Round 2 :
(1 sc, inc) x 3 (9)
Round 3 :
(2 sc, inc) x 3 (12)
Round 4 :
(3 sc, inc) x 3 (15)
Round 5-7 :
1 sc in each st (15)
Round 8 :
(3 sc, dec) x 3 (12)
Round 9-11 :
1 sc in each st (12)
Round 12 :
(2 sc, dec) x 3 (9)
Round 13-16 :
1 sc in each st (9)
Round 17 :
(1 sc, dec) x 3 (6)
Round 18-20 :
1 sc in each st (6)
Info :
Stuff horns lightly and insert optional wire at round 6-8 if poseable. Sew horns to head where marked approximately 6-8 stitches behind eye line on top of skull ensuring the cones lean slightly backward like the photo. Secure with tight stitches around base.
— Ear Fins (Make 2) :
Round 1 :
6 sc in magic ring (6)
Round 3 :
(1 sc, inc) x 6 (18)
Round 4 :
(2 sc, inc) x 6 (24)
Round 5-6 :
1 sc in each st (24)
Round 7 :
(2 sc, dec) x 6 (18)
Round 8-10 :
1 sc in each st (18)
Info :
Fold ear slightly along one edge and sew base to the head at positions just above eye line and slightly behind the horn base. Shape the ear to curve outward to match the photo's slightly cupped ear fins.
— Wing Membranes (Make 2) :
Info :
Wing membranes are worked flat in black yarn, then edged and reinforced with purple tubular 'bones'. The pictured wings are roughly triangular with three ribs. Make two mirror pieces. Measurements assume about 28-32 stitches across base and 18-20 rows tall; adjust if you prefer larger or smaller wings.
Start :
Ch 30 (or desired base width)
Row 1 :
From 2nd ch from hook, sc across to end (29)
Row 2 :
Ch1, turn, sc across (29)
Row 3-6 :
Repeat Row 2 (29)
Row 7 :
Ch1, turn, sc2tog at beginning to create taper, sc across to last 2 sts, sc2tog (27)
Row 8-11 :
Ch1, turn, sc across (27)
Row 12 :
Ch1, turn, sc2tog at beginning and end (25)
Row 13-15 :
Ch1, turn, sc across (25)
Row 16 :
Ch1, turn, sc2tog (23)
Row 17-18 :
Ch1, turn, sc across (23)
Row 19 :
Ch1, turn, sc2tog across end to shape wing tip (reduce when needed) (21)
Info :
Adjust number of rows to match the desired curvature. The membrane should be slightly curved up at top. Block gently by pinning membrane flat and steam blocking if using acrylic-friendly methods to keep shape.
Edging :
Join purple yarn at bottom corner and work 1 sc evenly around wing edge, working 3 sc in each corner to round them. This neat edging provides the purple outline visible in the photo.
Info :
To make the ribbed 'bone' details, crochet three thin tubes in purple (see 'Wing Bones' below) and sew across the membrane spaced evenly from base to tip. Sew only to the front of the membrane so the tubes stand out visibly.
— Wing Bones (Make 6: 3 per wing) :
Round 1 :
6 sc in magic ring with purple yarn (6)
Round 2-12 :
1 sc in each st (6) — work in continuous spiral to create a tube approximately the length of the wing from base to near tip (make tube length by repeating rnds until desired). (6)
Info :
Stuff tubes very lightly or not at all: they should be flexible but maintain shape. Sew one end securely to the base of the wing, then run the tube across the membrane and attach at intervals along the edge so it appears as a rib. Make sure tubes are sewn through a few stitches of membrane for secure hold.
— Wing Finishing :
After sewing tubes in place, add a row of purple sc along the membrane edge again to trap tubes in place if desired and give the wing a finished raised contour.
Info :
Attach wings to the body at approximately body rounds 12-16 aligned with shoulder seams. Sew wings to body firmly through several rounds and around the base for secure hold. If you want wings to fold, attach only along a short central base and glue/stitch a strip so they pivot.
— Tail :
Round 1 :
6 sc in magic ring (6)
Round 3 :
(1 sc, inc) x 6 (18)
Round 4-6 :
1 sc in each st (18)
Round 7 :
(2 sc, inc) x 6 (24)
Round 8-11 :
1 sc in each st (24)
Round 12 :
(3 sc, inc) x 6 (30)
Round 13-15 :
1 sc in each st (30)
Info :
Tail tapers slowly with a rounded tip. Stuff firmly at the base, lighter toward tip. For the tail in the photo the tail is long and slightly curved; insert a thin length of wire (optional) down the center before final stuffing to be able to pose the tail curve. Ensure wire ends are folded and wrapped so they do not poke through stitches.
Round 16 :
(3 sc, dec) x 6 (24)
Round 17 :
(2 sc, dec) x 6 (18)
Round 18 :
(1 sc, dec) x 6 (12)
Info :
Leave a long tail for sewing to the body at the rear center after stuffing. Add a few extra stitches around the base when attaching to the body for a more seamless join. Optionally add a few small spikes along the tail by sewing small cones (see Spikes below) every 6-8 stitches.
— Back & Tail Spikes (Make approx 12) :
Info :
Spikes are small cone shapes worked in purple to add the rounded dorsal ornamentation. Make 12 or adjust spacing depending on tail and back length.
Spike Round 1 :
4 sc in magic ring (4)
Spike Round 2 :
1 sc in each st (4)
Spike Round 3 :
(1 sc, inc) x 2 (6)
Spike Round 4 :
1 sc in each st (6)
Spike Round 5 :
(1 sc, dec) x 2 (4)
Spike Round 6 :
Fasten off leaving a tail to sew. Stuff minimally and shape into small rounded cone then sew along center back and tail evenly spaced.
Info :
Sew the larger spikes down the head starting between the horns and continuing to the base of the neck, then smaller spikes across the spine and tail. Use pins to mark exact placement first for even spacing (approx every 6-8 rounds along tail and every 4-6 stitches across neck).
— Assembly & Placement Notes :
Info :
Before sewing parts together, block pieces gently on a flat surface and arrange them to match the photo: head center, horns slightly back-leaning, ear fins just behind eyes, wings attached at upper side of body aligned to shoulder seam, forelegs attached at chest and resting forward, hind legs attached to base so the dragon sits upright.
Info :
Sew large pieces with mattress or whip stitch using the long tails left on parts. Make sure to sew through multiple rounds of body stitches to create a secure seam that will support play and posing. Reinforce joints with extra passes of yarn where stress will occur.
— Finishing Touches :
Weave in all ends neatly and add any embroidered nostril and mouth details with black yarn. If desired, add a faint blush by dabbing with a small amount of fabric-safe paint mixed with water. Inspect seams and re-sew any weak points.
Info :
Block wings and set them with pins while wet/steam for a nice gentle curve so the dragon’s wings are slightly cupped like the picture. Reposition spikes and horns as needed after a final press.
This giant midnight purple dragon is a magical project that rewards patience with dramatic results. Each section builds into a plush companion that sits proudly while showing off dramatic horns, wings, and a curved tail. I hope stitching this brings you the same joy I felt designing it — every spike and stitch adds personality. 🐉🧶 Enjoy the slow, satisfying process and share your finished friend with pride! 🎃