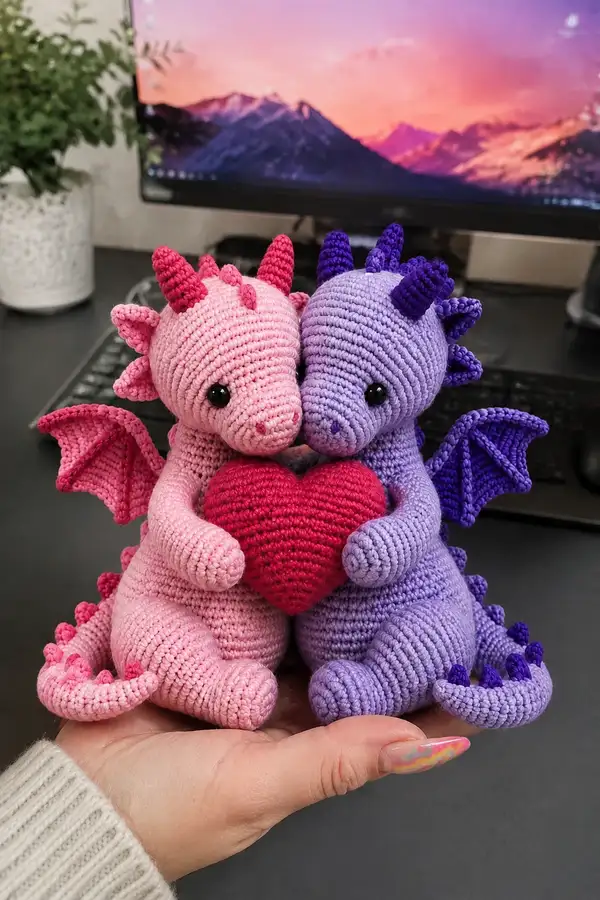
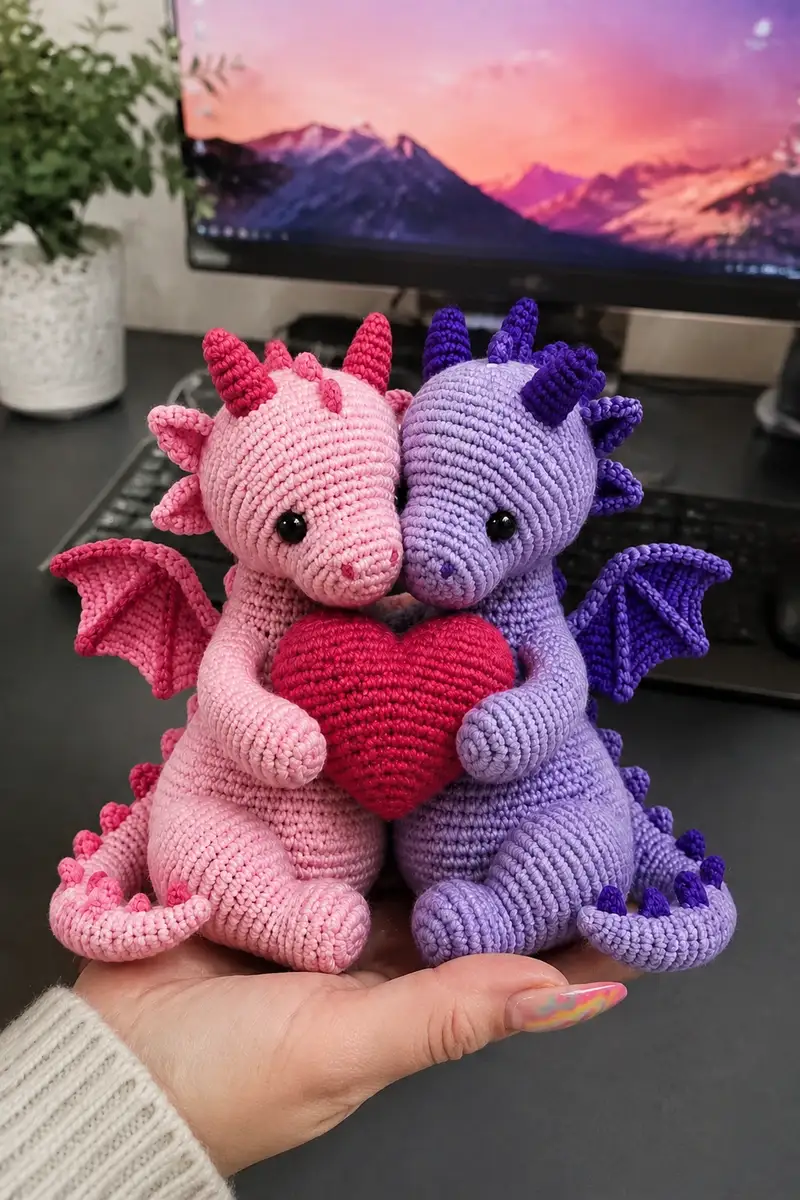
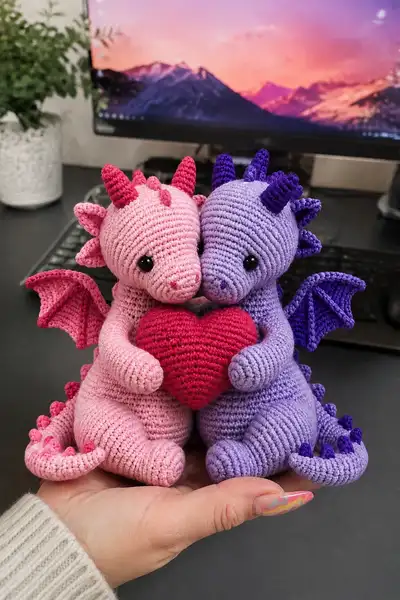
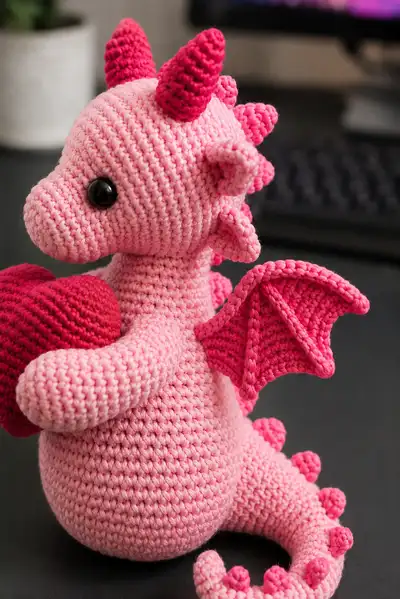
Create a pair of cuddly dragons sharing one bright heart in this detailed amigurumi pattern. Two palm-sized dragons feature rounded bodies, curled tails, spiky back details, wing membranes and tiny horns. The pattern uses simple amigurumi shaping with clear round-by-round instructions for every part from head to heart. Ideal as a heartfelt gift or desk friend, this pattern walks you through shaping, stuffing, color changes and assembly for a charming duo.
Progress Tracker
0% Complete
— Head :
Round 1 :
6 sc in magic ring (6)
Round 3 :
(1 sc, inc) x 6 (18)
Round 4 :
(2 sc, inc) x 6 (24)
Round 5 :
(3 sc, inc) x 6 (30)
Round 6 :
(4 sc, inc) x 6 (36)
Round 7 :
(5 sc, inc) x 6 (42)
Round 8 :
(6 sc, inc) x 6 (48)
Round 9-12 :
1 sc in each st (48) - work four even rounds to begin height of muzzle/head
Info :
Place safety eyes between rounds 12-13, approximately 8-10 stitches apart for a sweet expression; mark eye placement with pins and do not full-tighten the ring until eyes are in place
Round 13-16 :
1 sc in each st (48) - continue even rounds to shape forehead
Round 17 :
(6 sc, dec) x 6 (42)
Round 18 :
(5 sc, dec) x 6 (36)
Info :
Begin main stuffing now — stuff the forehead and sides firmly while keeping the muzzle area slightly less stuffed so you can shape the snout smoothly
Round 19 :
(4 sc, dec) x 6 (30)
Round 20 :
(3 sc, dec) x 6 (24)
Round 21 :
(2 sc, dec) x 6 (18)
Round 22 :
(1 sc, dec) x 6 (12)
Info :
Do NOT close the head completely here. Fasten off leaving a long tail if you will join head to neck later; alternatively continue to make a muzzle extension before final closure if you want a pronounced snout shape (instructions follow)
Round 24 :
Rejoin at front to create elongated muzzle: pick up stitches evenly around front opening to form muzzle tube. 1 sc in each st around for 6 sts, then work in continuous rounds increasing to shape the muzzle as below
Round 25 :
Working on muzzle: 6 sc (6)
Round 26 :
(1 sc, inc) x 3 (9)
Round 27 :
(2 sc, inc) x 3 (12)
Round 28 :
(3 sc, inc) x 3 (15)
Round 29 :
1 sc in each st (15)
Round 30 :
(3 sc, dec) x 3 (12)
Round 31 :
(1 sc, dec) x 4 (8)
Round 32 :
Dec until closed or leave opening for stitching to head then fasten off leaving long tail (4-6) — finish stuffing and shape the muzzle round and smooth
Info :
If you prefer a flatter snout, reduce muzzle rounds and flatten before final closure. Use small amounts of stuffing to maintain a soft, sculpted muzzle that can be stitched to the head opening for a seamless join
— Facial & Head Details :
Info :
Embroider two small nostrils using a contrasting darker yarn onto the muzzle tip using a yarn needle. Use two small stitches or French knots for subtle nostrils. If using safety eyes, secure backs firmly and position between rounds 12-13 as indicated above.
Spikes on Head (make 7) :
These are small cone spikes positioned along the head center from forehead to nape. Work each spike in contrast color or slightly darker shade.
Round 2 :
(1 sc, inc) x 2 (6)
Round 3 :
(2 sc, inc) x 2 (8)
Round 4 :
1 sc in each st (8)
Round 5 :
(2 sc, dec) x 2 (6)
Round 6 :
Slip stitch and fasten off leaving tail for sewing. Make 7 spikes varying the size: for the two big horns make 2 longer cones (instructions below), and 5 small spikes as above for the nape.
Big Horns (make 2) :
These are slightly larger cones used on the top of the head over the ears area. Use accent color.
Round 2 :
(1 sc, inc) x 3 (9)
Round 3 :
(2 sc, inc) x 3 (12)
Round 4 :
1 sc in each st (12)
Round 5 :
(3 sc, inc) x 3 (15)
Round 6 :
1 sc around (15)
Round 7 :
(3 sc, dec) x 3 (12)
Round 8 :
(2 sc, dec) x 3 (9)
Round 9 :
(1 sc, dec) x 3 (6)
Round 10 :
6 dec fasten off and leave long tail for sewing — stuff lightly so cone keeps shape (0), if you want a closed tip leave 1-2 sc to close before fastening off
Info :
Sew the big horns to the top of the head symmetrically around two stitches from the center. Sew the smaller spikes down the center from forehead to tail base, spacing each about 6-8 stitches apart depending on head size.
— Ears (make 2) :
Round 2 :
(1 sc, inc) x 3 (9)
Round 3 :
(2 sc, inc) x 3 (12)
Round 4 :
1 sc in each st (12)
Round 5 :
(2 sc, dec) x 3 (9)
Round 6 :
1 sc in each st (9) - fasten off leaving long tail for sewing and shape slightly by flattening and stitching base to head
Info :
Sew ears on either side of head at rounds 10-11 spaced about 8-10 stitches from eyes. Slightly fold the outer edge and tack in place to create a soft ear curve.
— Neck :
Round 1 :
Attach yarn at base of head and 1 sc in each st around to form a neck tube – aim for 12-16 stitches depending on head-to-body ratio (12)
Round 2-6 :
1 sc in each st (12) - continue even rounds to desired neck height
Info :
Neck length here is important to create the cuddly, leaning-in pose. Work 4-6 rounds for a short neck; add more rounds for a taller neck. Stuff neck lightly or leave flexible if you want the head to tilt.
— Body :
Round 1 :
6 sc in magic ring (6)
Round 3 :
(1 sc, inc) x 6 (18)
Round 4 :
(2 sc, inc) x 6 (24)
Round 5 :
(3 sc, inc) x 6 (30)
Round 6 :
(4 sc, inc) x 6 (36)
Round 7 :
(5 sc, inc) x 6 (42)
Round 8 :
(6 sc, inc) x 6 (48)
Round 9 :
(7 sc, inc) x 6 (54)
Round 10 :
(8 sc, inc) x 6 (60)
Round 11-14 :
1 sc in each st (60) - work even rounds to build belly height
Info :
Change to body color if you made the neck in a different color. Stuff the bottom third of the body lightly to form the rounded base before continuing even rounds. You will add legs from the lower body rounds—mark leg placement now.
Round 15 :
1 sc in each st BLO (60) - use BLO to create a ridge for the leg seam and body decoration
Round 16-20 :
1 sc in each st (60) - continue even to create the full belly
Info :
Begin stuffing the body gradually starting at rounds 14-16. Stuff firmly for a stable sitting base but leave some give for natural posture. For the two-dragons-holding-heart pose, keep the front of the belly slightly less stuffed to allow arms to fold inward.
Round 21 :
(8 sc, dec) x 6 (54)
Round 22 :
(7 sc, dec) x 6 (48)
Round 23 :
(6 sc, dec) x 6 (42)
Round 24 :
(5 sc, dec) x 6 (36)
Round 25 :
(4 sc, dec) x 6 (30)
Round 26 :
(3 sc, dec) x 6 (24)
Round 27 :
(2 sc, dec) x 6 (18)
Round 28 :
(1 sc, dec) x 6 (12)
Info :
Leave the bottom opening large enough to insert the stuffing and, if desired, an optional flat base disc (crocheted or plastic) for weight and stability. Fasten off leaving a long tail for sewing to the base if closed separately.
— Legs (make 2) :
Round 1 :
6 sc in magic ring (6)
Round 3 :
(1 sc, inc) x 6 (18)
Round 4 :
(2 sc, inc) x 6 (24)
Round 5 :
1 sc in each st (24)
Round 6 :
(3 sc, inc) x 6 (30)
Round 7-10 :
1 sc in each st (30) - build foot length and shape
Round 11 :
(3 sc, dec) x 6 (24)
Round 12 :
(2 sc, dec) x 6 (18)
Round 13 :
(1 sc, dec) x 6 (12)
Round 14 :
1 sc in each st (12) - short ankle round
Round 15 :
(1 sc, inc) x 6 (18) - begin leg tube
Round 16-22 :
1 sc in each st (18) - work even rounds for desired leg height
Info :
Stuff feet firmly before shaping ankle rounds. Leave the top of leg slightly unstuffed so it can be sewn to the marked spots on the lower body rounds (rounds 14-16 area). When attaching, rotate leg slightly outward so the dragon sits naturally.
Round 23 :
(2 sc, dec) x 3 (15) - taper for hip
Round 24 :
1 sc in each st (15)
Round 25 :
Fasten off leaving long tail for sewing to body
— Arms (make 2) :
Round 1 :
6 sc in magic ring (6)
Round 3 :
(1 sc, inc) x 6 (18)
Round 4-6 :
1 sc in each st (18) - shape the paw/hand bulb
Round 7 :
(2 sc, dec) x 4 + 2 sc (14) - begin wrist narrowing
Round 8-11 :
1 sc in each st (14) - tube for lower arm
Info :
Stuff paw area fairly firmly to create a rounded hand capable of holding the heart. Do not overstuff the lower arm so it can bend; add optional pipe cleaner inside before finishing for poseable arms.
Round 12 :
(1 sc, dec) x 4 + 2 sc (10)
Round 13-18 :
1 sc in each st (10) - finish upper arm length
Round 19 :
Fasten off leaving long tail for sewing. Make sure both arms are stuffed so the paw faces inward when sewn to body. Add a few whip stitches along the inner arm curve to help create the hook shape used to hold the heart.
— Tail :
Round 1 :
6 sc in magic ring (6)
Round 3 :
(1 sc, inc) x 6 (18)
Round 4-6 :
1 sc in each st (18) - form tail base
Round 7 :
(2 sc, dec) x 4 + 2 sc (14)
Round 8-12 :
1 sc in each st (14) - tapering tail length
Round 13 :
(1 sc, dec) x 4 + 2 sc (10)
Round 14-18 :
1 sc in each st (10) - work until desired tail length then fasten off leaving long tail for sewing
Info :
Sew several small spikes along the top of the tail spaced every 6-8 stitches. Use small spikes pattern above to create a graduated row from base to tip; larger spikes toward base and smaller near tip look natural.
— Back Spikes (make 9-11) :
Small Spike Round 1 :
mr, 4 sc (4)
Round 2 :
(1 sc, inc) x 2 (6)
Round 3 :
1 sc in each st (6) - fasten off leaving tail for sewing. Make 9-11 spikes varying orientation for a textured back.
Info :
Sew spikes centered along the spine from nape to tail base. Use pins and mirror placement on each dragon for symmetry. For a visual pop, use a darker accent color for these spikes compared to body color.
— Wings (make 2) :
Wing Base (attach to wing later) Round 1 :
ch 6, sc in 2nd ch from hook and across (5)
Round 2 :
ch1 turn, 2 sc in first st, 1 sc in next 3 sts, 2 sc in last st (7)
Round 3 :
ch1 turn, sc across making increases at ends to shape base (9)
Wing Membrane :
We now work outwards from the base to create three 'finger' ridges and a curved membrane using FLO to create ridges. Rejoin yarn at base corner.
Round 4 :
Attach yarn to outermost base stitch, ch1, 1 sc in same st, 1 sc in next 3 sts, 2 sc in next, 1 sc in next 3, 2 sc in last (total 16)
Round 5 :
FLO: 1 sc in each st (16) - this creates a ridge along the membrane edge
Round 6 :
Start shaping the three wing fingers: *ch3, skip 2 sts, sl st into next stitch* across to create wing finger ridges. Repeat to make three fingers total, then sc across to close wing outline
Round 7 :
Work 1 sc in each st around to complete shape, adding 2 sc at finger tips for rounded points (approx 20)
Round 8 :
Fold wing in half lengthwise and sew a running stitch along the inner fold to create the wing ridge. Use contrasting yarn for ribbing if desired. Fasten off leaving long tail for sewing to back.
Info :
Wings can be slightly stiffened by adding a small row of single crochet worked in BLO to create a ridge. Sew wings to upper back at rounds 10-12 on body. The wings pictured are slightly cupped—tack a few stitches from inner base to body to achieve that shape.
— Small Details & Finishings :
Eye Embellishment :
Sew safety eyes in place as placed earlier. Add a tiny embroidered line above each eye for a sleepy or gentle look if you like. Use black or darker color and single strand for subtlety.
Mouth :
Using yarn needle and darker pink or purple, add two short stitches for a smiling mouth centered under the muzzle. Keep stitches small and knot on interior to hide ends.
Info :
Weave in all ends inside the body and use a yarn needle to pull tails into tight places to avoid lumps. Use small backstitches to secure any loose seam edges.
— Heart (shared) :
Round 3 :
(1 sc, inc) x 6 (18)
Round 4 :
(2 sc, inc) x 6 (24)
Round 5 :
(3 sc, inc) x 6 (30)
Round 6 :
1 sc in each st (30)
Round 7 :
(3 sc, dec) x 6 (24)
Round 8 :
(2 sc, dec) x 6 (18)
Round 9 :
1 sc in each st (18)
Round 10 :
Fold the round to create the heart shape: sc2tog across the top 6-8 stitches to form the cleft, then continue around the remainder in sc to shape the lobes
Round 11 :
1 sc in each st around shaping and adding small increases at the outer lobes for roundness (approx 18-20)
Round 12 :
(1 sc, dec) x 6 (12)
Round 13 :
1 sc in each st (12)
Round 14 :
Dec to close to 6 stitches, stuff heart firmly, sc to close and fasten off leaving long tail for sewing between both dragons' paws
Info :
To make the heart symmetrical, pin it between both dragon paws before final sewing. Use mattress or whip stitch to attach heart to inner paws and body to keep it secure.
— Assembly :
Info :
Before assembly, block and shape wings slightly with steam if desired (careful with cotton blends). Lay out all parts and pin in place. The head attaches to the top of the body at the neck tube—sew evenly with ladder stitch around the neck opening for invisible seam.
Step 1 :
Sew legs to bottom of body at the marked lower rounds. Place each leg so the dragon sits with feet slightly forward; sew using long tail and secure with a knot inside the body.
Step 2 :
Attach arms slightly above the belly line and curve them inward as you sew so that the paws cup around the heart. Stitch through both the arm and a few stitches of body to secure firmly.
Step 3 :
Sew tail to back center of body at the last rounds where the body tapers; shape the tail curve by pulling through a few stitches along one side to create a gentle curl.
Step 4 :
Sew wings to upper back between rounds 10-12, slightly angled outward. Secure the base with several passes of yarn so the wings remain steady when posed.
Step 5 :
Sew on head spikes and horns using tails left earlier. Place horns symmetrically and smaller spikes along the center line from forehead to tail base.
Step 6 :
Position the heart between both arms and tack into place through inner arm seams and body to keep it from shifting. Weave in all ends and trim close for a neat finish.
Info :
Pin pieces first, take a photo of placement for reference, and stitch in short sections so you can adjust tension and placement until both dragons face each other symmetrically holding the heart.
— Additional Tips & Size Notes :
Info :
Finished size: approximately 12-14 cm (4.5-5.5 in) tall when using DK yarn and 2.5mm-2.75mm hook. Using heavier yarn and larger hooks will increase size proportionally. Keep tension firm for clean stitch definition and minimal gaps showing stuffing.
Info :
To make the pair in the photo, repeat the entire pattern for the second dragon in the alternate color set. Adjust accent color placement so horns and wing membranes contrast nicely with body color for visual interest.
This adorable dragon couple is pure joy to stitch up—rounded shapes, tiny horns and a shared heart create a warm, memorable gift. Each carefully stitched detail comes together to form a charming pair perfect for valentines, anniversaries, or as a desktop friend. Enjoy the slow, satisfying process of building each component and watching your dragons come to life. 🧶❤️🐲