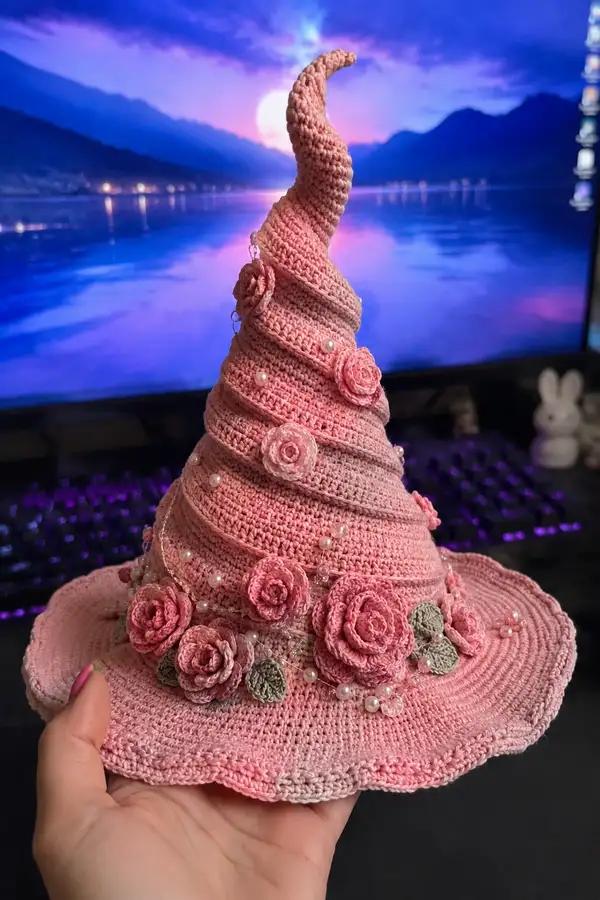
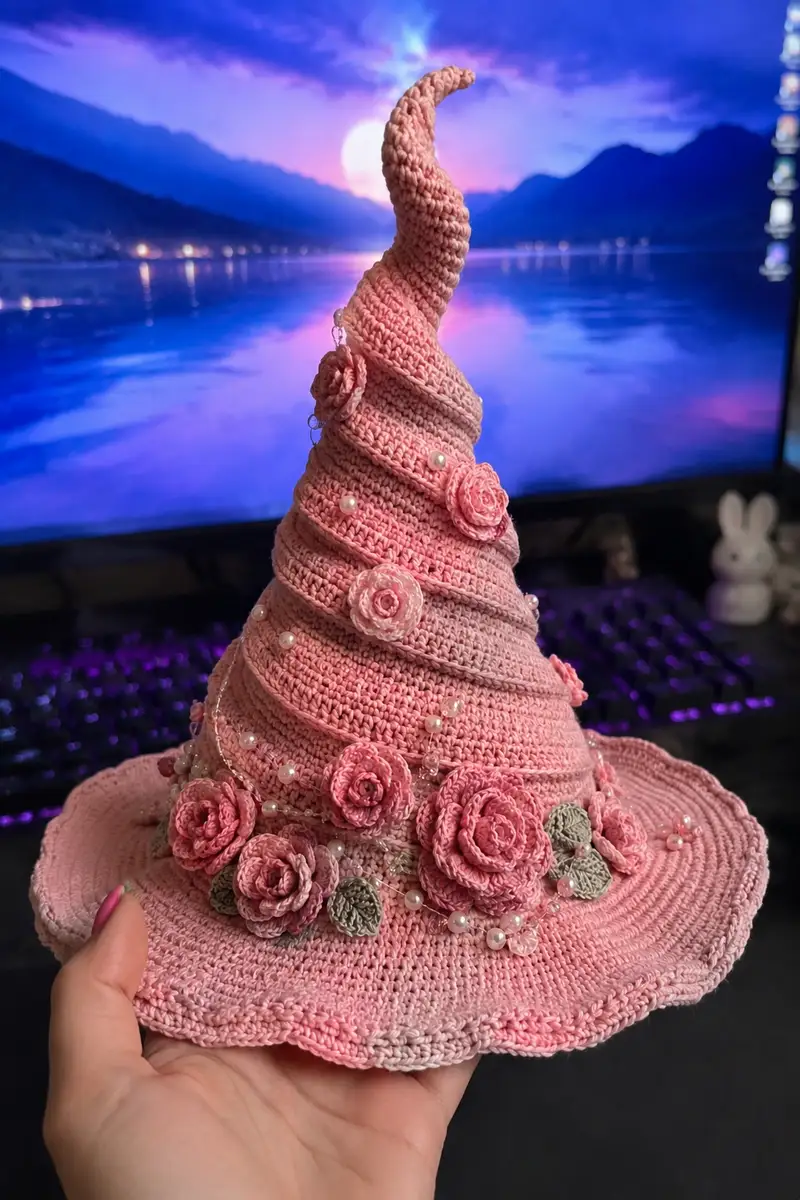
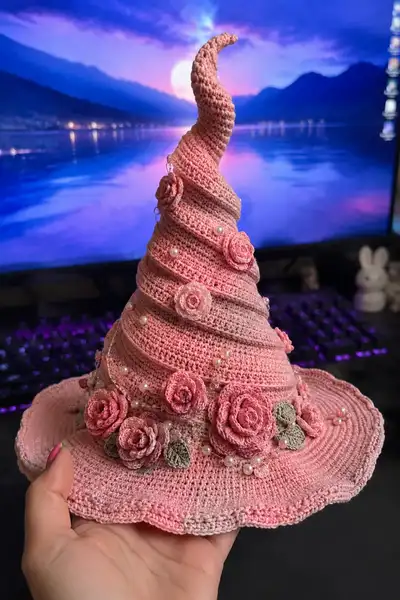
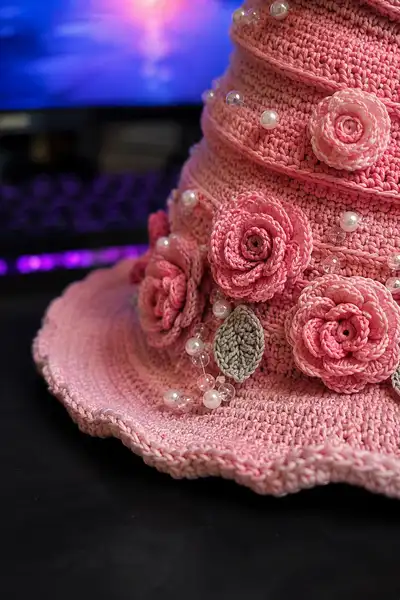
Create an enchanting tall spiral witch hat in soft blush pink, trimmed with delicate roses, tiny leaves and pearl bead garlands. This richly textured, sculptural hat features a pointed curled tip, layered spiral ridges, and a wavy brim for whimsical charm. The pattern includes clear shaping notes, decorative rose and leaf motifs, and optional internal support for a long-lasting silhouette. Perfect as a statement accessory, prop, or gift for lovers of romantic, fairy-tale crochet.
Progress Tracker
0% Complete
— Crown (base of cone) :
Round 1 :
6 sc in magic ring (6)
Round 3 :
(1 sc, inc) x 6 (18)
Round 4 :
(2 sc, inc) x 6 (24)
Round 5 :
(3 sc, inc) x 6 (30)
Round 6 :
(4 sc, inc) x 6 (36)
Info :
These increases create the circular base of the cone. Maintain a tight tension so the fabric doesn't cup. Place a stitch marker in round start and move every round.
Round 7 :
(5 sc, inc) x 6 (42)
Round 8 :
(6 sc, inc) x 6 (48)
Round 9 :
(7 sc, inc) x 6 (54)
Round 10 :
(8 sc, inc) x 6 (60)
Info :
At this point the diameter approximates the smaller hat crown of a medium adult head; adjust increases if you prefer a smaller or larger base. Use a ruler to check diameter (approx 16-17 cm across for our tension).
Round 11-14 :
1 sc in each st (60)
Info :
Work even for height to build the lower cone. Count rounds to ensure even vertical spacing for later spiral ridges. For a taller cone use extra even rounds here.
Round 15 :
(8 sc, dec) x 6 (54)
Round 16 :
1 sc in each st (54)
Round 17 :
(7 sc, dec) x 6 (48)
Info :
Begin gentle tapering to transition into the spiral midsection. Stuff a small amount of fiberfill into the base of the cone if you want a firmer structure for the spiral wrap to sit on later.
Round 18 :
1 sc in each st (48)
Round 19 :
(6 sc, dec) x 6 (42)
Round 20 :
1 sc in each st (42)
Info :
From rounds 18-22 you are creating the shoulder area where the decorative spiral starts. Keep counts even and stitch marker in place.
Round 21 :
(5 sc, dec) x 6 (36)
Round 22 :
1 sc in each st (36)
Round 23 :
(4 sc, dec) x 6 (30)
Round 24 :
1 sc in each st (30)
Info :
Finish crown shaping with these rounds so the top of the brim will meet smoothly when assembled. Fasten off if you plan to work the brim as a separate piece and leave a long tail for joining.
— Spiral Midsection and Tip :
Info :
The spiral midsection is created by alternating worked rounds with raised ridge rounds (worked in BLO or as surface slip-stitch) to form stacked bands that spiral up the cone. We'll create a spiral by working short rounds and moving the stitch marker slightly each rotation; stitch counts remain consistent to preserve the cone slope.
Round 1 (Tip - Start) :
Join yarn to last round of crown if separated. 1 sc in each st around (30)
Round 2 :
1 sc in each st BLO (30)
Round 3 :
1 sc in each st (30)
Round 4 :
Surface row: Working from base to tip, sl st in next 6 sts to create a raised ridge, then ch 1 and sl st in next stitch; repeat to make a short ridge segment that will appear as a band (no stitch count change)
Info :
To make a visible spiral, after making a ridge segment, move the stitch marker forward by 2-3 stitches so the next ridge sits slightly offset. The spiral will naturally form as you repeat ridges and normal rounds.
Round 5 :
1 sc in each st (30)
Round 6 :
1 sc in each st BLO (30)
Round 7 :
(3 sc, dec) x 6 (24)
Info :
Begin tapering toward the pointed tip. The spiral ridges will continue to wrap but must reduce smoothly in circumference. Keep beadwork and rose placement in mind; leave sections where you plan to attach floral elements slightly looser.
Round 8 :
1 sc in each st (24)
Round 9 :
1 sc in each st BLO (24)
Round 10 :
(2 sc, dec) x 6 (18)
Round 11 :
1 sc in each st (18)
Round 12 :
1 sc in each st BLO (18)
Round 13 :
(1 sc, dec) x 6 (12)
Info :
At this small circumference you may wish to add a small amount of stuffing to give the tip a plump base. If making the tall curled tip rigid, cut a piece of floral wire 2-3 cm longer than the remaining tip and insert, wrapping the wire end with tape or heat-shrink to protect yarn from piercing.
Round 14 :
1 sc in each st (12)
Round 16 :
Fasten off leaving long tail for sewing tip closed if desired. Bend the wire slightly and continue shaping the spiral tip by repositioning and sewing a few stitches to lock curl.
Info :
To achieve the pronounced curl shown in the photo, insert a short length of floral wire before decreasing completely, then gradually bend and sew the tip into a spiral, anchoring at the base of the curl with occasional stitches through adjacent rounds.
— Decorative Spiral Wrap (raised bands) :
Round 1 :
With main color, join at lower midsection where first band will begin. Ch 1, sc evenly in next 36 sts around (36) to make a tighter band base if starting slightly above crown due to previous decreases
Round 2 :
1 sc in each st BLO (36)
Round 3 :
Surface spiral: Working from lower left, sl st in next 8 sts creating a short spiral ridge, skip 1 st, sl st; continue around. This forms the raised rope-like band (no change in underlying stitch count)
Info :
For a consistent visible ridge, use a slightly larger hook (0.5mm larger) when working the surface sl st band so it sits proud of the base fabric. After each band, move marker 3-4 stitches forward to create an ascending spiral.
Round 4 :
1 sc in each st (36)
Round 5 :
Repeat Round 2 and Round 3 sequence for as many spirals as desired—approximately 8-12 spiral bands for the midsection depending on cone height
Info :
Pin the first wrap band before working subsequent ones to ensure a satisfying spiral alignment – the photograph shows tight, evenly spaced bands; spacing should be 6-8 rows between bands for this effect.
Round 6-18 :
Alternate 1 round sc and 1 round BLO + surface sl st band sequence maintaining 30-36 underlying stitches. Keep stitch counts identical to preserve slope.
— Brim (worked in rounds, separate or joined) :
Info :
You can work the brim attached to the crown by continuing in rounds, or work it as a separate flat circle and sew it on. Working it in one piece gives a cleaner join. The brim is worked flat with steady increases and then shaped with scalloped edging.
Round 1 :
Join to base of crown (where you left long tail). 1 sc in each st around (30) if joining, or start new magic ring 6 sc for separate brim base (adjust counts accordingly)
Round 2 :
(1 sc, inc) x 10 (40) if starting from 30; or (inc x6) if from magic ring
Round 3 :
(2 sc, inc) x 10 (50)
Round 4 :
(3 sc, inc) x 10 (60)
Round 5 :
(4 sc, inc) x 10 (70)
Info :
Select the brim diameter you prefer by adding or skipping increase rounds. For a gently flared brim used in the photo, 8-10 increase rounds gave a 12-14 cm wide brim. Pay attention to how the brim lays; if it curls up, add one extra even round and fewer increases.
Round 6 :
1 sc in each st (70)
Round 7 :
(5 sc, inc) x 10 (80)
Round 8 :
1 sc in each st (80)
Round 9 :
(6 sc, inc) x 10 (90)
Round 10 :
1 sc in each st (90)
Info :
At larger stitch counts the brim must be kept flexible. If your brim begins to ripple too much, stop increasing and work even rounds to allow the fabric to relax.
Round 11-14 :
1 sc in each st (90)
Round 15 :
Scalloped edge: *skip 1 st, 5 dc in next st, skip 1 st, sl st in next st* around to create small scallops; adjust repeats to fit evenly (approx 15 scallops)
Round 16 :
Finish with 1 sc around edge for tidy finish and fasten off. Weave in ends.
Info :
If the scallop is too pronounced, use 3 dc instead of 5 for a subtler wave. Blocking the brim on a plate and lightly steaming will flatten scallops uniformly.
— Large Roses (Make 5) :
Info :
Roses are worked as a flat spiral strip that is then rolled and sewn to form layered petals. Use the slightly smaller hook (3.0mm) for tighter definition.
Round 1 :
Ch 51 (or length approx 12 cm); 1 sc in 2nd ch from hook and in each ch across (50)
Round 2 :
Ch 1, turn, *1 sc in next st, 1 hdc in next, 2 dc in next, 1 hdc in next, 1 sc in next* rep to end to create alternating petal shapes (st count approx 50)
Round 3 :
Repeat Round 2 along the strip, making petals more pronounced by placing (1 sc, 1 hdc, 3 dc, 1 hdc, 1 sc) at each repeat. Fasten off leaving long tail for sewing.
Info :
To assemble, start at one end and roll the strip tightly to form the center. As you roll, tack down occasionally with a few invisible stitches to secure base. Adjust tension to let outer petals open slightly.
Round 4 :
Sew the rose base to the hat using the long tail - attach along the spiral ridge or where you want the clusters. Make 5 roses in varying sizes by changing initial chain length (e.g., 51, 41, 31, 21, 15).
Info :
For two-tone roses, use a contrasting inner strip for the center and a slightly larger outer strip for the petals, sewing them together before attaching to the hat.
— Small Rolled Roses (Make 6-8) :
Round 1 :
Ch 21; 1 sc in 2nd ch from hook and across (20)
Round 2 :
Ch 1, *1 sc, 1 hdc, 3 dc, 1 hdc, 1 sc* across to end. Fasten off leaving long tail. Roll and sew to form small roses. (Use different chain lengths for variety)
Info :
Small roses are perfect for tight clusters around the brim and spiral seams. Make extras so you can audition placement before sewing.
— Leaves (Make 8-10) :
Round 1 :
Ch 8, sc in 2nd ch from hook, hdc in next, dc in next 2, hdc in next, sc in last ch; working along other side of foundation ch: sc, hdc, dc, hdc, sl st to join (approx 14 stitches total)
Round 2 :
Fasten off leaving tail for sewing. Using yarn needle, shape the leaf by folding slightly and adding a central running stitch to create a midrib. Attach to hat beneath roses to simulate foliage.
Info :
Leaves made in a cooler grey-green tone give contrast to the blush roses. Make a few in slightly larger and smaller sizes for a natural look.
— Pearl and Bead Garland :
Info :
The hat in the photo features a draped string of faux pearls and clear beads threaded on thin nylon. You will make multiple short garlands to sew onto the spiral bands. Bead lengths vary from 8-14 cm.
Step 1 :
Cut beading thread to about 20-30 cm. Thread a pattern: clear bead, small pearl, clear bead, small pearl, clear, pearl - repeat until desired length. Knot ends securely and melt knot slightly if using nylon, or secure with a dab of glue.
Step 2 :
Pin the garland into place along the spiral bands and sew through the knot area at two or three points using nylon thread to anchor. Tuck attachment stitches beneath roses where possible for invisibility.
Info :
If you prefer a more permanent look, sew beads individually to the hat through their centers using beading thread. Use a small needle and anchor on backside with several tiny knots.
— Assembly and Decoration Placement :
Info :
Before sewing decorations, pin all roses and leaves in place and photograph or view at different angles to ensure balance. The pictured hat has a cluster of large roses at the front center of the brim, with a few vines and beads climbing the spiral to the tip.
Step 1 :
Lay the hat on a flat surface and place the largest rose at center front of brim. Use straight pins to hold. Arrange two medium roses slightly to the left and right, intersperse small roses, and tuck leaves beneath petals.
Step 2 :
Sew each rose down at the base with the long yarn tail and yarn needle, stitching through the hat base several times to secure. Sew leaves at multiple points along the base to lock them under rose clusters.
Step 3 :
Pin bead garlands across spiral bands. Sew down at two anchor points for each strand: once near base and once mid-spiral. Hide stitches under petals or inside the ridge where possible.
Info :
Embellish further with a tiny hand-stitched chain or add a small brooch pinned to the largest rose for a removable accent. Avoid heavy buttons near the crown top which would pull the cone off balance.
— Optional Internal Support for Tip :
Info :
To keep the tall tip erect and hold the curl, use floral wire or plastic boning. Insert wire down the center of the curled tip before final decreases. Wrap with yarn or padding to protect yarn from metal edges and to bulk the tip slightly.
Step 1 :
Measure a piece of craft wire to run from the tip center to the cone base (approx 6-10 cm depending on size). Fold wire into curve if desired and place along inside center of tip. Work decreases around the wire, then bend to achieve curl.
Info :
Seal the wire ends with heat-shrink tubing or tape so the yarn cannot be pierced. Alternatively, use narrow plastic boning adhered with hot glue inside the cone for a fully hidden support.
— Finishing Touches and Blocking :
Step 1 :
Weave in all loose ends thoroughly. Use small, neat stitches at motif bases to prevent sewing from showing on the front.
Step 2 :
Lightly steam-block the hat on a head-shaped form or plate to encourage the brim to curve similarly to the photograph. For the scalloped edge, pin the scallops in place and steam lightly until shape holds.
Info :
If using natural cotton, be cautious with steam temperature. Test a small scrap to ensure shape sets without shrinking or discoloration. For synthetic blends use minimal heat.
Step 3 :
Secure beads with a drop of fabric glue only after sewing – this prevents shifting. Allow glue to dry fully before handling.
Info :
Final adjustments: if spiral bands look too loose or flat, add additional surface slip-stitch rows to tighten the contrast. If the tip droops, add a second internal support or tighten the decreases at the very end and re-anchor with a few stitches.
This blush spiral witch hat is a labor of love — a romantic accessory that rewards time and care with a magical final result. Every sculpted round, rolled rose, and tiny pearl adds personality and grace. Wear it as a costume statement, display it as decor, or gift it to someone who adores handcrafted whimsy. 🧶💖 The process is meditative and playful — enjoy shaping the spiral and arranging the flowers. Share a photo when finished; I always love to see how makers personalize their hats! 🌸