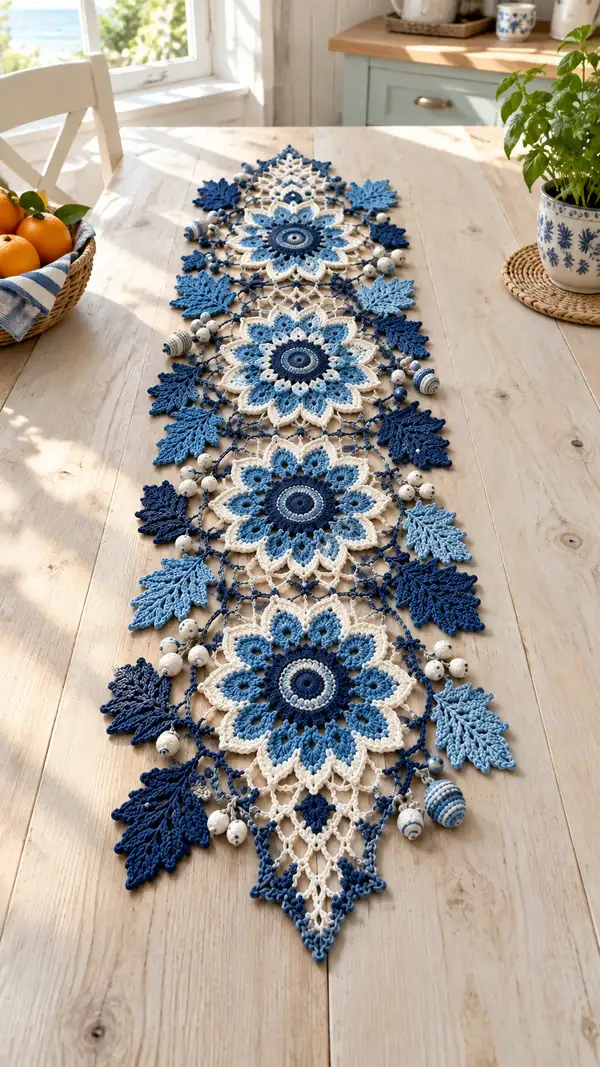
Create a stunning blue floral lace table runner featuring layered medallions, delicate leafy vines and bead embellishments. This elegant runner uses four shades of blue and cream to produce dimensional petals, intricate mesh connections and decorative edges. The finished piece is perfect for dining tables, sideboards or as a centerpiece for seasonal displays. Detailed round-by-round instructions, assembly tips and finishing notes make this an achievable project for intermediate crocheters.
Progress Tracker
0% Complete
— Overview :
Info :
This runner is constructed from repeating layered floral medallions (make 4–6 depending on desired length), triangular mesh connectors and leaf embellishments. All motifs are worked flat in the round and joined later using slip-stitch joins and whip stitch finishes. Use stitch markers to record round starts. Work tightly for clustered petal rounds and slightly looser for mesh rounds to achieve drape.
— Central Medallion (Make 4) :
Round 1 :
With Color A (Deep Navy) make a mr, ch1, 8 sc into ring. Pull ring closed and join with sl st to first sc (8)
Round 2 :
Ch1, inc in each st around (8 inc) (16)
Round 3 :
Ch2 (counts as first dc), dc in same st, (1 dc, inc) x7 around; join with sl st to top of beginning ch2 (24)
Round 4 :
Ch1, 1 sc in same st, (2 sc, inc) x8 to create a wide sc band (32)
Info :
Change to Color C (Light Blue) in last pull of previous round if you want a two-tone center. Carry Color A inside motif or cut and weave in later. Color changes create contrast for inner ring detail.
Round 5 :
With Color C, ch1, 1 sc in same st, (3 sc, inc) x8 (40)
Round 6 :
Ch3, (dc, ch1, dc) in next st to make 8 small raised clusters evenly spaced—work shell clusters across previous round by working shells into every 5th stitch (8 shells)
Round 7 :
Ch1, 1 sc in each st and ch1 space around (40)
Info :
Use FLO on this round for a subtle ridge to help the petal rounds sit above the center; the ridge will visually separate the center disc from the petals that follow.
Round 8 :
Change to Color B (Mid Blue). Ch1, 1 sc in each st FLO around (40)
Round 9 :
Ch1, (2 sc, inc) x10 (50)
Round 10 :
Ch3, *sk 2 sc, (5 dc cluster) in next st, sk 2 sc, ch2* repeat 10 times to form the first petal base. Join with sl st (10 petal bases)
Info :
When making petals, keep your tension consistent. Work clusters tension slightly tighter than sc rounds to make petals curl up gently.
Round 11 :
With Color C, join in the ch2 space, ch1, 1 sc, (ch3, 3 tr, ch3, sl st in same ch2 space) *move to next ch2 space and repeat* (10 large petal clusters)
Round 12 :
Sl st to base of first petal, ch2, 6 dc in the petal top to create fullness, sl st to next petal base and repeat around (60)
Round 13 :
Ch1, 1 sc in each st around (60)
Info :
Switch back to Color D (Cream) to create the large outer scalloped edge. This creates contrast and helps petals read visually across the runner.
Round 14 :
Change to Color D, ch3 (counts as dc), *2 dc in next 2 sts, ch2, sk 2 sts, 1 dc in next st* repeat around to begin forming scallops and spaces for next layer (approx 72)
Round 15 :
Ch1, sc in each st and ch sp around maintaining stitch count (72)
Info :
Petal layering continues: use BLO on the next round to create a defined ridge for the more dimensional layer that will overlay the cream scallop.
Round 16 :
With Color C, ch1, 1 sc in each st BLO around (72)
Round 17 :
Ch2, (hdc, 2 dc, hdc) in the tip of every alternate scallop to form raised petal points. Work into the ch2 spaces formed previously to make 12 raised petals (12 petal points; stitch total remains 72 if using post clusters)
Round 18 :
Ch1, sc in each st around but work sc2tog decreases at 6 evenly spaced points to shape petals slightly (72 - no net decrease if you place decreases strategically so total remains close to 72)
Info :
At this stage the medallion should measure roughly 12–15 cm across depending on yarn. If your medallion is too small, add additional dc rounds; if too large, omit one of the decorative rounds to scale down.
Round 19 :
With Color B, create a decorative picot ridge: *ch5, sl st to 3rd ch from hook; sk 2 sc, sc in next 3 sts* around forming 12 longer decorative points (72)
Round 20 :
Ch1, 1 sc in each st around to stabilize (72)
Info :
Now form the decorative shell overlay: use Color A to outline petals; this will be visually striking and tie motif color with beadwork later.
Round 21 :
Change to Color A, ch1, *(sc, ch2, 3 dc, ch2, sc) into the next petal tip* repeat across each petal point to create framed petals (12 framed petals total)
Round 22 :
Ch1, sc in each st and ch sp around to even out edges (72)
Round 23 :
Work a decorative lace ring below the outer petals: *ch6, sl st into sc five sts below in the body (this creates a looped chain lattice between petals)* repeat around forming 12 loops
Info :
Be sure loops are consistently sized. Use stitch markers to mark every third loop if needed. These loops will be used later to join motifs and add leaf connectors.
Round 24 :
Into each ch6 loop, work (sc, ch4, sc) to define the connecting loop (no change in the main counted sts but provides 12 small anchor points)
Round 25 :
With Color D, ch1 and sc evenly around to tighten the motif base and prepare for mesh joins (72)
Info :
Final decorative overlay: a small ring of popcorn clusters around the very center will add depth. Use Color A for contrast.
Round 26 :
Switch to Color A, *make popcorn (5 dc in same st, remove hook, reinsert into first dc and pull loop through) in every 6th stitch* around to lay down 12 popcorns. Join and fasten off, leaving a 25 cm tail for joining to mesh.
Info :
Block each medallion flat to shape and size. Pin petal points and steam or wet-block according to yarn instructions. Allow to dry before assembly.
— Inner Lace Diamond / Connector (Make 3 between medallions) :
Round 1 :
With Color D, ch6, join with sl st to form ring, ch3 (counts as dc), 11 dc into ring and join (12)
Round 2 :
Ch1, 1 sc in same st, *ch5, sk next 1 dc, sc in next dc* repeat around to make 12 ch5 loops; join (12 loops)
Round 3 :
Into each ch5 loop: (sc, ch3, 5 dc, ch3, sc) making 12 small diamond points surrounding the ring (visual count ~72 stitches distributed)
Round 4 :
Ch1, sc in each st around to firm up the diamond base (72)
Info :
This small connector is worked flat and will be used to bridge medallions; leave long tails for sewing and positioning. Block to a triangular diamond shape slightly elongated to sit between large medallions.
Round 6 :
Work decorative chain lattice: *ch7, sl st into sc on opposite side of diamond to form a netting* repeat creating three lattice diamonds per connector. Fasten off with long tails for joining.
— Mesh Expansion & Join Rows :
Round 1 :
With Color A, join long tail from medallion picot loop, ch6, sl st into outer loop of next medallion to connect them; ch6, sl st into next medallion loop forming an arched bridge. Repeat to create three arches between each medallion pair.
Round 2 :
Ch1, sc in each arch st and into the connector diamond to form a unified mesh. Aim for an even distribution of approx 60 sc across each bridging section. Use stitch markers for symmetry.
Info :
Spacing is critical for a flat runner. Lay motifs on a blocking board and pin connectors to match before stitching. This ensures even arches and prevents skewed joins.
Round 3 :
With Color D, create netted diamonds between arches: ch5, sl st down two stitches, ch5 to next arch, sl st forming diamond mesh. Repeat forming a lattice 4 rows deep between medallions to create the triangular taper visible in the photo.
Round 4 :
Ch1, sc around entire mesh and medallion margin to unify the join. Sc evenly to maintain a straight line at the runner center (stitch count varies with layout—approx 200-260 sts across the runner width when medallions are joined).
— Leaf Motifs (Make 16 assorted leaves: 8 dark navy, 8 light blue) :
Round 1 :
With Color A (or Color C for lighter leaves) ch6, sc in 2nd ch from hook, hdc, dc, tr, dtr, (working back along opposite side of chain) tr, dc, hdc, sc. Fasten off. This makes a small simple leaf (approx 10 stitches along center).
Info :
For larger textured leaves (as seen), work the following more detailed 10-round leaf pattern once desired scale is chosen. Leaves are assembled around medallion edges and at connector tips.
Round 1 :
Ch10, sc in 2nd ch from hook, hdc in next, 2 dc in next, (3 dc) in next two sts to form the leaf tip, dtr in next, ch1, sl st in next to create a small point then work back along chain: dtr, 3 dc, 2 dc, hdc, sc. Do not join; fasten off leaving tail for sewing (one worked leaf).
Round 2 :
For textured leaves: using Color A, ch8, sc in 2nd ch, *(hdc, dc, 2 dc, dc, hdc) in next 5 ch to form a scalloped half-leaf; work foundation single crochet along base back to start for a neat edge; add surface slip stitch veins by using FLO to catch the midline.* Fasten off with long tail.
Info :
Use a tapestry needle to add surface slip stitch veins to each leaf while blocked—this gives the raised vein effect shown. Pin leaves into position before attaching to check placement and symmetry.
— Bead Loops and Embellishments :
Round 1 :
Pre-thread beads onto long tails of Color A or D before starting the bead loop rounds. For each bead cluster use 1 large bead (10–12mm) and 2–3 small beads (6–8mm).
Round 2 :
To attach beads in a loop: work ch10 from the designated outer loop, slide bead down yarn to sit against the fabric, sl st into the fabric at base of loop to secure. Repeat beads on alternating outer loops (approx 12 bead loops per medallion pair).
Info :
For a sturdier attachment, pass the yarn through the bead twice and sew an extra pass through the bead hole with fine sewing thread, then knot and weave in. Balance bead weight across runner to avoid sagging.
— Outer Edge Points & Final Lace Border :
Round 1 :
With Color D, pick up at the runner end point; ch6, sl st in next 2 outer picot points forming a pointed tip; repeat to create the triangular point at each runner end.
Round 2 :
Ch1, sc around the outer perimeter working extra sts into tip points to emphasize the star-shaped finish. Add picots along the outer edge every 3 sc: ch3, sl st into first ch to form small decorative picot.
Info :
To prevent curling, work the last 2 rounds in a slightly larger hook (one size up) or use blocking spray to coax the edges flat. Make sure to pin each outer point straight while blocking.
— Finishing Rounds & Reinforcement :
Round 1 :
Use Color A to work a single crochet reinforcement row around all joins on the backside: sc through both layers where motifs meet to stabilize seam (stitch count varies with join length).
Info :
Sew all bead tails and leaf tails on the backside using mattress stitch or whip stitch for a neat finish. Weave in all ends at least 5 cm into the fabric and trim close to work.
Round 3 :
Perform final blocking: lay runner flat on blocking board, pin each medallion point, leaf and edge evenly, and lightly mist or wet-block according to yarn care instructions. Allow to dry fully before removing pins.
Info :
Optional: add a spray of fabric stiffener if you desire a crisper, less drapey finish, but test on a scrap swatch first to ensure beads stay secure.
— Alternative Shorter Motif Variation (If making 3 medallions) :
Info :
To make a shorter runner, omit one medallion and adjust connector counts. Keep bead and leaf distributions symmetrical by pairing leaf clusters across the central medallions.
— Gauge & Size Notes :
Info :
Using DK/sport cotton and 3.5mm hook, each medallion measures approximately 14–18 cm across when blocked; runner shown has 4 medallions and measures approx 120–140 cm long. Adjust number of medallions to achieve your desired length.
— Full Assembly Sequence :
Info :
Assemble on a flat surface: pin medallions in final layout, place connectors and leaf motifs, then sew with long tails; avoid stretching motifs during joining. Reinforce all joins with two passes of sewing for durability.
This beautiful floral lace table runner blends dimensional petal work, delicate mesh connectors and tasteful bead detailing to elevate any table setting. Each medallion blooms with layered texture and the contrasting blues and cream create a coastal, elegant look. The modular design lets you scale length easily; assembling and blocking bring all the details together into a show-stopping centerpiece. 🧶✨ Enjoy every stitch, and don’t forget to celebrate with a tea and a proud photo of your finished runner! 🌿