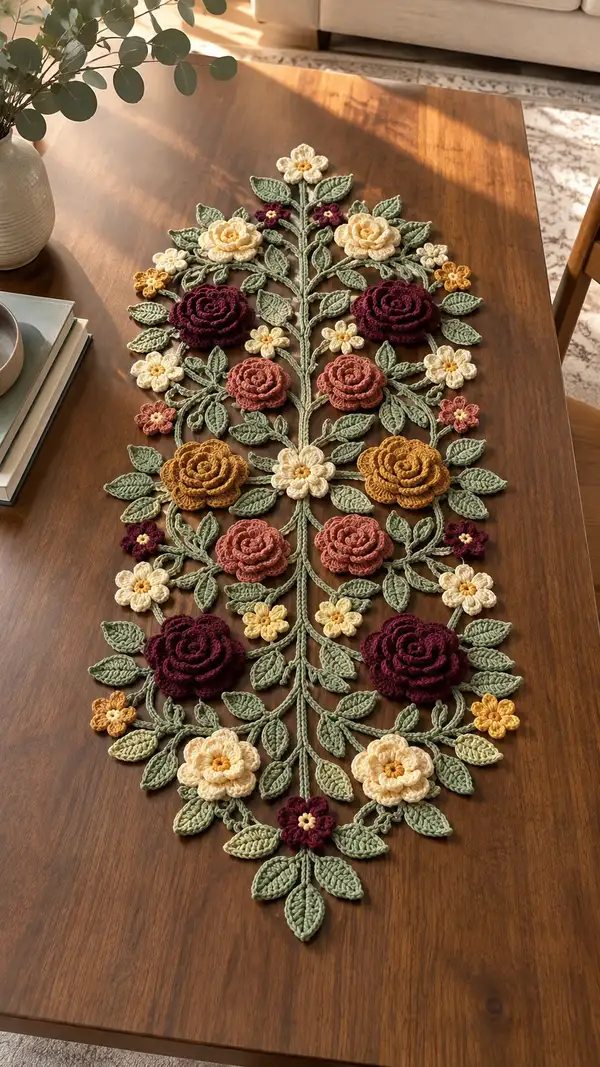
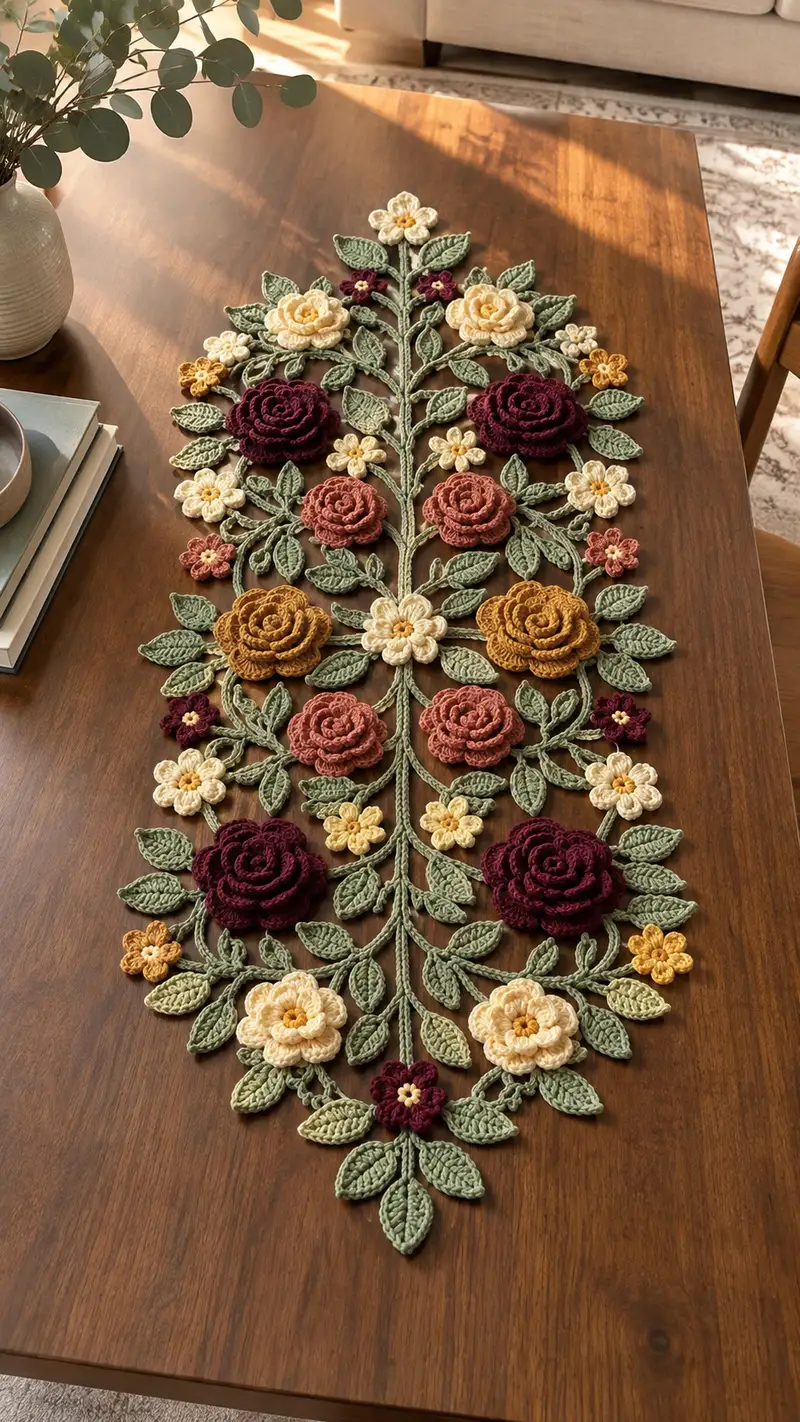
A romantic, layered floral table runner featuring dimensional roses, small blossoms and lush sage-green leaves. This elegant runner is worked motif-by-motif and joined into a symmetrical vine that elongates to fit a dining table. Colors shown: deep burgundy, mustard, terracotta, cream and sage green—perfect for autumn or year-round farmhouse style. Follow the step-by-step motif instructions and joining guide to assemble a striking centerpiece for your home.
Progress Tracker
0% Complete
— Materials & Gauge :
Info :
Recommended gauge: 18 sc x 20 rows = 10cm in single crochet using worsted weight cotton and 3.5mm hook. Gauge is not critical for motif work but consistent tension ensures pieces join neatly.
Info :
Work most motif rounds in continuous rounds where indicated, use a stitch marker and move it to the new first stitch each round for continuous spirals.
— Central Stem (Make 1 long stem and mirrored branch stems) :
Round 1 :
Ch 60 (this creates the central chain length — adjust longer or shorter to fit your table). Turn and work along both sides of the chain to create a rounded stem.
Round 2 :
Starting in 2nd ch from hook: 1 sc in each ch across to last ch, 3 sc in last ch to round the tip, rotate and continue working down the opposite side of the foundation chain: 1 sc in each ch back to start (total approx 122 sc)
Round 3 :
1 sc in each st around the chain tube to create a smooth stem (122)
Round 4 :
1 sc in each st BLO around for a subtle ridge (122)
Info :
If you need a narrower stem for a delicate look, use 2 sc in side rounds and 2 sc at the tip (reduces circumference). The counts above assume working 60 ch foundation—adjust counts if you changed length.
Round 5 :
Work 2 rounds of alternating sc and hdc to add texture: (1 sc, 1 hdc) x 61 (122)
Round 6-10 :
1 sc in each st (122)
Info :
Mark positions where you will attach branches and leaf clusters. Typical spacing on pictured runner: stems of opposite sides placed every 10-12 rounds along the central stem, mirrored on both sides.
Round 11 :
Create a subtle raised central ridge: *1 sc BLO 5 sts, 1 sc FLO 5 sts* rep around (122)
Round 12-20 :
1 sc in each st (122)
Info :
When stems reach desired length, fasten off leaving long tail for sewing and positioning. Make mirrored branch stems: ch 24, work along both sides as above for small branches (approx 46 sc). Make enough branches to match layout in photo (approx 12-16 branches total).
— Leaf (Make many; small, medium and large sizes) :
Round 1 :
Ch 7, 1 sc in 2nd ch from hook, 1 hdc, 2 dc, 1 hdc, 1 sc in last ch (7 sts across top); now work along opposite side of chain to form base: 1 sc in next ch, sl st to join to first st to form a leaf shape. (7)
Round 2 :
Work along the top edge: ch1, 1 sc in base of leaf, 2 sc, 2 hdc, 2 dc (peak), 2 hdc, 2 sc, 1 sc — turn and finish base with sl st. (approx 12-14 sts)
Round 3 :
1 sc in each st around leaf working a gentle taper at each end; at the tip work picot to create point (ch3, sl st in 3rd ch) then continue. (approx 20 sts)
Round 4 :
FLO: 1 sc in each st around to create a defined vein ridge (20)
Info :
For larger leaves increase foundation chain to ch9 or ch11 and add additional dc at peak. Always add a picot or small ch3 at tip to shape leaf point.
Round 5 :
Optional embroidered vein: embroider 3-5 straight stitches from base to tip using contrasting sage tone to mimic central vein. Secure ends and weave in.
Round 6 :
Block flat: pin leaf flat and steam lightly or spray with water and allow to dry to set shape.
Info :
Create small leaves with ch5 foundation and two rounds (quicker), medium leaves ch7 as above, large leaves ch11 with extra dc at peak and 3 rounds total for full fullness.
— Large Rose (Make 6) :
Round 1 :
mr, 6 sc in ring (6)
Round 3 :
(1 sc, inc) x 6 (18)
Round 4 :
(2 sc, inc) x 6 (24)
Round 5 :
(3 sc, inc) x 6 (30)
Info :
These first rounds form a compact disc for the rose center. Use continuous rounds (no join) and keep tension slightly firm so the center doesn't spread when adding petal layers.
Round 6 :
Ch 2, *(2 dc, ch 2, 2 dc) in next st*, rep around to form 6 small petal arches (each petal cluster occupies 1-2 base sts) (6 shells)
Round 7 :
Slip into first ch-2 sp, ch3 (counts as dc), work 3 dc in same sp, *ch2, 4 dc in next ch-2 sp* rep around; join with sl st. (6 shells of 4 dc)
Round 8 :
Ch2, in each ch2 sp work (1 tr, 2 dc, 1 tr) to make taller petals; rep around and join (6 tall petals)
Round 9 :
Begin second petal tier: working behind the first tier, join yarn to st between petals, ch4, sl st into base behind first tier to create a layered ruffle. Rep around to encase base with ruffle (approx 12 ruffle points)
Round 10 :
Ch 1, in each ruffle point work: slip st, ch3, 3 dc cluster, ch3, sl st to anchor creating deep rose scallops. Work carefully so layers overlap slightly. (12 scallops)
Round 11 :
Work a spiral outer layer: *ch5, sl st in next anchor point*, rep around to create loops. Then into each loop work (1 sc, 1 hdc, 3 dc, 1 hdc, 1 sc) to form large outer petals. (12 outer petals)
Info :
Shape petals by gently pinching and steaming each outer petal after crocheting to curl edges inward. For a tighter rose, reduce loop chain from ch5 to ch4.
Round 12 :
Work a finishing round: 1 sc in each st around outer petals to tidy edge and provide attachment points (approx 72 sts depending on petal size)
Round 13 :
Fasten off leaving long tail for sewing to leaf clusters. Weave tail through back of rose and flatten slightly while securing to give a dome shape.
Info :
Make 6 large roses in deep burgundy as pictured. Block lightly and shape each petal to achieve the dense layered look. Leave tail long for sewing to central stem and to attach decorative leaves at base.
— Medium Rose (Make 6) :
Round 3 :
(1 sc, inc) x 6 (18)
Round 4 :
Ch3, *2 dc in next st, ch1* rep around creating petal spots (approx 18 petal anchors)
Round 5 :
Into each ch1 sp work (3 dc, ch1, sl st) to make small petals around center (18 small petals)
Round 6 :
Behind this tier join yarn and work (1 sc, 1 hdc, 3 dc, 1 hdc, 1 sc) around to create second tier of petals (approx 90 sts)
Round 7 :
1 sc around to tidy edge and create sewing ridge (90)
Info :
Medium roses are worked slightly flatter than large ones and use mustard or terracotta yarn. Make 6 of each color as pictured to create alternating clusters.
Round 8 :
Fasten off and leave long tail for sewing.
— Small Layered Flower (Make 12) :
Round 3 :
Work 6 petals around: *ch4, sl st in next st* rep around to create loops; in each loop work (1 sc, 2 dc, 1 sc) to make little blossoms (6 petals)
Round 4 :
Fasten off leaving long tail for joining. Add small French knot-style center by using yarn or embroidery to create tiny raised center, or crochet a tiny 4-sc circle and sew into center.
Info :
These small flowers fill gaps and are often worked in cream or pale yellow. Make 12–18 depending on how dense you prefer the runner embellishment to be.
— Tiny 5-Petal Flowers (Make 20) :
Round 1 :
Ch 2, 5 sc in 2nd ch from hook, join with sl st to form 5 sc circle (5)
Round 2 :
*Ch3, sl st in next st* around to create 5 loops; into each loop work (1 sc, 1 hdc, 1 sc) to form petals (5 petals)
Round 3 :
Fasten off leaving tails for sewing and attach small french knot centers in pale yellow to mimic pollen.
Info :
Use these in clusters between larger flowers and leaves. Alternate colors for variety (cream, mustard, burgundy).
— Leaf Cluster Sprigs (Make many) :
Round 1 :
Ch 12, sl st back along chain to base leaving small loops: This forms a linear sprig of leaves. Into ch create small leaves as in leaf section every 4 ch.
Round 2 :
At ch4, make small leaf (use ch5 leaf pattern) attach by sl st to sprig, continue to end making 3-4 leaves per sprig.
Round 3 :
Edge round: sc along sprig backbone to define and create attachment stitches (approx 24 sts)
Info :
Make sprigs of varying lengths to mirror the photo where multiple leaves cluster around roses and along central stem. Make about 20-28 sprigs total to fill layout.
— Connector Motifs & Joining Chains :
Round 1 :
Decide your layout and mark central stem positions. Join motifs using ch-3 loops and picots: attach at the back of each flower with a sl st and work ch6 connecting to next motif, anchoring with sl st into base of other motif.
Round 2 :
For strong joins, after positioning, whipstitch along the back through both motifs with same-color yarn then secure with sl st at visible anchor points.
Round 3 :
Make decorative connecting chains: ch20, turn and sc along chain to create corded vine sections. Attach cords to stem at regular intervals with sl st.
Round 4 :
Create small loop joints where three motifs meet by crocheting a small ring: mr, 6 sc, sl st into corresponding back spaces and sew to three adjacent motifs for a secure tri-point join.
Info :
Always pin pieces flat on blocking board in desired layout first. Slightly overlap petals and leaves so joins are hidden. Use matching thread color to make joins nearly invisible.
Round 5 :
When joining leaf edges to stems, use mattress stitch through the sc rounds on stem and the back ridge of the leaf. Space stitches closely for secure attachment.
— Edging & Final Finishing :
Round 1 :
Once all motifs are joined, work 1 sc all around the outer edge of the entire runner to unify the piece (work in ends and outer loops). Make sure to follow natural contour of leaves and petals without distorting shapes. Count stitches as you go to maintain even border tension.
Round 2 :
Add decorative picot edging: *sc 3, picot* rep around any exposed leaf edges or petal tips that benefit from additional definition.
Round 3 :
Block the entire runner flat: pin to shape on a large blocking board, mist with water, and allow to dry completely. Block each petal so roses maintain their layered profile but remain flat enough to sit on a table.
Round 4 :
Secure all tails: weave ends through several layers within flowers and leaves, trim close. Use a small dab of fabric glue on especially visible joins if desired.
Info :
Final blocking not only flattens and shapes the runner but also sets joins. Lay runner on table and place a lightweight protective runner lining beneath if the yarn could scratch wood surfaces.
— Assembly Notes & Layout Guide :
Info :
Lay out central stem down table center. Arrange large roses in pairs mirrored around the central axis: place large burgundy roses at three principal positions (top, middle, bottom) mirrored left and right as shown. Insert medium roses and small flowers to fill and balance color across the runner.
Info :
Place leaf clusters around the base of each rose to hide joins and build the organic shape. Connect motifs using thin corded vines or ch-3 bridges and sew securely at each anchor point. Trim and weave all tails after assembly.
Info :
If making a longer runner, extend the central stem and add more identical motif repeats. Keep symmetry by mirroring left/right placements across the central axis.
This floral table runner brings timeless handmade charm to any table — a layered work of crochet art that's both decorative and heartwarming. Each rose and leaf is crafted with care and assembled into a balanced, botanical centerpiece you can be proud of. The detailed instructions guide you through motif making, shaping and joining so the final piece is as lovely as the photo. 🌸🧶 Make it for seasonal decor or a special gift—it's a project worth savoring!