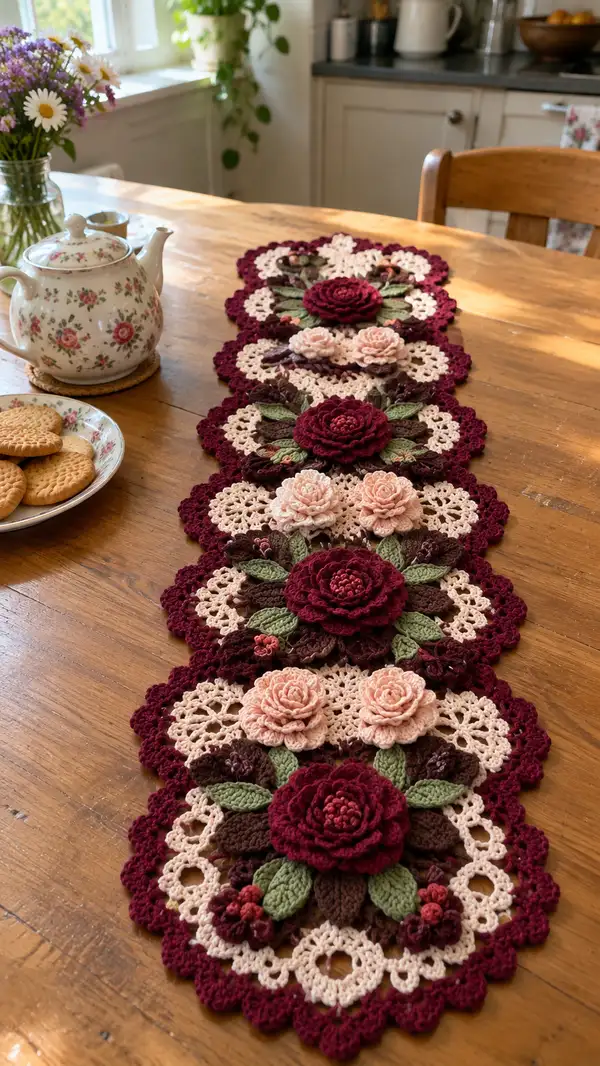
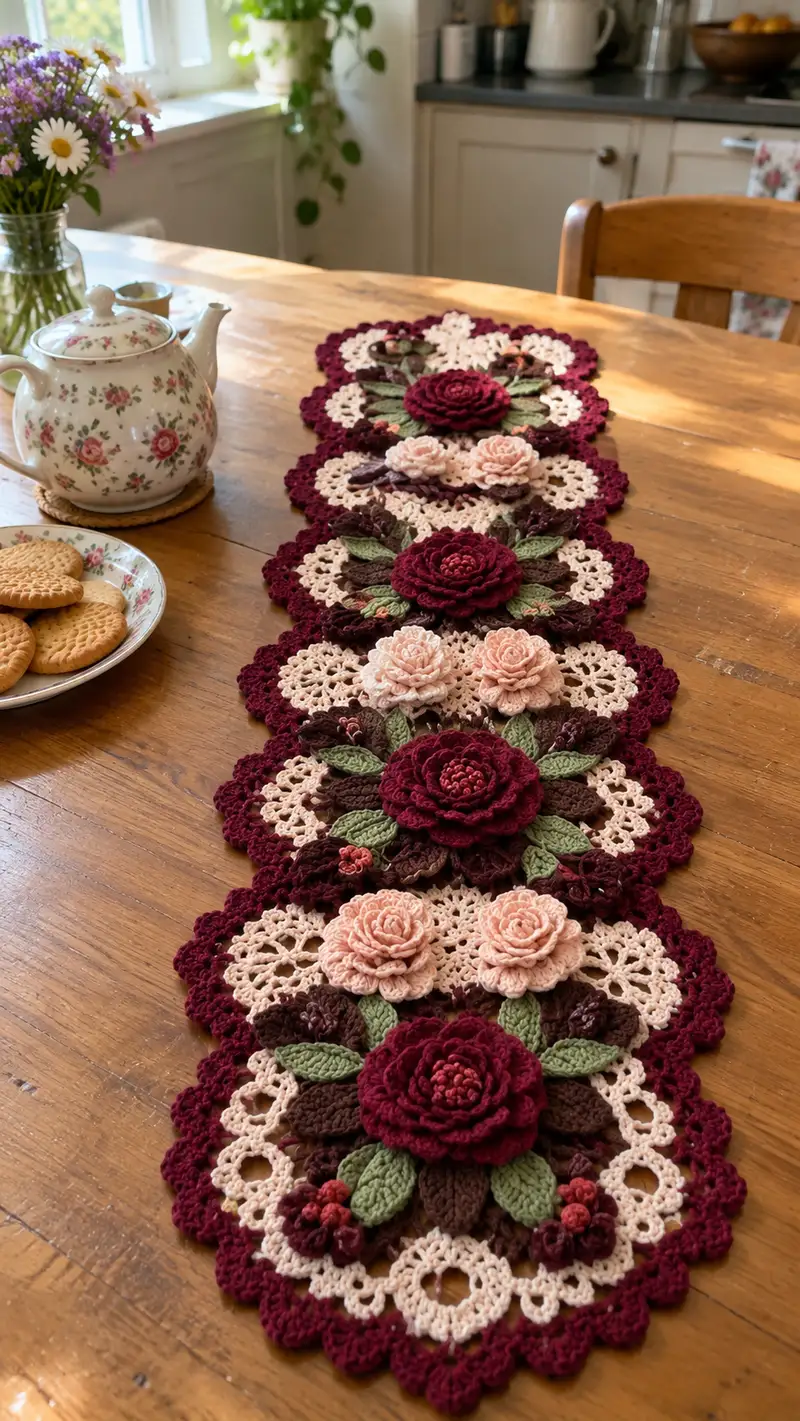
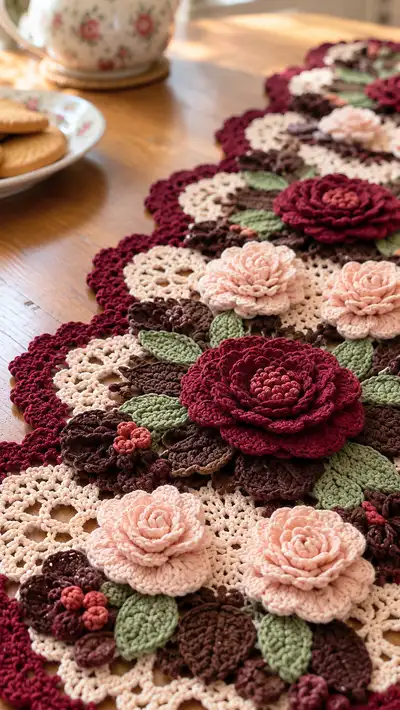
A richly detailed table runner composed of connected lace motifs and layered 3D roses in deep burgundy, soft blush and warm neutrals. Each round motif features a lacy cream base, large sculpted burgundy roses, smaller blush rosettes, olive leaves, and chocolate-brown foliage for a realistic floral centerpiece. The runner is made from worsted-weight cotton for a crisp, durable finish—perfect for dining tables, tea service, or as a statement runner for seasonal decor.
Progress Tracker
0% Complete
— Overview :
Info :
This pattern builds one circular lace motif, then adds layered floral elements (one large 3D rose, two small rosettes, multiple leaves and buds), and joins motifs end-to-end into a table runner. The pattern's rounds are written for each element: Lace Motif Base, Large Rose, Small Rosette, Leaf, Small Leaf/Bud, and Outer Border/Joining. The sample runner pictured uses 5 motifs joined in a straight line.
Info :
Recommended gauge: with a 3.5mm hook and worsted-weight cotton, one finished motif measures approximately 18cm (7 inches) across; the completed runner of five motifs measures approximately 90cm (35 inches) plus scalloped edging. Adjust number of motifs to desired runner length.
— Motif Base (Make 5) :
Round 1 :
6 sc in magic ring (6)
Round 3 :
(1 sc, inc) x 6 (18)
Round 4 :
(2 sc, inc) x 6 (24)
Round 5 :
(3 sc, inc) x 6 (30)
Round 6 :
(4 sc, inc) x 6 (36)
Round 7 :
(5 sc, inc) x 6 (42)
Round 8 :
(6 sc, inc) x 6 (48)
Round 9 :
(7 sc, inc) x 6 (54)
Round 10 :
(8 sc, inc) x 6 (60)
Round 11-14 :
1 sc in each st around (60)
Info :
These even rounds create a stable base for later lacework. Place a stitch marker at the start of each round to keep track. If you wish a slightly larger motif, work one or two additional even rounds before proceeding.
Info :
Change to cream/ivory yarn here for the lacy motif rounds. Carry burgundy yarn to the back of work or fasten off and reattach later if you prefer neater color joins.
Round 15 :
*sc in next 2 sts, ch 3, skip next 2 sts, sc in next st; rep from * around (creates ch-3 spaces; remain at 60 sc positions though chain spaces create lacy holes)
Round 16 :
In each ch-3 space: (sc, ch 2, 5 dc, ch 2, sc) to form small shell arches. In remaining single sc positions: sc. End with 60 main points (count will remain approximately equivalent to previous structural markers — shells occupy spaces but stitch anchor points remain spaced across the 60-point base)
Info :
When making shells, keep tension consistent—shells are worked into chain spaces created previous round to avoid altering base stitch count drastically. This creates the lacy open areas like the photo.
Round 17 :
Join shells with sl st to the next foundation sc and work *ch 4, sl st in top of next shell* to create connecting arches; rep around to emphasize openwork (no dramatic increase in anchor points)
Round 18 :
1 sc in each visible stitch or top of each shell around to tidy edges; (60)
Info :
Block each motif base flat before adding 3D elements for neat lace shape—spritz lightly and pin to a circular outline so scallops are even.
Round 19 :
Switch to burgundy yarn for outer scalloped edging. *Ch 3, skip 2, sc in next, ch 3, sc in next* across arches to create scallop anchors (repeat pattern across motif; roughly 12 scallop anchors)
Round 20 :
Into each scallop anchor: (5 dc, ch 2, 5 dc) to produce shell scallops around the motif; slip stitch between shells to anchor. Final outer round will visually read as 12 large scallops around motif—count depends on your anchors but aim for consistent spacing.
Info :
Fasten off, weave ends. Block again briefly if needed. Motif base is now ready for floral placement. Repeat to make a total of 5 motif bases (or desired number for runner length).
— Large 3D Rose (Make 5 — one per motif) :
Info :
Large roses are constructed as a dense circular center with layered petal rounds that are joined and then rolled or sewn slightly to create a full bloom. Use burgundy worsted cotton and a tighter hook (3.5mm or 3.25mm) to keep petals defined. Work petals flat in rounds and then shape into a spiral for 3D effect.
Round 3 :
(1 sc, inc) x 6 (18)
Round 4 :
(2 sc, inc) x 6 (24)
Round 5 :
(3 sc, inc) x 6 (30)
Info :
This round creates the dense center which will be covered by tight inner petals. Keep stitches small and even; these inner rounds will be the base for the first petal round.
Round 6 :
Ch 2, *FPdc around next st (front-post double crochet) to create vertical texture, ch 1* around for 30 textured posts (this is worked as post stitches into round 5 anchors)
Round 7 :
1 sc in each post top and chain space around to tidy (30)
Round 8 :
Petal round A: *ch 3, 3 dc in next st, ch 3, sl st in same st as start* repeat around creating 15 small petals (work into every 2nd stitch; final petal count 15; petal anchors spaced evenly)
Round 9 :
Tidy around petals with sc in each base stitch and sl st between petals (30)
Round 10 :
Petal round B: *in base space: (ch 3, 5 dc, ch 3, sl st) into each petal base* work 15 larger petals (these will form the second layer)
Round 11 :
1 sc around petal bases to secure (30)
Round 12 :
Petal round C (outer): In each space between petals work: ch 4, (7 dc cluster in loop created), ch 4, sl st to form large outer flange — make 15 outer petals
Round 13 :
Edge with sc around petal bases (30)
Info :
After finishing layering, seam the petals into a slight spiral by folding inner rounds slightly and whip-stitching at the base to hold curvature. Use the long tail to sew the spiral starting in the center and working outwards. Pin first to decide fullness before stitching permanently.
Round 14 :
Optional extra outer petals: if you want a fuller rose, add a final round of smaller overlapping petals: *ch 3, 3 dc, ch 3, sl st* into each outer petal loop (15) then sc tidy (30)
Info :
When shaping, slightly cup the petals and tack at the base in 3-4 places around the circle to keep bloom voluminous. You can also add a tiny dab of craft glue at the center underside to secure final shape for a table runner that will be handled frequently.
— Small Rosette (Make 2 per motif) :
Round 3 :
(1 sc, inc) x 6 (18)
Round 4 :
Petal formation: *ch 2, 5 dc in next st, sl st* around into 6 petal anchors—work petals tightly (6 petals)
Round 5 :
Sc around bases and sl st to center for a compact rosette. Fasten off leaving a long tail for sewing. (18 anchors)
Info :
Small rosettes are layered into two rounds of petal work for a compact bloom; stacking two small rosettes slightly offset creates the soft blush flowers in the photograph. Use blush yarn and a slightly loose tension so petals sit open but still three-dimensional.
— Leaves (Make 8 per motif: mixed sizes) :
Info :
Leaves are worked flat in rounds with shaping by increases and decreases, then blocked lightly and sewn between petals. Use olive green worsted cotton. Leaves in the pattern are a mix of longer lanceolate leaves and shorter rounded leaves.
Large Leaf Round 1 :
ch 11, sc in 2nd ch from hook, hdc in next, dc in next 3, hdc in next, sc in next 3, sl st to last st — work along foundation then mirror back along remaining chain to form a symmetrical leaf; total count roughly 22 stitches across the row.
Large Leaf Round 2 :
Edge: sc around leaf perimeter with (sc, hdc) in tip area to shape; fasten off leaving tail for sewing.
Small Leaf Round 1 :
ch 7, sc in 2nd ch from hook, hdc in next, dc in next 2, hdc in next, sc in next; mirror back along chain to form small leaf. Edge with sc around and fasten off. (approx 14 perimeter stitches)
Info :
Make leaves in two lengths and slightly steam-block to open the stitch pattern. For the leafy texture in the photo, add a heavy central ridge by working a row of FPdc down the center before edging and then blocking the leaf gently to hold the ridge.
— Chocolate Foliage & Bud Clusters (Make multiple per motif) :
Small Bud Round 1 :
mr, ch 1, 6 sc in mr, pull tight (6) - fasten off leaving long tail. Make 3-4 per motif to cluster near blooms.
Chocolate Leaf Round 1 :
ch 9, sc in 2nd ch from hook, hdc in next 2, dc in next 3, hdc in next, sc in next; mirror along chain back to starting point; edge with sc around and fasten off. Make 4–6 for each motif.
Info :
Cluster small buds by sewing three or five tiny buds together at bases and secure them to the motif between leaves and small rosettes for that textured, multi-dimensional effect.
— Assembly of Floral Elements onto Motif Base :
Info :
Arrange the large rose centered on the motif's center. Position two blush rosettes symmetrically above and below, then place larger olive leaves radiating between rose petals. Use chocolate leaves and small buds to fill negative spaces and create a natural cluster. Pin positions before sewing.
Step :
Using long tails, sew the large rose to the center by stitching through the motif base underside at 6–8 anchor points around the rose and through several base stitches to prevent shifting. Avoid sewing too tightly to preserve the lace shape.
Step :
Sew blush rosettes next, attaching through the base and tacking a couple of outer petal tips to the base to hold them slightly raised. Sew leaves under and between flower layers so their tips sit naturally over lace scallops.
Info :
When placing leaves, follow a radial layout so foliage balances the rose visually; overlap some leaf edges under petals and over adjacent chocolate leaves for depth.
— Joining Motifs into Runner (Five motifs pictured — join to your desired length) :
Info :
Motifs are joined by whip-stitching or slip-stitch joining at scallop points along one edge to produce a linear runner. For the photographed layout, motifs are joined at two scallop anchors on each opposing side producing an elongated chain of circular motifs with scalloped seams that remain decorative.
Step 1 :
Lay two motif bases right sides up, align outer cream rounds and scallops, then pin carefully so scallops nest without distortion. Match the scallop anchors evenly; count and verify alignment of 12 scallops per motif before joining.
Step 2 :
Whip-stitch through the outermost scallop edges using matching burgundy yarn for a nearly invisible join. Use small, consistent stitches and check that the join sits flat; for a decorative join, use slip-stitch method: with right sides together, sl st through both scallop shells at evenly spaced points creating small connecting loops.
Step 3 :
Continue joining in a line until all motifs are connected into a long center strip. Make sure to place motifs so that the large rose centers alternate orientation slightly if you want the runner to have a gentle staggered floral flow as pictured.
Info :
For more stability, after joining, tack motifs together from the underside with extra stitches through the cream base to reduce gaping between motifs when the runner is handled.
— Outer Border & Final Scalloped Edge :
Round 1 :
With burgundy yarn and motif strip assembled, work a unifying border across the outer edges by joining yarn at any scallop and working *sc evenly across 6–10 stitches between outer scallops, ch 3, sl st to next outer scallop* around the entire runner length. This creates anchor points for final scallops at the outer perimeter.
Round 2 :
Into each anchor point: (sc, 7 dc, sc) to create a larger scalloped shell. Repeat for every anchor along both sides and over motif ends to form continuous scalloped edging.
Round 3 :
Edge trim: sc in each st across shells and add a picot every 3-4 sc to create the little raised dots seen at the scallop tips in the photo. Fasten off and weave in ends carefully to underside.
Info :
If your runner is slightly uneven at joins, gently steam and pin the runner flat to a blocking board and allow to dry. Blocking will harmonize scallop shapes and flatten seams for a professional finish.
— Finishing Touches & Optional Variations :
Info :
Add tiny coral berry clusters near the base of roses by sewing three small buds close together and tacking them into place. For a more autumnal palette, substitute blush with warm peach and olive with a darker sage green. To make a longer runner, simply add more motifs and extend final border accordingly.
Care :
Hand-wash cold and dry flat. Because the runner uses cotton, it will soften slightly after washing but keep its lace detail well if handled gently. Re-block if necessary after washing.
Completing this Burgundy Blush Rose Table Runner is such a rewarding process — it combines delicate lacework with sculptural 3D roses for a truly show-stopping centerpiece. Each motif feels like a small work of art and joining them into a runner gives the piece museum-quality charm. I hope you enjoy the meditative pace of the petals and the satisfying payoff of a finished heirloom piece! 🧶🌹