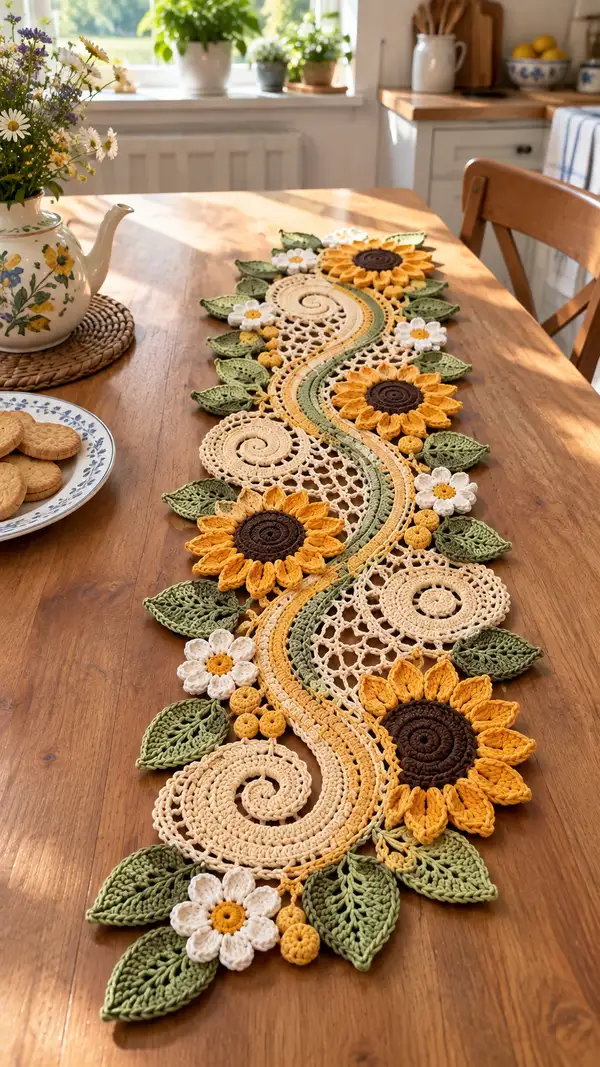
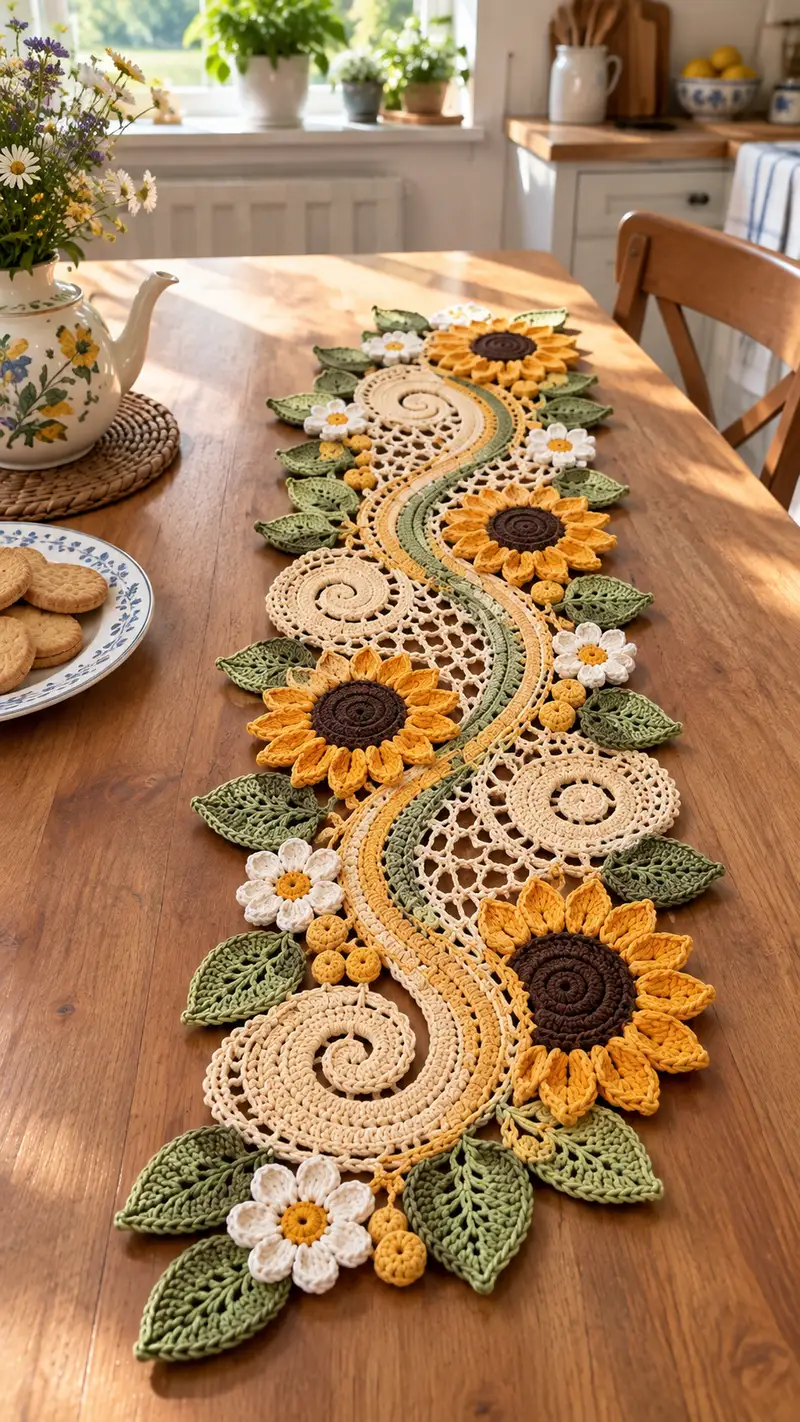
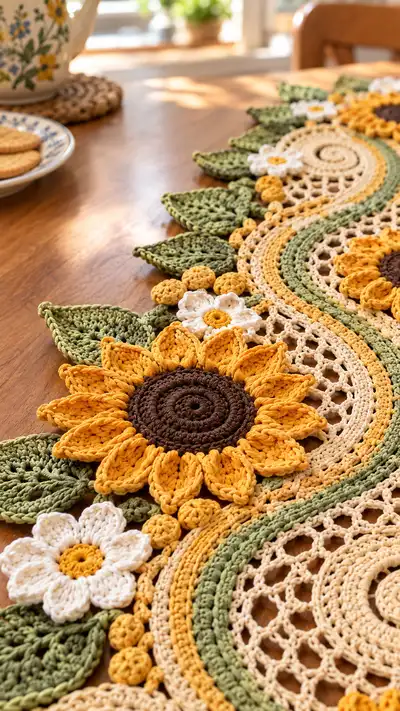
A warm, sunflower-themed lace table runner featuring swirling spiral motifs, raised sunflowers, little daisies, bobble clusters and layered leaves. Worked in cotton sport/ DK weight yarn with textured petals and open lace panels, this runner is perfect for brightening a kitchen table or making a thoughtful handmade gift. The pattern breaks the runner into motifs for easy stitching and assembly and uses clear step-by-step rounds for consistent shaping and finishing.
Progress Tracker
0% Complete
— Overview & Gauge :
Info :
This pattern is modular: you will make spiral doilies (three sizes), sunflower rosettes (three large), small daisies, leaf motifs, small round bobbles and several connecting mesh panels/curved border strips. Gauge is not strict but for consistency aim for 18 sc = 4 in (10 cm) using 3.5mm hook in a dense swatch. Final runner photographed measures approximately 100 cm long x 28-32 cm at the widest points. Use consistent tension and block motifs flat before joining.
Info :
We list each motif with round-by-round instructions. Keep stitch markers handy and check counts at the end of each round. Color changes are noted; carry yarn only when safe or weave in ends. Work all rounds in continuous rounds unless instructed to join and turn. Use slip stitch joins to finish rounds when required.
— Large Spiral Motif (Make 2) :
Round 1 :
6 sc in magic ring (6)
Round 3 :
(1 sc, inc) x 6 (18)
Round 4 :
(2 sc, inc) x 6 (24)
Round 5 :
(3 sc, inc) x 6 (30)
Round 6 :
(4 sc, inc) x 6 (36)
Round 7 :
(5 sc, inc) x 6 (42)
Info :
At this stage increase gently to keep the spiral flat. If fabric begins to ruffle, skip the next increase where needed. Mark the first stitch now and each round thereafter.
Round 8 :
(6 sc, inc) x 6 (48)
Round 9 :
1 sc in each st (48)
Round 10 :
1 sc in BLO around (48) - creates a subtle ridge for the inner spiral wall
Round 11 :
1 sc in each st (48)
Info :
Beginning lace section. We will convert the central disk into an open lattice to allow graceful spiral curvature. Keep counts accurate.
Round 12 :
*(ch3, skip 1 st, sc in next) repeat around* adjust so you end with sc; typical count (16 ch3 spaces + 16 sc) Treat each ch3 as 1 space (48 turning count remains visually even)
Round 13 :
In each ch3 space: (sc, ch3, sc) — creates arches (16 arches)
Round 14 :
Join into each arch: sl st into top, ch1, 3 dc into arch, ch1, sl st into same base to form picot-like loops (16 sets) - maintain 48 base equivalence for placement
Info :
Work tension lightly for the lace section so it lays flat. If the spiral begins to cup, block flat after finishing the motif.
Round 15 :
Ch2, 1 hdc in next st, *ch3, skip small picot loop, hdc in next st* repeat around (48 hdc positions including chains)
Round 16 :
Work a decorative scallop: *(sl st, ch3, 3 dc, ch3, sl st) into each hdc pair space* making 16 scallops spaced along the curve
Round 17 :
1 sc evenly around scalloped edge to tidy (72 sc) - note: counts increase due to scallop stitches; ensure even placement
Info :
This is the outer rim of the spiral. The spiral 'tail' will be formed by working an attached curved strip; keep this spiral motif to the side and make a second matching large spiral for the opposite curve.
Round 18 :
Change to olive green for decorative stripe: 1 sc in each st BLO around (72)
Round 19 :
1 sc in each st (72)
Round 20 :
(6 sc, inc) x 9 (81)
Round 21 :
1 sc in each st (81)
Info :
Fasten off leaving a long tail for sewing to the curved border strip later. Block flat on a towel and shape the spiral to match the photograph - spiral should taper gently inwards.
— Medium Spiral Motif (Make 3) :
Round 1 :
6 sc in magic ring (6)
Round 3 :
(1 sc, inc) x 6 (18)
Round 4 :
(2 sc, inc) x 6 (24)
Round 5 :
1 sc in each st (24)
Round 6 :
*(ch3, skip 1 st, sc in next) repeat around to create 6 arches (6 ch3 spaces and 6 sc)*
Round 7 :
Into each arch: (sc, ch3, sc) (6 arches)
Info :
Medium spirals are used as accent swirls between sunflowers and leaves. Keep these motifs smaller; block them slightly cupped if needed to follow the runner curve.
Round 8 :
Work 3 dc into each arch top, ch1 between sets (6 sets)
Round 9 :
1 sc around to tidy (30 sc)
Round 10 :
Change to cream and work 1 sc BLO (30)
Round 11 :
1 sc in each st (30)
Round 12 :
*(2 sc, inc) x 6 (36)
Round 13 :
1 sc in each st (36)
Info :
Fasten off leaving a long tail for joining to mesh panel. Block flat and arrange with large spirals before assembly.
— Small Spiral Motif (Make 4) :
Round 1 :
6 sc in magic ring (6)
Round 3 :
(1 sc, inc) x 6 (18)
Round 4 :
1 sc in each st (18)
Round 5 :
Ch2, 6 dc evenly around forming small petal points (18 dc counted as 6 clusters)
Info :
Small spirals act as filler pieces at the runner edge. Block flat and keep counts tidy for joining.
Round 6 :
1 sc around to tidy (18)
Round 7 :
Fasten off leaving tail for sewing
— Sunflower Rosette (Make 3 large) :
Round 1 :
In dark brown: 6 sc in magic ring (6)
Round 3 :
(1 sc, inc) x 6 (18)
Round 4 :
1 sc in each st (18)
Round 5 :
Change to dark brown BLO: 1 sc in each st BLO (18) - creates ridge for center
Round 6 :
Switch to mustard color. 1 sc in each st around (18)
Round 7 :
*(ch3, sc in next) repeat around to create 9 ch3 spaces (9 arches)
Info :
Petals are formed by working tall stitches into the arch openings. Use a slightly smaller hook for the center rounds to keep a firm core if you prefer.
Round 8 :
Into each arch: ch1, 7 dc (tall petals made of clustered dc), sl st to base to close petal (9 petals) - counts vary due to cluster formation
Round 9 :
Working behind petals, sc evenly around petal base to secure (approx 36 sc) - count to place evenly between petals
Round 10 :
Second petal round to add depth: *into top of petal work (sl st, ch2, 5 dtr, ch2, sl st)* repeat for each petal making 9 larger textured petals
Round 11 :
1 sc around the base to tidy and secure petals (approx 54 sc due to extra wraps)
Info :
Option: Slightly stuff the center with a very small amount of polyfill before closing the brown center to achieve a raised center like the photo. Use a light touch to avoid distorting petals.
Round 12 :
Fasten off and weave in ends. Block petals forward for natural sunflower look.
— Sunflower Petal Variation (Optional deep texture) :
Round 1 :
Make petals using elongated puff stitch: ch3, yarn over twice, insert hook, pull through (3 loops), repeat 3 times into same stitch, yarn over and pull through all loops, ch1 to close for a bold petal. Place petals around center forming 12-14 petals depending on desired fullness.
Info :
Elongated puff petals create more 3D texture. Use a hook 0.25-0.5mm smaller than the body hook to keep petals defined.
— Daisy Motif (Make 6) :
Round 1 :
In mustard center: 6 sc in magic ring (6)
Round 3 :
Switch to white: *(ch1, 6 dc into next st, sl st into same base)* repeat for 6 petals (6 clusters), ends approx 12-18 dc total shaped into petal clusters
Round 4 :
1 sc around to tidy (12 sc) - weave in ends
Info :
Daisies are worked quickly and used as filler to balance large sunflowers. Block petals slightly upward for a fresh look.
— Small Round Bobbles / Berries (Make many) :
Round 1 :
6 sc in magic ring (6)
Round 3 :
1 sc around (12) - for a firmer bobble use tightly packed sc; for a flatter disc do only round 1 and fasten off
Info :
Optional very light stuffing may be used. These small rounds are used to create clusters of 3-5 between leaves and flowers like the photo.
— Leaf Motif (Make 20-24 assorted) :
Round 1 :
Ch8, sc in 2nd ch from hook, hdc in next, dc in next 2, tr in next 2, dc in next, hdc in next, sc in last (this forms one side of leaf)
Round 2 :
Turn and mirror on opposite side: sc in next, hdc, dc2, tr2, dc1, hdc1, sc1 to base creating symmetrical leaf (approx 16-18 sts depending on stitches used)
Round 3 :
Edge: 1 sc around entire leaf edge to tidy (approx 32 sc)
Round 4 :
Using BLO across center spine only: 1 sc in each st BLO to create a slight ridge (32)
Info :
Vary leaf size by changing initial chain length (ch6 for small, ch10 for larger). Block leaves slightly cupped with stitch lines showing for realistic look.
Round 5 :
Optional decorative veins: Using contrast green and yarn needle, stitch straight veins from base to tip and small branching veins across leaf face. Fasten off and weave ends.
— Curved Border Strip / Connecting Bands (Make 2 long curved bands) :
Round 1 :
Ch80 (or adjust for desired runner length), join to form a long curved strip or work flat rows depending on preference. For curved runner, work a long foundation chain; we will build curvature by working increases on one side and decreases on the other in alternating sections.
Round 2 :
Round or row 2: 1 sc in each ch across (80)
Round 3 :
Work 3 rows of 1 sc to establish base (80)
Round 4 :
Info : To create the curved S-shape, we will do a sequence of increases along the inside edge and decreases on the outer edge over blocks of rows. Mark the center and adjust sections evenly so curves are symmetrical.
Round 5 :
Row: *(first 10 sts: 1 sc each) next 6 sts: (1 sc, inc) repeat 2 times to create 2 increases across that block, next 10 sts: 1 sc each, next 6 sts: (1 sc, dec) repeat 2 times* repeat sequence across row to build gentle undulation. Approx stitch count adjustments but keep total near 88-92 depending on increases/dec.
Round 6 :
Repeat Row 5 but shift increase/decrease blocks slightly to continue curve molding across 8-12 rows total. Maintain consistent edge to allow joining to spirals and mesh panels.
Info :
These curved strips form the backbone of the runner. Work two matching strips for the two inner stripes (one in cream and a thinner olive stripe). Block straight and pin to desired curve before joining motifs.
Round 7-14 :
Continue alternating shaping rows (eight rounds total suggested) maintaining the inside increases and outside decreases so the strip forms a slight wave. End by working 2 rounds of sc even across to tidy the edge.
— Open Lace Mesh Panel (Make 3 panels) :
Round 1 :
Ch40, sl st to join into a loop if desired for a circular open motif OR work flat mesh by turning rows. For circular: ch4 counts as dc + ch1 repeat; for flat: ch40 foundation.
Round 2 :
Round mesh: *(dc, ch3) repeat around, sl st to join forming 20 dc and 20 ch3 gaps* adjust to fit the curve
Round 3 :
Into each ch3 space: ch2, 3 dc, ch2; sl st into next dc to create petals of chain loops forming net (20 flower arches)
Round 4 :
1 sc around to tidy and reinforce (approx 80 sc) - count may vary with arch density
Info :
Mesh panels are trimmed to fit between curved bands and spirals. Block these large open panels carefully to avoid sagging—use more pins to spread evenly and let dry.
Round 5-12 :
Optional stitch pattern rows for depth: alternate rows of (ch3, sc in next dc) and (dc clusters in chain spaces) to reach desired mesh height (work 6-8 pattern rows). Fasten off leaving long tails for joining.
— Border & Edging (Final unify edge) :
Round 1 :
With cream yarn, work 1 sc around entire assembled runner edge once to unify (work into edges of motifs and through seams). Keep counts loose enough to follow curves without puckering.
Round 2 :
Work decorative scallop edge: *sl st, ch3, 3 dc, ch3, sl st* into intervals along the sc edge to create an airy scallop (approx 60 scallops depending on length) - space evenly
Round 3 :
Finish with 1 sc around again if needed to stabilize scallops, then fasten off and weave in all ends. Use steam block to set shape and gently press scallops upward if desired.
Info :
Blocking and pinning during final edge is essential for a professional finish. Spray lightly and allow motifs to dry flat on a towel or blocking mat.
— Assembly & Join-As-You-Go Notes :
Info :
Arrange all blocked motifs on your work surface following the runner photo or your own layout. Use pins to position spirals and sunflowers first, then fit mesh panels and leaves into gaps. We recommend a combination of whip stitch sewing and join-as-you-go slip stitch joins for a secure but flexible seam. Sew from the backside so stitches are less visible.
Info :
Where motifs butt together pick regular stitch junctions (such as scallop tips or sc stitches) to align and sew through both motif edges. For open lace areas, use small, discreet stitches through chain spaces and foundations to avoid visible tension lines.
Info :
Use yarn tails from motif finishes to sew neighboring motifs—this reduces ends to weave in later. Keep seams flat by placing seams at slight overlaps: one motif over the other by 1-2 stitches and then sewing along that overlap for a clean join.
— Finishing Touches :
Info :
Weave in all ends using a yarn needle and hide tails into the nearest dense stitch area. Lightly steam block the whole runner pinned to the shape you want. For added stiffness, apply a diluted starch or fabric stiffener following product directions and dry flat.
Info :
Final tip: if your runner is used on a smooth wooden table, consider a thin non-slip mat under it to prevent sliding. If needed, secure some key seam points with a tiny dab of fabric glue on the underside for extra stability before final blocking.
This sunflower lace table runner celebrates summer with textured petals, open lace and warm tones. The modular motifs come together to form a flowing, handcrafted centerpiece youʼll be proud to display. Pin, sew and block with care—each step reveals another layer of detail. 🧶🌻 Add it to your kitchen table or gift it for a cozy, handmade touch. Happy stitching and enjoy the slow, creative process! ✨