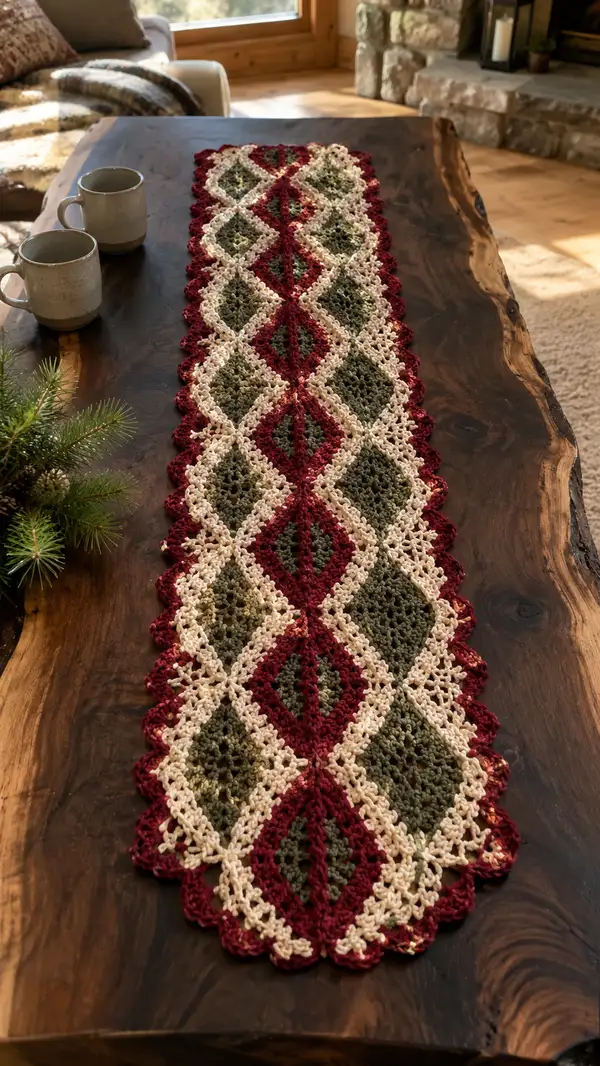
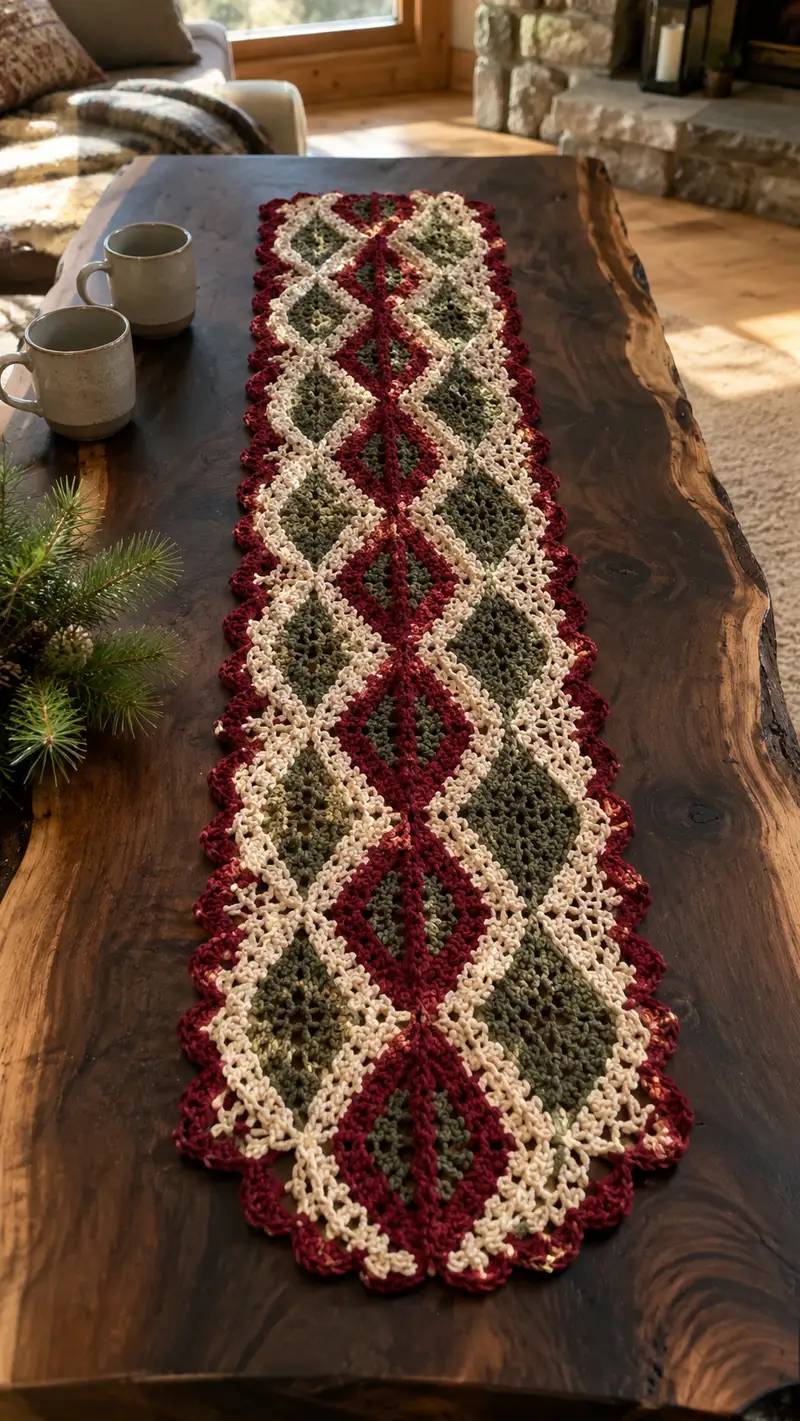
A warm, vintage-inspired diamond lace table runner worked in alternating burgundy, olive, and cream. The design features linked diamond lace motifs with an openwork center, scalloped cream joining rows, and a deep burgundy scalloped edge. Perfect for a cozy dining table or as a seasonal accent, this runner displays elegant negative-space lace and textured stitches that catch the light on a wooden surface.
Progress Tracker
0% Complete
— Notes & Gauge :
Info :
This runner is constructed from modular diamond lace motifs joined as you go in an alternating color pattern: olive-center diamonds and burgundy-center diamonds, joined with a cream lace grid and finished with a cream scallop and burgundy outer scallop. Gauge is not critical for lace but affects final length. With worsted yarn and 4.0mm hook, one diamond motif block measures approximately 10cm (4in) across the wide point. Measure one motif to estimate runner length and adjust the number of motifs to your desired final size.
Info :
Throughout the pattern, motifs are worked in rounds beginning at the center, expanding into a diamond shape by using chain spaces and cluster stitches. When joining motifs, we use slip stitch or single crochet joins as indicated to create continuous lace without bulky seams.
— Abbreviations Used in Pattern :
Info :
ch, sl st, sc, dc, hdc, tr, dtr, sk, sp, st, rep, BLO, FLO, yo, tog. The pattern uses US terms. Clusters are written as (3 dc cluster) meaning work 3 partial dcs together as one cluster unless otherwise specified.
— Diamond Motif A (Olive Center) :
Round 1 :
With olive yarn, ch 6, join with sl st to form ring (6 chs = ring)
Round 2 :
Ch3 (counts as dc), work 11 dc into ring, join with sl st to top of ch3 (12 dc)
Info :
This initial round forms a small solid circle in the center of the diamond. Keep tension even so the next round lays flat.
Round 3 :
Ch4 (counts as tr), *skip next dc, (tr, ch1, tr) in next dc; rep from * around to create 6 tr-v spaces, join with sl st to top of ch4 (12 tr, 6 ch-1 sps)
Round 4 :
Sl st into the ch-1 sp, ch3, (2 dc, ch2, 3 dc) in same ch-1 sp (corner cluster), *sk to next ch-1 sp, (3 dc, ch2, 3 dc) in each ch-1 sp; rep around to make 6 corner clusters, join with sl st (6 corner clusters)
Info :
The corner clusters start the diamond outline. Each cluster creates one point of the future diamond; place stitch marker at one corner to record motif orientation if working multiple motifs.
Round 5 :
Ch1, sc in same st, *ch5, sc in tip of next corner cluster (into ch-2 space between cluster dc groups), rep around to make 6 ch-5 loops, join with sl st (6 ch-5 sps)
Round 6 :
Sl st into first ch-5 sp, ch3, 9 dc evenly into ch-5 sp (9 dc across each loop), sl st into next sc and continue around creating 6 filled loops of 9 dc each, join with sl st (54 dc)
Info :
These filled loops create an elongated diamond center; keep stitch distribution even by spacing dc evenly across each ch-5 loop. Use stitch markers at centers of edge clusters where the diamond will connect to joining rounds.
Round 7 :
Ch3, (2 dc, ch2, 3 dc) in first st to form top point cluster, *sk 9 dc, (3 dc, ch2, 3 dc) in next st; rep around to create 6 larger clusters forming a hex that will be stretched into a diamond shape, join with sl st (6 big clusters)
Round 8 :
Ch1, sc in same st, *ch7, sc in center of next big cluster (between cluster groups), rep around to create 6 ch-7 loops, join with sl st (6 ch-7 sps)
Round 9 :
Sl st into first ch-7 sp, ch3, 11 dc evenly into ch-7 sp, sl st into next sc and continue around filling each ch-7 loop with 11 dc, join with sl st (66 dc)
Info :
At this stage the motif is expanding. The count of DCs per loop grows consistently (9 then 11) to keep the work flat; you can adjust by +/- 2 dcs if you notice cupping or ruffling, but keep symmetry among loops.
Round 10 :
Ch3, (3 dc, ch3, 3 dc) in first filled loop space to create elongated corner, *sk 11 dc, (3 dc, ch3, 3 dc) in next filled loop; rep around to make 6 corner arches, join with sl st (6 corner arches)
Round 11 :
Ch1, sc in same st, *ch9, sc in tip of next corner arch, rep around creating 6 ch-9 loops, join with sl st (6 ch-9 sps)
Round 12 :
Sl st into first ch-9 sp, ch3, 13 dc into ch-9 sp, sl st into next sc; rep around to fill all ch-9 loops with 13 dc each, join with sl st (78 dc)
Info :
Now the diamond motif is wide enough to be shaped by working elongated corner clusters in the next rounds that flatten into the diamond points. If your motif seems too small compared to pattern photos, you can add 2 dc to each loop consistently to increase size.
Round 13 :
Ch3, (4 dc, ch4, 4 dc) in first loop top to create prominent diamond point, *sk 13 dc, (4 dc, ch4, 4 dc) in next loop; rep around (6 large corner clusters)
Round 14 :
Ch1, sc in same st, *ch11, sc in tip of next large corner cluster, rep around to create 6 ch-11 loops, join with sl st (6 ch-11 sps)
Round 15 :
Sl st into first ch-11 sp, ch3, 15 dc into ch-11 sp, sl st into next sc; rep around filling all ch-11 loops with 15 dc each, join (90 dc)
Info :
The repeated increase of dc counts per loop (9,11,13,15) allows the diamond to expand at a steady rate producing an elongated diamond. Keep the same number of clusters and loops (6) to maintain symmetry for joining.
Round 16 :
Ch1, sc in same st, *ch3, (3 dc, ch3, 3 dc) in next loop center sc, ch3, sc in next sc; rep around making small arches between main points, join with sl st
Round 17 :
Ch1, sc in same st, *ch5, sc in center of next arch; rep around to make a lighter lacy edge of ch-5 loops (36 ch-5 sps), join with sl st
Round 18 :
Sl st into first ch-5 sp, ch3, 5 dc into ch-5 sp, sl st into next sc and continue around filling each ch-5 loop with 5 dc, join with sl st. Fasten off leaving tail for joining (180 dc total across motif)
Info :
Fasten off and weave in a short tail for temporary use when joining motifs; leave a longer tail if you plan to use it to whipstitch join to neighboring motifs. Block motif flat before joining for crisp diamonds.
— Diamond Motif B (Burgundy Center) :
Round 1 :
With burgundy yarn, ch6, join to form ring
Round 2 :
Ch3, 11 dc in ring, join (12 dc)
Round 3 :
Ch4, *(tr, ch1, tr) in next dc, rep around, join (12 tr, 6 ch-1 sps)
Round 4 :
Sl st into ch-1 sp, ch3, (2 dc, ch2, 3 dc) in each ch-1 sp around, join (6 corner clusters)
Info :
Motif B follows the same structural progression as motif A but worked in burgundy for center visual alternation. Keep counts identical so motifs are interchangeable for joining.
Round 5 :
Ch1, sc, *ch5, sc in next corner junction; rep around making 6 ch-5 sps, join
Round 6 :
Fill each ch-5 sp with 9 dc (6 loops x 9 dc = 54 dc), join
Round 7 :
Ch3, (3 dc, ch2, 3 dc) in first filled loop to form larger corner, *sk 9 dc, rep around to create 6 big corner clusters, join
Round 8 :
Ch1, sc, *ch7, sc in next cluster center; rep to create 6 ch-7 sps, join
Round 9 :
Fill each ch-7 sp with 11 dc (66 dc), join
Round 10 :
Ch3, (3 dc, ch3, 3 dc) into each filled loop top to enlarge corner points, *sk 11 dc, rep around, join
Round 11 :
Ch1, sc, *ch9, sc into next large corner tip; rep around, join
Round 12 :
Fill ch-9 loops with 13 dc each (78 dc), join
Round 13 :
Ch3, (4 dc, ch4, 4 dc) in each loop top to form pronounced diamond points, join (6 large clusters)
Round 14 :
Ch1, sc, *ch11, sc in cluster tip; rep around, join
Round 15 :
Fill ch-11 loops with 15 dc each (90 dc), join
Round 16 :
Ch1, sc in same st, *ch3, (3 dc, ch3, 3 dc) in next loop center, ch3, sc in next sc; rep around, join
Round 17 :
Ch1, sc, *ch5, sc in next arch; rep to make 36 ch-5 sps around, join
Round 18 :
Fill each ch-5 sp with 5 dc (180 dc total), join and fasten off. Leave tail for joining or weaving in. Block motif.
Info :
Keep motif counts identical to motif A so diamonds alternate perfectly when you lay them out in columns down the center of the runner.
— Joining Rounds (Cream) — Build Lattice:
Info :
We join motifs into a continuous runner by working cream rounds that connect motif tips into a lace lattice. Work the following joining rounds onto each motif to link to adjacent diamonds as you assemble motifs in columns. For a long runner like pictured, motifs are joined in a single long chain: diamond, diamond, diamond, alternating colors vertically.
Round 1 :
With cream yarn, join with sl st at the outer ch-5 loop pivot point of motif A (choose a top corner), ch1, sc in same st
Round 2 :
Ch4, sk 2 sts, sc in next tip (this begins a lacy arch between diamond motifs), *ch4, sc in next tip; rep around the motif to create 6 ch-4 arches, join with sl st
Info :
When working on the first motif only, keep the chain loops open. For subsequent motifs, you will join a chain loop to the corresponding chain loop on an adjacent motif by slip-stitching through both loops for an invisible, flat connection.
Round 3 :
Sl st into first ch-4 sp, ch3, 7 dc into ch-4 sp, sl st to base; rep around filling all ch-4 loops with 7 dc (42 dc)
Round 4 :
Ch1, sc in same st, *ch6, sc in next arch base; rep around creating 6 ch-6 loops, join (6 loops)
Round 5 :
Fill each ch-6 loop with 9 dc evenly, join to form a decorative connecting ring (54 dc)
Info :
To join motif B to motif A: when you reach the ch-6 loop that corresponds to the adjacent motif's loop, ch2, insert hook into the partner motif's ch-6 loop center, pull up a loop, complete the first dc of the 9-dc fill by yarning over and drawing through two loops so that the dc is worked through both motif loops simultaneously. Continue to fill remaining dc of that loop through the two motifs. This creates a join of equal strength and flatness.
Round 6 :
Ch1, sc in same st, *ch4, sc into next connecting dc cluster between motifs; rep around, join (36 ch-4 sps between motifs)
Round 7 :
Sl st into first ch-4 sp, ch3, 5 dc into ch-4 sp, sl st into next sc; rep around filling all ch-4 loops with 5 dc, join
Info :
When joining motifs vertically for the runner, always have motif A and motif B oriented so their diamond points align (point-to-point). Join at the mid-side ch-loops to create continuous vertical diamonds as pictured.
Round 8 :
Ch1, sc in same st, *ch3, sc in next st; rep around to tidy the join row and create a narrow ladder for the outer cream border to attach to, join with sl st
Info :
Work joining rounds for each new motif: join motif-to-motif in the same manner, matching corresponding ch-loops. For a runner of the length shown (approx 9-10 motifs long in photo), repeat motif assembly until desired length is achieved.
— Repeating Motif Layout & Counts :
Info :
Each motif block comprises 18 rounds in its own color. After motif creation, you will work 8 cream joining rounds that both connect motifs and create the lattice. Therefore: motif creation (18 rounds) + joining (8 rounds) = 26 rounds of work per motif unit if you include the join work that follows immediately. For the entire runner pictured, stated length uses 10 motifs (alternating olive/burgundy), giving a motif count footprint of 10 x 26 = 260 rounds of discrete steps when counting each motif's creation and join sequence separately. For simplicity we provide the full set of motif rounds once and then provide the repeat and assembly instructions below to streamline construction.
— Center Column Alternate Detailing Rounds :
Round 1 :
After assembling a vertical stack of motifs (one column), with cream yarn work around the entire column edge to create a smooth band before side border. Join cream at any outer tip, ch1, sc evenly around the column edge (estimate 3 sc per motif side cluster), join; continue even sc until full perimeter is covered
Round 2 :
Ch3, *2 dc in next sc, ch2, sk 1 sc, rep around to create a soft raised ridge that will accept the scalloped side border (this will increase stitch count by ~50% across the column; keep symmetry), join
Info :
This column wrap helps stabilize the runner, preventing diamonds from stretching longitudinally. If your runner feels too loose, add an extra row of sc prior to the ridge row to tighten the fabric.
— Outer Cream Scallop Border (Work Along Both Long Sides) :
Round 1 :
With cream yarn and starting at one short end, join in outermost sc near corner, ch1, sc in same st, ch3, sk 2 sts, sc in next; rep along long side creating even ch-3 arches; join at short end and continue around entire runner perimeter (approx count depends on motifs; maintain even spacing)
Round 2 :
Sl st into first ch-3 sp, ch3, 7 dc in ch-3 sp, sl st to base; rep along each ch-3 arch to create bold scallops (if spacing gives 60 arches, you will have 60 scallops; keep counts consistent)
Round 3 :
Ch1, sc in same st, *ch5, sc between scallops to create lacy picot anchors, rep around, join
Info :
This cream scallop is the primary outer decorative border. Work loosely to allow scallops to relax and lay flat; blocking will shape them into the consistent shell shape shown.
Round 4 :
Optional decorative row: sl st into center of scallop, ch3, 5 dc in center, ch3, sl st into center to form elevated shell center; rep across scallops, join
Round 5 :
Ch1, sc around inner join edge evenly to tidy border and create a flat panel for the outer burgundy scallop to attach to, join
Info :
When attaching outer burgundy scallop, keep tension slightly firmer to frame the runner without pulling the cream scallop inward. Fasten off cream when border is complete and weave in ends.
— Outer Burgundy Scallop Edge (Framing Edge) :
Round 1 :
Join burgundy to the outermost picot anchoring point on cream border, ch1, sc in same st, *ch3, sc in next picot base; rep across long sides to align scallops evenly, join
Round 2 :
Sl st into first ch-3 sp, ch3, 9 dc into ch-3 sp (larger scallop to create contrast), sl st to base; rep in each ch-3 sp forming a deep burgundy scallop around the runner, join
Round 3 :
Ch1, sc in same st, *ch5, sc in center of next scallop; rep around creating decorative loops between scallops, join
Round 4 :
Optional: Work a picot at peak of each burgundy scallop (ch3, sl st in 3rd ch) for extra texture; fasten off and weave in ends
Info :
The deep burgundy outer scallop frames the runner and anchors the cream and olive tones visually. Because it's an outer border, keep stitches neat and consistent; block the entire runner after this row to set scallops.
— Short Ends & Corner Treatment :
Round 1 :
At each short end, resume cream border and work a tighter half-shell cluster to close the diamond column cleanly: join cream at end tip, ch1, sc, *(3 dc, ch2, 3 dc) in next base, rep until end is covered, join
Round 2 :
Finish with a burgundy scallop that mirrors the long side scallops but uses 7 dc per scallop instead of 9 to maintain proportional balance at the ends, join and fasten off
Info :
Ensure corner scallops are centered and that short ends mirror each other identically. Use pins to shape scallops before blocking for symmetry.
— Alternative Decorative Rows (Optional for Extra Texture) :
Round 1 :
Working in cream between motif columns, ch1, sc around all motif junctions, *(ch3, sc in next junction) across length to create a light ladder effect, join
Round 2 :
Edging variation: work a picot round on the inside edges of the runners before the cream scallop. Ch1, sc, *ch3, sl st back into same stitch to make a small picot; rep around, join
Info :
These optional rows add subtle texture if your runner looks too flat. Use them sparingly and block after adding so the lace still reads clearly.
— Blocking & Finishing Rounds :
Info :
Blocking is essential for lace. Wet block your runner by dampening lightly or using a steam iron held above the fabric, then pin scallops and diamond points into shape on a blocking mat or towel. Shape diamonds to be symmetrical: pin outer tips and midpoints of each diamond to make edges straight. Let dry completely before removing pins.
Round 1 :
After blocking, optionally run a final finishing round of cream sc around entire runner to neaten edge. Join cream, ch1, sc evenly around scallop bases, join and fasten off
Info :
Weave in all ends from motif joins, border rounds, and color changes. Weave tails through several stitches inside the runner's lace pattern to make them invisible. Trim any excess yarn.
— Full Assembly & Repeat Instructions :
Info :
Create motifs A and B alternately (olive, burgundy, olive, burgundy) and join them vertically as you go using the cream joining rounds. For the runner pictured, you will produce 10 motifs in a single vertical column: start with an olive motif, join a burgundy motif beneath it, and repeat until length is reached. After completing the column, work the cream column wrap rows to stabilize, then proceed to the cream scallop side border and finish with the burgundy scallop framing row.
Info :
If you would like a runner wider than a single column, construct two or three columns of motifs and join columns laterally using the same cream joining technique. For two columns, align diamond points so they offset and create a basket-weave lace effect; join mid-side loops across columns using the cream 9-dc fill method.
Info :
Throughout assembly, maintain motif orientation: diamond points should alternate directionally (one up, next down) as shown in the photo to create the alternating colored diamond chain. Pin each motif before final join to ensure alignment and even spacing.
— Troubleshooting & Tips (Interleaved Info) :
Info :
If motifs cup (edges pull up), reduce the number of dc in the last filled loop by 2 for each loop across the motif. If motifs ripple (ruffle), add 2-4 dc to each loop evenly. Always make identical adjustments to matching motifs to retain symmetry.
Info :
When carrying cream yarn short distances between joins, work it along the inside of your motif through ch-spaces to avoid long floats on the surface. Fasten off only where necessary to change color to keep ends manageable.
Info :
For a firmer runner (less drape) use a slightly smaller hook (3.75mm) and tighter tension. For more drape and open lace, use a 4.5mm hook and looser tension. Keep in mind larger hooks will increase motif sizes and overall runner length.
This burgundy and olive diamond lace runner adds instant warmth and timeless style to any table. Each diamond motif and delicate scalloped edge come together in a rhythmic pattern that feels both nostalgic and modern. I hope you enjoy making this piece—pin it, stitch it, and let it bring seasonal charm to your home! 🧶🌿