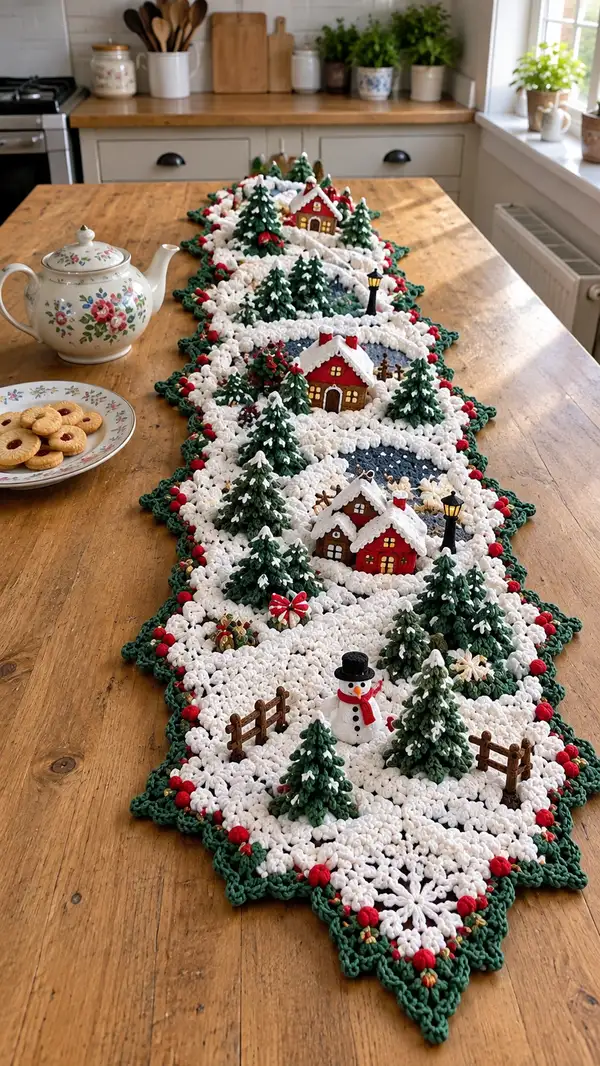
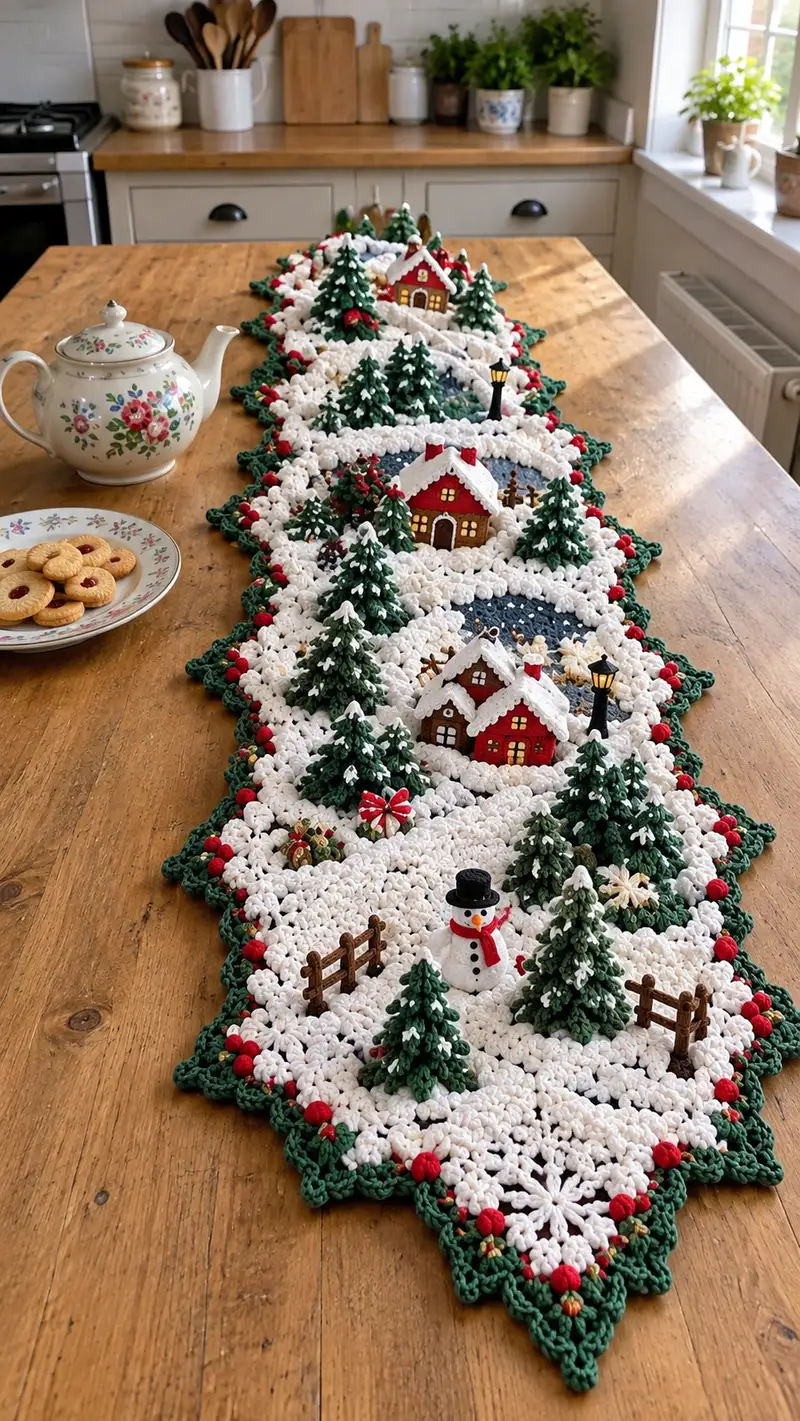
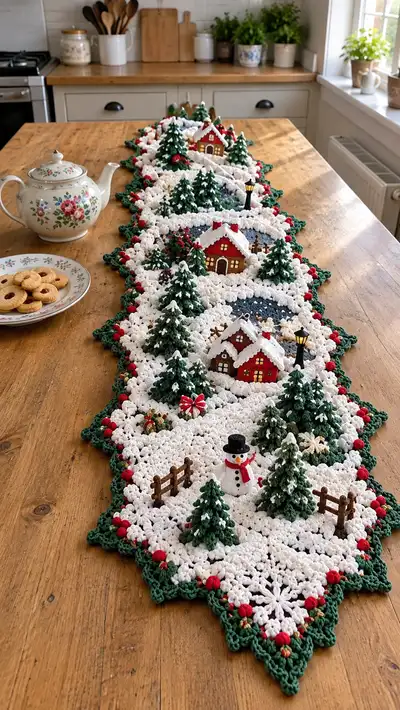
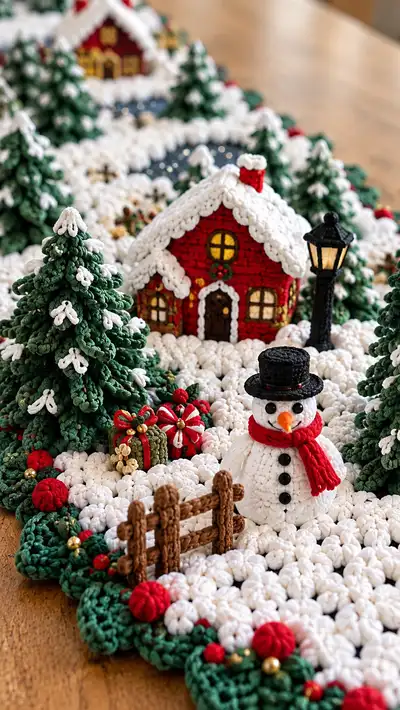
Create a magical crochet Christmas village table runner full of 3D houses, snowy trees, a jolly snowman and lamp posts. This richly textured runner uses chunky cotton or bulky yarn to build a snow-puff background, green scalloped edges, red berry bobbles and multiple amigurumi-style embellishments for depth. The finished piece sits beautifully down the center of a dining table as a seasonal centerpiece. Detailed step-by-step rounds and assembly notes help you recreate the whole scene.
Progress Tracker
0% Complete
— Notes and Overview :
Info :
This table runner is made modularly: a repeating puff-snow motif is crocheted and joined to make a diamond-shaped runner length. 3D embellishments (houses, trees, snowman, lamp posts, presents, fences) are crocheted separately and sewn on. Use bulky yarn to achieve a pronounced, plush texture like the sample. Working tightly on small 3D parts is important to avoid visible stuffing. The pattern lists rounds for each element — make the quantities indicated and arrange as shown in the photo.
Info :
Gauge is not critical for this decorative runner, but keep consistent tension across motifs for even joins. If using thicker t-shirt yarn, reduce hook size to maintain definition. Block flat motifs before joining and pin all decorative pieces prior to sewing.
— Main Puff Snow Motif (Make 7-9 and join to length) :
Round 1 :
6 sc in magic ring (6)
Round 3 :
(1 sc, inc) x 6 (18)
Round 4 :
(2 sc, inc) x 6 (24)
Round 5 :
(3 sc, inc) x 6 (30)
Info :
These first rounds build a tight center 'snow puff'. Work the first 5 rounds with a smaller hook if you want a denser nub center; otherwise continue with main hook for uniform texture.
Round 6 :
(4 sc, inc) x 6 (36)
Round 7 :
(5 sc, inc) x 6 (42)
Round 8 :
(6 sc, inc) x 6 (48)
Round 9 :
1 sc in each st (48)
Round 10 :
Work 12 clusters around to create textured puffs: *skip 1 st, (bp into next st, ch1, sl st into skipped st)* rep around so you form 12 puff clusters; sl st to join (48 equivalent)
Info :
BP (bobble/puff) instructions: yarn over 4 times, insert hook in stitch, yarn over pull through, yarn over and pull through next stitch repeat 3-4 times until you have 9 loops, yarn over and pull through all loops, ch1 to secure. Practice bobble tension for consistent size.
Round 11 :
Ch2, (dc, ch2, dc) into each puff sp to form little arches across the motif; sl st to top of first dc (this forms a lacy texture) (12 arches)
Round 12 :
Working into arch spaces: (sc, hdc, 3 dc, hdc, sc) in each arch to form a petal; sl st to join (12 petals, approximately 60 sts)
Round 13 :
1 sc in each st around (60)
Round 14 :
(4 sc, inc) x 12 (72)
Info :
At this stage, the motif is large enough to build into a diamond join. If you prefer a denser runner, repeat Round 13 once more before proceeding. Keep motifs blocked to the same width for neat joining.
Round 15 :
Working corners: *sc in next 9 sts, (ch3, 2 dc, ch3) in next st to create corner point* rep 4 times around, sl st to join (approx 80 sts including corner chains)
Round 16 :
Ch1, sc around working 2 sc into corner chain spaces and 1 sc in all others to reinforce points (80)
Round 17 :
Edging round: *sc 3, picot (ch3 sl st into first ch)* repeat around to create small points; sl st to join (approx 80)
Info :
Make 7-9 of these puff diamond motifs depending on desired runner length. Arrange motifs in a diagonal runner layout and join with mattress stitch or slip-stitch join, leaving a slight seam for depth. Place motifs with the pointy tips alternating to form a long diamond line.
— Joining Motifs and Snowbank Surface :
Round 1 :
With motifs blocked and aligned, join motif edges using slip stitch join or whip stitch through outermost rounds so join is flat but visible (join across entire seam length between motifs)
Round 2 :
Work a connecting round of sc around the full assembled runner working in white: 1 sc in each st across joins to create a uniform field (work carefully over seams) (st count varies by motif number, maintain consistent tension)
Round 3 :
Begin building raised snow: *(ch3, tr3tog cluster over next 3 sts) skip 2, sc in next 2* repeat across to form soft ridges that mimic snowdrifts; sl st to join
Info :
This surface round creates paths for small lakes and house placements. Leave designated spaces unworked or mark with pins where houses and lakes will sit; you will crochet around these spaces or leave them as recessed blue 'pond' panels (see lake section below).
Round 4 :
Work 2 rounds of 1 sc in each st to even out the surface and secure join (counts will vary). Fasten off and weave in ends.
— Pond / Frozen Lake Panel (Make 3 for sample) :
Round 1 :
With steel blue or navy bulky yarn, make a 6 sc in mr (6)
Round 3 :
(1 sc, inc) x 6 (18)
Round 4 :
(2 sc, inc) x 6 (24)
Round 5 :
(3 sc, inc) x 6 (30)
Round 6 :
1 sc in each st (30)
Round 7 :
Change to lighter blue or gray-blue yarn. 1 sc in each st to create a subtle ring of frost (30)
Info :
Make three pond panels in different places along the runner and sew them into the reserved spaces on the main surface. Add a fine sparkle thread or tiny beads to mimic ice glints if desired.
— Border: Forest Green Scallop with Red Berry Bobbles :
Round 1 :
With forest green yarn, join at any outer edge point. Ch1, sc evenly along edge placing 3 sc into each corner chain space from motif joins to keep edges flat; sl st to join (st count per side varies)
Round 2 :
*sc in next 3, 5 dc shell in next st, sc in next 3* repeat around to create scallops; increase by adding shells in corners as needed (even spacing) (approx shells equal to number of points)
Round 3 :
Sc around working 2 sc into each dc shell top to reinforce and create a crisp edge (st count varies)
Round 4 :
Switch to red yarn for berry bobbles: *make a 5-loop bobble in the space between shells every 4th sc* repeat around to form berry clusters; secure and fasten off (berries spaced evenly).
Info :
When adding berries, leave long tails and sew them to the underside of the scallop for durability. Add tiny gold bead sequins or French knots with metallic thread around berries for festive sparkle.
— House (Make 3 — Repeat rounds for each house with color variations) :
House Body - Round 1 :
6 sc in mr (6)
Round 3 :
(1 sc, inc) x 6 (18)
Round 4 :
(2 sc, inc) x 6 (24)
Round 5 :
(3 sc, inc) x 6 (30)
Round 6 :
Change to red (main house color). 1 sc in each st (30)
Round 7-18 :
1 sc in each st (30) — work 12 rounds to build wall height (30)
Info :
Place windows: mark window positions on rounds 10-11. Windows are embroidered after assembly or crocheted separately and sewn on. Keep walls even; if you prefer taller houses, add extra even rounds here.
Round 19 :
(4 sc, dec) x 6 (24) — for slight taper at top where the roof will sit
Round 20 :
1 sc in each st (24)
Info :
Fasten off leaving a long tail for sewing to the runner. Stuff base lightly if you want the house to sit with some weight. The roof will be crocheted separately and stitched on top.
House Roof Panel - Round 1 :
Ch 20 (or desired width to cover house top). Row 1: sc in 2nd ch from hook across (19)
House Roof Panel - Row 2 :
Ch1 turn, sc across (19)
House Roof Panel - Row 3-6 :
Repeat row 2 until you have 5 rows total, then decrease at ends to form slope: *Row: ch1 turn, sc2tog at first two sts, sc across until last two sts, sc2tog* until piece slopes to a peak. Fasten off leaving long tail
House Roof Assembly :
Sew roof panel to top of house body aligning peak to house ridge. Edge roof with white yarn to create snow: *sc around roof edges, then make clusters of 3 dc along edge and sl st into next stitch to simulate icicles* repeat. Add small white bobble clusters on roof peaks for heavy snow.
Info :
Make chimneys by crocheting a small tube: 6 sc in mr, inc to 12, work 6 rounds of sc, fold and sew to roof. Add a bit of stuffing and secure in place. Sew house into designated space on runner using long tail and whip stitch.
— Pine Tree (Make 10-12 trees of varying heights) :
Trunk - Round 1 :
6 sc in mr (6)
Trunk - Round 2 :
6 inc (12)
Trunk - Rounds 3-6 :
1 sc in each st (12) — 4 rounds to create a short trunk cylinder
Info :
Change to forest green yarn for leaves. Insert a small amount of stuffing into the trunk if you want the tree to sit with weight. Optionally slide a wire into trunk for help in standing or shaping branches (tuck wire ends and wrap with yarn).
Leaf Layer Base - Round 1 :
Into top of trunk, ch2, (5 dc shell, sl st into next st) repeat 6 times around to form 6 shell points (approx 36 dc total)
Leaf Layer - Round 2 :
Work into each shell: ch1, (sc, hdc, 3 dc, hdc, sc) in shell top to form a fuller layer; sl st to join (6 fuller petals)
Leaf Layer - Round 3 :
Repeat shell round but stagger shells to fill gaps: *ch2, 5 dc shell in space between previous shells* repeat around to create a second wider tier
Info :
Continue adding tiers, decreasing the number of shells by one every 2 tiers to shape into a cone. For a medium tree make 6-8 tiers; for small trees make 4 tiers; for tall trees make up to 10 tiers. Each tier adds roughly 2-3 rounds of work depending on fullness desired.
Top Finishing Rounds :
At the final tiers, make smaller shells: ch2, 3 dc shell to taper. Finish with a sc around the top and fasten off leaving tail to sew trunk to runner. Add small white bobble clusters to tips to mimic snow by stitching small white puff knots to selected outer dc tips.
— Snowman (Make 1 or more) :
Ball 1 - Base Round 1 :
6 sc in mr (6)
Ball 1 - Round 2 :
6 inc (12)
Ball 1 - Round 3 :
(1 sc, inc) x 6 (18)
Ball 1 - Round 4 :
(2 sc, inc) x 6 (24)
Ball 1 - Round 5 :
(3 sc, inc) x 6 (30)
Ball 1 - Round 6-9 :
1 sc in each st (30) — work 4 rounds to build height
Ball 1 - Round 10 :
(3 sc, dec) x 6 (24)
Ball 1 - Round 11 :
(2 sc, dec) x 6 (18)
Ball 1 - Round 12 :
(1 sc, dec) x 6 (12)
Ball 1 - Round 13 :
6 dec (6) — finish off leaving long tail and stuff firmly
Info :
This is the medium-size ball (the snowman base). Make a smaller top ball using the same steps but stop at Round 6-7 to create a smaller sphere for head. Stuff firmly but not overstuffed to keep shape; sew head to base securely with invisible stitch.
Snowman Face and Accessories :
Sew on two small black buttons or beads for eyes, embroider a smile with black yarn, and crochet a carrot nose: ch4, sl st back along the chain into first ch to form a small cone; stuff lightly and sew to face. Make a tiny top hat: ch 10, sc across to form brim, then work a small cylinder for crown (use 4 mm hook for tighter fabric). Make a scarf: ch 30, hdc back across, fasten and tie around neck.
Info :
Attach the snowman to runner at a pinned location. Sew through bottom ball into runner base with several passes for stability. Add 2-3 large black buttons down the front and a stitched smile for personality.
— Lamp Post (Make 2) :
Post - Round 1 :
Ch4, sl st to form a small ring, round 1: 8 sc into ring (8)
Post - Round 2-6 :
1 sc in each st (8) — work 5 rounds to create a slender post
Post - Info :
For extra rigidity, insert a pipe cleaner or wire into the post cylinder before closing and secure wire end into base so the lamp stands straight. Cover wire with yarn so it is hidden and soft to work with.
Lantern - Round 1 :
Make base ring: 6 sc in mr (6)
Lantern - Round 2 :
6 inc (12)
Lantern - Round 3 :
1 sc in each st (12)
Lantern - Round 4 :
Change to yellow or gold inside to represent lantern light: 1 sc in each st (12) and fasten off leaving tail to sew to top of post
Info :
Sew lantern to top of post and attach to runner; you can add a tiny flickering LED tealight inside if you want actual light (secure battery pack underneath runner surface away from heat sources).
— Presents and Small Balls (Make multiple) :
Present - Round 1 :
6 sc in mr (6)
Present - Round 2 :
6 inc (12)
Present - Round 3 :
1 sc in each st (12)
Present - Round 4 :
Fold flat, sc around to join edges and make a small cube; add contrasting yarn ribbons by sewing narrow chain strips across top and knotting in center to form bows
Info :
Make several presents in varying sizes and colors. Attach them with a few sewing passes to prevent shifting on the runner's surface.
— Small Fence (Make 2) :
Post - Round 1 :
6 sc in mr (6)
Post - Round 2-3 :
1 sc around (6) — make 4 tiny posts and join them horizontally with ch10 sl sts, then secure with sc into posts to form fence slats; fasten off and stitch onto runner
Info :
Stain look: use brown yarn and add a darker single embroidery stitch along post edges for wood grain effect. Secure fences with several sewn passes so they withstand handling when runner is moved.
— Assembly and Placement :
Info :
Layout: place the three houses along the center in staggered positions with ponds nearby and trees clustered around them. Place the snowman and presents near one end as a focal point. Lamp posts sit near houses close to 'pathways'. Pin all pieces in position before sewing.
Info :
Sew each piece: use long tails and whip stitch or ladder stitch to the runner base. When sewing heavy pieces (houses), add an internal anchoring stitch through runner and house base several times to secure. Use small, even stitches to keep seams tidy and nearly invisible.
Info :
Add decor: sew tiny beads and gold sequins near berries and presents with small knots on underside. For snowy details on trees and roofs, sew small white puff clusters and secure ends invisibly. Trim and tidy all ends on underside.
Info :
Blocking: lightly steam-block the runner laying flat on a towel; do not press hard onto small 3D pieces. Reshape scallops if needed after blocking.
Info :
Storage and care: spot clean when needed; if machine washing becomes necessary use a mesh bag on very gentle cycle and reshape immediately. Avoid tumble drying to keep puff texture intact.
This Christmas village runner is a joyful project that turns yarn into a miniature winter wonderland — each puff of snow, layered tree, and tiny rooftop builds a story. Working through the modular motifs and charming 3D details is incredibly rewarding, and the finished runner becomes an heirloom centerpiece you will bring out year after year. I hope this pattern brings cozy holiday cheer to your home and inspires you to customize your own village scenes. 🧶🏠🎄