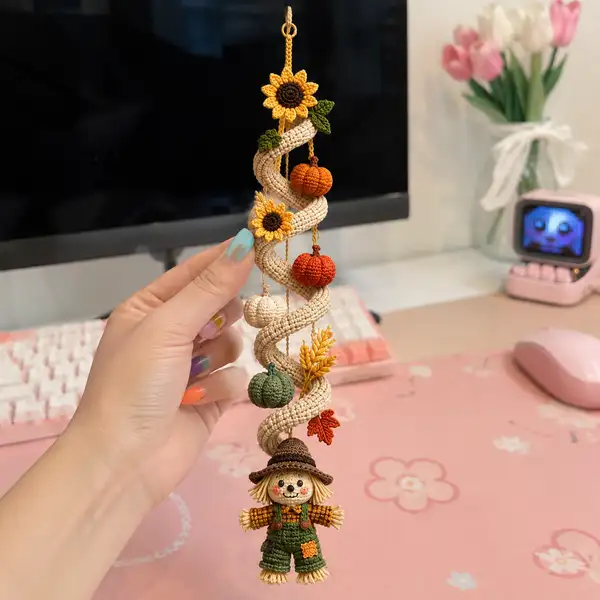
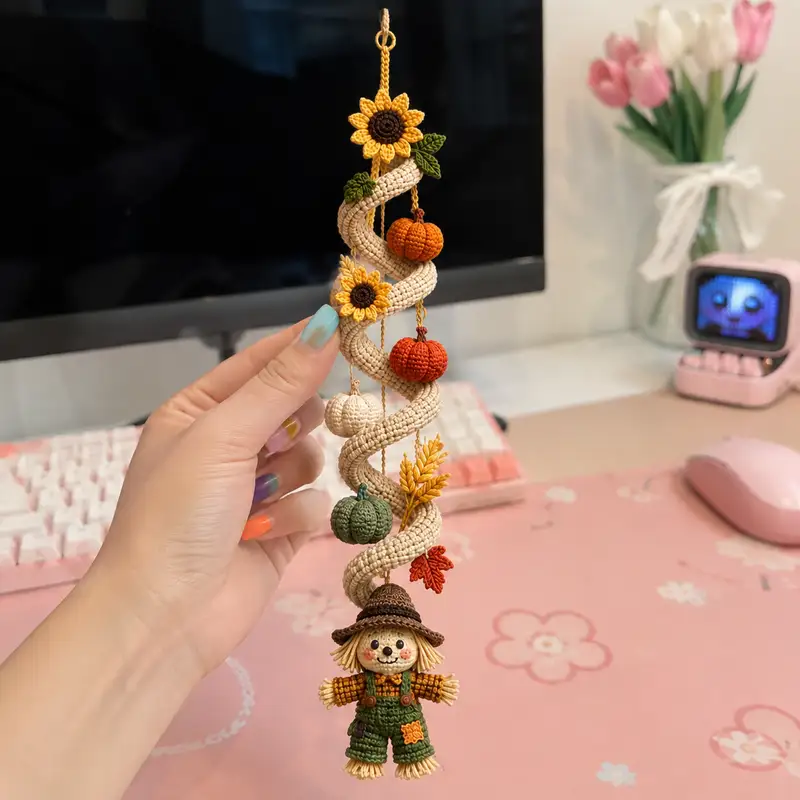
A charming autumn spiral garland featuring a coiled neutral rope studded with tiny crocheted pumpkins, sunflowers, wheat sprigs, leaves and a tiny scarecrow. Designed to hang as seasonal decor, this piece mixes warm oranges, greens and golds with a neutral spiral for a cozy, harvest-time look. The pattern includes detailed stitch-by-stitch instructions for every small piece and assembly guidance for a professional finish.
Progress Tracker
0% Complete
— Spiral Rope :
Round 1 :
6 sc in magic ring (6)
Round 3 :
(1 sc, inc) x 6 (18)
Round 4 :
(2 sc, inc) x 6 (24)
Info :
We are creating a narrow tube to be coiled later. The neutral beige yarn used here should be worked tightly; use a 2.0mm hook or slightly smaller than the yarn recommends. If you want a slightly thicker spiral, use more increases to reach 30 sts circumference instead of 24.
Round 5 :
1 sc in each st (24)
Round 6 :
1 sc in each st (24)
Round 7 :
1 sc in each st (24)
Round 8-15 :
1 sc in each st (24)
Info :
At this point start measuring the rope length as you work. The finished item pictured uses approximately 60 rounds at 24 sts = a length that coils into 5-6 visible spirals. If you want a longer garland use more rounds. Maintain even stuffing as you progress.
Round 16-25 :
1 sc in each st (24)
Info :
Insert flexible craft wire into the tube now if you plan to have the spiral hold its shape firmly. Feed the wire through the center of the tube; fold a small loop at one end and anchor with a few running stitches to the inside to prevent sliding. Leave a long tail of wire at the top for anchoring/hanging.
Round 26-40 :
1 sc in each st (24)
Info :
Stuff the tube very lightly as you work if you plan to coil it. Use small amounts of fiberfill to keep the tube pliable. Overstuffing makes tight coils harder to form. Keep the tube slightly flexible so the wire can bend it into a spiral.
Round 41-63 :
1 sc in each st (24)
Info :
When you've reached the desired length (the sample uses rounds up to 63 resulting in approximately 50-60 cm of tube length depending on gauge), fasten off leaving a long tail suitable for sewing the bottom ornaments. If you started with a loop of wire at the top, leave the loop exposed for hanging; you can cover this loop with a few sc rounds in the same yarn or finish later with a crocheted chain cover.
Round 64 :
Fasten off and weave in ends securely, keeping tube open at both ends until ornaments are secured
Info :
To create a neat top hanging loop: attach yarn at top edge, ch 30 (or desired length for hanging loop), sl st to the top of the tube, fasten off and weave ends. Alternatively cover the wire loop with spiral sc by working rounds around the loop.
— Small Pumpkins (Make 5 total in different colors) :
Round 1 :
6 sc in magic ring (6)
Round 3 :
(1 sc, inc) x 6 (18)
Round 4 :
(2 sc, inc) x 6 (24)
Round 5-7 :
1 sc in each st (24)
Info :
Use slightly thicker stuffing in the body of each pumpkin to get a firm, rounded shape. For the ridged pumpkin look, we will create longitudinal ribs later using surface slip stitches or by sewing with a contrasting yarn around segments after stuffing.
Round 8 :
(2 sc, dec) x 6 (18)
Round 9 :
(1 sc, dec) x 6 (12)
Info :
Before closing completely, stuff firmly. To create the pumpkin 'ribs' take a long length of contrasting/identical yarn, knot and secure at the top center (or bottom), then run the yarn under the stitches evenly around the pumpkin and pull gently to indent creating segments (6-8 segments depending on your preference). Fasten securely and hide ends inside.
Round 11 :
Fasten off leaving long tail for sewing (6). Embroider or crochet a tiny stem (ch 3, 3 sc in 2nd ch from hook, sl st back into pumpkin top) and sew to the top. Create a hanging loop by sewing a short chain to top if desired.
Info :
Make pumpkins in bright orange, rust, cream and green. The green pumpkin follows the same rounds but use green yarn; for cream pumpkin use off-white. Adjust stuffing for slightly flatter look for decorative variety.
— Sunflower (Make 2) :
Round 1 :
6 sc in magic ring with dark brown (6)
Round 3 :
(1 sc, inc) x 6 (18)
Info :
The sunflower center is a small, flat disc. Work tightly so the petals have contrast and the center sits slightly recessed. We will crochet row of petals around this center next.
Round 4 :
1 sc in each st (18)
Round 5 :
Change to mustard yellow yarn. *Ch 6, sl st into next st* around 18 times to form 18 petals. Fasten off and weave ends (18 petals)
Round 6 :
To create fuller petals: join yarn at base of each chain petal, work 4 sc into each ch-6 loop to form a fuller petal. This yields a layered look; fasten off after completing petals.
Info :
Sew the sunflower to the spiral rope by using the long tail at the back of the center. Pin to rope in desired position and sew through several stitches of the rope tube for secure hold. Add 1-2 small embroidered green leaves with dark green yarn near each sunflower.
— Small Leaf Motifs (Make 4) :
Round 1 :
ch 6, sl st to first ch to form small ring (or mr 6). This leaf is worked flat
Round 2 :
Work along chain: sc in next 2 ch, hdc in next ch, dc in next ch, hdc in next ch, sc in last ch. Turn and work along opposite side: sc, hdc, dc, hdc, sc. Sl st to base. Fasten off and shape leaf by folding slightly and stitching central vein.
Info :
Make leaves in dark green and olive; leave long tails for sewing to the spiral rope. For maple-shaped leaf (red-orange), increase the number of chains and create pointed lobes by replacing some sc with dc to make prominent points.
— Wheat Sprig (Make 2) :
Round 1 :
ch 12 for a short stalk
Round 2 :
Working back along the chain: *sl st, ch 3, sl st in next ch* to create grain loops across the top 6-8 chs. Fasten off leaving a long tail to sew. Trim loops at an angle to create tapered wheat head.
Info :
Use mustard or pale yellow yarn. After trimming loops, lightly brush them with a soft toothbrush to fluff and mimic wheat. Sew the stalk to the rope between coils.
— Maple Leaf Accent :
Round 1 :
ch 8, in 2nd ch from hook: sc, hdc, dc, tr, dc, hdc, sc across; turn to work back along chain to shape symmetrical lobes: sl st, ch 3, sl st into base at 3 points to create a serrated shape. Fasten off and shape.
Info :
Use red-orange yarn for an autumnal color. Leave long tail for sewing and pinch the leaf midlines slightly to create natural veins.
— Tiny Cream Gourd :
Round 1 :
6 sc in magic ring (6)
Round 3-4 :
1 sc in each st (12)
Round 5 :
(1 sc, dec) x 4 (8)
Round 7 :
Stuff, fasten off leaving long tail to sew (4)
Info :
For realistic variety, make one small cream gourd; sew into rope as a hanging ornament on short chain. Use a long tail to create a loop and attach to rope by weaving through several stitches and knotting inside.
— Scarecrow Doll — Head :
Round 1 :
6 sc in magic ring with skin-tone yarn (6)
Round 3 :
(1 sc, inc) x 6 (18)
Round 4 :
(2 sc, inc) x 6 (24)
Round 5 :
(3 sc, inc) x 6 (30)
Info :
Place safety eyes between rounds 10-11 about 6-8 sts apart, or embroider eyes later for child-safe toy. Mark the center line and eye positions before adding features.
Round 6-9 :
1 sc in each st (30)
Round 10 :
(4 sc, inc) x 6 (36)
Round 11-15 :
1 sc in each st (36)
Info :
Begin lightly stuffing head from round 11 onward. Use small amounts of fiberfill to shape cheeks and forehead. For a slightly flattened nose, embroider a short stitch at center between eyes later.
Round 16 :
(4 sc, dec) x 6 (30)
Round 17 :
(3 sc, dec) x 6 (24)
Round 18 :
(2 sc, dec) x 6 (18)
Round 19 :
(1 sc, dec) x 6 (12)
Round 20 :
6 dec (6). Fasten off leaving long tail for sewing to body. Finish stuffing firmly and shape the neck area slightly flattened for seam to body.
Info :
Embroider small freckles and rosy cheeks with light blush or embroidery thread now before attaching hair and hat. For blush: use a small amount of powdered eyeshadow or blush dabbed with a cotton swab and fixed with a textilereinforcer if desired.
— Scarecrow Doll — Body :
Round 1 :
6 sc in magic ring with green yarn (6)
Round 3 :
(1 sc, inc) x 6 (18)
Round 4 :
(2 sc, inc) x 6 (24)
Round 5 :
(3 sc, inc) x 6 (30)
Round 6-9 :
1 sc in each st (30)
Info :
Work the body as a slightly flattened pear to allow legs and arms to be sewn on smoothly. You can add small patch pockets by changing to orange yarn for 3 rounds of BLO and sewing a square patch later.
Round 10 :
(4 sc, dec) x 6 (24)
Round 11-14 :
1 sc in each st (24)
Round 15 :
(2 sc, dec) x 6 (18)
Round 16 :
(1 sc, dec) x 6 (12)
Round 17 :
6 dec (6) - do NOT fasten off. Leave opening for stuffing and for attaching the head as well as legs. Stuff moderately firm for stability.
Info :
Insert a little stuffing and keep an opening large enough to sew the head with a ladder stitch. We will attach legs later. If you want the scarecrow to hang rather than stand, adjust stuffing to be lighter.
— Scarecrow Doll — Arms (Make 2) :
Round 1 :
6 sc in magic ring with orange checked yarn for sleeve (6)
Round 3-4 :
1 sc in each st (12)
Round 5 :
Change to skin-tone yarn. (1 sc, dec) x 4 (8)
Round 6 :
1 sc in each st (8)
Round 7 :
Stuff hand lightly; round 1 sc around to close slightly or leave open for straw fringe
Round 8-12 :
1 sc in each st (8) working length for lower arm and upper sleeve. Use orange/checked yarn for sleeve pattern; change colors every 3 rounds for a plaid effect
Info :
Insert a small piece of folded straw-like yarn or fringed raffia into the hand opening for straw effect if desired. Stuff arms sparingly; they should be a little floppy to look like straw-filled sleeves.
Round 13 :
Dec around as needed to taper toward shoulder: (1 sc, dec) x 2 (6)
Round 14 :
1 sc in each st (6). Fasten off leaving long tail for sewing to body. Repeat for second arm.
Info :
Pin arms to body at side positions about 6-8 stitches down from the head seam. Sew firmly through front and back of body and through arm top to secure.
— Scarecrow Doll — Legs (Make 2) :
Round 1 :
6 sc in magic ring with green yarn for pants (6)
Round 3 :
(1 sc, inc) x 6 (18)
Round 4-6 :
1 sc in each st (18)
Round 7 :
Switch to straw-color for shoe fringe or cuff: 1 sc in each st (18)
Round 8 :
(2 sc, dec) x 6 (12)
Round 9 :
1 sc in each st (12)
Round 10 :
(1 sc, dec) x 4 (8)
Round 11 :
Stuff feet fairly firm, then continue 1 sc in each st (8)
Round 12-15 :
1 sc in each st (8) to create legs length. Fasten off leaving long tail for sewing. Repeat for second leg.
Info :
Sew legs to bottom of body so that the scarecrow can hang. If desired flatten feet slightly and sew through multiple rounds of the body to anchor securely.
— Scarecrow Doll — Hair (Straw) :
Info :
Cut multiple short lengths (approx 4-6 cm) of light beige yarn. Group 6-8 strands, fold in half and use a latch hook or crochet hook to pull through stitches around the head circumference at the top and sides for straw hair. Trim ends to shape. Secure with a few whip stitches and add a brown hat on top.
— Scarecrow Doll — Hat :
Round 1 :
6 sc in magic ring with dark brown (6)
Round 3 :
(1 sc, inc) x 6 (18)
Round 4-5 :
1 sc in each st (18)
Round 6 :
(2 sc, inc) x 6 (24)
Round 7 :
Work a wide brim by switching to a slightly wider hook: *2 sc in next st, ch 1, sl st in next st* around (24) then work one round of sc around the edge to neaten.
Info :
Sew hat to the top of the head over the straw hair, anchoring with a few stitches so it sits slightly tilted like the sample. Add a small loop of twine or braid a tiny raffia band as hat trim.
— Scarecrow Doll — Finishing Touches :
Info :
Sew head to body by aligning the neck (head round 20 open edge) to the top opening of the body. Use a yarn needle and mattress stitch or ladder stitch to create an invisible seam. Add embroidered mouth and nose with dark brown yarn and tiny patches on overalls with orange yarn. Add straw fringe under sleeves and pant legs by sewing short lengths of yarn poking out to resemble straw stuffing.
— Assembly & Hanging Ornaments Placement :
Info :
Plan placement before sewing. The photographed sample has: sunflower at the top-most visible coil, orange pumpkin hanging from the first coil, cream pumpkin hanging from the second coil, green pumpkin hanging from third coil, small red-orange pumpkin between coils, wheat sprig near lower coils, and the scarecrow anchored at the very bottom. Use pins to map positions first.
Info :
To attach ornaments: create short chains (ch 12-18, or desired drop length) in mustard or beige yarn, fold in half and sew both ends into the ornament top and into the rope tube between stitches. Alternatively, sew ornaments directly to tube using long tails. Make sure weight distribution is even so the spiral hangs balanced.
Info :
Secure all sewn joins with multiple passes of yarn, then weave ends into the nearest interior space of the spiral tube to hide them. If you used craft wire as the core, tuck the ends into the tube and wrap with extra yarn before finishing to prevent poking out.
Info :
Use a light spray of fabric stiffener on the sunflowers and leaves if you want them to hold shape with time. Avoid stiffener near yarn-dyed items that may darken when treated.
This cozy autumn spiral garland brings seasonal charm to any room — the neutral coil is the perfect stage for bright pumpkins, sunflowers and a sweet scarecrow dangling at the bottom. Each tiny embellishment is lovingly crocheted and stitched in place to create a compact, decorative story. I hope you enjoy assembling each small detail as much as I did designing them — every stitch adds personality and warmth to your home. 🍁🧶🎃