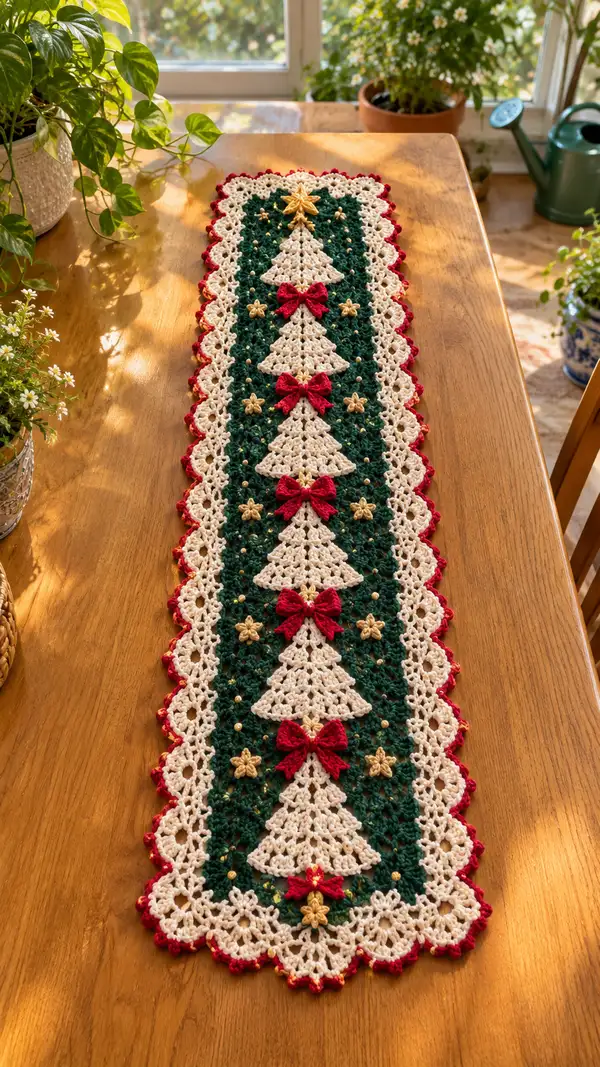
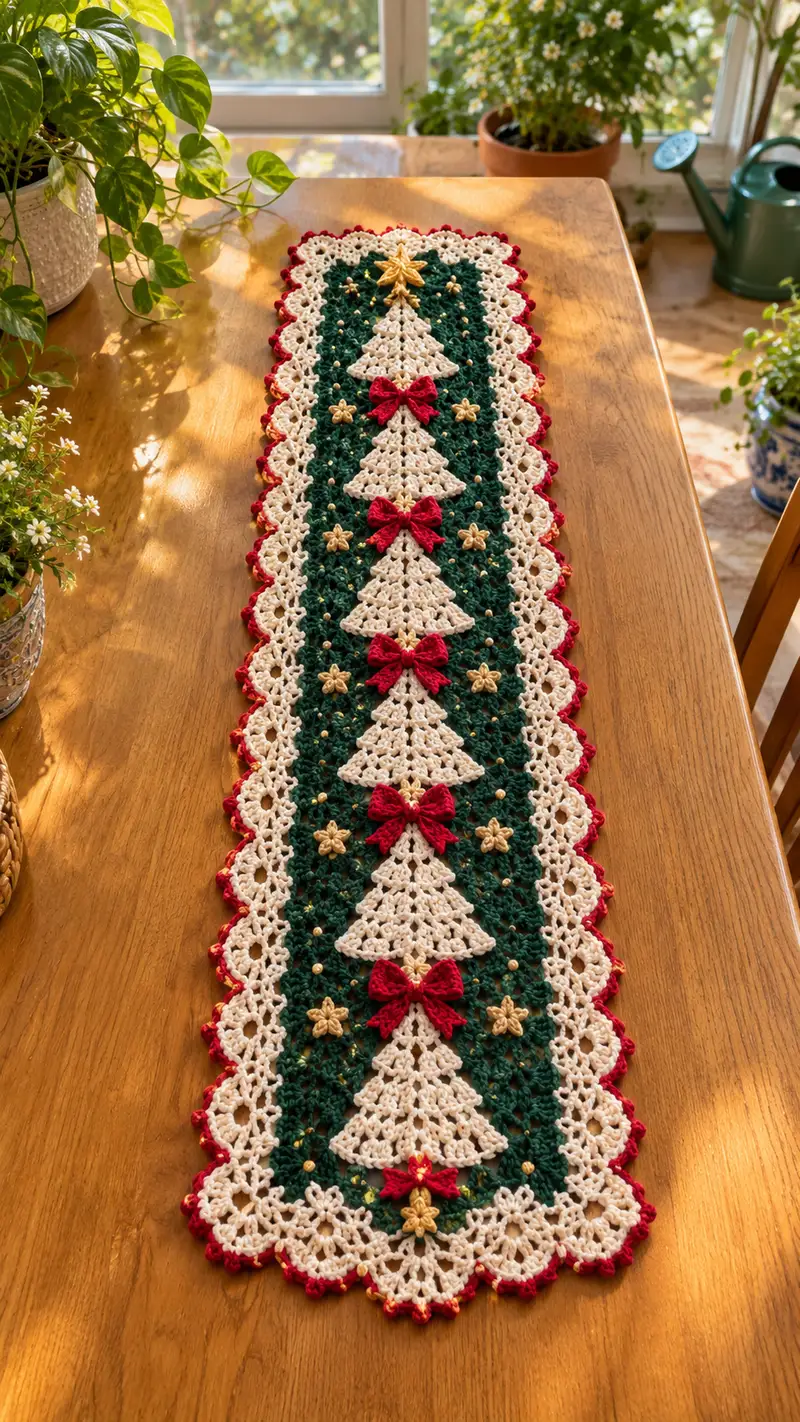
A festive, lacy table runner featuring five stacked cream tree motifs on a deep forest green background, finished with a scalloped cream lace border, red bows and gold star accents. This decorative runner is ideal for holiday centerpieces, with delicate openwork, pearl-like beads and a bright red picot edging to frame the design. The pattern uses classic shell and cluster stitches to create airy texture, combined with simple applique9 bows and star motifs for holiday charm. Suitable for creating a long runner to fit dining tables or sideboards.
Progress Tracker
0% Complete
— Overview :
Info :
This pattern is modular: make a single central tree motif unit and repeat it down the center to create the desired runner length. Each tree motif is worked flat as a triangular shell-cluster triangle. The surrounding forest-green panel is a lattice/trellis worked in rows and joined to each tree's edges. A wide cream lace border is worked around the entire assembled panel, followed by red picot scallops. Add red bows and gold star applique9s and sew gold beads for highlights. All motifs are worked in worsted weight yarn unless stated otherwise.
Gauge :
Gauge is flexible for a runner. Sample gauge: 10 shells = 4 inches measured across 4–5 shell rows with 4.0mm hook in worsted weight yarn. Adjust hook if you prefer a denser or more open lace.
Size :
The photographed runner measures approximately 10 x 42 inches (25 x 107 cm) using 5 tree motifs. To lengthen, repeat the central tree module additional times. Width can be adjusted by adding or removing border repeats (see assembly notes).
— Center Tree Motif (Make X depending on desired length – photo uses 5) :
Info :
The tree motif is worked flat in rows (here called rounds for consistency). Each 'round' builds one tier of the tree using 3-dc shells separated by ch-1 spaces; cluster counts increase by two clusters each row to form a symmetrical triangle. These counts are given as cluster counts (shells) rather than raw stitch counts—each shell is 3 dc in the same space unless otherwise specified.
Round 1 :
Make a magic loop or ch4 and join into a ring. Work 3 dc into ring (form first shell) - create a small central cap then ch1 and work 2 more shells into same ring for a total of 3 shells (3 shells)
Round 2 :
Ch3 (counts as first dc), turn. Work 1 shell (3 dc) into the ch-1 space between shells where needed to create increases at both edges and between existing shells so that you wind up with 5 shells across (5 shells)
Round 3 :
Ch3, turn. Work shells into each ch-1 space and add shells at both outer edges so total shells now 7 (7 shells)
Round 4 :
Ch3, turn. Repeat shell placement across; add shell at each edge to increase to 9 shells (9 shells)
Info :
Always begin each round with ch3 (counts as a dc) where specified; when placing the edge increase, work an extra shell into the edge space so the triangle grows symmetrically. Keep counts accurate: shells increase by two each round.
Round 5 :
Ch3, turn. Work shells into each ch-1 space across to bring shell total to 11 (11 shells)
Round 6 :
Ch3, turn. Continue adding shells at each outer edge and into the interior ch-1 spaces to bring to 13 shells (13 shells)
Round 7 :
Ch3, turn. Continue (15 shells)
Round 8 :
Ch3, turn. Continue (17 shells)
Info :
Check your edge symmetry every two rounds. The tree's tiers should form a pleasing triangular silhouette. Use stitch markers at the first and last shell of each row if helpful to track edge increases.
Round 9 :
Ch3, turn. Work shells across to 19 shells (19 shells)
Round 10 :
Ch3, turn. Work shells to 21 shells (21 shells)
Round 11 :
Ch3, turn. Work shells to 23 shells (23 shells). Fasten off and weave in tail. This completes one tree motif triangle approximately the width needed for the central column in the photo. Make as many tree motifs as required for your runner length (photo used 5 trees with small seams between).
Info :
Blocking tip: Pin each tree flat to a small blocking mat to open shells slightly and keep triangle shape crisp. Blocking before joining makes the seam lines lie flat.
— Forest Green Background Panel (Make central panel matching number of trees & spacing) :
Info :
The green panel is worked as a long rectangle in rows with an open trellis or lattice stitch (shell and ch spaces) designed to accommodate the insertion of tree motifs down the center. You can work an entire rectangle first and then sew in trees, or work narrow strips and join-as-you-go around tree edges. These rounds are rows across the width of the runner. Beginning with foundation chain measured to match the width needed to hold the tree bases and side borders approximately 10" wide as photographed. Adjust chain to accommodate more or fewer shells across; below instructions assume starting chain to accommodate 23-shell tree plus side spacing: foundation chain of 71 chains (this is an example starting point for the photographed width). Adjust as necessary.
Round 1 :
With green, ch71 (or adjust for your width). Row 1: dc in 4th ch from hook (counts as first dc), *ch1, skip 1, dc in next; rep from * across to last ch, end with dc in last ch. Turn. (approx 68 dc and ch-1 sps across; counts vary with width)
Round 2 :
Ch3, turn, *skip next dc, shell in next ch-1 space: (dc3 in ch-1 sp), ch1, sk next dc; rep across placing shells in ch-1 spaces, end with dc in top of turning ch. This creates a open shell lattice. (Shell count across will equal approx half number of ch-1 spaces)
Round 3 :
Ch3, turn. Work dc across into each shell top and ch-1 spaces to create alternating rows: *dc in each shell top, ch1, dc in next ch-1 sp; rep to end. This evens out a mesh suitable for attaching tree edges. (Even row)
Round 4 :
Ch3, turn. Repeat Round 2 to reintroduce shells creating a lacy texture. Continue alternating Row 2 and Row 3 style pattern to build body of panel.
Info :
Work the green panel until its length reaches the measurement needed to accommodate the number of tree motifs with about 1 shell row of spacing between each tree apex and base, leaving extra rows at top and bottom for border joining. In the photo the green panel between the cream side borders spans approximately 34 rows; adjust based on the number of trees. Keep counts even and consistent.
Round 5-12 :
Repeat Rounds 2-3 alternation to build the panel; maintain established stitch pattern. Check alignment of shell rows so tree apexes will align to the center row of shells. (work 8 rows – maintain pattern)
Round 13 :
Info : Plan tree placement—measure and mark the center column of the panel with stitch markers where each tree apex and base will sit. For the photographed runner, place tree apex markers every 8 rows by counting shell-row repeats to fit five trees.
Round 14-24 :
Continue alternating the lattice shell and dc rows. Maintain symmetry. (add 11 more rows)
Round 25 :
Work two even dc rows to establish a firm base around tree bases and to make sewing-in points for the cream tree bases. Ch3, turn, dc across; next row ch3, turn, dc across. (2 stabilizing rows)
Round 26-34 :
Continue the shell/dc alternating pattern for another 9 rows or until panel reaches desired length to insert all tree motifs plus spacing allowances (finish with a final even dc row to prepare for border join). (finish panel length as required)
Info :
When your green panel is complete, block it flat. If you plan to join tree motifs by whip-stitch, position trees on the panel and baste with safety pins or large-tack pins before sewing to ensure even spacing.
— Joining Tree Motifs To Panel :
Round 1 :
Info : Lay your green panel flat. Position your first cream tree with its apex marker aligned to the first apex marker on the green panel. The base of the tree should rest over the stabilizing even dc rows. Pin in place with rustproof pins. Space tree motifs evenly down the center (photo spacing approx 7–9 shell rows between each tree apex and the next tree base).
Round 2 :
Sew each tree to the panel using a neat whip stitch or mattress stitch along each side of the tree, catching only a few threads of the green fabric so the join is invisible. Use cream yarn for an invisible join. Stitch through the bases for extra stability at the bottom of each tree. Sew all trees before moving to the border to ensure even alignment.
Info :
For a join-as-you-go approach: stop your green panel two rows short where you want to insert a tree, place the tree edge along the unfinished edge and use sl sts to join shells into corresponding ch-1 spaces of the panel as you work the final rows. This takes more planning but gives a seamless look.
— Cream Lace Side Border (Work both sides the same, join to panel) :
Info :
The cream lace panels are worked as long strips and then sewn to either side of the green panel, or worked as a continuous round around the entire assembled rectangle. The lace uses fan shells and picot details to create scalloped edges. The photographed border is wide and lacy, approximately 2.5 inches of lace per side.
Round 1 :
With cream, attach yarn at top left corner of the green panel. Ch4 (counts as tr), *skip next dc, work 5 dc fan in next ch-1 space (fan = dc5 in same sp), ch2, sk next dc, sl st into next dc across to create small bridge; rep along length to form alternating fans and bridges. Work until you reach bottom corner. Turn. (fan count will match number of ch-1 spaces along edge)
Round 2 :
Ch3, turn. In the center of each fan work: (dc2, ch1, dc2) forming a double fan stacked atop prior fan, then in each bridge do sl st and ch3 to create airy loops. Repeat to end. This builds a layered lace effect. (fans doubled)
Round 3 :
Ch3, turn. Work a shell (dc3) into each ch-1 sp created in previous round and add a small scallop of (sc, ch2, sc) in the bridge loops to define the lace edge. (evening row)
Round 4 :
Info : Continue building the lace by repeating a fan-row and then a scallop-row. The layered fans create depth and openwork that frames the central green panel. Work these pattern repeats until the cream border measures approximately the same length as the green panel with tree placement aligned (photo used 34 rows of lace layering to match panel height).
Round 5-12 :
Repeat fan, double-fan, scallop sequence for a total of 8 additional pattern repeats to build width. Remember to maintain equal number of fans so the bottom and top align. (repeat sequence)
Round 13 :
Work final scallop defining row: *(sc, ch2, sc) across each bridge loop, then sl st into next fan center; rep to end. Fasten off and weave ends. Repeat all steps for the other side border. Alternatively, work border continuously around the entire perimeter if desired (use corner increases where two panels meet).
Info :
Pin borders to panel before sewing. Use small whip-stitches taking only a few green and cream loops to attach — this makes the seam less visible. For a more seamless join, use a sl st join along the seam if working borders while the panel is on hook.
— Red Bow Applique9 (Make 4–6 as desired) :
Info :
Small red bows are worked flat and cinched in the center to create a decorative bow. Make one bow between each tree pair and one at the top and bottom as shown. Bows are lightweight and should be sewn flat on the runner over the tree junctions. Use a smaller hook (3.5mm) for slightly tighter stitches if desired.
Round 1 :
With red, ch20. Row 1: sc in 2nd ch from hook and across (19 sc). Turn. (19 sc)
Round 2 :
Ch1, sc across in back loops only (BLO) (19 BLO sc). Turn. This ridge helps bow texture.
Round 3 :
Ch1, sc across both loops (19 sc). Fasten off leaving 8–10" tail. Fold piece in half widthwise so edges meet and use tail to stitch seam closed lengthwise, creating a narrow tube. Pull seam tight and position seam to the back of bow.
Round 4 :
Info : Form the bow by pinching the center of the tube to form classic bow loops. Wrap the long tail tightly around the center several times to cinch the bow. Tie off and weave tail inside the bow to secure. Add a small dab of glue or tack stitch if you want extra security.
Round 5 :
Make a small bow-knot: ch6, sl st in 2nd ch from hook, sc in next 3, sl st to base, fasten off leaving long tail for sewing. Use this narrow strip to wrap over center and stitch in place.
Info :
Lightly stuff the bow center if you want it to puff slightly, but in the photo bows are mostly flat and decorative. Pin bows to runner at intended positions (center of tree joins) and sew securely with yarn needle and matching red yarn using small whip stitches. Make sure the bow sits flat against the lace and is centered on the tree seam.
— Gold Star Applique9 (Make one between each tree and at ends) :
Info :
Small decorative stars are made using a round cluster technique and are lightly stuffed with a tiny bit of fiberfill if you want dimension. The star in the photo is a 6-point star made with gold yarn and sewn over the green background between the trees and at the top and bottom.
Round 1 :
With gold yarn, make magic ring. Ch2 (counts as hdc), work 6 hdc into ring, pull ring tight and sl st to top of ch2. (6 hdc)
Round 2 :
Ch2, *in next st work (tr, ch1, tr) to form one point, sl st into next st to anchor point; rep from * around to form 6 points total. Fasten off leaving tail for sewing. (6 points)
Round 3 :
Info : If you prefer a flatter star, work smaller stitches: ch3, sc around and work picot in each point. For a puffier star, add a small knot of fiberfill under the center before sewing onto runner. Sew stars down with gold yarn and a needle through center and each point for stability.
— Adding Beads and Gold Accent Stitches :
Round 1 :
Info : Place beads in the small ch-1 spaces of the green lattice to mimic the photograph's scattered gold beads. Use a small tapestry needle and thread beads onto a length of embroidery thread or thin yarn. Sew through fabric from back to front, pass bead on, then go back down through the same hole and pull snug. Tie off at back and hide tails by weaving into the lace. Space beads evenly — in the photo bead spacing is roughly one bead per 6–8 shell clusters in the central panel.
Round 2 :
Tip : Sew beads after attaching motifs and border but before final blocking. That makes it easy to maneuver and adjust spacing while the runner is flat.
— Red Picot Scallop Edging (Final outer edge, continuous) :
Info :
The final red edging is worked continuously around the entire runner perimeter if desired, or just along the outer edge of the cream lace border. The edging uses small shell clusters with picot tips to create the bright punctuated scallops seen in the photo. Use a 3.5–4.0mm hook for crisp picots.
Round 1 :
Join red yarn at a bottom corner with sl st. Ch1, sc around the edge picking up one stitch in each outer loop of the cream scallop; when you reach the center of each cream scallop, work (dc3, picot, dc3) to create a pronounced red scallop. (work around entire runner)
Round 2 :
Picot definition: picot = ch3, sl st into 3rd ch from hook (small pointed bump). After each (dc3) group, ch3 and picot into center of group, then continue sc in outer loops. Repeat down length. Fasten off and weave ends.
Info :
To get the exact red bead-like dots seen between scallops, you can add one small satin or pearl-like bead at the tip of each picot using thin thread and a small needle, stitching through the picot and catching the underside of the edging before knotting off.
— Optional: Beaded Outline And Additional Gold Wire Accent :
Info :
If you want extra sparkle, stitch a single row of small gold beads just inside the cream lace border, spaced uniformly. Use fine jewelry wire or embroidery thread for secure attachment. If using wire, ensure ends are tucked into stitches and not exposed to prevent scratching table surfaces.
— Finishing, Blocking and Care :
Round 1 :
Info : After all applique9s are attached and beads added, wash gently by hand in lukewarm water with a mild detergent if yarn permits. Press water out gently and pin the runner flat to blocking board or towels, stretching to perfect rectangular shape and scalloped edges. Leave to dry thoroughly.
Round 2 :
Weave all ends on wrong side of runner and trim. Make sure all applique9 edges are sewn securely; reinforce bows with a few extra stitches under the center if they will be handled often.
Info :
Storage tip: Store the runner flat or gently rolled with acid-free tissue paper between folds. Avoid storing with heavy objects on top to preserve scallops and bows.
This classic Christmas table runner blends lacy crochet technique with festive color for a heirloom tabletop accent. The cream tree motifs and scalloped border give a delicate, handmade feel while red bows and golden stars add joyful sparkle. It's a heartwarming project you'll be proud to display each season. 🧶✨🎁