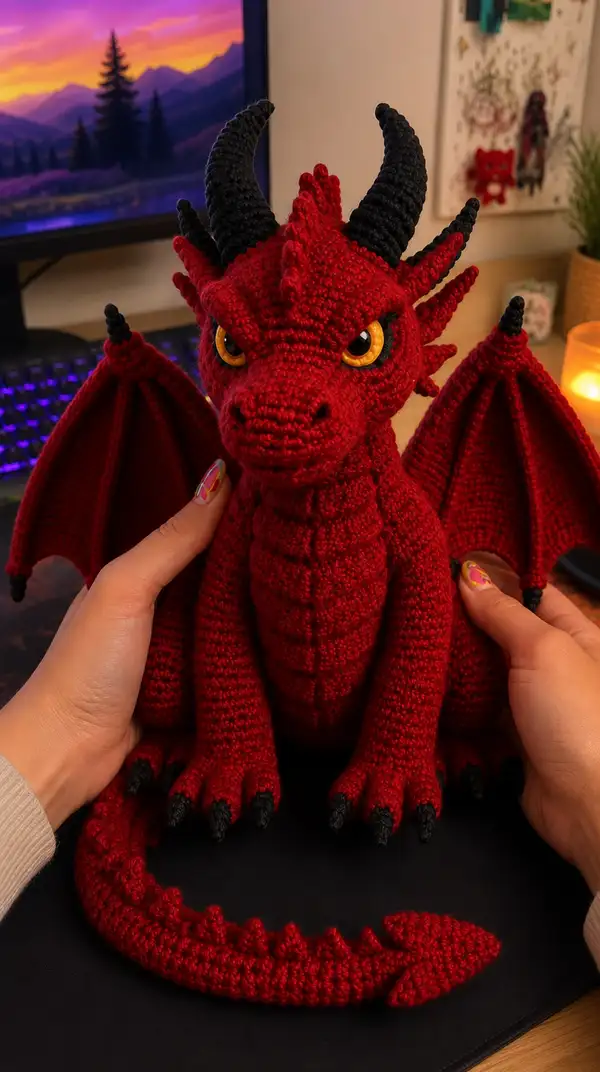
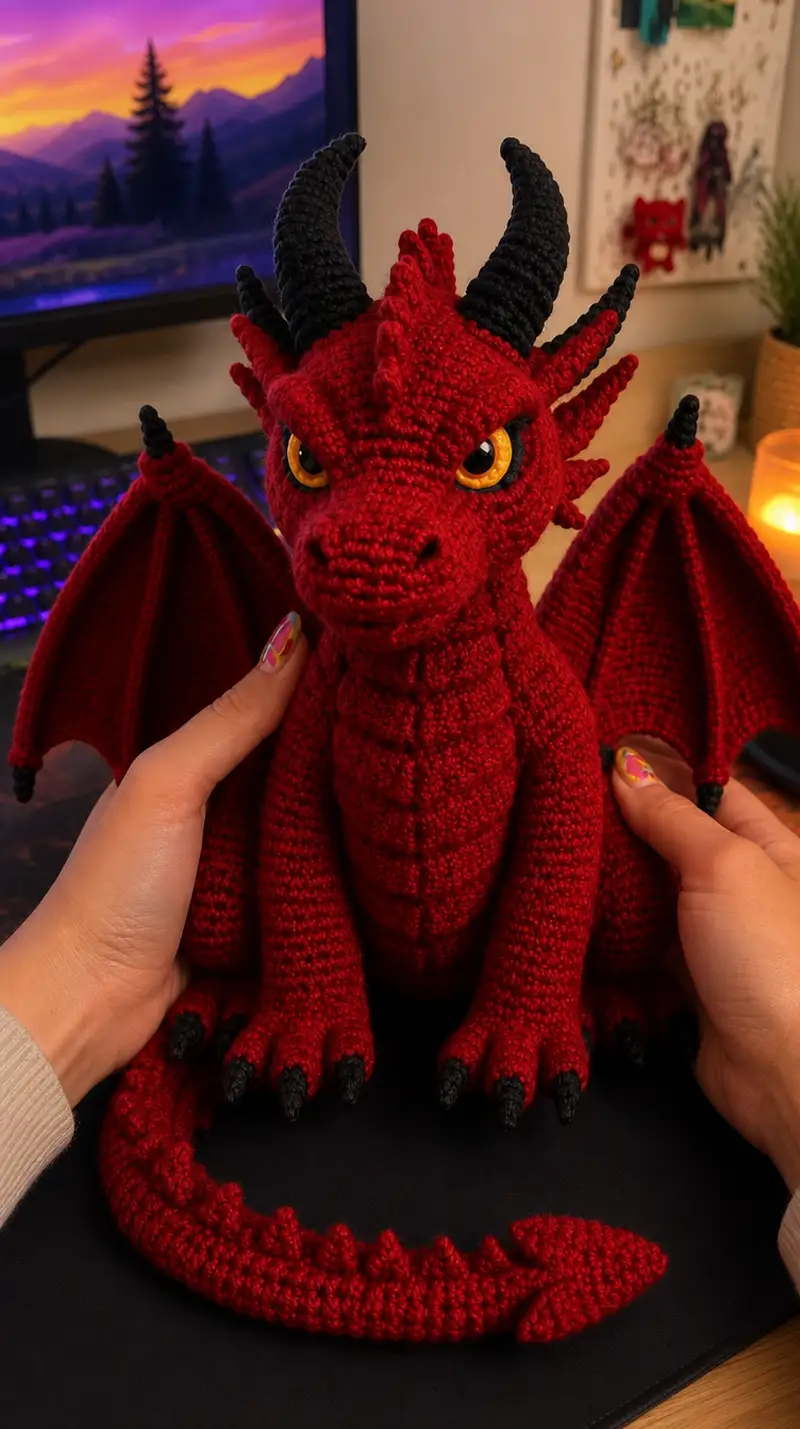
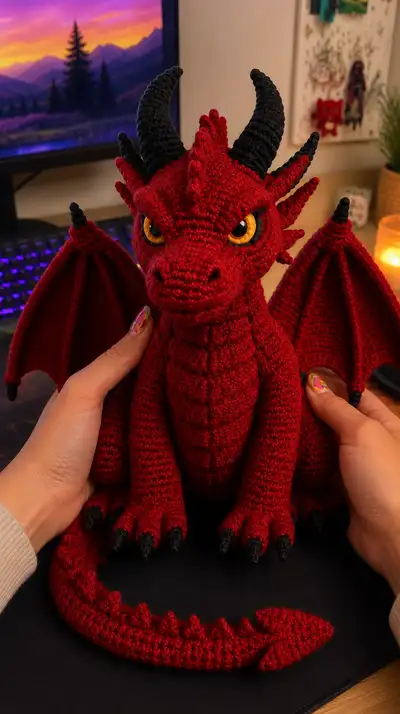
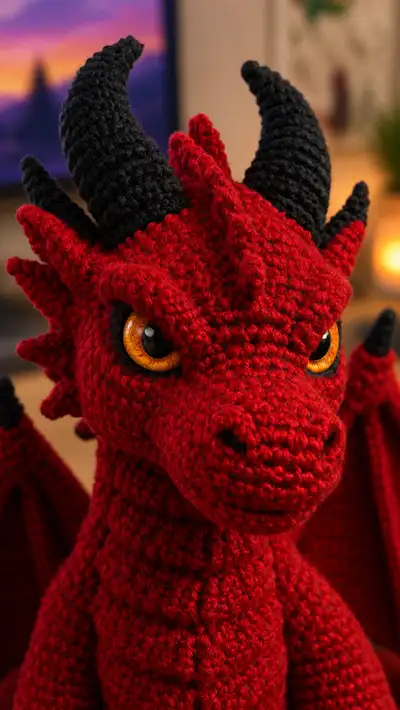
Bring this fierce yet cuddly crimson dragon to life — a richly detailed amigurumi with dramatic horns, articulated wings, a ridged chest and a long spiked tail. This pattern recreates the characterful face, golden eyes, and layered scales visible in the photos. The finished dragon sits upright and has sturdy limbs for posing and display.
Progress Tracker
0% Complete
— Head :
Round 1 :
6 sc in magic ring (6)
Round 3 :
(1 sc, 1 inc) x 6 (18)
Round 4 :
(2 sc, 1 inc) x 6 (24)
Round 5 :
(3 sc, 1 inc) x 6 (30)
Round 6 :
(4 sc, 1 inc) x 6 (36)
Round 7 :
(5 sc, 1 inc) x 6 (42)
Round 8 :
(6 sc, 1 inc) x 6 (48)
Info :
This head is worked in continuous rounds. Place a stitch marker at the first stitch of every round. Work tightly to avoid stuffing showing. You will shape the muzzle separately with surface shaping and a short snout extension.
Round 9-13 :
1 sc in each st (48)
Info :
Place safety eyes between rounds 12 and 13. Mark their centers approximately 8-10 stitches apart depending on desired fierce expression; for the pictured look use 9 stitches between the inner edges of the eyes.
Round 14 :
(6 sc, 1 inc) x 6 (54)
Round 15-18 :
1 sc in each st (54)
Info :
If adding eyelids, crochet small black circles or 1 round of sc around the eyes with black yarn before continuing. Secure eyes now with washers and test position with light stuffing.
Round 19 :
(7 sc, 1 dec) x 6 (48)
Round 20 :
(6 sc, 1 dec) x 6 (42)
Round 21 :
(5 sc, 1 dec) x 6 (36)
Round 22 :
(4 sc, 1 dec) x 6 (30)
Info :
Begin stuffing the head moderately at this point – aim for a firm but slightly yielding shape so the muzzle remains sculpted. Use small tufts of fiberfill to push into the brow and eye sockets for expression.
Round 23 :
1 sc in each st (30)
Round 24 :
1 sc in each st BLO (30)
Info :
Working Round 24 in BLO creates a slight ridge at the base of the head which helps define the neck seam and mimics a collar of scales. Keep tension consistent to maintain the ridge edge.
Round 25 :
(3 sc, 1 dec) x 6 (24)
Round 26 :
(2 sc, 1 dec) x 6 (18)
Round 27 :
(1 sc, 1 dec) x 6 (12)
Round 28 :
1 sc in each st (12)
Info :
Stop stuffing more firmly now if you have not already. Leave the head opening a little loose (do not close). We will attach the head to the neck and body; leave a 15-20 cm tail to sew through the neck ring for a secure join.
Round 29 :
(1 sc, 1 inc) x 6 (18)
Round 30 :
(2 sc, 1 inc) x 6 (24)
Round 31 :
1 sc in each st (24)
Round 32 :
1 sc in each st (24)
Round 33 :
(3 sc, 1 dec) x 4,(2 sc) x 2 (20)
Round 34 :
(2 sc, 1 dec) x 4,(1 sc) x 2 (16)
Round 35 :
1 sc in each st (16). Fasten off leaving long tail for sewing neck into body (16)
Info :
The head design uses later surface stitches to form brows and nostril ridges. Using a blunt yarn needle, you can surface stitch over the crocheted fabric to emphasize the brow. Keep the head slightly elongated forward to form the snout; do not stuff the very front tip too firmly until you finish muzzle shaping.
— Neck (worked as extension/connector) :
Round 1 :
Attach crimson yarn to the neck opening and work 1 sc in each of the 16 st around (16)
Round 2-7 :
1 sc in each st (16)
Info :
Neck is a short tube that will be stitched into the top of the body. Stuff lightly to maintain shape but keep the tube slightly pliable for sewing. Add a small amount of fiberfill after round 4 if needed.
Round 8 :
(2 sc, 1 inc) x 4,(1 sc) x 4 (20)
Round 9 :
1 sc in each st (20)
Round 10 :
1 sc in each st (20). Fasten off leaving long tail for attaching to body (20)
Info :
Keep the neck opening neat. You will sew this tube to the top opening of the body later—use the long tail and weave through the body stitches to secure. Make sure the head faces forward and is centered when sewing.
— Body :
Round 1 :
6 sc in magic ring (6)
Round 3 :
(1 sc, 1 inc) x 6 (18)
Round 4 :
(2 sc, 1 inc) x 6 (24)
Round 5 :
(3 sc, 1 inc) x 6 (30)
Round 6 :
(4 sc, 1 inc) x 6 (36)
Round 7 :
(5 sc, 1 inc) x 6 (42)
Round 8 :
(6 sc, 1 inc) x 6 (48)
Round 9-14 :
1 sc in each st (48)
Info :
The main body reaches 48 sts circumference to create the wide chest. Work these even rounds to build torso height. If you want a chunkier torso use one more increase round to 54 sts as desired.
Round 15 :
(6 sc, 1 dec) x 6 (42)
Round 16 :
1 sc in each st (42)
Round 17 :
(5 sc, 1 dec) x 6 (36)
Round 18 :
1 sc in each st (36)
Info :
Before you reduce too far, pin the neck tube into the top opening to check fit. The neck should sit inside the top 20-24 rounds of the body. You can sew neck into position now or wait until final assembly — stitching now gives a secure join.
Round 19 :
(4 sc, 1 dec) x 6 (30)
Round 20 :
1 sc in each st (30)
Round 21 :
(3 sc, 1 dec) x 6 (24)
Round 22 :
1 sc in each st (24)
Round 23 :
(2 sc, 1 dec) x 4,(1 sc) x 8 (20)
Round 24 :
1 sc in each st (20)
Round 25 :
(1 sc, 1 dec) x 4,(1 sc) x 12 (16)
Round 26 :
1 sc in each st (16)
Round 27 :
(1 sc, 1 dec) x 4 (12)
Info :
Stuff the body firmly as you approach the last rounds. For a stable sitting pose stuff the bottom heavier and shape the hip area. You can insert a small flat base (cardboard or felt disc) inside the lowermost stuffing for extra stability.
Round 28 :
1 sc in each st (12)
Round 29 :
1 sc in each st (12). Fasten off leaving long tail for closing (12)
Info :
Do not close this body opening fully if you plan to sew the legs and tail in from the inside; instead leave an access hole to insert limbs and tail, then sew closed after assembly.
— Front Legs (Make 2) :
Round 1 :
Start with crimson yarn. 6 sc in magic ring (6)
Round 3 :
(1 sc, 1 inc) x 6 (18)
Round 4 :
(2 sc, 1 inc) x 6 (24)
Round 5-7 :
1 sc in each st (24)
Info :
These front legs are thick and slightly tapered. Start stuffing the paw area firmly after round 6 to keep a rounded paw shape. You will add claw tips later in black yarn.
Round 8 :
(2 sc, 1 dec) x 6 (18)
Round 9-12 :
1 sc in each st (18)
Round 13 :
(1 sc, 1 dec) x 6 (12)
Round 14-16 :
1 sc in each st (12)
Round 17 :
(1 sc, 1 inc) x 4,(1 sc) x 4 (16)
Round 18 :
1 sc in each st (16). Fasten off leaving long tail for sewing (16)
Info :
Sew the front legs to the body at approximately rounds 18-22 of the body (check placement visually) using the long tail and a yarn needle. For the front-seated pose, position legs forward with about 6-8 stitches of space between them.
— Back Legs / Hips (Make 2) :
Round 1 :
6 sc in magic ring (6)
Round 3 :
(1 sc, 1 inc) x 6 (18)
Round 4 :
(2 sc, 1 inc) x 6 (24)
Round 5-8 :
1 sc in each st (24)
Round 9 :
(2 sc, 1 dec) x 6 (18)
Round 10-14 :
1 sc in each st (18)
Info :
Back legs are larger and will attach lower on the body to create a sitting pose. Stuff the foot area firmly and the upper leg moderately. Pin legs into the bottom opening of the body and sew through the underside so the dragon sits balanced.
Round 15 :
(1 sc, 1 dec) x 6 (12)
Round 16 :
1 sc in each st (12)
Round 17 :
(1 sc, 1 inc) x 6 (18)
Round 18 :
1 sc in each st (18)
Round 19 :
(2 sc, 1 inc) x 6 (24)
Round 20-22 :
1 sc in each st (24). Fasten off leaving long tail for sewing (24)
Info :
Sew back legs into place at the base of the body so the dragon sits with legs slightly splayed. Attach extra stuffing into the hip so the piece sits upright without toppling forward.
— Claws (Make 10 small claws for toes) :
Round 1 :
With black yarn, 4 sc in magic ring (4)
Round 2 :
(1 sc, 1 inc) x 2 (6)
Round 3 :
1 sc in each st (6)
Round 4 :
(1 sc, 1 dec) x 2 (4)
Round 5 :
1 sc in each st (4). Fasten off leaving tail to sew onto paw tips.
Info :
Sew three claws to each front paw and four claws to each back paw to match the pictured dragon. Secure claws with extra stitches and knot ends inside paw to prevent loosening.
— Horns (Make 2, black) :
Round 1 :
With black yarn, 6 sc in magic ring (6)
Round 3 :
(1 sc, 1 inc) x 6 (18)
Round 4-6 :
1 sc in each st (18)
Round 7 :
(2 sc, 1 dec) x 6 (12)
Round 8-10 :
1 sc in each st (12)
Round 11 :
(1 sc, 1 dec) x 4 (8)
Round 12-14 :
1 sc in each st (8)
Round 15 :
(1 sc, 1 dec) x 2 (6)
Round 16-18 :
1 sc in each st (6). Fasten off leaving long tail for sewing. Stuff lightly and shape a gentle curve in the horn by sewing through the base to pull up one side then attach to head angled back as pictured.
Info :
For strong horns you can insert a short length of thin wire or pipe-cleaner before finishing stuffing to help hold the curved shape. Be sure to fold or cap wire ends safely inside the horn so they are not sharp.
— Head Spikes / Frill (Make 8-10 small spikes) :
Spike A - Round 1 :
With crimson yarn, 4 sc in magic ring (4)
Round 2 :
(1 sc, 1 inc) x 2 (6)
Round 3 :
1 sc in each st (6)
Round 4 :
(1 sc, 1 dec) x 2 (4)
Round 5 :
1 sc in each st (4). Fasten off leaving tail for sewing.
Info :
Make 8-10 of these small spikes to sew around the back of the head and down the top of the neck. Vary placement and turn them slightly so they look organic and layered like the picture.
— Eyes & Eyelids :
Info :
Use two 14mm amber safety eyes. Crochet black eyelid rings for a deep-set look: make a small circle by ch2, 6 sc into second ch from hook and sl st to join. Fasten off and sew around each eye so the black surrounds the amber slightly, creating the fierce look in the photos.
— Wings (Make 2) :
Round 1 :
With crimson yarn, ch 22. Row 1: sc in 2nd ch from hook and across (21)
Round 2 :
Ch1, turn. Sc across (21)
Round 3 :
Ch1, turn. (2 sc in next st, sc in next 9, 2 sc in next st, sc to end) - add increases at the edges to give a tapered wing (23)
Round 4-7 :
Ch1, turn. Sc across increasing 2 sts spread evenly down one side to create triangular wingboard, ending with approx 30 sts at widest point
Info :
These wings are worked flat as a tapered panel then edged and shaped into a membraned wing with ridges. Add a central ridge by crocheting a tube for the leading edge using black yarn and attaching with whipstitch; this gives a sturdy posture and a sharp silhouette.
Round 8 :
Work 1 sc in each st across the panel in BLO to create a defined ridge near the membrane edge (30)
Round 9-14 :
Work repeated sc rounds adding subtle decreases near the tapered tip and increases towards the base to shape the wing curvature. End with approx 28-32 sts depending on shaping.
Round 15 :
Edge the wing with sl st into each outer stitch and then work small picot-style points along the trailing edge by (sc, ch2, sl st) every 6th stitch to mimic the membrane folds
Round 16-20 :
Fold the wing slightly and sew the inner curve using invisible slip stitches leaving a channel for optional wire. Create the black fingertip cone (3 small black cones) at the wing tip and two along the arm edge by crocheting 3 small cones like horns but smaller (see Horns section) and stitch in position.
Info :
For poseable wings insert a length of florist wire along the leading edge and through the channel, then close the channel with a few discreet stitches. Secure wire ends by folding over and taping or wrapping in yarn before final sewing to avoid sharp points.
— Tail :
Round 1 :
With crimson yarn, 6 sc in magic ring (6)
Round 3 :
(1 sc, 1 inc) x 6 (18)
Round 4-6 :
1 sc in each st (18)
Round 7 :
(2 sc, 1 dec) x 6 (12)
Round 8-16 :
1 sc in each st (12)
Info :
Tail is a long tapered tube. Stuff lightly as you go so tail remains flexible. We will add spikes along the top by sewing small spike pieces at regular intervals. For a segmented look, create slight surface ridges every 4 rounds by working 1 sc in each st BLO for a single round.
Round 17 :
(2 sc, 1 dec) x 3 (9)
Round 18-22 :
1 sc in each st (9)
Round 23 :
(1 sc, 1 dec) x 3 (6)
Round 24 :
1 sc in each st (6)
Round 25 :
Fasten off leaving long tail for sewing and sculpting tail tip into pointed arrow shape if desired (6)
Info :
Sew the tail to the back center of the body at the lower rounds (approx rounds 26-28 on body) and angle it slightly forward so it isn't floppy. Add small spikes along the top by sewing the small spike pieces you made earlier every 3-4 rounds; stitch firmly through tail and body as needed.
— Tail Spikes (Make 8) :
Round 1 :
3 sc in magic ring (3)
Round 2 :
(1 sc, 1 inc) x 1,(1 sc) x 1 (4)
Round 3 :
1 sc in each st (4)
Round 4 :
1 sc in each st (4). Fasten off leaving tail for sewing
Info :
Sew these small spikes spaced along the top of the tail. For the look in the photo, stagger them with the largest spikes closer to the body and smaller ones toward the tip.
— Chest Ridge / Belly Plates :
Round 1 :
Create a set of belly plates by chaining 6. Row 1: sc in 2nd ch from hook and across (5)
Round 2 :
Ch1, turn. Sc across (5)
Round 3 :
Ch1, turn. Sc in first 2 sts, dec, sc in last 2 sts (4)
Round 4 :
Ch1, turn. Sc across (4)
Round 5 :
Fasten off. Make 6-8 plates of graduated sizes (longer near the neck, shorter toward belly) then sew down the center front of the body overlapping slightly to create the ridged chest seen in the pictures.
Info :
Stitch belly plates to the center of the body using ladder stitch for a neat invisible join. Use surface stitches to emphasize splits between plates and to add shadowing with black yarn running a single running stitch down the seam lines.
— Scales / Back Spikes (Optional extra texture) :
Info :
You can add extra texture by working small bobbles or puffs across the back row by row. For pictured look, use small spikes described above in a staggered row down the back from head to tail base.
— Assembly & Sewing Details :
Info :
Before final sewing, block and shape all pieces slightly by stuffing and positioning under hand to set curves. Keep pins in place while you evaluate balance and posture.
Round 1 :
Attach head neck tube into body opening: position head centered and whipstitch neck tail into the body opening round-by-round using long tail; gather evenly to avoid gaps
Round 2 :
Sew front legs to body sides: align paw bottoms to body front at approximate body rounds 18-22. Use mattress stitch or whipstitch through body and leg rounds for a sturdy attachment.
Round 3 :
Sew back legs into lower body opening: place them evenly spaced left and right so the dragon sits. Reinforce by stitching around the hip seam twice for strength.
Round 4 :
Attach tail: slip tail base into body opening at center back and use long tail to sew in an overlapping spiral, tucking end inside and weaving tail to secure.
Round 5 :
Sew horns and spikes to head: pin each horn at the positions shown in the photo (two large horns centered at the back top of the skull slanting back, smaller horns/points along the brow and cheekbone). Sew firmly then weave ends inside the head.
Round 6 :
Attach wings: sew wing bases to upper back at approximately body rounds 8-12 centered behind shoulder blades. Reinforce base with extra stitches and hide ends inside body.
Info :
When stitching pieces together use small tight stitches, and after final assembly weave all loose ends through several internal stitches before trimming. Adjust stuffing after assembly if seams change shape.
Completing this dragon is so satisfying — from sculpting the brow and muzzle to sewing in the dramatic horns and grand wings, each step shapes a magical companion you can display with pride. The bold red and black palette truly pops and the golden eyes bring life to the character. 🐉🧶 Take your time, enjoy the assembly, and don’t forget to share your finished dragon — it’s a piece worth showing off!