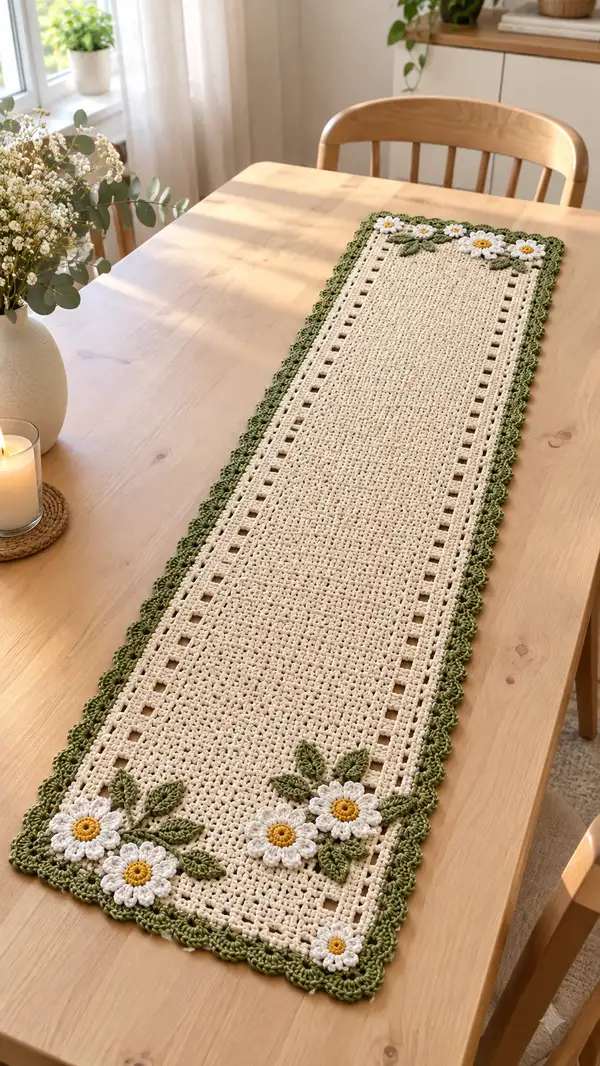
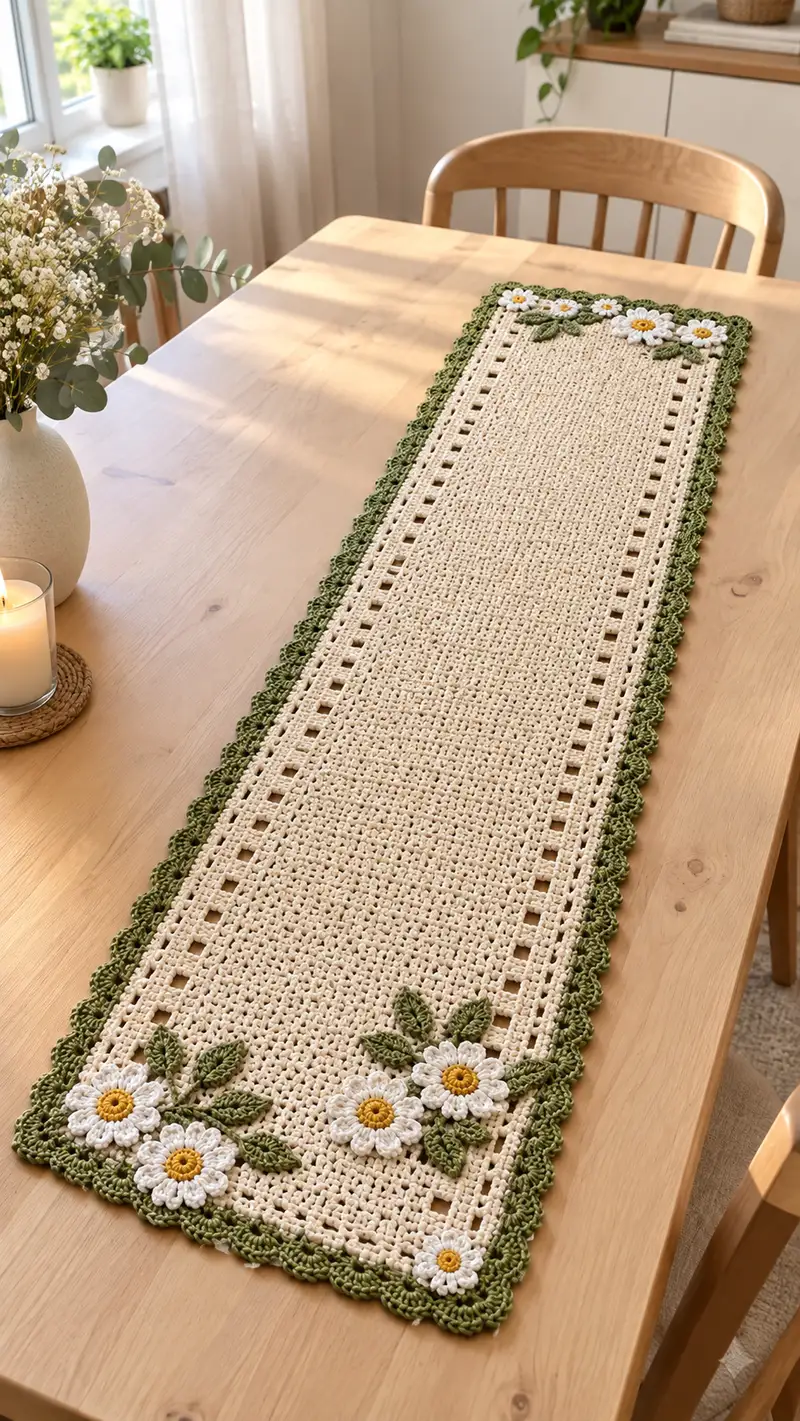
A long, elegant crochet table runner worked in creamy natural cotton with a soft olive-green scalloped border and daisy appliques at each end. This pattern uses simple repeat rows and delicate openwork columns to create a lacy, vintage-inspired look. The daisies and leaves are crocheted separately, then sewn on to add dimensional floral accents. Perfect for a bright spring or summer table, this runner blends structure with feminine detail.
Progress Tracker
0% Complete
— Notes & Gauge :
Info :
Gauge is not critical for this runner but will affect final size. With worsted cotton and 3.5mm hook, 12 sc x 12 rows = 4 in (10 cm) in dense single crochet. Adjust hook if your fabric is noticeably looser or tighter. The sample measures approximately 12" (30 cm) wide by 48" (122 cm) long before blocking and with the appliques attached.
Info :
This runner is worked flat from one short edge to the other. Each 'Round' below refers to one working row across the width; you will turn your work at the end of every row. The pattern uses a consistent row stitch count throughout for easy counting: foundation chain creates 121 base positions across the width (121 sts across). When performing mesh (openwork) rows we replace some sc with ch-2 spaces but maintain the physical positions so edge alignment remains neat.
— Foundation :
Row 1 :
Using Natural/Cream, ch 121. (This is the foundation chain - the runner width.)
Row 2 :
Turn, 1 sc in 2nd ch from hook, 1 sc in each ch across to last ch, 1 sc in last ch. (121 sc) - counts as Row 1 of body after foundation.
Info :
Place a stitch marker in the first sc of this row to mark the beginning of every row. This helps maintain stitch count when working long even rows.
— Main Panel (Rows 2-61) :
Row 3 :
Turn, ch 1, 1 sc in each st across (121 sc).
Row 4 :
Turn, ch 1, 1 sc in each st across (121 sc).
Row 5 :
Turn, ch 1, sc 4, *ch 2, sk next 2 sc, sc 8; rep from * across until 8 sts remain, ch 2, sk next 2 sc, sc 4. (Positions across stay 121; this creates the first openwork column pattern close to both edges)
Info :
The ch-2 spaces create the square holes that run parallel to the runner length. Count your repeats to ensure symmetry; the pattern above places a mesh column near each long edge while maintaining a uniform center solid panel.
Row 6 :
Turn, ch 1, 1 sc in each st and in each ch space across (121 sc equivalent positions).
Row 7 :
Turn, ch 1, 1 sc in each st across (121 sc).
Row 8 :
Turn, ch 1, sc 3, *ch 2, sk next 2 sc, sc 10; rep from * across until 10 sts remain, ch 2, sk next 2 sc, sc 3. (121 positions)
Info :
Alternate openwork rows every 4-6 rows to create a subtle decorative line but preserve the dense center. The center of the runner remains predominantly single crochet for durability and to provide a placemat-like surface.
Row 9 :
Turn, ch 1, 1 sc in each st across (121 sc).
Row 10 :
Turn, ch 1, 1 sc in each st across (121 sc).
Row 11 :
Turn, ch 1, sc 4, *ch 2, sk next 2 sc, sc 8; rep from * across until 8 sts remain, ch 2, sk next 2 sc, sc 4. (121)
Info :
After every 10 rows, check that both long edges look even and straight. If one side drifts, gently block the runner before proceeding with the border to save time finishing later.
Row 12 :
Turn, ch 1, 1 sc in each st and in each ch space across (121).
Row 13 :
Turn, ch 1, 1 sc in each st across (121).
Row 14 :
Turn, ch 1, sc 3, *ch 2, sk next 2 sc, sc 10; rep from * across until 10 sts remain, ch 2, sk next 2 sc, sc 3. (121)
Info :
Keep your tension consistent on mesh rows; if your ch-2 spaces pull the edges inward, make the first and last sc of that row slightly looser to maintain straight sides.
Row 15 :
Turn, ch 1, 1 sc in each st across (121).
Row 16 :
Turn, ch 1, 1 sc in each st across (121).
Row 17 :
Turn, ch 1, sc 4, *ch 2, sk next 2 sc, sc 8; rep from * across until 8 sts remain, ch 2, sk next 2 sc, sc 4. (121)
Row 18 :
Turn, ch 1, 1 sc in each st and in each ch space across (121).
Info :
If you prefer fewer mesh rows, repeat mesh every 8 rows rather than 4; the pattern will remain balanced. The provided counts maintain the visual effect from the sample photo.
Row 19 :
Turn, ch 1, 1 sc in each st across (121).
Row 20 :
Turn, ch 1, sc 3, *ch 2, sk next 2 sc, sc 10; rep from * across until 10 sts remain, ch 2, sk next 2 sc, sc 3. (121)
Row 21 :
Turn, ch 1, 1 sc in each st across (121).
Row 22 :
Turn, ch 1, 1 sc in each st across (121).
Row 23 :
Turn, ch 1, sc 4, *ch 2, sk next 2 sc, sc 8; rep from * across until 8 sts remain, ch 2, sk next 2 sc, sc 4. (121)
Info :
At the halfway point, measure the runner. If you'd like a longer or shorter runner, add or subtract multiples of 4 rows in the main panel. Keep the final number of rows even so that both short ends line up for applicating the daisies symmetrically.
Row 24 :
Turn, ch 1, 1 sc in each st and in each ch space across (121).
Row 25 :
Turn, ch 1, 1 sc in each st across (121).
Row 26 :
Turn, ch 1, sc 3, *ch 2, sk next 2 sc, sc 10; rep from * across until 10 sts remain, ch 2, sk next 2 sc, sc 3. (121)
Row 27 :
Turn, ch 1, 1 sc in each st across (121).
Info :
To ensure your mesh columns line up perfectly from end to end, mark the start and end of the mesh repeat on your foundation row with removable stitch markers; this reduces drift over many rows.
Row 28 :
Turn, ch 1, 1 sc in each st across (121).
Row 29 :
Turn, ch 1, sc 4, *ch 2, sk next 2 sc, sc 8; rep from * across until 8 sts remain, ch 2, sk next 2 sc, sc 4. (121)
Row 30 :
Turn, ch 1, 1 sc in each st and in each ch space across (121).
Row 31 :
Turn, ch 1, 1 sc in each st across (121).
Row 32 :
Turn, ch 1, sc 3, *ch 2, sk next 2 sc, sc 10; rep from * across until 10 sts remain, ch 2, sk next 2 sc, sc 3. (121)
Info :
When working long rows, keep a small cup of pins nearby. If the outer edges tend to curl, pin the row out gently during or after finishing the row to encourage a flat plane.
Row 33 :
Turn, ch 1, 1 sc in each st across (121).
Row 34 :
Turn, ch 1, 1 sc in each st across (121).
Row 35 :
Turn, ch 1, sc 4, *ch 2, sk next 2 sc, sc 8; rep from * across until 8 sts remain, ch 2, sk next 2 sc, sc 4. (121)
Row 36 :
Turn, ch 1, 1 sc in each st and in each ch space across (121).
Info :
Check your stitch count every 8-10 rows by counting 10-stitch sections across to confirm you still have 121 positions; correcting early is easier than ripping back many rows.
Row 37 :
Turn, ch 1, 1 sc in each st across (121).
Row 38 :
Turn, ch 1, sc 3, *ch 2, sk next 2 sc, sc 10; rep from * across until 10 sts remain, ch 2, sk next 2 sc, sc 3. (121)
Row 39 :
Turn, ch 1, 1 sc in each st across (121).
Row 40 :
Turn, ch 1, 1 sc in each st across (121).
Row 41 :
Turn, ch 1, sc 4, *ch 2, sk next 2 sc, sc 8; rep from * across until 8 sts remain, ch 2, sk next 2 sc, sc 4. (121)
Row 42 :
Turn, ch 1, 1 sc in each st and in each ch space across (121).
Info :
At this stage you have completed the majority of the panel. If you want to add a runner of different final length, add or subtract multiples of 6 rows here to keep the mesh rhythm intact.
Row 43 :
Turn, ch 1, 1 sc in each st across (121).
Row 44 :
Turn, ch 1, sc 3, *ch 2, sk next 2 sc, sc 10; rep from * across until 10 sts remain, ch 2, sk next 2 sc, sc 3. (121)
Row 45 :
Turn, ch 1, 1 sc in each st across (121).
Row 46 :
Turn, ch 1, 1 sc in each st across (121).
Row 47 :
Turn, ch 1, sc 4, *ch 2, sk next 2 sc, sc 8; rep from * across until 8 sts remain, ch 2, sk next 2 sc, sc 4. (121)
Row 48 :
Turn, ch 1, 1 sc in each st and in each ch space across (121).
Info :
Stop and measure the panel now. The sample has 61 working rows including the initial foundation sc row. If your piece is slightly shorter/longer, you may add/subtract pairs of sc rows evenly before beginning the border to ensure symmetry at both ends.
Row 49 :
Turn, ch 1, 1 sc in each st across (121).
Row 50 :
Turn, ch 1, sc 3, *ch 2, sk next 2 sc, sc 10; rep from * across until 10 sts remain, ch 2, sk next 2 sc, sc 3. (121)
Row 51 :
Turn, ch 1, 1 sc in each st across (121).
Row 52 :
Turn, ch 1, 1 sc in each st across (121).
Row 53 :
Turn, ch 1, sc 4, *ch 2, sk next 2 sc, sc 8; rep from * across until 8 sts remain, ch 2, sk next 2 sc, sc 4. (121)
Row 54 :
Turn, ch 1, 1 sc in each st and in each ch space across (121).
Info :
If the center of your runner is starting to cup (edge higher than center), block the panel flat and allow to dry under pins before continuing; blocking cotton evens gauge and helps the applied border sit correctly.
Row 55 :
Turn, ch 1, 1 sc in each st across (121).
Row 56 :
Turn, ch 1, sc 3, *ch 2, sk next 2 sc, sc 10; rep from * across until 10 sts remain, ch 2, sk next 2 sc, sc 3. (121)
Row 57 :
Turn, ch 1, 1 sc in each st across (121).
Row 58 :
Turn, ch 1, 1 sc in each st across (121).
Row 59 :
Turn, ch 1, sc 4, *ch 2, sk next 2 sc, sc 8; rep from * across until 8 sts remain, ch 2, sk next 2 sc, sc 4. (121)
Row 60 :
Turn, ch 1, 1 sc in each st and in each ch space across (121).
Row 61 :
Turn, ch 1, 1 sc in each st across (121). Fasten off and weave in ends. This completes the main panel. (121)
Info :
Lightly block the panel to even out edges and openwork columns. Allow to dry fully before adding the border to make attachment easier and neater.
— Inner Trim Row (Join for Border) :
Row 62 (Join) :
With Olive/Leaf Green, join with a sl st into the first stitch at one short end (right side facing up), ch 1, 1 sc evenly around the entire outer edge of the runner working 1 sc in each position including ends and into the ch-2 spaces (approx 486 sc around for this sample - maintain even spacing). Join with sl st to first sc. Fasten off and change to 3.0mm hook for edging.
Info :
Counting total edge stitches is not strictly necessary if you work evenly, but for a uniform scallop border you benefit from an even number of edge sts. The sample has an even number to make scallop repeats symmetrical.
— Scalloped Border (Worked around entire runner) :
Round 1 :
Join Olive with sl st into any sc, ch 1, *skip 1 sc, (5 dc) in next sc, skip 1 sc, sl st in next sc; rep from * around entire runner to create scallops. Adjust final repeat to fit evenly. Join with sl st to first sl st. (Approx 120 scallop groups around depending on width and length; space to fit.)
Info :
Scallop size can be increased to 6 dc or reduced to 4 dc per shell to change visual density. For the sample, 5-dc shells give a crisp rounded look that matches the original photo.
Round 2 :
Ch 1, sl st in first dc of a shell, ch 1, sc in same dc, *ch 3, sc in center dc of next shell; rep from * around to create small picot arches between shells. Join with sl st and fasten off. Weave in ends.
Info :
Work shells evenly around corners: at each short end corner, place shells in the last edge stitches so the scallops wrap neatly around the corner without bunching. Pin corner shells before stitching to check shape.
— Daisy Applique (Make 7 or as desired) :
Note :
Make 3 daisies for each short end cluster as shown in photo (two larger clusters of three and one small accent daisy on the corner). You can make 7 daisies for each end cluster grouping shown in the sample: 3 large + 3 large on opposite end + 1 small accent. Use White for petals and Sunshine Yellow for center.
Center Round 1 :
With Yellow, ch 2, 8 sc in 2nd ch from hook. (8)
Center Round 2 :
1 sc in each st around (8). Join with sl st to first sc. (8)
Center Round 3 :
Switch to White in last sl st, ch 1, *ch 2, 3 dc in next st, ch 2, sl st in next st (this forms a petal loop); rep around to form 8 raised petals. Fasten off and weave ends. The petals will be layered next round.
Info :
The technique above forms bloom petals by working clusters into single center stitches. For a fuller daisy, make a second petal round on top of this round by attaching in the gaps and repeating a petal cluster smaller (3 dc) to create layered petals.
Petal Round 1 (Layer) :
Join White into the sl st between two petals, ch 2, 5 dc into same sl st, sl st in next sl st between petals; rep around to place 8 larger petals offset to the base petals. Fasten off and weave ends. (8 petals)
Info :
For the smaller accent daisy use the center rounds only and a single petal round to achieve a more modest flower. Block each daisy lightly to flatten and shape petals consistently before sewing onto runner.
— Alternative Single-Petal Daisy (Small Accent) :
Small Center Round 1 :
With Yellow, ch 2, 6 sc in 2nd ch from hook. (6)
Small Petal Round :
Join White, *ch 2, 3 dc in next sc, sl st in next sc; rep around (6 petals). Fasten off. (6)
Info :
Use the small daisy for corner accents or to fill smaller spaces near leaves. Varying sizes adds layer and depth to flower clusters.
— Leaves (Make 14-16) :
Leaf 1 :
With Olive, ch 9. Row 1: sc in 2nd ch from hook, hdc in next, dc in next 3 ch, hdc in next, sc in last ch. Working on opposite side of foundation chain: sc in first ch, hdc next, dc in next 3 ch, hdc next, sc last. Sl st to join at base. (Leaf shape symmetrical, approx 14-16 sts around)
Leaf 2 :
For a more sculpted leaf: ch 8, sc in 2nd ch, hdc, dc2tog over next 2 ch, tr in center ch, dc2tog returning, hdc, sc. Sl st and fasten off. Block flat and add a little row of embroidery veins using darker green if desired.
Info :
Make leaves in two sizes by working extra dc or tr in the center; use larger leaves in the center of clusters and smaller leaves along edges. Starch lightly if you want leaves to hold a stronger shape.
— Assembling Flower Clusters :
Info :
Arrange three daisies near each short end in a triangular cluster: two slightly lower and one higher as pictured. Add 3–4 leaves around each cluster, tucking leaf tips under petals and pinning in place. The sample has one small corner accent daisy on each corner in addition to the main cluster.
Info :
Sew each daisy to the runner using a fine tapestry needle and matching thread: stitch through the yellow center to anchor, then run a few invisible stitches around the petal bases. Secure all yarn tails by weaving toward the center and trimming close.
— Decorative Embroidery (Optional) :
Info :
Add a few French knots or straight stitch veins with darker green or brown to create visual depth in centers and leaves. Use a small sharp embroidery needle and tie off inside the stitched groundwork so knots don't show through the runner face.
— Finishing Touches :
Info :
After all appliques are attached, block the entire runner gently to set shape. Pin scallops evenly around edges and steam or spray with water and allow to dry. Trim all ends and weave them into the border or underside for a neat finish.
Info :
Optionally attach a lightweight fabric backing or interfacing to underside for extra table protection. Use fabric glue or stitch the backing by hand along the scalloped edge to keep it invisible from the top.
Info :
Store flat or rolled — do not hang — to maintain shape. Wash gently by hand in cool water and reshape while damp; avoid harsh agitation that may stretch the scallops or loosen appliques.
This Daisy Meadow Table Runner brings handcrafted charm to your dining space with soft cotton texture and garden-inspired appliques. Every scallop and petal adds personality and coziness to your table setting, making it perfect for seasonal decorating or as a thoughtful gift. I hope you enjoy stitching every detail—each flower is a small celebration of handmade warmth. 🧶🌼