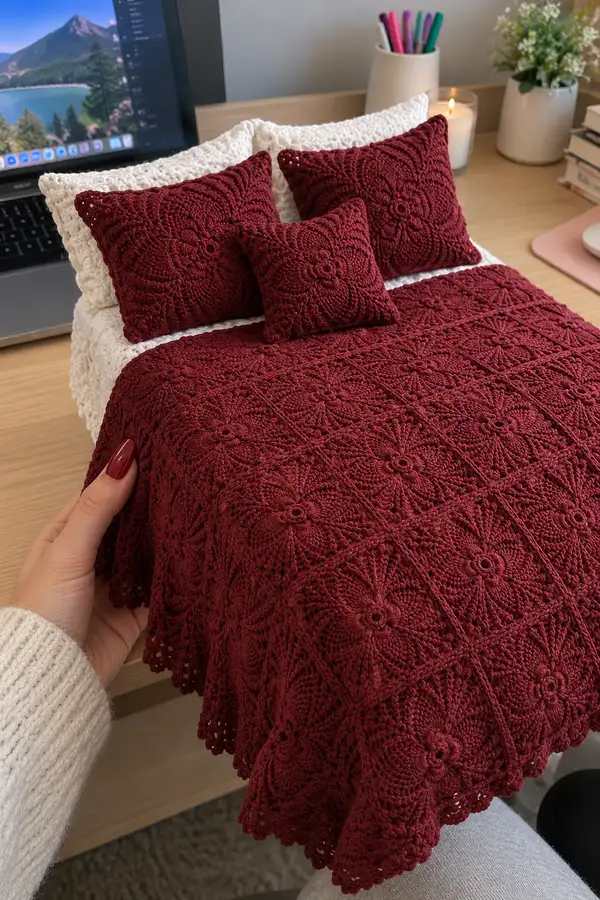
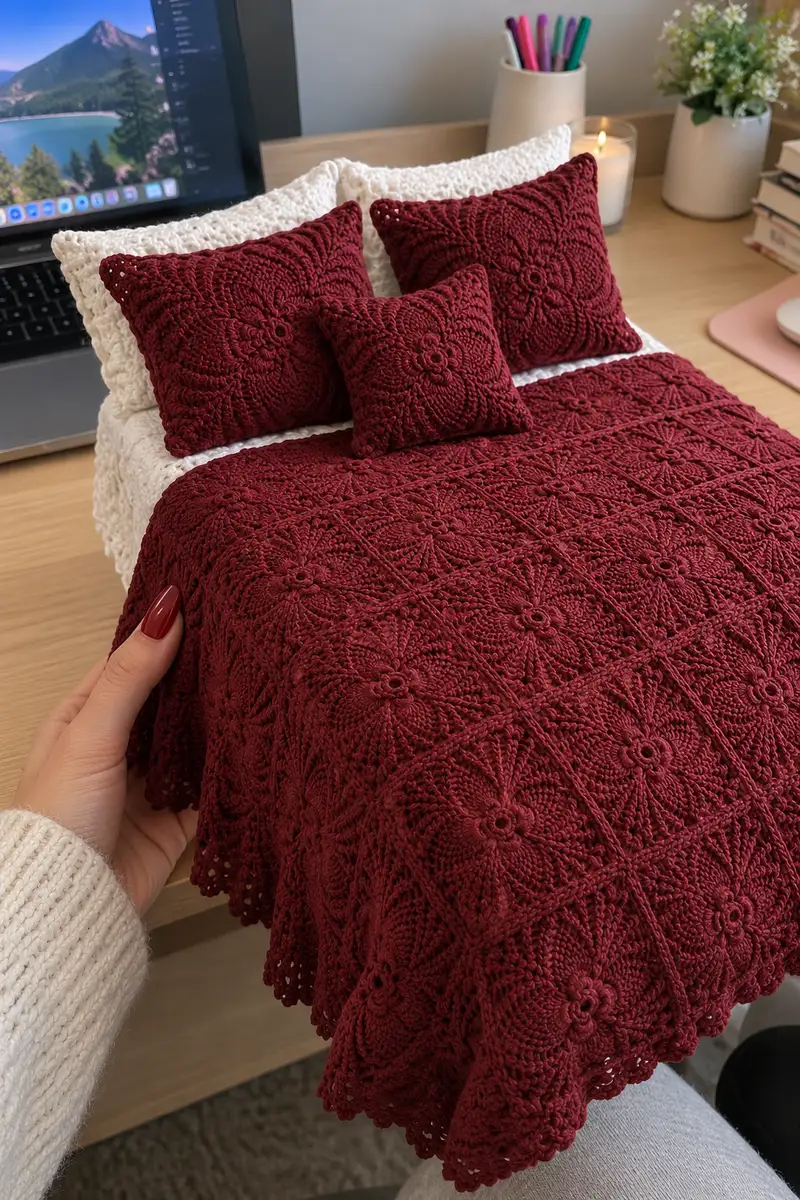
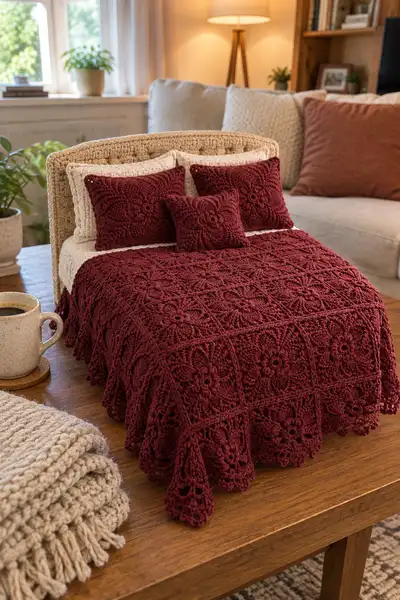
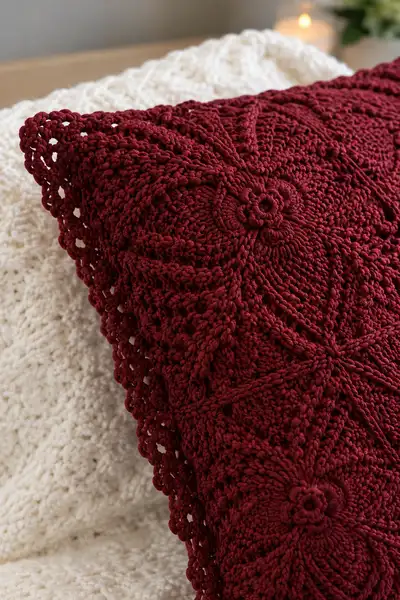
Create a luxurious deep burgundy bedspread made from joined floral square motifs. This pattern recreates the textured flower-in-a-square design with raised puff petals, openwork rays and a scalloped border — shown here as a quilted bedspread and matching pillow covers. The finished look is richly textured and cozy, perfect for an elegant bedroom or a thoughtful handmade gift.
Progress Tracker
0% Complete
— Notes & Gauge :
Info :
This pattern is modular and worked in identical square motifs joined together. Gauge for each completed motif (after blocking) should be approximately 18cm/7in square using stated yarn and 4.0mm hook. Adjust hook size if your motif measures larger or smaller. Work tightly enough so puff and cluster stitches hold shape and stuffing for pillows does not show through.
— Motif (Make multiple identical squares) :
Round 1 :
Start with a magic ring. Ch1, work 6 sc into the ring. Pull tight. (6)
Round 2 :
2 sc in each st around. (12)
Round 3 :
(1 sc, inc) x6. (18)
Round 4 :
(2 sc, inc) x6. (24)
Info :
Keep tension consistent. These first rounds form a small, firm center for the raised flower. Use stitch marker to mark start of round and move it each round.
Round 5 :
(3 sc, inc) x6. (30)
Round 6 :
1 sc in each st (30)
Round 7 :
1 sc in each st (30)
Info :
Rounds 6-7 create a slightly raised disk to anchor the flower. Keep these rounds snug but not tight to allow puff stitches to sit cleanly on top.
Round 8 :
*Ch2, make 5-loop puff in next st: yarn over, insert hook, pull up loop, repeat 5 times (you now have 11 loops on hook), yarn over and pull through all loops, ch1 to close puff; sl st in next st to anchor puff. Rep from * around to create 10 puffs spaced around outer edge; after final puff sl st to starting point. (10 puffs)
Round 9 :
Ch1, in same place sl st to move into the space between puffs, ch3 (counts as dc), work 3 dc into same sp, ch2, 4 dc into next sp between puffs, ch2; repeat around so that each puff is flanked by two fans separated by chain-2 corners. Join with sl st to top of ch3. (10 fans with chain-2 petals)
Info :
These rounds form a raised 10-petal flower. The puff round is intentionally dense; keep tension even. If your puff stitch looks too flat, use fewer loops (4-loop puff) to suit your yarn.
Round 10 :
Ch1, sc into same st, *ch4, skip next fan, sc into next space between fans (aligned with puff centers)*; repeat around to create an openwork ring of ch-4 loops. Join with sl st. (10 ch-4 loops)
Round 11 :
Into each ch-4 loop: (sc, hdc, 4 dc, hdc, sc) forming a petal fan. Join with sl st. (10 petals)
Round 12 :
Ch1, sc in same st, *ch3, sc into center top of next petal (between 4 dc cluster)*; repeat around to create evenly spaced chain-3 arches. Join. (10 ch-3 spaces)
Info :
The petals created by the 4-dc shells should be symmetrical. If a petal looks narrow, gently stretch while blocking later. Count petals after this round to ensure you have 10 consistent petal points.
Round 13 :
Working into each ch-3 arch: ch1, sc, (3 dc, ch1, 3 dc) in arch to form a taller fan. This creates a second row of petals that will begin to define the square sides. Join with sl st. (10 fans)
Round 14 :
Ch1, sc into same st, *ch5, sc into center of next fan* around to create longer arches that span between petals (10 ch-5 loops). Join.
Round 15 :
Into each ch-5 loop: sc, hdc, 6 dc, hdc, sc to form extended fans that create a broader shape. Join. (10 wide fans)
Info :
At this stage the motif is still circular. We will add corner shaping to create a square. Count stitches at the end of each round to keep even spacing. Use markers to note where you want the square corners to fall — typically every 2 fans equals one corner when making a 10-fan motif; we will create virtual corner points with chain spaces.
Round 16 :
Ch1, sc in same st, *(sc in next 2 sts), ch3, sk 4 sts (across fan), sc in next 2 sts*; repeat around to create 10 small ch-3 loops placed at regular intervals. Join. (patterned placement forming 10 arches)
Round 17 :
Now begin squaring: Work across to create corner groups. Identify positions for 4 corner groups by counting 2 and a half fans between corners. At first corner: (sc, ch3, 3 dc, ch3, sc) into the ch-3 loop to form a larger corner shell; continue between corners with sc into each ch-3 loop. Repeat to make 4 larger corner clusters and smaller side sc groups between them. Join. (corner shells x4, side sc groups)
Info :
Placement here is crucial. Before stitching, place stitch markers at the 4 putative corner loops so you can consistently build corner shells in subsequent rounds. If your motif uses 10 fans, you will space corners so they are roughly every 2 fans plus a partial fan; visual alignment is acceptable for handmade pieces, then correct with blocking.
Round 18 :
Ch2, work (hdc, 7 dc, hdc) into each corner shell to enlarge corner squares; between corners work (sc, ch3, sc) across side loops to begin forming straight side edges. Join. (4 corner clusters and straight sides)
Round 19 :
Working across side spaces: 1 sc in each sc, but in corner clusters work (dc, ch2, dc) to keep square turn. This round starts to flatten the motif into a squarish shape. Join. (even round forming squarer outline)
Info :
Check shape; if your motif remains circular, gently tug sides while blocking. The corner clusters will dominate the square outline after next rounds.
Round 20 :
Ch1, sc around motif working evenly: sc across each side stitch and (2 sc, ch2, 2 sc) in each corner ch-2 space. This creates neat corner points to define the square. Join. (even sc round)
Round 21 :
Repeat Round 20 to build a square panel. Sc in each st and keep (2 sc, ch2, 2 sc) in each corner. (slightly larger square)
Info :
From this point forward the motif behaves like a square granny. The count for side stitches will vary based on your petals, so count total sts at the end of each round to ensure symmetry across sides and corners.
Round 22 :
Ch3 (counts as dc), dc across side stitches evenly to begin creating textured ridges; in corner ch-2 spaces work (dc, ch2, dc). Join. (textured dc round)
Round 23 :
Ch1, sc around working 1 sc in top of each dc and sc, and (2 sc, ch2, 2 sc) in corners. Join. (square stays same size)
Round 24 :
FLO round: 1 sc in each st in the front loop only to create a defined ridge on the right side. Join. (same stitch count)
Info :
The FLO round creates texture similar to the photographed bedspread where rows of stitches form slightly raised channels. This ridge will be visible across the grid when multiple motifs are joined.
Round 25 :
Ch1, sc across same count. Work (sc, ch3, sc) in each corner ch-2 to keep corners flexible for blocking. Join.
Round 26 :
Begin decorative edge: *(sc, ch2, 3 tr, ch2, sc) in next side center; sk equivalent number of sts to place around evenly*; repeat along sides to create vertical openwork arches that mimic the radial spokes seen in the photos. In corners work (sc, ch4, sc) for a larger arch. Join.
Round 27 :
Ch1, sc in each st and into tr clusters sc around to anchor arches. Join. (even round)
Info :
Count the total stitches at the end of Round 27 and write it down. You will need consistent stitch counts when joining motifs so that edges line up. If your stitch count differs from the sample, adjust between rounds 25-27 by adding or subtracting sc evenly across sides.
Round 28 :
Sc all around as a tidy brace round. This completes one motif. Fasten off leaving tail for joining if you plan to sew, or leave tail short if joining later using JAYG (join-as-you-go). (final motif completed)
Info :
Make the required number of motifs for your chosen bedspread size. For a small throw or single/twin decorative bedspread shown in photos you will arrange motifs in a grid: for example 4 x 6 motifs yields a rectangular spread. Adjust motif count as needed: more motifs = larger spread. Block each motif square to exact size before joining.
— Join-As-You-Go (JAYG) Method for Assembly :
Round 29 :
Prepare first row of motifs: pick two motifs. With RS facing and last round live, attach second motif to first by working sc across side edge of first motif, then sc into corresponding stitches of second motif, joining through the back loops only of the second motif to create an invisible seam. Work corner joins with (sc, ch2, sc). Continue across motif side. (join first seam)
Info :
Pin motifs together before joining to ensure alignment of petals and seams. Use a stitch marker at the point you begin a join to keep consistent starting points across all motifs in a row.
Round 30 :
Complete joining second motif to first along one edge. Turn motif and continue joining subsequent motifs by repeating Round 29 for each seam until you have the first row assembled. Fasten off and weave ends between motifs to hide tails.
Round 31 :
To join new row beneath the first row, lay a motif with its bottom edge aligned to top edge of assembled row. Working from RS, sc through both motifs' corresponding edge stitches, placing (sc, ch2, sc) at corners where four motifs meet to lock the cross junction in place. Continue to join across the row. (row join complete)
Info :
At intersections where four corners meet, make an extra secure crossing by working an additional sc into each of the four joining loops to prevent gaps and create a decorative square knot look on the RS.
Round 32 :
Once all rows are joined in a grid to desired bedspread size, go back to each seam on RS and work a tidy sc ridge across the seam by inserting hook through both loops of the seam stitches and working 1 sc in each stitch across the seam. This creates a corded seam visible as a grid line like in the photos. (grid ridge completed)
Info :
If you prefer a flat join instead of a raised ridge, use invisible mattress stitch with yarn needle to seam motif edges from WS. For the textured look in the image the sc ridge across seams is recommended.
— Bedspread Border & Scallop Edge :
Round 33 :
With entire bedspread assembled, work 1 rnd sc evenly around the outer edge of the grid; in corner spaces work (2 sc, ch2, 2 sc) to maintain square shape. Join with sl st. (brace round)
Round 34 :
Ch1, 1 sc in each st around. Join. (even round)
Info :
This braces the entire spread and evens out any small irregularities from motif joins. Work slowly and count stitches along each side to keep symmetry; adjust by adding or skipping single sc to match lengths on opposite sides.
Round 35 :
Scallop foundation: *ch3, sk 2 sts, 5 dc in next st, sk 2 sts, ch3, sl st in next st*; repeat around. At corners work larger scallops by doing 7 dc into corner space to maintain drape. Join. (scallop groups formed)
Round 36 :
Ch1, sc into each dc and chain space to tidy scallops. In the center of each scallop work (picot, sc) to give a neat pointed edge: (ch3, sl st in 3rd ch) to make picots. Join. (scalloped edge rounded)
Info :
Work scallops loosely so the bedspread edge drapes and forms the scalloped curve like the photos. If your yarn is stiff, increase scallop depth by adding more dc per scallop.
Round 37 :
Optional decorative double scallop: *in each scallop foundation, work (sc, ch3, 3 tr, ch3, sc)* to add height and repeating texture. Join. (double scallop formed)
Round 38 :
Finish with one more round of sc in the back loop only to create a subtle hem and hide join stitches. Fasten off and weave ends. (border completed)
Info :
Block entire bedspread again after completing border to set scallops and let the whole piece settle into a flat, even drape. Use steam blocking or wet blocking depending on yarn instructions. Pin scallops out to shape while blocking for crisp edges.
— Small Throw Pillow Covers (Make 3: two larger, one small) :
Round 39 :
Each pillow cover uses 3x3 motifs for the large pillow and 1x1 for the small square accent. Make motifs exactly as for bedspread (Rounds 1-28) but stop after Round 25 and add extra sc rounds if you need exact pillow dimensions. Block squares to exact size for neat seams. (motifs for pillows made)
Round 40 :
Join motifs for pillow front using JAYG along two seams, leaving one side open for zipper or envelope closure. For an envelope backing, work two rectangular panels: top/back and bottom/back with overlapping piece. Join sides and bottom, insert pillow, then stitch closed or insert zipper.
Info :
For a clean finish on pillow backs, use simple sc rounds to create a neat fabric that complements the textured front. Use mattress stitch to invisibly close envelope back seams if desired.
Round 41 :
For pillow edging: with RS facing, attach yarn to edge and work 2 rnds of 1 sc in each st to create a sturdy frame. On final round work a small scallop (ch3, sl st in base) repeating for a neater edge. Fasten off. (pillows edged)
Round 42 :
If using an insert, center insert and hand sew a small starting stitch to hide corners. Weave in all yarn tails well into pillow seams. (pillows finished)
Info :
Alternatively, create a hidden zipper by sewing a zipper strip to the inside of the back panel before closing seams; this yields a removable cover for washing.
— Alternative Joining Option (Sewing) :
Round 43 :
If you prefer sewing to JAYG, block motifs and use a mattress stitch or whip stitch with matching yarn to join motifs on the WS. Use three passes per seam for stability and hide knots by weaving ends across several motifs.
Info :
Sewing produces a flatter join; JAYG with an sc ridge produces the raised grid as in photos. Choose the finish that best matches your desired look.
— Finishing Touches & Optional Embellishments :
Round 44 :
Optional: Add a light slip-stitch ridge along each seam on RS using contrasting yarn for subtle grid highlight: *with contrasting yarn, join at one corner and sc across seam stitches on RS*; tie off and weave ends. (decorative seam)
Round 45 :
Optional tassels: At each corner of spread, attach a small tassel made from 20 strands of yarn folded in half and tied securely. Trim to desired length. (tassels added)
Info :
These extras are optional but add a designer finish. If using tassels, ensure they are secured with several tight knots and sewn into the border stitches to prevent pulling free during use or washing.
— Blocking & Care :
Round 46 :
Block each motif flat individually to exact size prior to joining: wet block or steam block per yarn instructions. Pin scallop edges to shape. After joining, block the entire assembled spread to set stitches and shape. (blocking complete)
Info :
Care: wash gently according to yarn label. For cotton-blend yarn, cold wash on gentle, reshape while damp and lay flat to dry. Avoid tumble drying which may distort scalloped edges.
— Measurements & Sizing Advice :
Round 47 :
Single motif measures approximately 7in/18cm square after blocking in this yarn. For a small decorative bedspread shown in photos (approx. throw/small bed), assemble a grid of 4 x 6 motifs for an overall approximate finished size of 28 x 42in (71 x 107cm) before scalloped border. Adjust motif count to achieve full bed sizes: double bed ~ 8 x 10 motifs etc. (sizing reference)
Info :
Always calculate finished size by multiplying blocked motif size by number of motifs, then add border width. Make a swatch motif to confirm size before committing to full project to estimate yarn needs accurately.
— Troubleshooting & Tips :
Round 48 :
If sides become wavy after joining, press with steam and re-pin during blocking to force straight edges. If corners do not lay flat, add an extra sc or ch in the corner cluster to ease tension. If scallops pull in, reduce tr per scallop or increase base ch foundation. (common fixes)
Info :
Keep a notebook with motif stitch counts and any modifications so each motif is consistent and assembly is smooth. Check every 6-8 motifs together to make any small corrections early.
Round 49 :
Wrap up: Weave in all ends, check seam symmetry, and give the whole piece a final light blocking to marry joins and border. Photograph finished project on a flat bed or draped to evaluate border drape and texture. (final finish)
Completing this deep burgundy bedspread is a truly satisfying project — each floral square builds into an elegant whole that drapes beautifully and adds instant warmth to any room. The textured petals and scalloped border give it heirloom quality while the modular construction makes the process manageable and meditative. You’ll love seeing the bedspread come together motif by motif! 🧶❤️✨