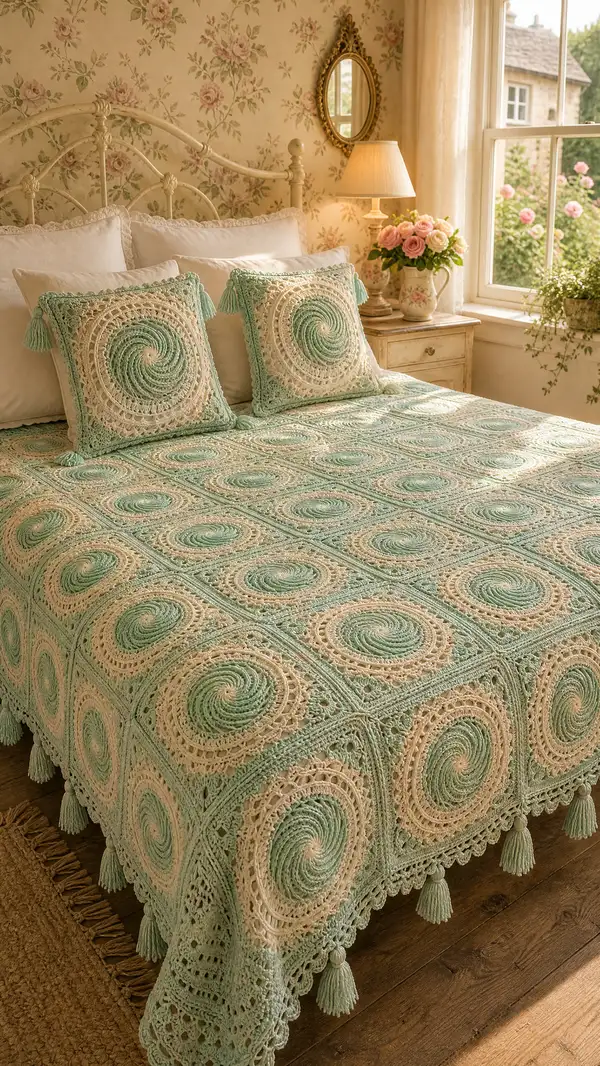
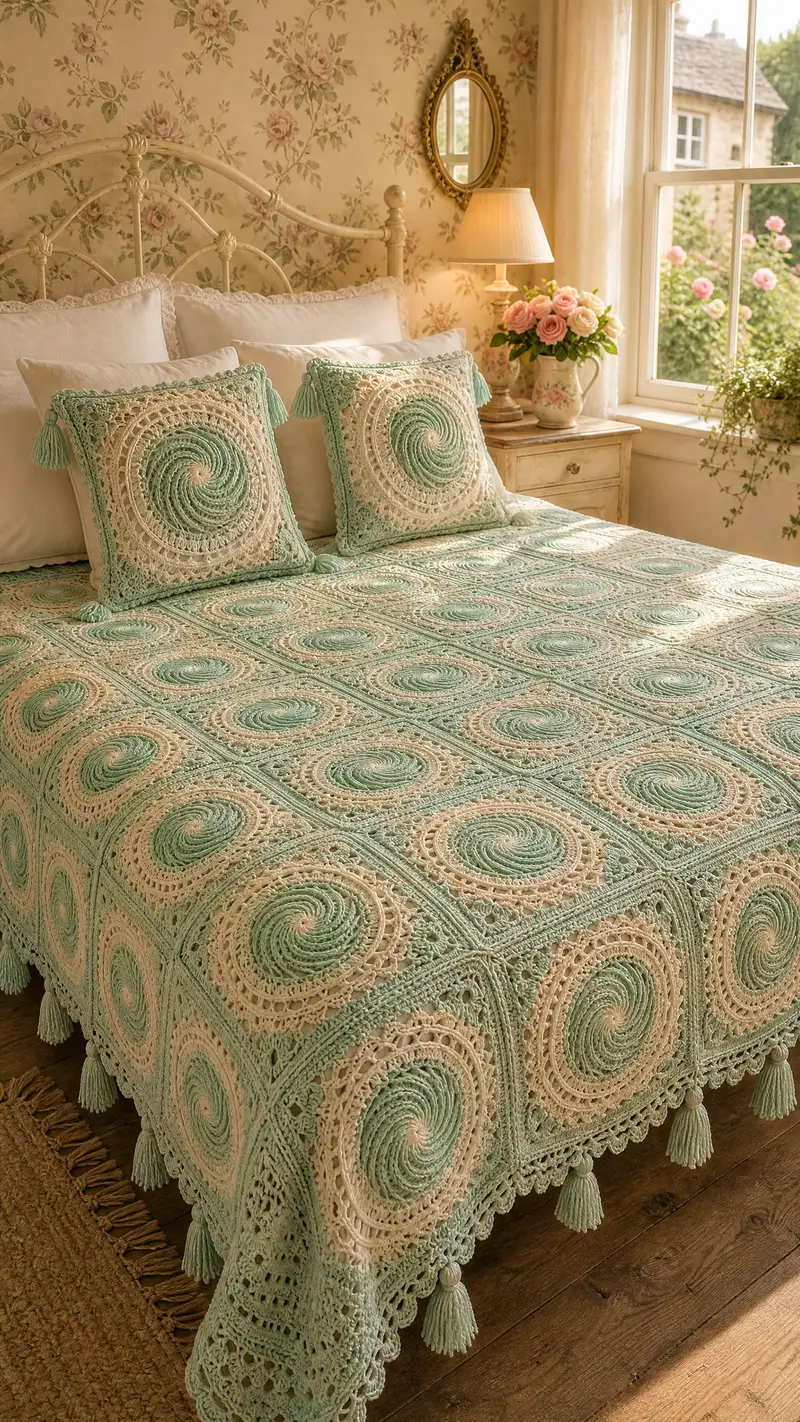
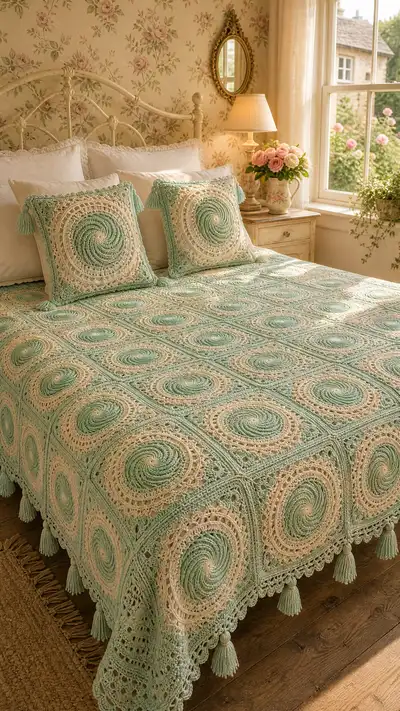
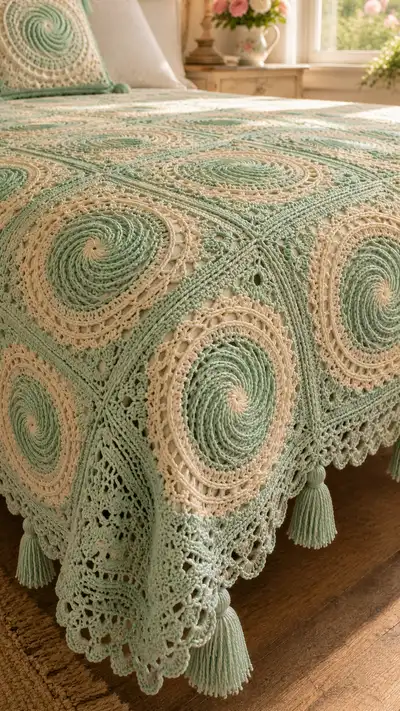
A romantic, vintage-inspired bedspread made from spiral granny squares in soft seafoam and cream. This pattern recreates the raised spiral medallions, lacy square surrounds, and scalloped border with tassel corners shown in the photo. Perfect for a cozy bedroom with delicate floral tones and cottage-style charm. Detailed instructions cover making each spiral square, join-as-you-go assembly, full edging and tassel finishing.
Progress Tracker
0% Complete
— Overview :
Info :
This pattern describes how to make the Seafoam Spiral Granny Square and finish a bedspread similar to the photo. Make the number of squares required for your bed size (sample shown uses 6 x 6 = 36 squares). Each square is worked from the center outward: spiral center, decorative rings, square framing, and then joined-as-you-go. Finally work a wide scalloped border and attach large tassels to outer corners and along the border as shown.
Info :
Gauge note: One finished square (after blocking) measures approximately 11.5" square with DK/light-worsted yarn and 4.0 mm hook. Gauge will vary with yarn and hook; adjust number of squares for bed size as needed. Tension should be slightly firm to keep spiral ribs defined.
— Abbreviations & Special Stitches :
Info :
Special stitch notes for this pattern: 'Raised Spiral Row' is made by working front-loop-only dc rows (fpdc) alternating with regular sc rows to create a rope-like ridge. 'Corner Cluster' for square shaping is (2 dc, ch3, 2 dc) worked in the same stitch/space. 'Shell' = 5 dc in same stitch/space. 'Picot' = ch3, sl st into top of last stitch. Use US terms for dc/tr notation.
— Spiral Center (Make each square) :
Round 1 :
6 sc in magic ring (6)
Round 3 :
(1 sc, inc) x 6 (18)
Round 4 :
(2 sc, inc) x 6 (24)
Round 5 :
(3 sc, inc) x 6 (30)
Info :
Work these early rounds tightly so the spiral foundation is firm. Draw the magic ring closed fully and weave the tail inside the center for a clean start.
Round 6 :
(4 sc, inc) x 6 (36)
Round 7 :
(5 sc, inc) x 6 (42)
Round 8 :
(6 sc, inc) x 6 (48)
Round 9 :
1 sc in each st around (48)
Info :
Change to seafoam or alternate color here if you want the spiral to shift color. Carry unused yarn neatly along the back or fasten off and join the new color.
Round 10 :
Working in BLO: 1 dc in each st BLO around (48). This creates the first raised ridge for the spiral effect.
Round 11 :
1 sc in each st around (48)
Round 12 :
Working in FLO: 1 dc in each st FLO around (48) — this alternation of post and standard dc helps build the spiral texture
Info :
If you prefer a more pronounced rope spiral, substitute fpdc (front post double crochet) into Round 10 and tr into Round 12. Keep counts even by placing one post stitch in each base stitch.
Round 13 :
(3 sc, inc) x 12 (60)
Round 14 :
1 sc in each st (60)
Round 15 :
(4 sc, inc) x 12 (72)
Round 16 :
1 sc in each st (72)
Info :
At this stage you have a broad circular medallion. The next rounds convert the circle to a square frame. Use stitch markers to mark four quarter points (every 18 sts with 72 total) — these are your corner anchors for the square conversion.
— Transition to Square (Rounds to establish corners) :
Round 17 :
*Work 16 sc, (2 dc, ch3, 2 dc) in next st (corner made)* repeat from * to * 4 times — after 4 corners you will have 72 + (4 x 4 additional stitches) = 88 counted stitch positions; for clarity count by clusters: you will have 4 corner clusters and 4 side segments of 16 sc each (work is now framed into 4 sides)
Info :
The corner cluster (2 dc, ch3, 2 dc) creates a roomy ch3 corner that will shape the square. When counting stitch totals for decorative rounds, count corner clusters as single corner units rather than trying to convert to a strict numeric sc total.
Round 18 :
In each side between corners: work (sc in next 16 sts) ; in each corner: (3 dc, ch2, 3 dc) into ch3 sp from previous round — repeat for 4 sides. This creates an elevation and a slightly open corner ch2 for later lacy shells.
Round 19 :
Work a round of shells to frame the square sides: *in side spaces: (sc, ch3, sc) evenly across side segment (make 5 shell points across each side), in corner ch2 sp: (5 dc shell) ; repeat for 4 sides*
Info :
From Round 17 onward many rounds are worked in side segments and corner spaces rather than single-stitch counts; count your shells and corner clusters to ensure each side is symmetrical — typically 5 shell groups per side gives a pleasing proportion for this square size.
Round 20 :
1 sc around working evenly into shells and corner clusters (treat each shell apex as a stitch), slip stitch to join.
Round 21 :
Working in FLO: *work 1 dc in each sc across the side segments (approx 20-22 dc per side depending on your shell counts), in corner spaces work (dc, ch2, dc) ; repeat for 4 sides*
Info :
This round flattens the surface and reinforces the square frame. Use stitch markers at the corners to keep accurate placement of corner clusters and to identify the center of each side for later joining points.
Round 22 :
Work a delicate open lace ring around the square: *in each side: (sc, ch3, sk 1, sc) repeated across; in corner ch2 sp: (sc, ch3, sc) ; repeat for 4 sides*
Round 23 :
1 sc in each st/ch across to stabilize the lace ring. The square should feel flat and measure roughly 11-12" once fully blocked.
Info :
If you want the spiral center to show more prominently, keep stitches tight in Rounds 17-23 and avoid oversized ch spaces. Conversely, if you prefer an airier look, increase ch counts in the lace ring by ch1 or ch2 between shells.
— Decorative Square Frame & Final Motifs :
Round 24 :
Change to cream yarn if alternating colors here. Work one round of reverse single crochet (crab stitch) around entire square to provide a defined edge. Work evenly around sides and corner clusters. This creates a crisp frame edge. (Work evenly — stitch count varies by side)
Info :
Color changes: join new color in an inconspicuous place (preferably midpoint of a side). Carry color inside or fasten off the old color and weave ends later. Keep color joins consistent on all squares for neat joins.
Round 25 :
In cream: *shell picot row across sides — (sc, ch3, 5 dc shell, ch3, sc) in repeated spaces across each side; in corners: (sc, ch3, 7 dc shell, ch3, sc)*. This defines the ornate round surrounding the spiral.
Round 26 :
1 sc round in seafoam across shells and corners, working evenly to preserve square shape.
Round 27 :
Work a scallop row: *in each side: (sk 2, 5 dc in next st, sk 2, sl st) repeat to create 6-8 scallops per side; in corners: work an extended scallop of 9 dc to soften corner bend*
Info :
The scallop row gives the square its antique, lacy look seen on the bedspread. Maintain consistent stitch height across sides so the square stays even.
Round 28 :
Fasten off and weave in ends, or continue direct join-as-you-go if you are assembling squares immediately. If making many squares and blocking later, leave long tails for joining — approximately 20-30" tail per side if using whip stitch, less if j-ayg.
Info :
Blocking tip: lightly mist each square and pin to a square template. Stretch gently to even out sides and flatten spiral center so the medallion looks uniform. Allow to dry fully before joining.
— Quantity & Layout :
Info :
Sample layout (shown): 6 squares across x 6 squares down = 36 squares for a bedspread that covers a double/queen bed with small overhang. For a larger bed, make 7 x 7 or 8 x 8; for a twin, 4 x 6 works well. Adjust border width accordingly.
Info :
Make an even number of squares for symmetrical tassel placement if you plan tassels at each corner of the full spread. Label and block squares in batches to keep color rhythm consistent if alternating colors for centers and rings.
— Join-As-You-Go (JAYG) Method — Joining Squares into Rows :
Info :
We recommend join-as-you-go so joins sit flat and the lace aligns. Join each new square to previously-placed squares by working the final border round of the new square: when you reach the edge where it meets a neighboring square, slip stitch into the corresponding stitch/space on the neighbor instead of working the stitch into the new square; continue working the border as written. This creates a neat seam that looks like decorative raised piping.
Round 29 :
Begin JAYG border round: join with yarn in corner; *work along side: sc in next st, when reaching join side: (sc in next st, sl st into neighbor st) repeat across; in corner spaces work (sc, ch3, sc) into corner and join corner with sl st into neighbor corner; repeat for full square*
Info :
Work slowly across the first few joins and pin motifs temporarily to ensure matched motifs and lacy rings align. If a join point feels tight, skip a sl st occasionally to avoid puckering; conversely, add an extra sl st to close gaps if needed.
Round 30 :
After joining rows, work a decorative ridge round: *in seafoam: work 1 dc in each sc across joined seams and into neighbor sl st locations to create a raised join line. In corners continue to work (3 dc, ch2, 3 dc) to emphasize corner points.*
Info :
Continue assembling squares in rows and then join rows together with the same JAYG method. For the outermost perimeter squares, leave the outer side free for the border rounds.
— Continuous Border & Wide Scalloped Edging (Perimeter) :
Round 31 :
With the entire spread assembled and laid flat, join seafoam yarn at any outer corner. Work one round of sc evenly around the entire perimeter of the assembled spread, working 3 sc into each exposed corner ch3 to maintain square corners. This evens the edge and creates a foundation for the wide border.
Round 32 :
Work a lacy openwork round: *(ch4, sk 1 sc, sc) around across sides making 2-3 small arches per square side; in corner clusters work 6 chain arches to separate corner tassel points*
Info :
This round is intentionally open and airy — use consistent arch spacing so the subsequent shell rounds sit evenly. Use markers at the midpoint of each perimeter side to help distribute scallops evenly across the edge.
Round 33 :
In cream yarn: Work a shell round across the perimeter: *into each arch from previous round work (sc, ch3, 7 dc shell, ch3, sc); in corner arch work (sc, ch3, 9 dc shell, ch3, sc) — repeat along entire perimeter*
Round 34 :
Work 1 sc round around shells to stabilize. Keep tension even. This prepares the work for the large scalloped finish.
Round 35 :
Wide scallop row (seafoam): *sk first 2 sts, in next st work 9 dc, sk 2 sts, sl st into next st; repeat across perimeter; in corners work 11 dc to form a fuller corner scallop. Repeat until the edge is consistently scalloped*
Round 36 :
Decorative picot trim: in cream yarn, work *(sc, ch3, sl st in top of sc) across scallop peaks to add small picots between larger scallops. This gives the antique lace finishing touch seen in the photos.*
Info :
Edge shaping: if the scallops distort the perimeter, decrease or increase dc within each scallop by one stitch to even out the arc. Blocking will smooth the final scallop curve significantly.
— Extra Wide Lace Flounce (Optional final rounds) :
Round 37 :
Work an optional flounce for additional drop: join seafoam and work repeated fan arches along the scallop row: *ch6, sl st into 3rd dc of next scallop, rep to create a fringe like lacy apron*
Round 38 :
Stabilize flounce with a sc round into ch spaces and sl st across peaks. Fasten off and weave ends well into the flounce to keep stitches secure.
Info :
Large spreads benefit from a heavier border to help drape; follow the optional flounce if you want more vertical drop over the sides of the bed.
— Tassels & Corner Finishing :
Round 39 :
Make large tassels: wrap yarn around a 3.5" cardboard 80-110 times depending on desired fullness. Cut one short length of yarn and tie securely around top to form tassel head. Fold and wrap a small piece of yarn around the top 1/2" of the tassel to make a neat neck and secure with stitches.
Round 40 :
Attach tassels to each outer corner: Thread the secure top tail through edge and knot on wrong side with several stitches. For the sample bedspread, attach a tassel at each corner of the whole spread and additional tassels centered between perimeter squares along the long sides every 2 squares for balanced spacing.
Info :
Use the tapestry needle to pass the tassel knot inside the scallop and secure multiple times. If tassels are heavy, reinforce with upholstery thread inside the knot for extra strength to avoid slippage when washed or handled.
— Finishing & Care :
Round 41 :
Weave in all ends on the wrong side using a large yarn needle. For long tails left for joining, trim to neat lengths after sewing seams securely.
Round 42 :
Final blocking: lay spread flat on blocking board, pin scallops and straight edges carefully, lightly mist and shape. Allow to dry fully. This step makes medallions pop and ensures the border lies flat.
Info :
Care instructions: Hand wash in cool water or machine wash on gentle cycle inside a laundry bag. Lay flat to dry to preserve the shape and avoid stretching. Remove tassels before washing if concerned about tangling.
Round 43 :
Optional: add a lightweight cotton lining to the underside if you prefer less airflow through the lacy fabric — pin and hand-stitch a square of cotton muslin to the wrong side of each square before joining.
Info :
This completes the pattern steps. The sections above describe every round of the spiral medallion, the square shaping and the full border. Repeat and adapt counts as needed for different yarns or finished square sizes.
Completing this Seafoam Spiral Granny Square Bedspread is such a satisfying journey — each medallion feels like a small triumph as it becomes part of the larger tapestry. The soft seafoam and cream palette gives a restful, vintage-cottage look that's perfect for a relaxing bedroom. Take your time with blocking and joining; the payoff is a luxurious drape and beautifully even lace. I hope you enjoy every stitch and the cozy atmosphere this bedspread brings to your home! 🧶🌿