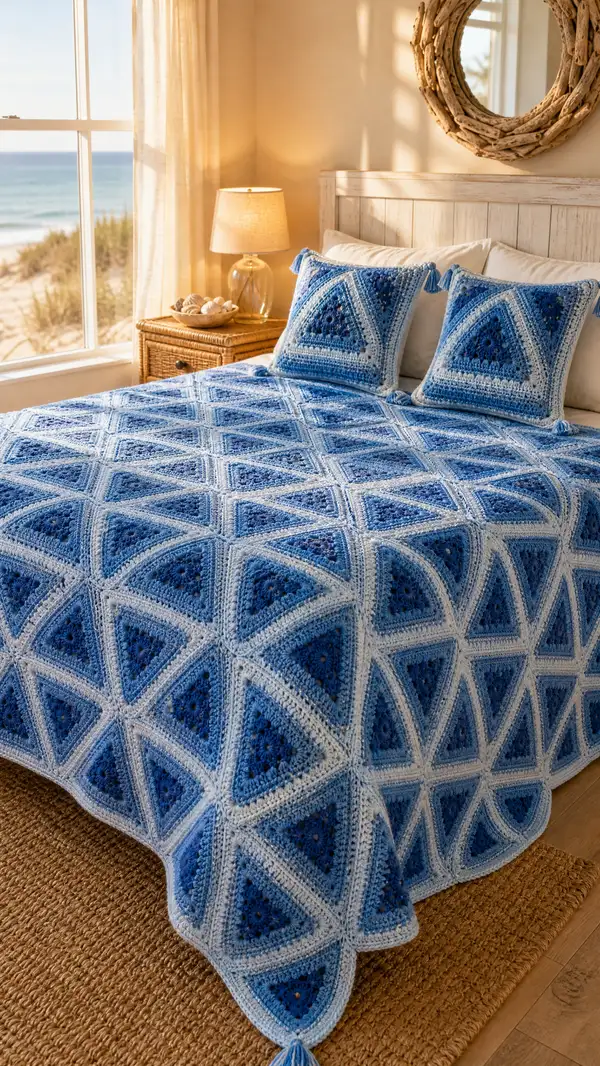
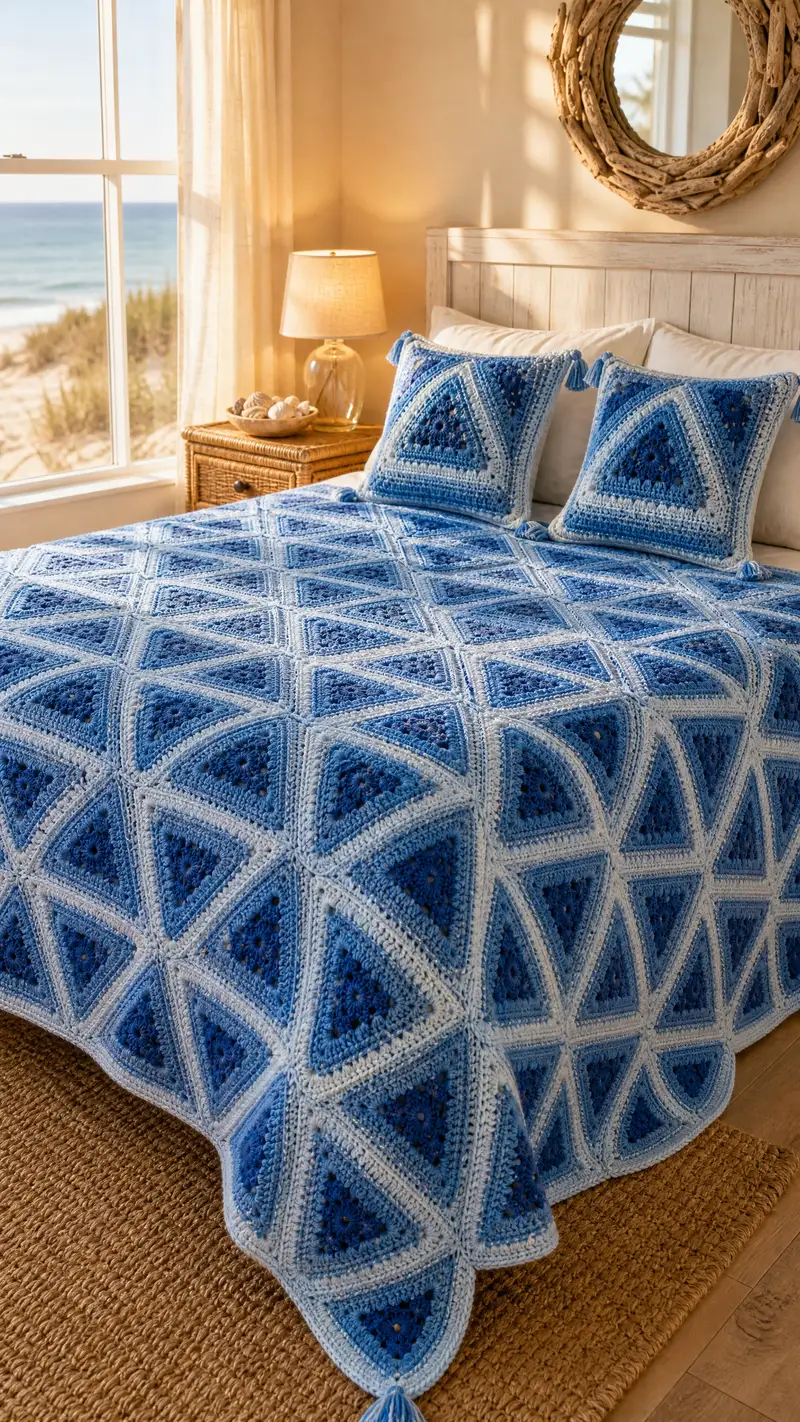
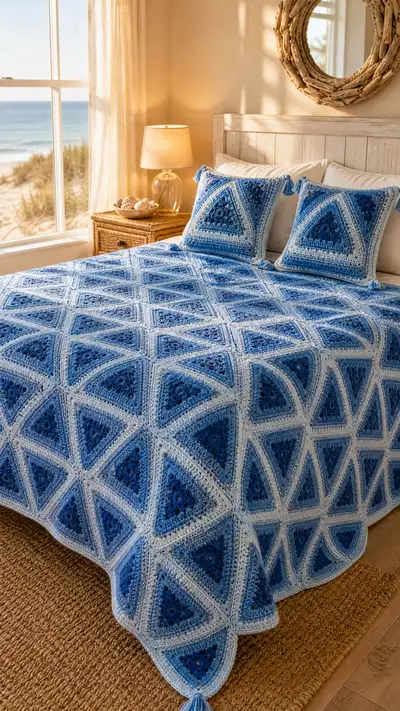
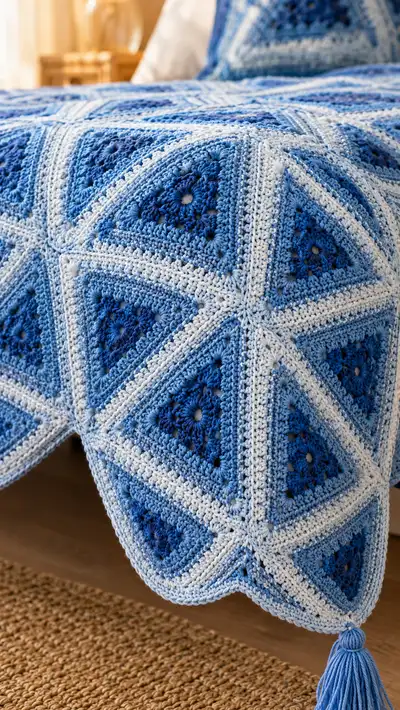
A soothing coastal-inspired bedspread made from denim-blue triangular granny motifs joined into a geometric diamond grid. This pattern features graduated blues framed in a soft cream border, with scalloped edging and tassel corners for a polished finish. Detailed motif construction and joining instructions make assembly straightforward. Ideal for a full/queen bed sized throw with matching pillow covers included.
Progress Tracker
0% Complete
— Notes & Gauge :
Info :
Gauge for one completed triangle motif (after rounds and blocking): approx 8.5" (21.5 cm) along each triangle side when using 4.0 mm hook and the specified yarn. Gauge is approximate; block motifs to match and adjust hook size if necessary.
Info :
Construction overview: Make modular triangle motifs (instructions below). Each square on the finished bedspread is formed by 4 triangles joined at their edges to create a diamond/rotated-square. Join motifs as you go using whip stitch or your preferred join-as-you-go method, finish with a multi-round framed border, scalloped edging, and tassels on corners. Pillow covers use the same triangles joined into squares for fronts; backs are worked as flat panels or assembled squares.
— Triangle Motif (make as many as needed) :
Info :
Each triangle motif is worked in rounds from the center out. We use 3 colors in the triangle (Dark Denim, Medium Blue, Light Sky Blue) and finish with a cream frame row. Change color at the end of the designated round using the final yarn over to carry a clean color change. Block each finished triangle to the same dimensions before joining.
Round 1 :
Using Dark Denim Blue, make a magic ring. Ch3 (counts as first dc), work 2 dc in ring, ch2, (3 dc in ring, ch2) twice more; sl st to top of ch3 to join. (3 corner clusters; total 9 dc, 3 ch-2 corners)
Round 2 :
Ch3, turn. *Work 3 dc into the ch-2 corner space, ch1, 3 dc into next side space across, ch1* along each side; at each corner work (3 dc, ch2, 3 dc) into corner ch-2 space; sl st to top of beginning ch3 to join. (Increase: clusters increase along sides; total clusters = 9, total dc = 27)
Round 3 :
Ch3. Along each straight side work 3 dc into each ch-1 space from previous round; at each corner work (3 dc, ch2, 3 dc) into corner ch-2. Sl st to join. (Total clusters = 15; total dc = 45)
Round 4 :
Ch3. Repeat Round 3 pattern: work 3 dc in each side space and (3 dc, ch2, 3 dc) into each corner. Maintain even tension to keep the triangle flat. (Clusters = 21; dc = 63)
Info :
Check for curling: if edges cup, loosen tension slightly or add an extra ch-1 space on sides for a flatter motif. If ruffling occurs, try a smaller hook.
Round 5 :
Ch3. Continue: 3 dc in each side space, (3 dc, ch2, 3 dc) into each corner. (Clusters = 27; dc = 81)
Round 6 :
Ch3. Repeat pattern along sides and corners. Maintain stitch counts carefully. (Clusters = 33; dc = 99)
Round 7 :
Ch3. Continue repeating the side and corner cluster pattern. This round will expand the motif and define the triangular shape. (Clusters = 39; dc = 117)
Info :
Change color to Medium Blue at end of Round 7: when finishing round, join Medium Blue with final yarn over on the last sl st, or cut and join new color neatly. Carry the Dark Denim tail and weave in later or leave a 6-8" tail for weaving.
Round 8 :
Using Medium Blue, ch3. Continue: work 3 dc in each side space; at corners work (3 dc, ch2, 3 dc) into corner space. (Clusters = 45; dc = 135)
Round 9 :
Ch3. Repeat as Round 8. This round deepens the Medium Blue band. (Clusters = 51; dc = 153)
Round 10 :
Ch3. Repeat side and corner clusters. (Clusters = 57; dc = 171)
Info :
Change color to Light Sky Blue at end of Round 10. If you want a more gradual gradient, you can add an extra Medium Blue round and then switch.
Round 11 :
Using Light Sky Blue, ch3. Work 3 dc into each side space and (3 dc, ch2, 3 dc) into each corner to continue building the outer triangle band. (Clusters = 63; dc = 189)
Round 12 :
Ch3. Repeat pattern around: 3 dc in each side space, (3 dc, ch2, 3 dc) into corner spaces. Finish round and fasten off Light Sky Blue, leaving a tail for weaving or joining. (Clusters = 69; dc = 207)
Info :
Final decorative frame row in cream: Join Soft Cream at any corner ch-2 space to frame the triangle and create a neat join edge. Work the cream row as described in Round 13.
Round 13 :
Join Soft Cream in any corner ch-2. Ch1, sc in same corner space, ch1, sc in next side space, *ch1, sc in next side space* across the side until you reach the corner ch-2; into corner work (sc, ch2, sc) to form a defined corner. Continue around. This creates a gridable sc frame along every side. (This round provides a uniform sc ridge along triangle edges to make joining easier.)
Info :
Trim ends and weave in tails neatly or leave long tails for joining—if you plan to join-as-you-go, leave the joining tails attached and use them for whip stitching later. Block each triangle now: pin to an 8.5" triangle shape measured along edges and steam or wet-block as fiber permits. Blocking equalizes motif size for tidy joining.
— Joining Motifs into Squares (each square = 4 triangles) :
Info :
Each square is formed by joining four identical triangle motifs so that points meet in the center and outer sides form the square edges. There are two ways: join-as-you-go (JAYG) or sew completed motifs together. This section shows a recommended whip-stitch join with cream yarn to match the frame.
Round 1 (Join Step 1) :
Arrange 4 triangles with cream frame facing up so that two triangles form the top and bottom and two form left and right and points meet in the center. Using a tapestry needle and Soft Cream, whip-stitch along the sc frame edges: align the sc stitches of one triangle to the adjacent triangle and insert needle under both sc front loops and pull yarn through. Work evenly to avoid pulling motifs out of shape. (No numeric stitch total; match sc frame counts across edges.)
Round 2 (Join Step 2) :
Sew all four triangles together so the inner points meet cleanly in the center. When all four sides are joined you will have a single square unit consisting of 4 triangles. Smooth the center join by sewing a small round of slip stitches on the WS through all layers to lock the center if desired.
Info :
Check alignment: after joining two triangles, fold the square to ensure the seam sits flat and the center point lies flat. Use blocking pins to keep seam flat while sewing the remaining seams.
Round 3 (Optional center reinforcement) :
With Soft Cream, working through all 4 inner tip layers, work 8 sl st around the very center hole to secure the meeting point. This creates a tidy center with no open hole. Fasten off and weave in ends completely.
Info :
Make as many 4-triangle square units as needed for your target dimensions. Suggested queen layout in this pattern: 10 squares across × 11 squares down = 110 squares. Each square uses 4 triangles = total 440 triangles. Adjust layout for smaller or larger bedspreads (see Layout section below).
— Assembling Bedspread Panels and Rows :
Round 1 :
Plan your layout. The sample bedspread uses a 10×11 square layout (10 squares wide × 11 squares long). Lay out 110 squares in the desired color pattern (alternating gradients) on a large flat surface or blocking board.
Round 2 :
Join squares horizontally first: align two adjacent squares so cream frames meet; using Soft Cream and a tapestry needle, whip-stitch through the sc frames aligning sc to sc. Work across each row joining all squares into 10-square wide rows. Repeat for all 11 rows. (There is no single stitch count listed—align sc frames and count sc stitches across for consistency.)
Info :
When joining rows, match seam tension across entire row to prevent smaller/longer stretches. Use pins every few inches to hold squares in place while you work. Work joins on RS for a cleaner WS seam or on WS for a cleaner RS depending on preference.
Round 3 :
After all horizontal joins are complete, join rows vertically: place adjacent rows with seam edges aligned and sew through sc frame spaces as before so all squares become one single large panel. Work slowly around any center cross seams so the grid lines match up precisely.
Round 4 :
After completing the main joins, check the overall rectangular shape. If edges are uneven due to blocking differences, gently stretch and pin the outer edges, then steam-block lightly (or wet-block per yarn instructions) to square the bedspread.
Info :
Alternatively, use slip-stitch joining or join-as-you-go technique when adding last round of each triangle to avoid sewing later. If using JAYG, follow the JAYG instructions in the triangle round-end Info sections when making later motifs to attach them directly into position.
— Frame Rows & Border Prep :
Round 1 :
With the assembled large panel laid out, join Soft Cream at any outer corner. Work 1 round sc evenly around the entire bedspread working (sc, ch1) in corner spaces where needed to keep corners square. Use 4.0 mm hook and sc into each outer sc from the motif frames; total stitch count will depend on panel size. This first framed sc round evens the outer edge and provides a base for the decorative border.
Info :
Work loosely when sc-ing around many layers (the bedspread edge is thick). You may switch to a 4.5 mm hook for the border if the fabric is too tight; keep consistent tension so the edge lies flat.
Round 2 :
With Soft Cream, ch2 (counts as hdc in this round if you prefer texture), work 1 hdc in each sc around to build a modest frame thickness. In corner spaces work (hdc, ch2, hdc) to maintain square corners. Sl st to join and fasten off. (This creates a 2-row cream frame around the whole bedspread.)
Round 3 :
Change to Light Sky Blue. Ch3 (counts dc). Work 1 dc in each st around to create a subtle blue band. In corner ch-2 spaces work (2 dc, ch2, 2 dc) to square corner. Join with sl st and fasten off Light Sky Blue. (This is decorative and echoes the triangle outer band.)
Info :
If your panel has scalloped edges (because outer triangle points create curves), you may prefer to work this round into both edge stitches and into the body where needed—always maintain even stitch density to keep border flat.
— Scalloped Decorative Border (12 rounds detailed) :
Round 1 :
Join Soft Cream. Ch1, sc evenly around as previous but plan scallop points: for every 10 sts along the long edges, leave a small gap and execute the scallop sequence to create consistent spacing. Exact repeats depend on panel circumference—aim for 1 scallop approx every 2.5-3".
Round 2 :
Ch3 (counts as dc), *skip 2 sts, 5 dc in next st (scallop shell), skip 2 sts, sl st in next st; rep from * around adjusting spacing for corners with (sl st, 5 dc, sl st) into corner to keep shells from bunching. Join with sl st.
Info :
If the scallops look too wide, work 4 dc shells instead of 5 dc. Try a small test on a corner scrap to match visual in photo.
Round 3 :
Switch to Medium Blue. Ch1, sc into the center of each scallop (work into 3rd dc of the shell), ch2, sc into same center, making a small picot-like ridge across scallops; sl st to join.
Round 4 :
Change to Light Sky Blue. Ch3, dc evenly into shells and base edge to bolster scallop shape; into corner shells work (2 dc, ch2, 2 dc) to accentuate corner shells. Join and fasten off Light Sky Blue if desired.
Round 5 :
Return to Soft Cream. Work 1 sc into each st across to give the scallop a crisp outline. Join with sl st. This gives a finished framed look that mirrors the motif framing.
Info :
You may continue with additional decorative rounds if you prefer a bulkier border—work alternating sc and dc rows, or surface crochet a chain outline along the diagonal seams for more definition.
Round 6 :
Optional: Work a final picot or crab stitch (reverse sc) border in Soft Cream to give a neat reversed edge that lies well over bedding. To crab stitch, work sc in reverse (left to right) in each st around.
Round 7 :
Info: Fasten off and weave in any remaining tails thoroughly across the border. Press lightly if yarn permits to flatten border, but avoid overheating cotton blends.
— Pillow Covers (Make 2 matching) :
Round 1 :
Pillow front: Make a square by joining 4 triangle motifs as described earlier. For a standard 18" pillow, join four triangles of the same blocked size to form an 18" square. Use the same cream frame to join and hide seams.
Round 2 :
For the pillow back: Option A: Work a 18" square in hdc or dc in Light Sky Blue to create a solid back. Option B: Make a second assembled 4-triangle square and join front and back together with sc edging. If using Option A, start at a corner and work rounds of dc increasing uniformly until you reach approx 18" square.
Round 3 :
Joining pillow: Place front and back RS together and sc around with Soft Cream leaving a 4" gap for stuffing or insert a pillow form and finish sc closed. Alternatively sew three sides and insert zipper on the fourth side for removable cover. Fasten off and weave ends.
Info :
Add tassels to pillow corners to mirror bedspread tassels: make 6-8 strand tassels approx 3.5-4" long and attach securely to corners using a strong knot and weaving the tail ends into the seam for stability.
— Tassels & Corner Finish :
Round 1 :
Make tassels using 8-10 strands of Light Sky Blue wound around a 3.5" card to create a 3.5–4" tassel. Secure top with a tight wrap using the same yarn and trim bottom evenly. Attach to each outer corner of the bedspread and pillow corners with several secure stitches hidden in the border.
Round 2 :
For the bedspread pictured, tassels are placed at each corner of outer scallops; use a long tail when attaching and weave through border layers to lock tassel in place. Tie an extra knot inside the border for durability.
Info :
If bedspread will be washed frequently, reinforce tassels with a small dab of fabric glue at knot (optional) or sew a small button on the inside seam and tie tassel loop over button for non-permanent attachment.
— Alternate Joins and Decorative Cross-Seam Detail :
Round 1 :
To mimic the pronounced cream grid lines in the photo, after joining rows and securing seams, use Soft Cream yarn and a surface slip-stitch to work along diagonal seams on the RS: attach yarn at one corner and work sl st along the middle of the sc frame seam so the cream line is raised and visible. Work along both directions across the whole bedspread for the crisp lattice effect.
Round 2 :
Work two parallel surface rows (one on each side of seam) if you desire thicker lattice lines. Keep stitches even and tension consistent to avoid pulling sides inwards.
Info :
Surface crochet gives a highly visible crisp grid—practice on a scrap to ensure visual spacing matches the photograph before working across the entire spread.
— Layout & Size Adjustment Guidance :
Round 1 :
Sample bedspread size shown (approx): Queen size finished cover ~ 90" × 90" (square-ish layout). Suggested layout producing similar coverage: 10 squares across × 11 squares down = 110 squares (each square ~9" blocked), giving approx 90" × 99" before border. Trim or adjust border rounds to achieve exact desired dimensions.
Round 2 :
Smaller bedspreads: reduce square count—for a throw approx 50" × 60" make 5 squares × 7 squares (35 squares). For a twin bed, try 7×9 squares. Number of triangles required = squares × 4.
Info :
Because motif blocking changes final dimensions more than stitch count, measure several blocked triangles across and recalculate how many squares across you need to reach your desired width before committing to hundreds of triangles.
— Finishing & Care :
Round 1 :
Weave in all loose ends using a tapestry needle, hiding ends through the join seams and border. Use firm but not overtly tight stitches when weaving to avoid puckers.
Round 2 :
Blocking: lay bedspread flat, pin to shape, and steam or wet-block per yarn manufacturer’s instructions. Cotton blends generally relax with steam; do not over-press acrylic blends. Let dry completely before use.
Info :
Care: Machine wash gentle cycle in cool water and lay flat to dry or tumble dry low depending on fiber content. Tassels can be hand washed and reshaped. Store flat or folded; avoid hanging which may stretch joins over time.
— Troubleshooting & Tips :
Info :
If you find motifs slightly different sizes after blocking, re-block the smaller motifs again or add an extra thin frame row to the small motifs to equalize. Keep a reference motif pinned as the model for size as you progress.
Info :
To speed production, work in assembly-line fashion: make 12 triangles in a sitting, then switch color banding and make the next 12. This rhythm keeps color transitions consistent across many motifs.
Info :
Record counts: keep a tally of motifs completed and pattern placement on a schematic or grid. Photograph your layout before joining rows to ensure you like the color placement before irreversible joining.
Bringing this bedspread to life is a wonderfully meditative process—one triangle at a time. The gradual blues framed in cream give a coastal, calming look that drapes beautifully on a bed. Each join and border round adds definition until the spread becomes a cohesive statement piece you’ll reach for every morning. I hope this pattern inspires long evenings of peaceful stitching and a lovely finished heirloom. 🧶✨