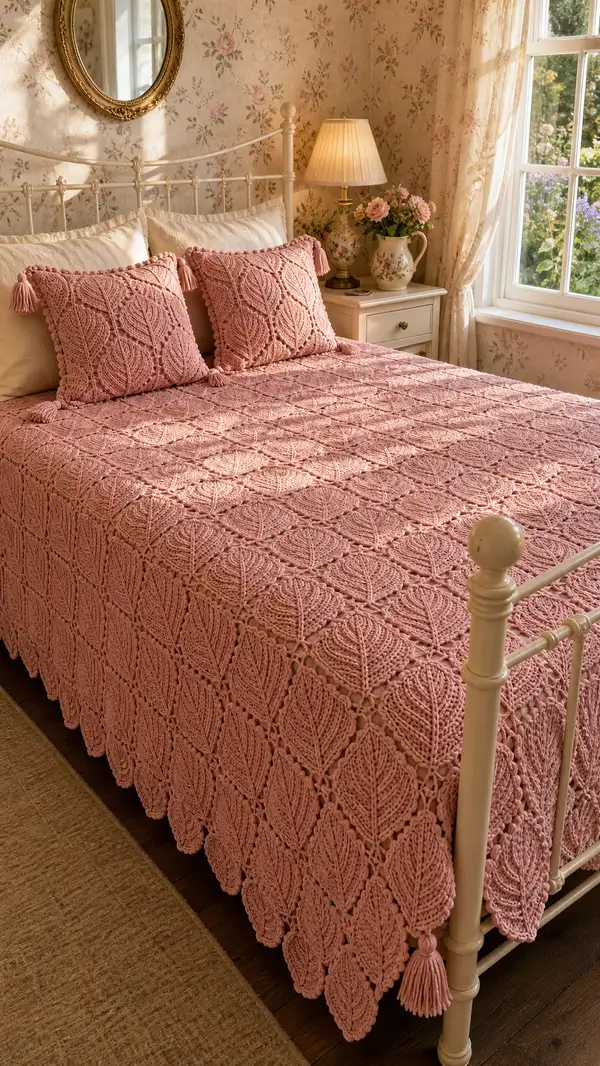
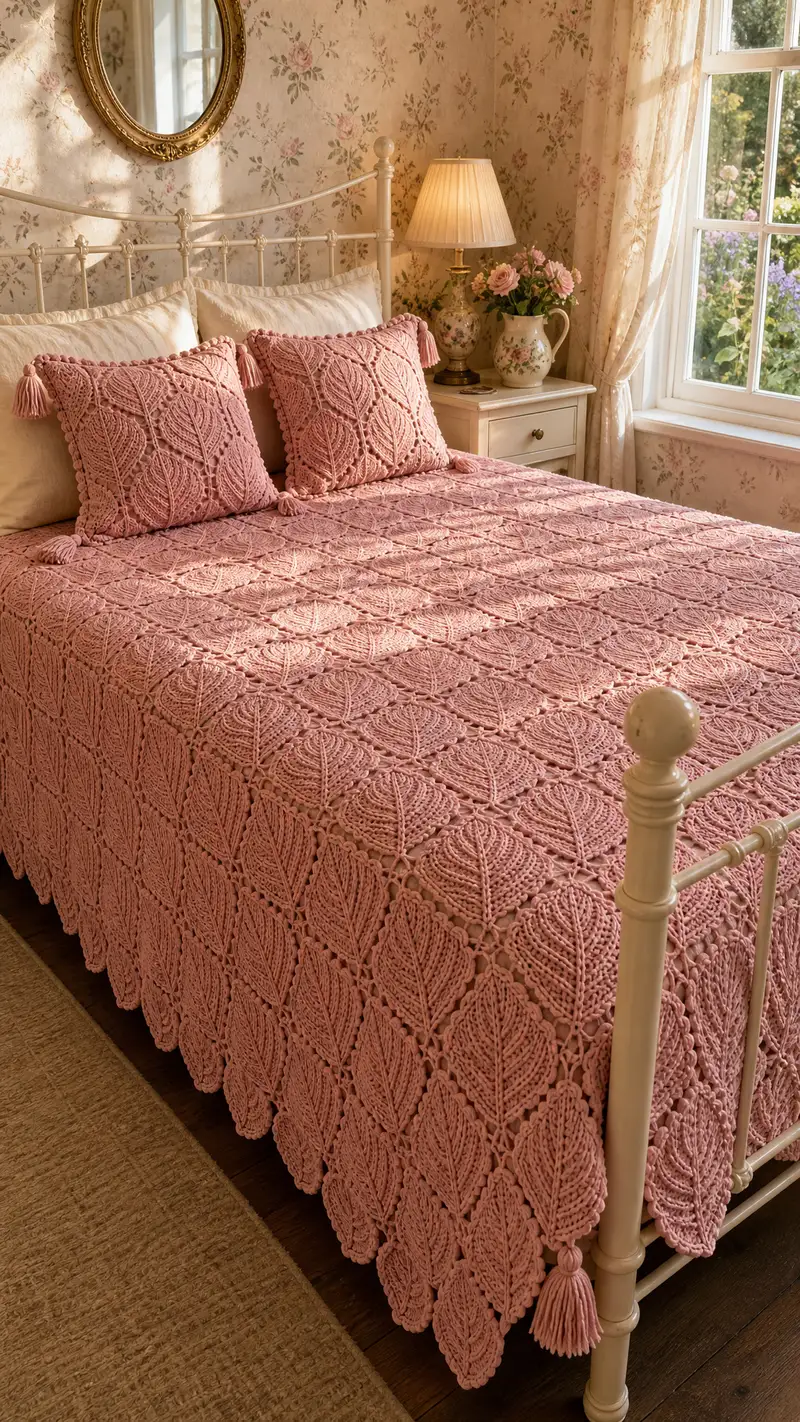
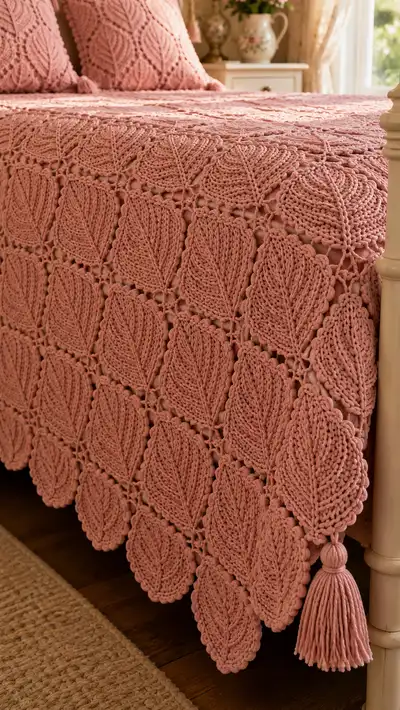
Create a romantic, vintage-inspired bedspread composed of large dusty rose leaf granny motifs joined into an elegant single-bed cover. The pattern features raised leaf texture, openwork joins, scalloped edges and coordinating pillow covers with tassels. Written for an intermediate crocheter, the design uses post stitches and puff clusters to get that sculpted leaf look and a soft drape perfect for a cozy bedroom.
Progress Tracker
0% Complete
— Overview :
Info :
This pattern describes the construction of a modular leaf granny motif, how to work textured leaf rounds, how to join motifs using a join-as-you-go (JAYG) method, how to build a scalloped border and instructions for two matching pillow covers with tassels. The examples use bulky weight (#5) yarn and a 6.5mm hook. Gauge and motif size will vary with yarn/hook — each finished motif as written measures approximately 19cm (7.5in) square before blocking.
— Motif (Leaf Granny Square) :
Materials for motif :
Bulky yarn, 6.5mm hook, stitch marker. Each motif begins with a small center ring and grows into a square with a textured leaf motif occupying the center.
Round 1 :
8 sc in magic ring (8)
Round 3 :
(1 sc, inc) x 8 (24)
Round 4 :
(2 sc, inc) x 8 (32)
Round 5 :
(3 sc, inc) x 8 (40)
Info :
Rounds 1–5 build a compact circular center. Keep stitch marker in the first stitch. Maintain even tension; this center will form the base of the leaf veins.
Round 6 :
(4 sc, inc) x 8 (48)
Round 7 :
(5 sc, inc) x 8 (56)
Round 8 :
(6 sc, inc) x 8 (64)
Info :
Now that you have a 64-stitch round, we will begin defining the square and the leaf texture. All further rounds remain 64 sts in count unless indicated otherwise — some rounds substitute textured clusters that count as one stitch.
Round 9 :
Ch1, 1 sc in first 16 sts, place marker after 16th st to mark the first side. Continue 1 sc in next 16 sts, place marker, 1 sc in next 16 sts, place marker, 1 sc in last 16 sts (64)
Round 10 :
Ch2 (counts as hdc), *hdc in next 15 sts; hdc in next st; rep across each side to maintain 16 hdc per side (64)
Round 11 :
Ch1, 1 sc in each st across (64)
Info :
Rounds 9–11 square the piece into four identifiable sides of 16 sts each — this helps locate the leaf center and the corner points later. Keep markers in place to identify sides for shaping.
Round 12 :
Begin leaf spine: ch3 (counts as dc), *skip 1, dc in next 15 sts along side 1, ch1 across corner space, dc in first 15 sts along side 2, skip 1 (creating a vertical spine). Repeat mirrored on remaining two sides so that the dc lines form a cross of raised dc columns across the square (64)
Round 13 :
Ch1, 1 sc in each st and ch-sp around, working 3 sc in each corner ch1 to keep square shape (64 + corner allowances counted as 64 main stitches)
Info :
Round 12 builds four dc ridges that will later be the guideline for leaf halves. Round 13 evens the fabric. From here we start the leaf texture using front post and puff clusters centered on the spine.
Round 14 :
Ch1, *sc for 6 sts, fpdc around the next dc ridge 3 times (these 3 fpdc form the start of a textured vein), sc for remaining sts across the side; repeat each side (64)
Round 15 :
Ch2, dc in next 6 sts, puff in next 3 sts (work puff over 3 loops leaving last loop on hook for each puff — puff counts as 1 st), dc in next 6 sts; repeat across each side so that each side has a centered puff cluster forming the leaf belly (64)
Info :
Puff stitch: yarn over, insert hook, yarn over, pull up a loop, repeat twice in same stitch for a 3-loop puff, yarn over and pull through all loops, ch1 to secure. Count the puff as one stitch in the round count.
Round 16 :
Ch1, sc around working sc in each puff-ch1 space as a single st and sc in fpdc stitches (64)
Round 17 :
Leaf shaping row: on side 1 work (sc3, inc, sc3) across the side center to slightly widen the leaf base (increasing by 2 sts on that side only). Repeat symmetrically on opposite side. If you increase 2 sts each on two opposite sides, total stitch count becomes 68 (68)
Info :
Small increases on opposite sides begin to bias the square to a vertical leaf orientation. Keep track of which sides received the increases; place removable markers if needed.
Round 18 :
Ch2, dc in each st around maintaining 68 sts, but work dc2tog (decrease) at the exact corner points to keep square corners defined (68)
Round 19 :
Ch1, 1 sc in each st (68)
Round 20 :
Detailed vein row: *fpdc around selected dc from Round12 for 6 fpdc along the central spine to push the vein forward; between fpdc groups work sc to maintain stitch count — overall remain 68 (68)
Info :
Work evenly and keep fpdc height consistent. If your fpdc are too tall, use hdc front post instead to reduce height. This row defines the raised central vein of the leaf.
Round 21 :
Ch1, sc around (68)
Round 22 :
Leaf shaping: create tapered leaf tip by working (2 sc, dec) across top side center twice, and (2 sc, dec) across opposite side center twice. This decreases 4 sts total resulting in (64)
Round 23 :
Ch1, sc around (64)
Info :
At this stage the central leaf shape is visible: a raised vein and puff clusters form the bulk of the leaf; rounds 22–23 start tapering to make the tip and base. Maintain stitch counts carefully when making decreases.
Round 24 :
Leaf ribbing: *ch2, skip next st, sc in next st across center leaf area to produce small open ribs on either side of the central vein; continue sc around the border to maintain 64 sts (64)
Round 25 :
Ch1, sc around (64)
Round 26 :
Work a row of small shell bumps along motif edges to prepare for joining: *sc in first 2 sts, (hdc, dc, hdc) in next st, sc in next 2 sts; rep around (64)
Round 27 :
Ch1, sc around (64)
Info :
Rounds 24–27 refine the leaf texture and add a decorative pre-join edging. If you prefer a flatter motif, substitute fpdc with hdc or sc in earlier texture rows.
Round 28 :
Prepare corners for square finish: At each corner work (sc, ch3, sc) in the corner point to form a small corner loop; sc across sides to maintain 64 major sts, corner ch-loops are counted as decorative spaces (64)
Round 29 :
Ch1, 1 sc in each st and in each corner ch3 loop work 3 sc to secure corner (64)
Round 30 :
Final motif round: *sc, picot (ch3, sl st in first ch) across the side by repeating every 4th st to create a soft scallop; adjust so total remains 64 (64)
Info :
Fasten off leaving a 30–40 cm tail for joining if you plan to join using a whip or mattress stitch. Block motif to 19cm (7.5in) square measurements, pinning to shape and steam or wet-block per yarn guidelines. Repeat to make the number of motifs needed for your bedspread layout.
— Motif Notes (texture choices) :
Info :
If you prefer a more pronounced leaf rib, replace the puff clusters with 5-loop puff stitches or use tr front post for the central rib. The pattern counts assume puff clusters count as one stitch; keep stitch counts as instructed for consistency.
— Motif Repeat & Layout :
Info :
For a single bed layout shown in the photo, plan 6 motifs across by 8 motifs down to cover mattress top and sides with overlap for drape. That yields 48 motifs. Measure your mattress and adjust: width = number motifs across x motif width, length = motifs down x motif length. Overlap by 1 motif depth for side drop if desired.
— Join-As-You-Go (JAYG) Method — Joining motifs as you go :
Info :
We recommend joining motifs using a simple JAYG slip-stitch seam worked into the corner ch3 spaces and edge sts so leaves align. Alternate method: sew motifs together after blocking using tapestry needle and mattress stitch.
Join Round 1 :
Work motif to Round 27 leaving final rounds unworked (stop after Round 27). With right sides facing, align a new motif to an already-blocked motif placed flat. Join in corner ch3 loop with sl st, then sl st into each corresponding edge stitch across until corner — join through back loop only to create a subtle ridge (work sl st across 1 side, 16 joins). Repeat across both directions.
Info :
When joining, keep motifs oriented so leaf veins all point the same direction unless you want alternating direction for a chequered effect. Use a contrasting stitch marker at the start of joining row to maintain reference.
Join Round 2 :
After joining sides with sl st, return to the front and work a sc border along the joined seam through both motif edges: *sc through both loops into seam join; ch1 between each sc to maintain flexibility (work 16 sc for each side you joined) (counts vary per seam)
Info :
Joining two motifs will produce a seam of approximately 16–18 sc depending on motif width. If your motif stitch count differs slightly, adjust sc count to match the number of edge stitches precisely so joins lay flat.
Join Round 3 :
Once you have sewn two rows of motifs, start joining the next motifs into the seam row using the previous sl st join row as the joining foundation. Work sl st into previous join row ch1 spaces, then return to sc across the new seam to reinforce (repeat until full panel assembled).
Info :
For stability, after assembling rows, crochet a single round of sc around the entire joined panel before working edge rounds. This evens join tension and creates a clean base for the scalloped border.
— Edge & Scalloped Border (worked after entire bedspread assembled) :
Border Round 1 :
With right side facing, attach yarn to any edge stitch. Work 1 sc in each edge st around the entire assembled spread; in corner work (sc, ch3, sc) to turn the corner. Maintain counts that correspond to assembled edge; this creates a firm foundation round.
Border Round 2 :
Ch3 (counts as dc), *skip next st, (dc, ch1, dc) in next st, skip next st, dc in next st; rep around to create spaced clusters (counts depends on edge length) — try to keep cluster repeats evenly distributed.
Info :
Border Round 2 creates the openwork lattice for the scallops. Count stitches along each edge and distribute cluster repeats evenly so the scallops line up on each side and corner.
Border Round 3 :
Ch1, sc in each dc and ch1-space around, but in each (dc,ch1,dc) work (sc, picot, sc) into the ch1 space to make a small decorative point (maintain counts by substituting clusters).
Border Round 4 :
Scallop formation: *work (5 dc) into the center of each cluster from Round 2 to create scallop arcs; in between arcs work (sc in next 3 sts) to maintain spacing. Continue around making sure scallops fill corners with (5 dc, ch2, 5 dc) at corner clusters.
Border Round 5 :
Ch1, sl st across scallop peaks to smooth and then work small single crochet picot edging: *sc3, picot (ch3 sl st in first ch), sc3 across each scallop peak and around corners.
Info :
Depending on how deep you want the scallops, repeat Round 4 and Round 5 to increase scallop depth or keep it subtle with a single scallop pass. Blocking after the border is essential to open scallops evenly.
Border Round 6 :
Finish with one last sc round: 1 sc in each st and in each picot space, fasten off and weave in ends. Trim and tidy, then steam-block the entire bedspread flat to open motifs and scallops.
— Pillow Covers (Make 2) :
Design Notes :
Pillow covers are assembled from four leaf motifs (2x2 layout) joined with same JAYG method, finished with a narrow border and a removable pillow insert or sewn closed backing. The pictured pillows are square and have tassels on each corner.
Pillow Motifs :
Make 4 motifs to the completion of Round 30 for each pillow (8 motifs total). Block each motif to exact size so the four-piece panel is square and seams align.
Pillow Join Round 1 :
Join the four motifs into a 2x2 square using the JAYG sl st technique: join two top motifs across their adjacent side, join two bottom motifs, then join across the middle seam. Reinforce joins with a sc row through both edges.
Pillow Border Round 1 :
Round 1: sc around the 2x2 pillow panel, working 3 sc in each corner loop to keep corners square.
Pillow Border Round 2 :
Round 2: Ch3 (counts as dc), *dc in next 2 sts, ch1, skip 1 st; rep around to create a light openwork. Fasten off.
Back Panel Option A (Envelope) :
Create two rectangular panels in sc to fit pillow back with overlap for closure (measure pillow insert). Attach to front panel by sewing three sides leaving top open for insert.
Back Panel Option B (Zipper/Finished) :
Make one back panel the exact size of the front and sew all around leaving one side open to insert a zipper or button closure. Sew edges together for permanent closure if desired.
Info :
For a neater look, use a thin yarn of same color to whip stitch edges invisibly. Pillow covers should be blocked flat and trimmed before attaching tassels.
— Tassels (Corner Tassels) :
Tassel Size :
Make four tassels per blanket corner (two per corner if you prefer fuller tassels). In the photo each tassel is substantial; measure about 12–15 cm long for the hanging portion.
Tassel Round 1 :
Wind yarn around a 12cm wide piece of cardboard approximately 40–50 times for a full tassel. Slip one loop at the top, tie firmly with a short yarn tail for the head, fold loops in half and wrap yarn around the top 2–3 cm to make the tassel neck. Trim the bottom loops to even them and remove from cardboard.
Tassel Round 2 :
Sew tassel securely to each corner by feeding the taped neck tail through the corner ch3 loop and knotting on the underside. Reinforce with a few whip stitches to the motif corner for security.
Info :
For long-lasting tassels, use a small dab of fabric glue beneath the neck wrap or stitch across the wrap several times. Make tassels consistent in length by trimming all four together on a flat surface.
— Finishing & Blocking :
Info :
After joining and attaching border, pin the entire spread to measurements on a blocking mat and steam or wet-block following yarn instructions. Gently shape scallops and leaf tips outward. Allow to dry completely before removing pins. Weave in all loose ends, trim, and press seams if needed.
— Sizing & Adjustments :
Info :
To make the spread larger or smaller, add or subtract motif rows. Each motif as worked measures approximately 19cm (7.5in) square; calculate number of motifs needed by dividing the desired finished width/length by motif size. Consider overlap for drape if you want side drop beyond mattress depth.
— Advanced Texture Variations :
Info :
If you prefer an even more sculpted leaf, replace the central fpdc column with fp tr (front post treble) and make puff clusters 5 loops instead of 3. Keep stitch counts unchanged by treating these tall stitches as single stitch equivalents.
— Troubleshooting & Tips :
Info :
If motifs look stretched on one axis, check your tension when making post stitches and ensure blocking is uniform on each motif. Use a single brand and dye lot of yarn for even color and thickness across the spread.
This dusty rose bedspread pattern brings a touch of vintage romance to any bedroom with its sculpted leaf motifs and soft scalloped border. Each motif is a tiny work of art, and joining them creates a beautiful repeating leaf field that's a joy to make and display. Whether you're gifting it or keeping it, you'll love the tactile detail and the soft handmade warmth it adds to a room. 🧶🌸