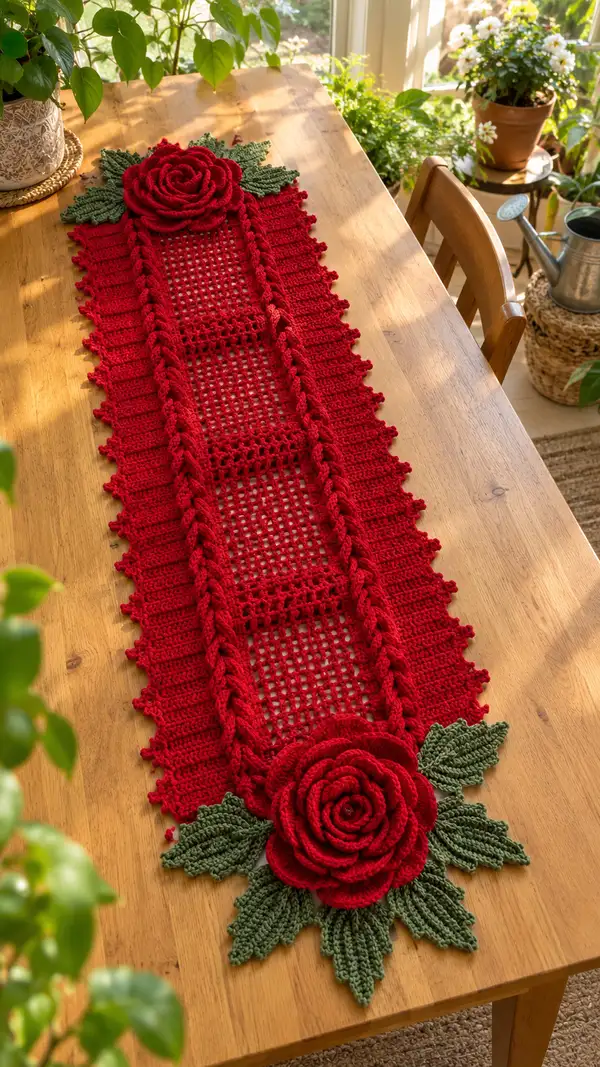
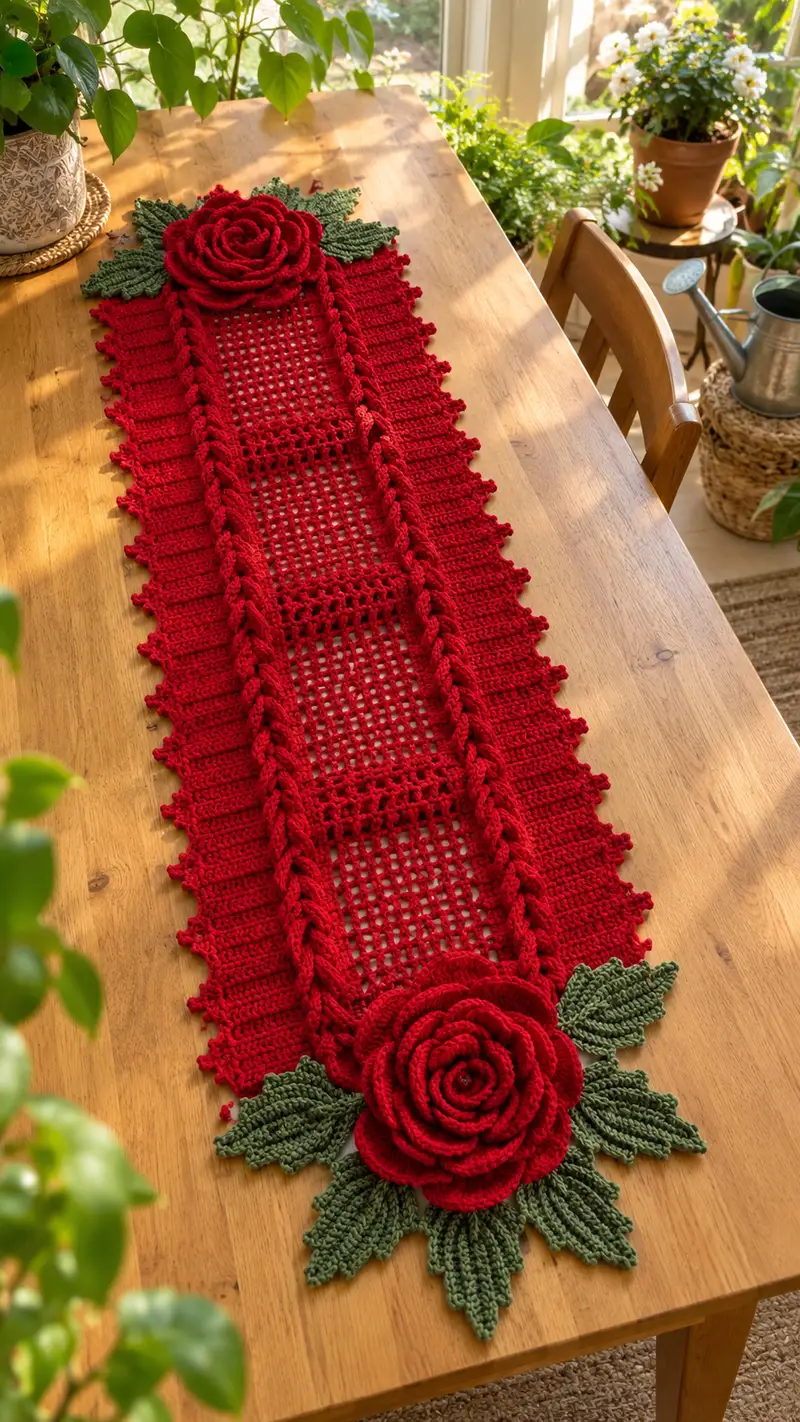
Create a stunning, vintage-inspired table runner featuring three airy mesh panels, sculpted braided columns and two dramatic layered crochet roses with textured green leaves. Worked in worsted-weight yarn, this runner combines filet mesh, post-stitch cables and floral appliques for a bold centerpiece. The pattern is modular so you can adapt length by repeating the central panel. Clear step-by-step rounds, tips and assembly notes make this a satisfying project for intermediate crocheters.
Progress Tracker
0% Complete
— Pattern Notes :
Info :
This pattern is written using US terms and is modular: a central mesh panel (Panel A) is repeated three times to match the photographed runner length. You can make more or fewer panels to adjust overall length. Work loosely through the mesh sections but pull tension tighter for braided columns and roses to maintain definition. Block pieces lightly before assembly for best results.
Info :
Gauge is not critical for overall look but affects final dimensions. With worsted yarn and 4.0 mm hook, a single mesh panel (as written) will measure approximately 10.5 x 10.5 inches (after light blocking). Use this to calculate repeats for desired length.
— Foundation and Layout :
Info :
The runner is constructed from three types of long components: central mesh panels (make multiple), braided cable columns (make two long columns that run full length), and outer plain border strips (make two). Floral clusters are made separately and sewn to each end. All long strips are joined at the end edge to make the continuous runner.
Info :
Central mesh panel counts are given for one panel unit. The pictured runner uses 3 mesh panels joined end-to-end with short joining rows between them. Repeat the central panel instructions for additional repeats.
— Central Mesh Panel (Make 3) :
Row 1 :
With main color, ch 41. Turn. (foundation chain 41)
Row 2 :
Working into 4th ch from hook (counts as dc), 1 dc, *ch 1, sk 1 ch, 1 dc in next ch; rep from * across until last ch, 1 dc in last ch. Turn. (Approx 20 dc + 20 ch-1 spaces)
Info :
This establishes a filet mesh (dc and ch1 spaces). Count of dc and ch spaces will alternate; you should have a dc at each edge and ch-1 spaces between. Keep edges neat by placing the final dc in top of turning chain when possible.
Row 3 :
Ch 3 (counts as dc), *ch 1, sk next dc, dc in ch-1 sp; rep from * across ending with dc in top of turning ch. Turn. (Mesh repeat continues)
Row 4 :
Repeat Row 3 across. Turn. (Maintain mesh grid)
Rows 5-12 :
Repeat Row 3 for a total of 12 mesh rows (including Row 3 & 4). Keep tension even and count spaces to ensure 20 ch-1 spaces persist. (Panel height after Row 12 reaches the first mesh block height.)
Info :
Place stitch markers in the first and last st of every 4th row to help match up vertical placement when joining panels later. These markers also help align braided columns.
Row 13 :
Ch 3, 1 dc in same st, *ch 1, sk next dc, 2 dc in next ch-1 sp; rep from * across, ending with 1 dc in top of turning ch. Turn. (Creates slight widening row in mesh)
Row 14 :
Ch 3, *ch 1, 2 dc in next ch-1 sp; rep across, ending with dc in top of turning chain. Turn.
Rows 15-18 :
Repeat Row 3 four times to restore even mesh grid. Turn after each row. (This builds middle open section.)
Info :
If you prefer a tighter mesh, substitute dc with hdc on odd-numbered rows for a denser fabric. The pictured runner uses full dc for airy look.
Row 19 :
Ch 3, then dc in each dc and ch-1 space across to edge, placing 1 dc in top of turning ch. Turn. (Solid row creates a defined band between mesh sections)
Rows 20-24 :
Repeat Row 3 for five rows to create the second mesh section (rows counted from Row 1 of this panel). Turn after each row.
Info :
At the end of Row 24 the panel height matches approximately one third of the runner in the photo. Make three identical panels and join with short joining rows as explained later to achieve pictured length.
Row 25 :
Ch 3, 1 dc in same st, *ch 1, sk next dc, 2 dc in next ch-1 sp; rep from * across, ending with dc in top of turning chain. Turn. (Gives symmetry to panels)
Row 26 :
Ch 3, *ch 1, 2 dc in next ch-1 sp; rep across. Turn.
Rows 27-28 :
Repeat Row 3 for two rows finishing the panel. Fasten off leaving long tail for joining. Block panel lightly to square edges.
Info :
Make 3 Mesh Panels in total. If you desire a longer runner, make additional panels and join them end-to-end. Blocking each panel before joining ensures even joins and straight braid alignment.
— Braided Cable Column (Make 2 full-length) :
Info :
The braided cable column is a raised vertical element along either side of the mesh panels. Work a long strip to match the full runner length (three mesh panels joined length). The braid effect is achieved with front and back post double crochets and cluster crossings. The written rounds describe a 6-stitch wide braid column; repeat the 8-row cable repeat along the length.
Row 1 :
With main color, ch 6. Turn. (foundation chain 6)
Row 2 :
Ch 1, sc in 2nd ch from hook and across (5 sc). Turn. (5 sts)
Row 3 :
Ch 2 (counts as hdc), hdc in each st across (5 hdc). Turn.
Row 4 :
Ch 2, *fpdc around next st, bpdc around next st; rep from * across to last st, hdc in last st. Turn. (Texture foundation)
Row 5 :
Ch 2, hdc in first st, *bpdc around the fpdc of previous row, fpdc around the bpdc of previous row; rep from * to last st, hdc in last st. Turn. (Creates the crossing effect)
Info :
Rows 4-5 form the basic crossing which, when repeated, appears as a braided column. Keep post stitches loose enough so the braid sits proud of the surface rather than flattening into the mesh.
Row 6 :
Ch 1, sc across in BLO to create tidy edges (5 sc). Turn. (This locks the braid)
Row 7 :
Ch 2, hdc in each st across (5 hdc). Turn.
Row 8 :
Repeat Row 4 across (fpdc/bpdc cross). Turn. (This completes an 8-row braid repeat)
Rows 9-160 :
Repeat Rows 5-8 twenty times (total height will match three mesh panels joined). Continue until braid column length equals the combined length of all Mesh Panels plus joining rows (measure as you go). Fasten off and block lightly.
Info :
For the pictured runner the braid column is continuous; it's easiest to work one long strip to the full length. If you prefer, make shorter braid lengths equal to each panel and seam between panels aligning the crossings.
— Outer Border Strip (Make 2 full-length) :
Row 1 :
With main color, ch 14. Turn. (foundation chain 14 per strip)
Row 2 :
Ch 1, sc in 2nd ch from hook and across (13 sc). Turn. (13 sts)
Row 3 :
Ch 2, hdc across (13 hdc). Turn.
Rows 4-10 :
Repeat Row 3 seven times to build a flat plain border. Turn after each row. (Creates the broad outer edge visible along runner sides)
Info :
The outer border strip is slightly wider than the braid column and frames the runner. Adjust chain count to match visual width if you prefer a narrower or wider outer border.
Rows 11-160 :
Continue Row 3 until the strip height equals combined panel length. Fasten off leaving tail for seaming. Block flat.
— Joining Mesh Panels into Length :
Info :
Once you have created three Mesh Panels, two Braided Columns and two Outer Border Strips to the same length, join them into a single runner. The order from left to right is Outer Border - Braided Column - Mesh Panel - Braided Column - Mesh Panel - Braided Column - Mesh Panel - Braided Column - Outer Border. In the pictured arrangement the braid columns sit between panels, with the outer borders framing the runner.
Join Step 1 :
Lay pieces flat on blocking surface with RS up and align edges. Use mattress stitch or whip stitch with a yarn needle and matching yarn tail to sew narrow edges together. Ensure the braided crossings align vertically across joins. Sew the mesh panel short edges to the braid column edges first, then sew braid-to-mesh-to-braid and finally attach outer border strips to braid outer edges.
Info :
Use pins to hold pieces and check that the central mesh holes line up across joins. Sewing through both layers at the edge of the dc row gives a neat seam. Weave tails inside and knot securely on the WS.
— Decorative Scalloped Picot Edge (Work all around runner) :
Round 1 :
With RS facing, join yarn at one corner with sl st. Ch 1, sc evenly along outer edge (approx one sc per row edge), 3 sc in corner to turn, continue around entire outer edge of runner, placing 3 sc in each corner. Join with sl st to first sc. (Count varies by runner length)
Round 2 :
Ch 1, sc in same st, *sk 2 sc, (5 dc in next sc), sk 2 sc, sc in next sc; rep from * around. Join with sl st. This creates a slightly ruffled outer band. Fasten off and weave ends.
Round 3 :
Join yarn at any sc on outer band, ch 3, (sl st, ch 3) in every sc around to create small loops. Fasten off and trim ends. Block gently to set picots open.
Info :
For a more delicate picot edge, substitute 3-dc clusters with 3-tr clusters and smaller chain loops. The pictured runner shows a small bobble-like picot edging; the above approach approximates that look.
— Large Layered Rose (Make 2 for ends) :
Info :
The rose is worked as a spiral foundation with progressively larger petals worked in rows and then coiled into a packed rose form. Work petals in tighter hook (3.5 mm) if you want sharper petals. Each 'round' below is actually a row within the spiral. For visual similarity make two identical roses and stack the coils to build volume.
Round 1 :
With main color and 3.5 mm hook, ch 5. Sl st to first ch to form a small ring. Ch 3 (counts as dc), 11 dc into ring. Join with sl st to top of ch-3. (12 dc)
Round 2 :
Ch 3, (dc, ch 1, dc) all in same st (creates center petal), *skip next st, (dc, ch1, dc) in next st; rep from * around. Join with sl st to first ch-3. (6 petal clusters)
Round 3 :
Ch 1, sc in same st, *ch 3, sk petal cluster, sc in next space between clusters; rep around creating spaced picot loops. Join. (Sc foundation for next round petals)
Round 4 :
Ch 3, 2 dc in first ch-3 sp, ch 2, 3 dc in same sp (shell), *3 dc, ch 2, 3 dc in next ch-3 sp; rep across forming rounded petals. Join. (Shells create first ring of petals)
Info :
At this point your center will look like a small rosette. To get the layered look, subsequent rounds increase petal size and stitch counts and are not seamed; you'll join the spiral by coiling as you work or after finishing all petal rows.
Round 5 :
Ch 1, sc in same st, *ch 4, sc in center of next shell; rep around. Join. (Creates taller spacing for larger petals)
Round 6 :
Ch 3, 4 dc in ch-4 sp, ch 3, 5 dc in same sp (large shell), *5 dc, ch 3, 5 dc in next ch-4 sp; rep around. Join. (Larger petals forming)
Round 7 :
Ch 1, sc around petals to anchor, place sc evenly across tops of shells. Join. (Anchor round)
Round 8 :
Ch 3, 6 dc in next ch-3 sp, ch 4, 6 dc in same sp; rep around creating very large outer petals. Join. (Outer ring created)
Round 9 :
Ch 1, sc across the top of each large petal to make a tidy edge. Fasten off leaving long tail for coiling and sewing. (Do not stuff heavily.)
Info :
Make two identical rose spirals. For extra depth make a smaller spiral center (Repeat Rounds 1-5) and stack inside the larger spiral before sewing closed.
Assembly (Rose Coiling) :
Lay the spiral flat with RS up. Starting at the outermost end, roll the spiral inwards forming petals on top of one another, adjusting overlap until the rose looks full and balanced. With long tail and yarn needle, stitch through the base of the spiral and several petals to secure coil. Sew across the bottom in several passes to lock shape. Weave tail to wrong side and trim. Repeat for second rose.
Info :
For the dramatic layered style in the picture, make one larger outer spiral and a slightly smaller denser spiral for the center then stack and sew the smaller onto the larger, offsetting slightly to achieve the layered swirl.
— Leaves (Make 8 per rose cluster; 4 per side) :
Info :
Leaves are worked flat with textured ridges using BLO and post stitches. Use green contrast yarn. The pictured runner shows 7-9 pointed leaves fanning under each rose—work 8 leaves per cluster to match photo fullness.
Leaf 1 Row 1 :
Ch 12. Turn. (foundation chain 12)
Leaf 1 Row 2 :
Sc in 2nd ch from hook, hdc in next, dc in next 3, hdc in next 2, sc in last 2. Turn. (Creates a tapered shape)
Leaf 1 Row 3 :
Ch 1, sc in first st, *working in BLO only across this row: hdc, dc in the top of center st making apex, hdc, sc; rep shaping to other side to create mirror by continuing along remaining sts; do not join—leaves are worked flat. Fasten off with tail for sewing. (Defined center ridge appears)
Row 4 :
Optional: Add surface fpdc ridge down center; join yarn at base with sl st then work fpdc in a narrow row up center to mimic vein. Fasten off and weave ends.
Info :
Make 8 leaves per cluster. For varied sizes make half with ch 10 (smaller) and half ch 14 (slightly larger). Shape leaves by blocking over a curved edge to get natural curl and dimension.
— Small Decorative Bobelets Between Braids and Border :
Info :
The little bobble/picot details seen on the outer border are optional but add vintage charm. Work them along the inner edge of the outer border strip before joining. The instructions below create small picot bobbles spaced every 6 rows.
Round 1 :
With RS facing, attach yarn at chosen spot on border edge. Ch 1, sc in next 3 sts, *ch 3, sl st in same st (picot), sc in next 6 sts; rep along border. Fasten off and weave ends. Repeat mirror on other border strip.
Info :
Space counts will depend on your border stitch count. Adjust spacing for even distribution matching the photo—approximately 8-10 small picot bobbles per long side segment between roses in the pictured runner.
— Final Assembly and Applique :
Info :
Arrange all components on a flat blocking surface: the long joined runner center and both roses with leaf clusters. Position the large rose clusters so that each rose sits flush with the runner end and the leaf cluster fans outward slightly off the runner edge as pictured. Pin in place.
Sewing the Rose :
Using long tails from rose bases, whip stitch the rose base onto the runner end edge, being sure to catch both the runner fabric and a few stitches of the inner coil. Take multiple passes to fully secure the rose so it does not shift. Hide knots and tails on WS.
Sewing Leaves :
Position leaves around the rose base, overlapping slightly and alternating leaf points to create a full fan. Sew each leaf at the base into the runner and into underside of the rose with small stitches. Reinforce where leaf meets rose with a few extra stitches for stability.
Info :
Weave all ends neatly on the wrong side. For additional security, small dots of fabric glue can be used under the rose base before sewing, but only if preferred and completely dry before moving runner.
Blocking and Finishing :
Lightly spray-starch or use steam to block the runner flat. Push the braids slightly up so their texture shows. Pin flower petals open gently to preserve shape while drying. After completely dry, remove pins and give a final tidy weave of ends.
Info :
Store the runner flat or rolled to avoid flattening the roses. For table use, consider a subtle non-slip textile under the runner to keep it centered on the table without shifting under the weight of decorations.
This elegant runner transforms a simple table into a romantic display—crisp mesh panels, proud braided columns and lush layered roses create a statement piece. Each applique and stitch brings texture and depth; the modular design lets you adapt length and color to suit seasonal decor. I hope making this piece fills your home with handcrafted charm and floral warmth. 🧶🌹✨