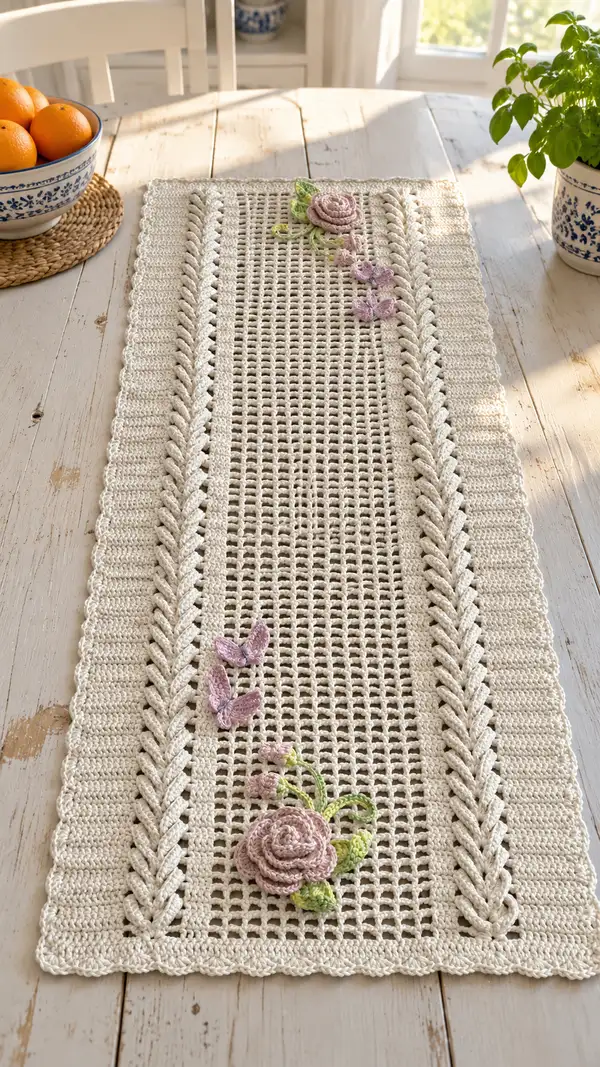
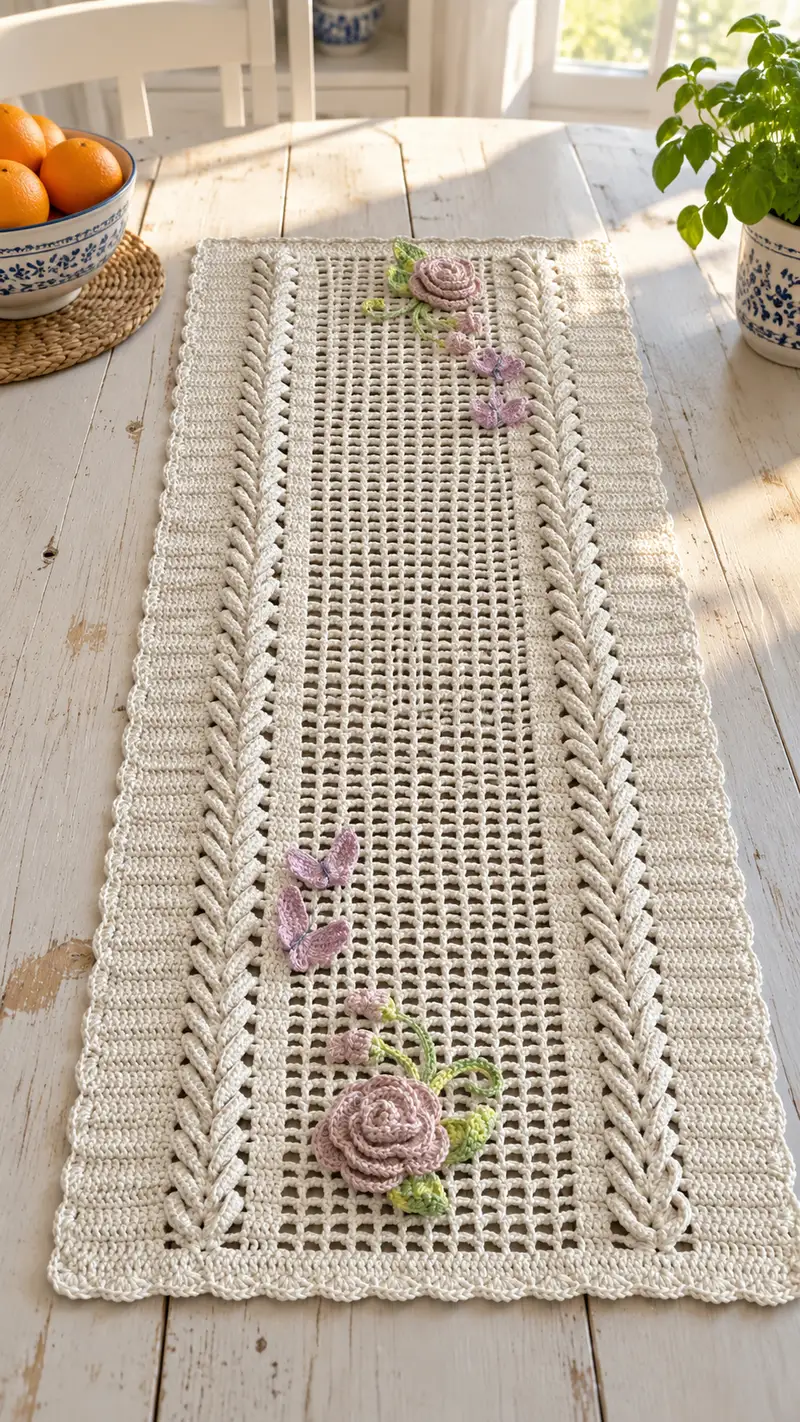
This elegant rectangular table runner features a central open filet mesh panel flanked by raised braided cable panels and a ribbed border, finished with a delicate scalloped edge. Soft cream cotton yarn provides a neutral, vintage look while hand-sewn floral appliques in blush and lavender add romantic accents. The runner lays flat, shows subtle texture from post-stitch braids, and works beautifully as a centerpiece on a farmhouse or modern table.
Progress Tracker
0% Complete
— Notes & Gauge :
Info :
This pattern is worked flat in rows. Gauge is not critical for absolute size but important for stitch definition; with worsted cotton and 4.0mm hook: 12 dc x 8 rows = 4 inches in solid fabric. Adjust hook to match your tension. The foundation chain below sets the width for the runner pictured: 97 foundation chains plus turning chain. You may increase or decrease width in multiples of the filet repeat (2 sts) plus the fixed side panel widths described below.
— Foundation & Setup :
Round 1 :
Chain 97. (This gives a working width composed of: left outer rib 10 sts, left braid panel 14 sts, central mesh 49 sts, right braid panel 14 sts, right outer rib 10 sts.)
Round 2 :
Ch 3 (counts as dc), turn. 1 dc in 4th ch from hook and in next 96 chains—total 97 dc (97). Place stitch markers to mark panel boundaries: after first 10 stitches (outer rib), after 24 stitches (braid panel), after 73 stitches (end of central mesh), after 87 stitches (end of right braid panel). Keep markers in place while working to identify sections.
Info :
Markers help maintain post-stitch braid columns alignment across rows. Move markers up as you complete each row. Record your rows using a row counter; this runner uses many repeated row sets.
— Border Base Rows (create a firm base for braid panels) :
Round 3 :
Ch 1, turn. Work 97 sc evenly across (97). This creates a solid base for the rib border. (RS)
Round 4-6 :
Repeat: Ch 1, turn. 1 sc in each st (97) (97). Work 3 rows of single crochet to build a sturdy border foundation.
Info :
Work these sc rows with consistent tension—this area will form the base for the outer ribbing and will prevent scallops from flaring out.
— Ribbed Outer Borders (left and right, worked across the full width) :
Round 7 :
Ch 1, turn. Work ribbing as follows across full row to maintain edges while leaving center for braid and mesh: *10 sc (this forms the left outer rib), 14 sc (left braid panel placeholder), 49 sc (mesh placeholder), 14 sc (right braid placeholder), 10 sc (right outer rib)* — total 97 sc (97). On this round work 1 sc in each st but begin using BLO for the 10-st outer rib areas in next rows.
Round 8 :
Ch 1, turn. Work first 10 sts in BLO sc (10), next 14 sts in normal sc (14), next 49 sts sc (49), next 14 sts sc (14), last 10 sts BLO sc (10). Total 97 (97).
Round 9-12 :
Repeat Round 8 for 4 rows to build a ribbed look on the outer edges (97 each row). The BLO sc rows will produce a subtle vertical ridge that frames the runner.
Info :
Continue to use stitch markers at the panel boundaries. BLO on outer 10-st borders only; keep braid panels clear for post-stitch work in upcoming rows.
— Braid Panels & Center Mesh: Overview (main working section) :
Info :
The braid panels use a 12-row crossing repeat built with front and back post double crochets to create a raised plait. The center is a filet mesh created with dc and ch1 spaces. All three sections are worked in the same row so the runner is flat and one-piece. The 12-row braid repeat will be worked repeatedly across the runner length; the center mesh will be worked for a long sequence of rows to reach desired runner length.
— Braid Panel Stitch Key (12-row repeat) :
Round 13 :
Ch 3, turn (counts as first dc). Work to first marker: 10 BLO sc (outer rib) — leave as sc; then for braid panel start pattern: 14 sts for braid: [work 14 dc as follows] dc in next 14 sts (14), center mesh 49: (dc, ch1) mesh row begins next round, then right braid dc in 14 sts, outer rib 10 BLO sc. For clarity we will give the full row layout in Round 14 where the braid sequence begins in earnest.
Round 14 :
Ch 3, turn (counts as dc). Work 10 sc in BLO across outer left border (10). For left braid panel begin the 12-row pattern row 1 as follows across 14-st panel: *dc in next 14 sts* (14). For central mesh: *dc in next st, ch 1, sk 1* across next 49 sts finishing with dc in final mesh st (this creates (dc, ch1) grid across mesh; counts remain 49 functional stitches though there are ch1 spaces between). For right braid panel: dc in 14 sts (14). Last 10 sts BLO sc (10). Total 97 (97).
Round 15 (Braid Row 2) :
Ch 3, turn. Work 10 BLO sc. For left braid panel: fpdc around the post of 3rd and 4th dc of previous 14-st block to begin creating raised columns—work sequence: *(fpdc around next dc, bpdc around next dc) x7* across 14 sts producing alternating post stitches which lay the foundation for crossing in later rows (14). Center mesh: continue dc, ch1 pattern across (49). Right braid: mirror left (14). Outer rib 10 BLO sc (10). Total 97.
Round 16 (Braid Row 3) :
Ch 3, turn. 10 BLO sc. Left braid: Work fpdc around the same columns but prepare for the first cross: work (fpdc around next 2 sts, then cross by working fpdc around a post two sts ahead and then bpdc around intervening post) — the aim is to set up the cable cross so stitches will be crossed on Row 17. Maintain 14 sts worked as post-stitch units. Center mesh: dc, ch1 across 49. Right braid: mirror. Last 10 BLO sc. Total 97.
Info :
The braid instructions are intentionally descriptive here: you will create a repeatable crossing that spans 12 rows. The math is kept to 14 stitches per braid panel; however some stitches are worked around posts not counted differently. Keep your post count equal to maintain 14 physical columns per panel.
Round 17 (Braid Row 4 - First Cross) :
Ch 3, turn. 10 BLO sc. For left braid do the first cable cross: *skip next fpdc post, work fpdc around the next two posts (this pulls a loop forward), then go back and fpdc around the skipped post to create the crossing look.* Repeat across the 14-st panel leaving 14 post-work units. Center mesh: dc, ch1 across 49. Right braid mirror. 10 BLO sc. Total 97.
Round 18 (Braid Row 5) :
Ch 3, turn. 10 BLO sc. Left braid: work a stabilizing row of bpdc around each post (14). Center mesh: dc, ch1 across (49). Right braid: bpdc (14). 10 BLO sc. Total 97.
Round 19 (Braid Row 6) :
Ch 3, turn. 10 BLO sc. Left braid: repeat Row 3 sequence to build the cable height (14). Center mesh: dc, ch1 (49). Right braid mirror. Last 10 BLO sc (10). Total 97.
Round 20 (Braid Row 7) :
Ch 3, turn. 10 BLO sc. Left braid: complete the mirrored cross that complements the first cross so braid reads as a plait when alternating crossing rows are observed—work crossing in reverse pattern to Row 17 (14). Center mesh: dc, ch1 (49). Right braid mirror. 10 BLO sc. Total 97.
Round 21 (Braid Row 8) :
Ch 3, turn. 10 BLO sc. Left braid: bpdc across all posts to smooth and lock the cross in place (14). Center mesh: dc,ch1 (49). Right braid: bpdc (14). Last 10 BLO sc. Total 97.
Round 22 (Braid Row 9) :
Ch 3, turn. 10 BLO sc. Left braid: repeat Row 2 sequence to prepare next crossing (14). Center mesh dc,ch1 (49). Right braid mirror (14). 10 BLO sc. Total 97.
Round 23 (Braid Row 10) :
Ch 3, turn. 10 BLO sc. Left braid: repeat Row 3 preparatory crossing steps (14). Center mesh dc,ch1 (49). Right braid mirror (14). 10 BLO sc. Total 97.
Round 24 (Braid Row 11) :
Ch 3, turn. 10 BLO sc. Left braid: execute the second major crossing (mirror of Row 17) to continue the braided cable — this establishes the plait repeat across 12 rows (14). Center mesh dc,ch1 (49). Right braid mirror (14). 10 BLO sc. Total 97.
Round 25 (Braid Row 12 - Repeat Anchor) :
Ch 3, turn. 10 BLO sc. Left braid: bpdc across posts to anchor and flatten the braid row (14). Center mesh: dc,ch1 (49). Right braid: bpdc (14). 10 BLO sc. Total 97.
Info :
You have now completed the 12-row braid repeat. From here on work Rows 14-25 as a repeat for the braid panels for the full length of the runner. The center mesh rows continue in their dc,ch1 grid simultaneously. Keep stitch markers marking panel boundaries and move them each row.
— Continue Main Body: Repeat Rows for Length (Rows 14-25 repeat) :
Round 26-105 :
Repeat Rows 14-25 (the 12-row braid repeat) consecutively until the runner measures desired length. In the photographed runner the maker repeated the 12-row set 8 times (that is 96 rows of braid repeats) after the initial setup for a total of 105 working rows including base rows. Each repeat maintains 97 sts total each row. Work 8 full repeats of the 12-row braid sequence (Rows 14-25) which yields 96 rows. This brings the working row count into balance for the pictured length. Maintain dc,ch1 mesh in the center for each row of the sequence.
Info :
Check length frequently: the photographed runner is approximately 36-40 inches long from the top to the bottom visible area. You can make it longer by adding more 12-row repeats. When measuring for table placement allow extra for scalloped edge and blocking expansion.
Round 106 :
After finishing the final braid-repeat sequence, work a transition row: Ch 1, turn. Work 97 sc across in the round to create a solid band before starting the outer ribbing and edge shaping (97).
Round 107-110 :
Ch 1, turn. Work 4 rows of sc across (97 each) maintaining BLO on the outer 10-st borders to continue vertical rib definition. This creates a balanced band matching the top base band worked at the beginning of the runner.
Info :
If you prefer a more open feel at the ends, reduce the sc rows to 2; for a sturdier end, make 6 sc rows. Keep the number of rows identical at beginning and end for symmetry.
— Scalloped Outer Edge (Single Row Scallop Shell) :
Round 111 :
Ch 1, turn. Work along the long edges first (left and right sides): Along the side edge pick up stitches through the side of each row: *skip 1 row, 5 dc in next side space, skip 1 row, sl st in next side space* repeat down the side. Alternatively, continue from final sc row around width by working the following: Along top edge work sc across to end. For a controlled layout we recommend working scallops by single crochet bases across the top row: *sk 1 st, (5 dc) in next st, sk 1 st, sl st in next st*. Repeat across entire top edge including ends to form even scallops. The aim is to create a soft shell at all four edges. Work same scallop sequence across the bottom edge.
Round 112 :
Work a finishing round of sl st around the entire perimeter to smooth shells: sl st evenly between each shell and at corners (this tidies the edge). Fasten off and weave in ends thoroughly. Block flat using pins and steam or wet-block method to shape scallops evenly.
Info :
Blocking is essential to open the filet mesh and define braid columns. Pin the runner to dimensions you desire and allow to dry completely for the best finished look.
— Applique: Spiral Rose (Make 2 large roses, several small buds) :
Round 1 :
With blush pink and 3.5mm hook, ch 36. (36)
Round 2 :
Sc in 2nd ch from hook, sc in next 4 sts (5 sc), change to hdc in next 6 ch (6 hdc), dc in next 8 ch (8 dc), tr in next 8 ch (8 tr), 3 tr in last ch; now working along opposite side of foundation chain: continue tr in next 8 ch (8 tr), dc in next 8 ch (8 dc), hdc in next 6 ch (6 hdc), sc in remaining 5 ch (5 sc). Do not join—fasten off leaving long tail for turning and sewing. This creates a petal strip with graduated petals.
Round 3 :
Roll the petal strip tightly beginning at one narrow end to form the rose center; adjust tightness to get the rose size desired (approx 2.25-2.75 inches wide for chain length 36). Use yarn tail and tapestry needle to whip stitch base together as you roll to secure each coil; use about 10-12 small stitches to hold the spiral. Fasten off and weave in tail neatly on the underside.
Info :
For a fuller rose, lengthen foundation chain to 48-60 and repeat the graduated petal step proportions (add more dc/tr stitches proportionally). You may add a little polyester stuffing inside the center for volume before sewing the spiral closed if you want a puffier rose.
Round 4 (Small Rose Bud) :
Ch 18. Sc in 2nd ch from hook across for 16 sc. Fasten off leaving tail. Roll and sew as above to form a small bud, approx 1.0 inch diameter. Make 3-4 small buds for accent.
Info :
Varying chain lengths will produce varied rose sizes—chain 24-30 for medium buds, 36 for larger ones as used on the runner.
— Applique: Leaves (Make 6-8) :
Round 1 :
With light green and smaller 3.5mm hook, ch 8. Sl st in 2nd ch from hook, sc in next, hdc in next 2, dc in next, hdc in next, sc in last. Now work back along other side of chain: sc in next, hdc in next, dc in next, hdc in next, sc in next; sl st to close at base. Fasten off, leaving tail to sew (leaf approx 1.25-1.75 inches long).
Round 2 :
For a more textured leaf work 1 sc, 2 hdc, 3 dc at the center point to create a central lobe; finish symmetrical on the other side. Make 6-8 leaves for the placement seen in the photo.
Info :
For pointed leaves, extend the chain to ch10 and increase dc counts, or add a picot at the tip using ch 3 and sl st into the base of the chain to form a realistic tip.
— Applique: Tiny Butterflies (Make 3-4) :
Round 1 :
With lavender and 3.5mm hook, ch 8. Row 1: sc in 2nd ch from hook, hdc in next, dc in next, tr in next, sl st in last. Turn and work along opposite side: tr in next, dc in next, hdc in next, sc in last. Fasten off leaving long tail for sewing. Pinch center and secure with a few stitches to create 2 distinct wings. Optionally add a tiny body by embroidering a few stitches in darker purple.
Round 2 :
Make small double-layer variants by working a second smaller chain (ch 5) and sewing it centered on top to create dimensional wings as seen in the photograph.
Info :
Use a dab of fabric glue under center before sewing if you want the butterfly to sit perfectly flat on the mesh without stitching through visible front loops.
— Assembly & Placement of Appliques :
Info :
Block the runner flat first. Lay out appliques on the runner as shown: two larger roses placed asymmetrically along the central mesh slightly off-center towards one side, with small buds, leaves and 3 butterflies cascading between the roses. Use pins to secure positions and photograph placement if you want to replicate exactly.
Round 1 :
Sew roses to mesh by stitching through the underside of the spiral base into several mesh dc posts—use long-tailed sewing method and hide tails under spiral. For leaves and buds sew through a few matches of dc and ch1 spaces to anchor without distorting mesh.
Round 2 :
Embroider thin stems in light green using a simple surface chain stitch or a stem stitch: work a long chain of loose sl st across surface anchored at both ends with a tiny stitch; secure ends discreetly on underside. Add tiny french knot centers in darker rose color to buds for detail.
Info :
When sewing onto mesh, avoid pulling too tightly—this will pucker the grid. Instead use even small stitches to keep appliques flush and slightly raised as desired.
— Finishing Touches & Blocking :
Round 1 :
Weave in all tails on the WS using a tapestry needle following yarn strands for invisibility. Trim close to fabric but do not cut too short—leave a millimeter to avoid accidental slippage through stitches.
Round 2 :
Block the runner flat to final dimensions: wet block or steam block according to yarn manufacturer. Pin scallops evenly using a tape measure to keep all scallops equal in distance. Allow to dry fully (24 hours for wet block).
Info :
After blocking, check placement of appliques; if a petal shifted during blocking, re-anchor with a few small stitches. For a final sheen brush lightly with a wet sponge and allow to dry for a subtle softening of cotton fibers.
Finishing this runner is such a satisfying moment—watching the mesh open up and the braid plaits stand proud after blocking is pure joy. Each small rose and leaf adds personality and charm, turning simple cotton into an heirloom-quality centerpiece. Whether you keep it for daily table warmth or gift it for a special occasion, your handmade runner will invite compliments and cozy conversation. 🧶🌸💫