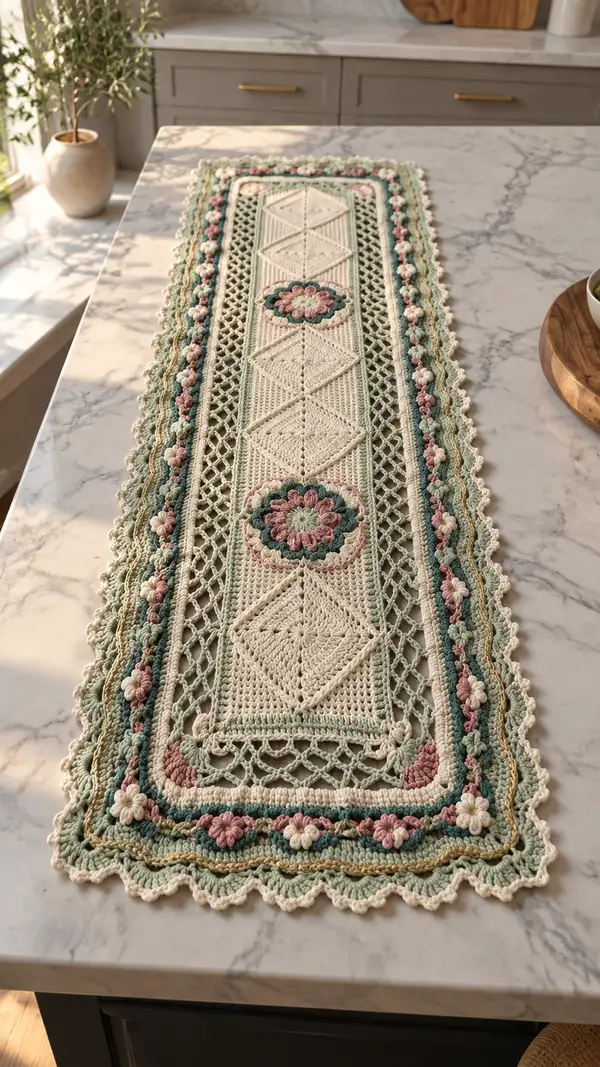
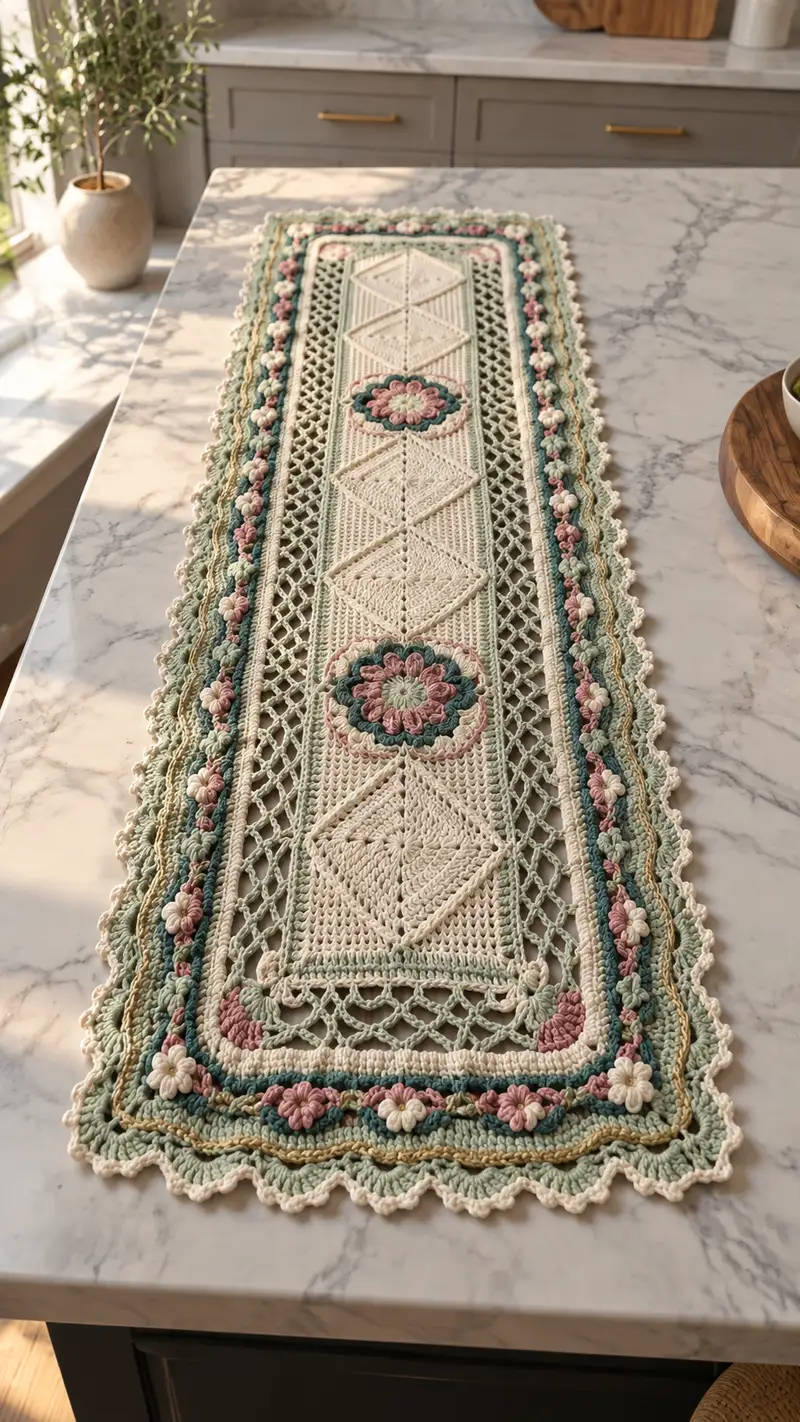
This elegant crochet table runner features a central panel of geometric diamonds and three raised floral medallions, framed by airy lattice panels and a multi-layered floral border. Soft cream, sage green, dusty rose, teal and a hint of gold combine for a vintage-inspired palette. The detailed pattern uses textured petals, popcorns and scalloped edgings to create a heirloom-quality runner perfect for dining tables or sideboards.
Progress Tracker
0% Complete
— Notes & Gauge :
Info :
Gauge is not critical for overall pattern but important for consistent edge measurements. Using worsted cotton on 4.0mm hook, sample 10cm x 10cm (4"x4") in sc is approximately 18 sc × 22 rows. This runner is shown at approximately 14" wide by 48" long using three center medallions and extended borders. Block motifs flat after completing before joining. Work tightly for popcorn and puff stitches so texture holds.
Info :
Abbreviations used throughout. Maintain consistent tension. Use stitch markers at the beginning of long rows and at motif centers during joining. Change hook to 3.5mm for very tight textured rounds if desired.
— Center Floral Medallion (make 3) :
Round 1 :
6 sc in magic ring (6)
Round 3 :
(1 sc, 1 inc) x 6 (18)
Round 4 :
(2 sc, 1 inc) x 6 (24)
Round 5 :
(3 sc, 1 inc) x 6 (30)
Info :
Switch to dusty pink for petal foundation if making colored petals. Keep tension even. The center is small and will be covered by petals; do not overstuff.
Round 6 :
1 sc in each st (30)
Round 7 :
(4 sc, 1 inc) x 5, 4 sc (35)
Round 8 :
1 sc in each st (35)
Round 9 :
Switch to dusty pink. *(ch2, puff in next st) skip next st, sl st in next st* rep around to create petal anchors; adjust to end with sl st. (approx 17 petal anchors)
Info :
Puff stitch: yarn over, insert hook, yarn over, pull up a loop (repeat 3 times to have 7 loops on hook), yarn over and pull through all loops, ch1 to close puff. Use consistent loop height for uniform petals.
Round 10 :
Working into petal anchors: in each anchor make (ch1, 5 dc cluster in same anchor, sl st to base) to form petals. Join with sl st. Count petals; adjust spacing so there are 12-18 petals depending on your tension (ideal 12 for larger petals or 16 for tighter spacing).
Round 11 :
Switch to teal. Around petals, *ch3, sl st into space between petals* repeat to form small picot loops (12-16 loops depending on petal count)
Round 12 :
In back loops of the previous round, 1 sc in each st around to create a tidy ridge (count matches previous round loops)
Info :
If you want slightly padded centers, stuff a tiny bit of polyester into center before completing Round 12. Otherwise leave flat. Fasten off and weave tail to center on wrong side.
Round 13 :
Join cream around outer petals: *(ch4, sk 1 sc, tr in next st) × repeat* to create decorative scalloped base (st count varies with petal count; aim for even scallops aligning with petals)
Round 14 :
1 sc evenly around scallops to create a flat base for joining (st count equals number scallops × 3-4)
Round 15 :
Switch to sage green. Work 2 rounds: Round 15 - 1 sc in each st BLO creating a textured ring; Round 16 - 1 sc in each st (this builds a raised outer ring) (st counts equal Round 14)
Round 16 :
1 sc in each st (same as above) (st count remains)
Round 17 :
Working behind the medallion edge, *fpdc around sc of Round 12, ch2* repeat to create little arches; sl st to join (st count based on previous)
Round 18 :
Switch to gold. 1 sc in each arch base to outline the medallion with a thin metallic accent (same st count)
Round 19 :
Final tidy round in cream: 1 sc around leaving a neat outer edge for joining to mesh panels (same count)
Info :
Make three identical medallions. Block flat, centering petals. Mark the midpoints of runner center line for medallion placement: top, center, bottom; they are spaced evenly along the central diamond panel later during joining.
— Diamond Square Panels (center strip) :
Info :
We will construct four diamond squares joined end-to-end in the center strip between medallions; each diamond is tall and shallow to create a long rectangular center section. Use cream yarn for the diamond body. Each diamond will be worked flat in rounds to create an open-laced diamond motif.
Round 1 :
Ch6, dc in 4th ch from hook, dc in next 2 ch, turn to work on other side of foundation chain: dc, dc, ch1 join to form a small elongated diamond (6 dc total)
Round 2 :
Ch3 (counts as dc), 1 dc in same st, 1 dc in next 2 sts, *(1 dc, ch1, 1 dc) in ch-1 at point*, continue along opposite side, join (10 dc + chain points)
Round 3 :
Ch3, dc in each dc along side, at point make (dc, ch1, dc) into chain space; repeat for both points; aim for 14 dc around (14)
Round 4 :
Ch3, (dc, ch1, dc) in each corner chain space, dc evenly along sides to expand diamond (increase sides to 18 total) (18)
Info :
From this point expand evenly on each straight side by adding two dc per side each round to maintain diamond proportions. Place stitch markers at the top and bottom points to keep track of increases.
Round 5 :
Work even increasing pattern to reach (22)
Round 6 :
Continue expansion (26)
Round 7 :
Continue expansion (30)
Round 8 :
1 sc in each st around to set the diamond shape and flatten edges (30)
Round 9 :
Work 6 rows of alternating dc rows to create a solid fill: Row A - ch3, dc in each st (30) Row B - ch1, sc in each st (30) repeat alternating for 6 rows total
Round 10 :
Pivot and create a decorative spine down diamond center using front post double crochet: *fpdc in every 3rd st to create rib* (30)
Info :
Make four diamonds in a series. When assembled, diamonds will be joined with short bridging chains to create a long central strip. Block diamonds to identical size before joining.
Round 11 :
At the edge, create triangular corner picots to fit lattice: *(ch1, sl st, ch3, sl st) at each apex* (4 picots)
Round 12 :
Switch to sage and work 1 round of 1 sc evenly around diamond to create a colored frame (30)
Round 13 :
Switch to cream. Work a filet-style open triangle at each side using *dc, ch2, skip 2* to create diagonal openwork. Work 4 rows of diagonal filet to create internal lattice through diamond center (st count fluctuates but maintain edges)
Round 14 :
Work a final round of sc around and block flat. Repeat to make four diamonds. Join diamonds end-to-end using mattress stitch or join-as-you-go slip-stitch seam aligning central points. Leave space between diamonds to house medallions; the center slot will later be replaced by medallion placement.
Info :
When joining diamonds, slip-stitch through both edges from wrong sides for a flat join, or use whip stitch for a slightly raised seam. Aim for 2-3 stitches per inch of join for stability.
— Mesh Lattice Side Panels (make 2 long strips) :
Round 1 :
Ch 96 (or desired runner length in chains divisible by 8 + 4), turn, dc in 4th ch from hook and across (approx 94 dc)
Round 2 :
Ch4 (counts as tr), *sk 2, tr in next, ch2, tr in same st* repeat across to create tall lacy tr groups; end with tr in last ch (creates mesh posts)
Round 3 :
Ch1, sc in each tr and ch2 space across to stabilize lattice (st count equal to number of grouping stems, approx 48)
Round 4-6 :
Repeat Round 2-3 twice to lengthen lattice consistent pattern (maintain counts)
Info :
These lattice strips are worked to the length of the runner; make both identical. Measure often. If your runner is shorter or longer, adjust foundation ch count in multiples of 8 to maintain pattern repeat. Block flat before joining to center panel.
Round 7 :
Work one round of sc along both long sides to square up edges (st count ~equal to foundation ch)
Round 8 :
Switch to sage for a decorative rope edge: *ch2, fpdc around each sc along edge to create ridged rope* repeat both sides (st count varies)
Info :
When making lattice, keep tension even across ch-spaces. Use a stitch marker every 10 repeats to avoid losing count in long rows.
— Joining Center Strip and Side Panels :
Round 1 :
Lay one lattice strip to left side of joined diamonds. Align edges and using cream yarn and sc, work through both layers (diamond edge and lattice edge) with 1 sc per corresponding space to join, making flat seam (work entire length). Repeat on right side with other lattice strip.
Round 2 :
At positions where medallions belong, leave a gap of 12-14 stitches (measured center-to-center) before completing seam; these gaps will be covered by medallions which are sewn on top. When you reach medallion placements, fasten off and rejoin after the medallion slot.
Info :
Block assembled center to ensure flat join. Pin medallions in place along the center diamond strip: one near each end diamond center and one central medallion aligned with center diamond. Sew medallions through outer cream ring into both diamonds and lattice panels to secure, using invisible ladder stitches around the back ring.
Round 3 :
Reinforce joins with an overcast sc round around entire joined center (1 sc through both layers around full perimeter) to ensure a firm base for border work (st count equals perimeter stitches)
— Raised Flower Row (both sides of runner) :
Round 1 :
With dusty pink, join to long side edge with sl st, ch1, sc in same st, *ch3, puff in next st, sl st in next st, ch3, sc in next 3 sts* repeat across to create spaced puff flowers (approx 20-24 flowers per side depending on length)
Round 2 :
Switch to teal: around each puff, work (sc, hdc, dc, hdc, sc) into space surrounding puff to form little floral halos. Join with sl st and continue.
Round 3 :
With cream, 1 sc around entire row to tidy and anchor flowers to base (st count equals previous round stitches)
Info :
Make small popcorn or puff flowers by pulling loops high and closing cleanly. Keep petals upright while joining the halo to avoid flattened flowers. Use a smaller hook if puff stitches feel loose.
Round 4 :
Switch to gold and work a thin chain ridge between flowers and lattice: *ch5, sl st into next chain space* repeat to create braided metallic accent.
Round 5 :
With sage, sc in each stitch across to flatten and anchor ornamental lines (st counts consistent)
— Multi-Layer Border (build outward from center) :
Round 1 :
Join cream to entire outer perimeter of runner and work 1 round sc in each st around, placing 3 sc in each corner stitch to maintain flat rectangle (perimeter st count = around body stitches)
Round 2 :
Switch to sage and work 1 round of hdc evenly around to create a base ridge (same count)
Round 3 :
Switch to teal and work *ch5, skip 2, sc in next* repeat to make airy loops for next flower row to sit on (maintain multiples)
Info :
At this stage, maintain consistent stitch counts around all four sides. If the runner begins to ruffle, adjust by decreasing or increasing 2-4 stitches across the problematic side to flatten. Blocking will also help even out small discrepancies.
Round 4 :
With dusty pink, work bobble row: *into loop ch-5, make bobble (yarn over 4 times, insert, pull loop repeat 4 times, yarn over pull through), sl st to close bobble, ch2, sc in next loop* repeat across (bobble count = number of loops)
Round 5 :
Rejoin cream and work 2 rounds of sc around to secure bobbles and prepare for scallop layer (st count unchanged)
Round 6 :
With gold, work a twist ridge: *ch2, fpdc around next sc, bpdc around next sc* repeat to create alternating rope texture for two rounds
Info :
Keep color changes tidy by carrying yarn short distances behind work when possible, or break and rejoin as required to avoid long floats over open lattice sections.
Round 7 :
Border scallop foundation: with cream, *sc in next 2 sts, 5 dc in next st, sc in next 2 sts* repeat around to form large scallops. In corners, work extra dc cluster to keep runner flat. (Number of scallops = perimeter / 5 approx)
Round 8 :
Switch to sage: Work picot edging across each scallop top: *sl st to center top, ch3, sl st into same st* to create delicate looped detail over scallops
Round 9 :
With dusty pink, place small flower clusters along scallop troughs: in each scallop valley make a 5-petal mini flower (worked as puff and sl st to base). Secure petals by stitching in center with matching thread.
Info :
Test first 2 scallops to ensure evenness; adjust the number of dc in each scallop or the placement of picots to keep corners square. Corners need 3-4 extra dc to maintain flatness.
Round 10 :
Final finishing ridge in cream: 1 sc evenly around entire outer edge, weave in ends. Use tapestry needle to tidy join backs of flowers into runner body.
— Corner Decorative Fans (4 corners) :
Round 1 :
At each corner, join cream, *ch2, 9 dc fan in corner stitch, sl st to return*, then sc along next edge for 4 sts to anchor fan. Repeat in each corner to create ornate rounded corners.
Round 2 :
Over fans work 1 round of sc then decorative *ch3 picot* to finish corners neatly. Weave ends in and block well.
Info :
Pin corners precisely during blocking to form gentle rounded corners like those in the photograph. Fans add vintage charm and soften the runner edges.
— Final Blocking & Finishing :
Info :
Soak the completed runner in lukewarm water with a few drops of fabric conditioner, gently press out excess water, lay flat on blocking mats, pin to exact rectangular dimensions, and allow to dry thoroughly. Use light spray starch if you want a crisper finish. Trim any visible ends and weave tails a minimum of 2" inside the body for security.
Info :
Inspect raised petals and bobbles. If any are flattened, re-shape them while damp and pin them into place until dry. For long-term use, consider gentle handwashing and drying flat rather than machine laundering.
Completing this floral lace table runner is such a satisfying project—watching the textured medallions, airy lattice and layered scallops come together feels like creating a vintage treasure. The soft palette adds subtle elegance to any table, and the tactile petals invite a second glance. Pack it away for seasonal tables or display it year-round; it’s a piece that will start conversations and warm your home. 🧶🌸✨