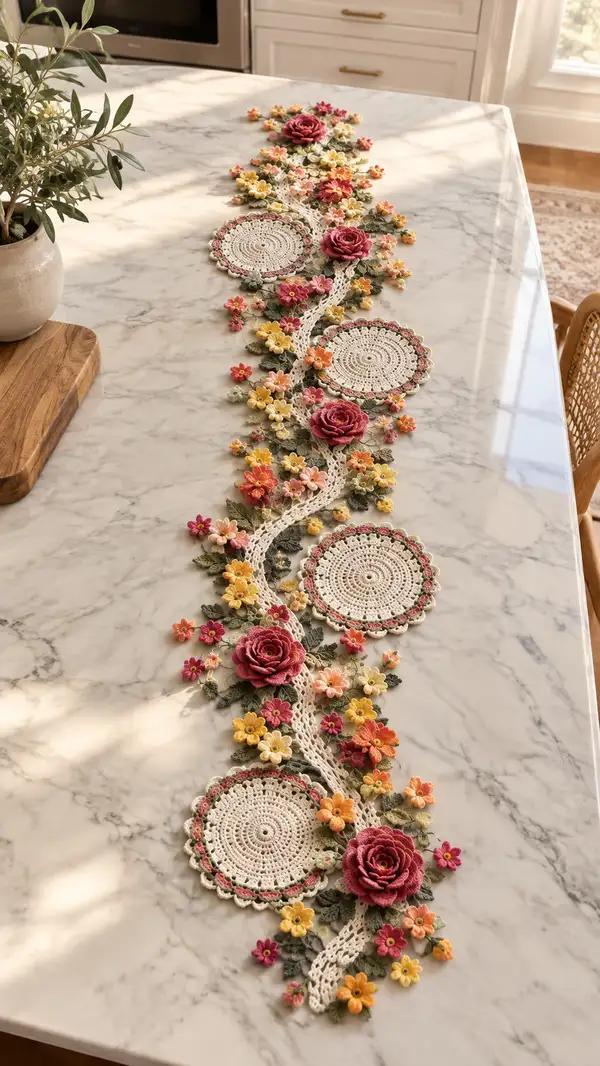
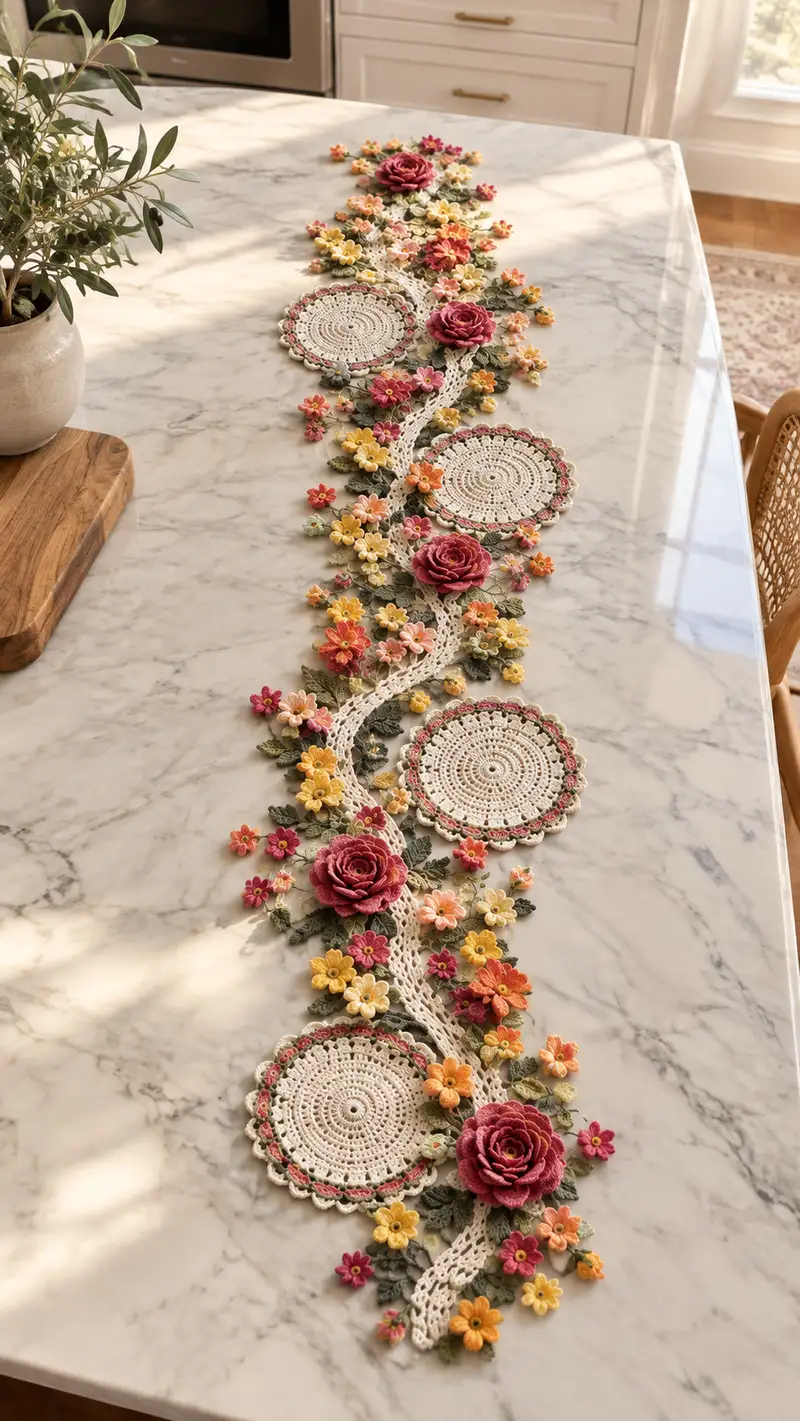
Create a romantic, vintage-inspired crochet table runner featuring circular doilies, a wavy lace vine, layered roses, abundant tiny flowers and leafy accents. This runner sits beautifully along a dining table, combining neutral lace with pops of rose, coral, peach and yellow. The pattern includes detailed motif instructions and assembly notes so you can reproduce the cascading botanical layout shown in the photo.
Progress Tracker
0% Complete
— Overview & Preparation :
Info :
Work this pattern with a light DK or sport cotton yarn and a 2.25mm crochet hook for crisp stitch definition. Make all motifs using the same tension and hook to ensure they block to the same size. Plan to make 3 circular doilies, 4 large layered roses, many medium five-petal flowers, dozens of tiny flowers and a series of sculpted leaves. Block every motif flat (doilies) or shaped (roses, leaves) before final assembly. Leave long tails for sewing where indicated.
— Circular Lace Doily (Make 3) :
Round 1 :
MR, ch1, 10 sc into ring, pull tight (10)
Round 2 :
2 sc in each st around (20)
Round 3 :
(1 sc, inc) x10 (30)
Round 4 :
(2 sc, inc) x10 (40)
Round 5 :
(3 sc, inc) x10 (50)
Info :
At this point the center is forming. Keep tension even to avoid cup or ruffle. If your circle wavers, block more aggressively later.
Round 6 :
(4 sc, inc) x10 (60)
Round 7 :
1 sc in each st (60)
Round 8 :
(5 sc, inc) x10 (70)
Round 9 :
1 sc in each st (70)
Round 10 :
(6 sc, inc) x10 (80)
Info :
From rounds 7–10 check for flatness. If the doily ruffles, omit an increase evenly distributed in the next round; if it cups, add an extra round of increases.
Round 11 :
1 sc in each st (80)
Round 12 :
*(ch3, sk 1 st, dc) in next st, sc in next 2 sts* around to create an airy ringed texture. Adjust spacing to keep counts consistent; finish with sl st to first sc (80)
Round 13 :
1 sc in each st around, working into ch-spaces where present (80)
Round 14 :
*sc in next 3 sts, (5 dc shell) in next st, sc in next 3 sts* repeat around to create scalloped decorative points; adjust repeat to fit 10 shells (80)
Info :
Change to a narrow contrasting color thread for a decorative round now if you want a colored scallop edge. Carry ecru inside and work the contrast with short tails woven in later.
Round 15 :
If using contrast: attach contrast yarn, *ch1, sc around shell ridge edge to create a beaded scallop (work 10 total shell trims)*; if not, continue with ecru and sc evenly to maintain shape (80)
Round 16 :
Reverse picot round: *sc in next 4 sts, (ch3, sl st in 3rd ch from hook) to form picot, sc in next 4 sts* repeat around for a delicate edge; aim to produce 10 picots evenly spaced (80)
Round 17 :
Finish with a refined scallop: sl st into each picot base and make a small cluster of (sc, hdc, sc) into each picot to stiffen edging (10 clusters)
Round 18 :
Fasten off leaving a 20–30cm tail for sewing to vine. Weave tail across a few rounds on the backside for security before trimming.
Info :
Block the doilies flat to a diameter of approximately 15–17cm (6–6.5 inches) depending on tension. Use rustproof pins and spray with light starch to hold precise scallops.
— Wavy Lace Vine (Central Connector) :
Round 1 :
With ecru, ch90 (or length desired) to form foundation chain for a single vine segment. Join with sl st to form a long chain loop if making continuous, otherwise work a long chain secured to a stitch later for a wavy effect
Round 2 :
sc in 2nd ch from hook and each ch across (89)
Round 3 :
Ch3, turn, dc in each st across to create a raised ridge. End with sl st into final st for a neat edge
Round 4 :
Ch1, sc across working into top loops only to create a slightly cupped moulding (89)
Info :
The vine is worked in long narrow strips that will be arranged into a gentle S-curve. Block each strip with a light curve — pin to shape the S; this is essential to achieve the flowing composition.
Round 5 :
Along one long edge: *ch5, sk 3 sts, sl st into next st* repeat creating looping spaces for flower attachments. At the end, fasten off leaving long tail for sewing
Round 6 :
Work a decorative edge on the opposite side: attach yarn, sc along edge, *ch3, sc in next st* repeat to create small arches for leaves to be sewn into (approx 17 arches depending on length)
Round 7 :
For a second vine strip repeat rounds 1–6; create two or three vine strips to stitch together, staggering ch-spaces for varied attachment points
Round 8 :
Optional: for extra body join two strips using whip stitch along underside, offsetting loops to create a fuller braid-like vine. Fasten off and weave tails.
Info :
Make vine pieces slightly longer than the distance between doilies so you can ease them into curves and overlap under floral clusters. Do not sew them taut; allow slack for bloom clusters.
Round 9 :
If you prefer a lacy open vine: use a mesh pattern — ch5, sc in 3rd ch from hook, dc in same ch, sl st into vine strip every 6th st to create organic openings for leaves
Round 10 :
Fasten off after shaping desired vine length. Block pins to set curve.
— Large Layered Rose (Make 4) :
Round 1 :
With rose color, ch4, sl st to first ch to form a ring, ch1, 8 sc into ring (8)
Round 3 :
(1 sc, inc) x8 (24)
Round 4 :
1 sc in each st (24)
Round 5 :
*ch6, sl st in same st; repeat into every 2nd st to create 12 long loops for petals* (12 loops)
Info :
These long loops are the foundation for creating layered rolled petals. Keep loops even and do not tighten the center too much; the rolling will shape itself.
Round 6 :
Work petals on each loop: into each ch6 loop work (sc, hdc, 3 dc, hdc, sc) — this forms one large petal. Fasten off and leave long tail for sewing base together
Round 7 :
Create a second petal round by slip-stitching behind each petal base and repeating (sc, hdc, 4 dc, hdc, sc) into the back loops of the same loops to create a layered inner ring (12 petals)
Round 8 :
Cut shorter petals: make a small strip of ch5, sl st base to inner round in staggered positions to build a tighter inner rosebud core (10 small petals)
Info :
To form the rose, wind the petal strip around itself: start by rolling the small internal petals tightly to form the bud, then add the larger petal rounds around the bud, stitching the base down as you go to make a secure spiral. Use mattress or whip stitch with long tail to secure the entire spiral.
Round 9 :
After rolling and sewing the petals in place, add a base circle: MR, ch1, 8 sc (8). Sew rose base to this circle to create a stable disc for attaching to runner
Round 10 :
Edge the rose base with small picot stitches or seed beads for a finished look: attach contrast thread and do *sc, ch3, sl st in 3rd ch* around base for 8 picots
Round 11 :
Optional tonal shading: with a slightly darker rose color, surface-slip stitch faint concentric lines on the petals to simulate depth
Round 12 :
Fasten off leaving a 30cm tail; weave through base and underside to secure. Do not stuff; shape petals with finger smoothing and light spray starch for rigidity.
Info :
Roses are best created in layers and hand-shaped. If you prefer, use a lightweight fusible interfacing disc glued to the base for extra stability when sewing onto the runner.
Round 13 :
Make small back leaves for each rose: using leaf green, MR, ch1, 6 sc, sl st; flatten and sew 3–4 leaves to underside of rose base for a natural look
Round 14 :
Optional: wire the base. Using thin florist wire, make a small loop on the underside and sew through with a few tight stitches if you want the rose to be removable or slightly poseable (tuck wire ends under and cover with stitches)
Info :
Block each rose lightly to set petal curves. Do not over-starch—roses should appear soft but hold shape.
— Medium 5-Petal Flower (Make 30–40, Round Pattern) :
Round 1 :
MR, ch1, 6 sc into ring (6)
Round 2 :
*(ch5, sl st in same st) x6* to create 6 loop petals around the center; fasten off and join color as needed (6 loops)
Round 3 :
Into each ch5 loop work (sc, hdc, 3 dc, hdc, sc) to form a rounded petal; repeat for all 6 loops (6 petals)
Round 4 :
Center dot: using yellow, attach yarn to center and make 6 sc in center ring to form a raised pistil. Fasten off and weave ends
Info :
For size variation, use ch4 loops for smaller flowers (tiny filler) or ch6 for slightly larger blooms. Make many in mixed colors to replicate the clustered look.
Round 5 :
Optional: add a tiny bead in the center stitched down with matching thread for sparkle. Alternatively, embroider a French knot in cotton thread.
Round 6 :
Fasten off leaving 10–15 cm tail for sewing. Block flat and starch lightly.
— Tiny Filler Flowers (Make 40–60) :
Round 1 :
MR, ch1, 5 sc into ring (5)
Round 2 :
*ch4, sl st in same st* x5 to create small loops (5 loops)
Round 3 :
Into each loop make (sc, hdc, dc, hdc, sc) to form tiny rounded petals (5 petals)
Round 4 :
Fasten off and weave tail. Make centers with small yellow French knots using embroidery thread for contrast.
Info :
Tiny flowers are used to fill gaps between larger blooms and along vine edges. Work in multiple shades for lively depth.
— Sculpted Leaves (Make 40–60) :
Round 1 :
With leaf green, ch6
Round 2 :
Sc in 2nd ch from hook, hdc in next, dc in next 2, hdc in next, sc in last — shape a pointed leaf (approx 6 sts)
Round 3 :
Turn and work along opposite side: sc, hdc, 2 dc, hdc, sc into base to close leaf; sl st to first sc and fasten off (about 12 total sc/hdc/dc placements)
Round 4 :
Surface vein: with a darker green, use surface slip stitches to draw a central vein from tip to base, catching a few back loops to anchor
Info :
For larger leaves used under roses, increase chain to ch8 and add an extra dc on each side. Leaves can be steamed and shaped to cup slightly for realism.
Round 5 :
For serrated edge variant: before fastening off, work small picots along one edge: sc in next st, ch3, sl st in 3rd ch from hook for a delicate serration.
Round 6 :
Make many leaves in two slightly different greens for visual depth. Block lightly on a curved board to give subtle 3D shape.
— Tiny Buds & Pistils (Make 20–30) :
Round 1 :
MR, ch1, 4 sc into ring (4)
Round 2 :
1 sc in each st (4)
Round 3 :
Pull center tight to form a small bud; secure with a few stitches. Optionally wrap a very thin wire around base for a protruding bud that can be attached under a flower for dimension.
Info :
Buds are placed in clusters near roses to add realism. Use contrasting tiny color dots to simulate unopened petals.
— Decorative Mini Rosette (Make 8) :
Round 1 :
Ch10, turn, sl st into 2nd ch from hook and into each ch back to form a flat tube (9 sl st)
Round 2 :
Fold tube in half and sew along one side to form a petal strip, then roll and sew into a tiny rosette. Fasten off and hide tail inside coil.
Info :
These mini rosettes add texture in gaps and are quicker than full roses. Use for trailing edges and small focal points.
— Motif Edging & Small Scallops :
Round 1 :
Where doilies meet vine, add a small joining picot round: attach ecru to doily underside and sc along edge that will face vine, making a picot every 6th stitch. This creates tidy loops for overlapping vine stitches (approx 10 picots)
Round 2 :
Work a 3-color barbed edge if desired: attach accent color in alternating shells of 5 dc around doily edge in every other scallop to echo rose tones
Info :
Edging provides both ornament and practical attachment points. Keep edges consistent across all doilies for symmetry.
— Assembly & Joining (Detailed Steps) :
Info :
Lay out all blocked doilies, vine strips and floral pieces on a flat blocking board or towel-covered table. Arrange into the S-curve composition shown in the image: doily, rose cluster, doily, rose cluster, doily. Test spacing and overlap before sewing. Use rustproof pins to hold pieces in place while sewing.
Round 1 :
Attach vine to first doily: position vine strip to overlap the doily by about 3–4cm. Using the long tail from the doily scallop, whip stitch vine to doily underside through picot loops at 3–4 evenly spaced points to secure (use small, neat stitches)
Round 2 :
Sew the second doily to the other end of the vine mirroring the first. Make sure the S-curve flows naturally — do not pull vine taut; allow a small S-shaped curve for the floral layout (fasten off and weave ends under doily)
Round 3 :
Position large roses: each rose should sit near a doily edge on the runner top as pictured. Place rose so petals slightly overlap the doily scallop. Using the long tail left on the rose base, ladder stitch across the rose base into the doily surface and vine edge, sewing tightly and invisibly until secure. Use 6–8 passes around base.
Round 4 :
Arrange medium five-petal flowers in clusters around the roses and along the vine, pinning in place. Sew each flower with its tail using small stitches through vine edge and doily edge to anchor them; add 2–3 stitches per flower plus one stitch into vine for extra security.
Round 5 :
Sew leaves around floral clusters: tuck leaf bases under flower bases and catch both vine and doily edges. For larger leaves, overlap the base under the rose base and stitch around the base perimeter to secure. Make sure leaf veins face slightly outward for realism.
Info :
Stitch through the sturdy foundation only — avoid visible stitches on petals by entering needle through the underside or base reinforcement disc. Use a matching yarn to minimize visibility of seams.
Round 6 :
Add tiny filler flowers and buds last, tacking them with a couple of stitches into gaps to create a natural clustered appearance. Place many tiny flowers around edges where runner will be most visible.
Round 7 :
Secure any overlapping vine joins underneath with small whip stitches. If two vine strips meet, sew them with a 1cm overlap and an overcast stitch so seam lies flat beneath floral clusters.
Round 8 :
Edge finishing: work a final ecru whip stitch around exposed vine and doily joins to hide raw edges. Make sure stitches are small and evenly spaced. Weave all ends through several motif rounds and trim.
Info :
When sewing motifs, keep tension moderate. Excessively tight stitching will pucker motifs; loose stitches produce gaps. Pin several times and stitch in short segments to control fit.
Round 9 :
Optional: attach small seed beads into flower centers using a fine beading needle and nylon thread for a refined finish. Secure knots behind petals and hide within motif backs.
Round 10 :
Final gently steam-block the fully assembled runner on a flat surface to re-shape any curves and set petal positions. Use pins to hold curves and let dry fully.
— Finishing Touches & Care :
Info :
To keep your runner looking beautiful, hand wash in lukewarm water with mild soap and reshape while damp. Avoid machine washing or tumble drying. Re-block as needed and avoid high heat near petals. For permanent stiffness use a light starch spray in moderation.
Round 1 :
Check all stitch anchors on underside and secure any loose threads with additional small stitches. Trim stray ends after weaving them at least 6cm into motif body.
Round 2 :
Optionally attach a thin felt backing to the underside of each doily area to protect table surfaces; tack felt with small hand stitches spaced every 1cm, ensuring stitches do not show through the top.
Info :
Store flat when not in use to avoid flattening roses. If curling occurs over time, lightly steam and press flat on a protected surface, re-pinning to original shape whilst drying.
Completing this floral table runner is a truly rewarding journey—each blocked doily and hand-stitched rose brings the design to life. The layered petals and scattered tiny flowers create a garden feel that brightens any table. Take your time with blocking and assembly; the final result is elegant and heirloom-worthy. 🧶🌸 Your finished runner will be a cherished centerpiece for gatherings or a treasured handmade gift. Happy crocheting! ✨