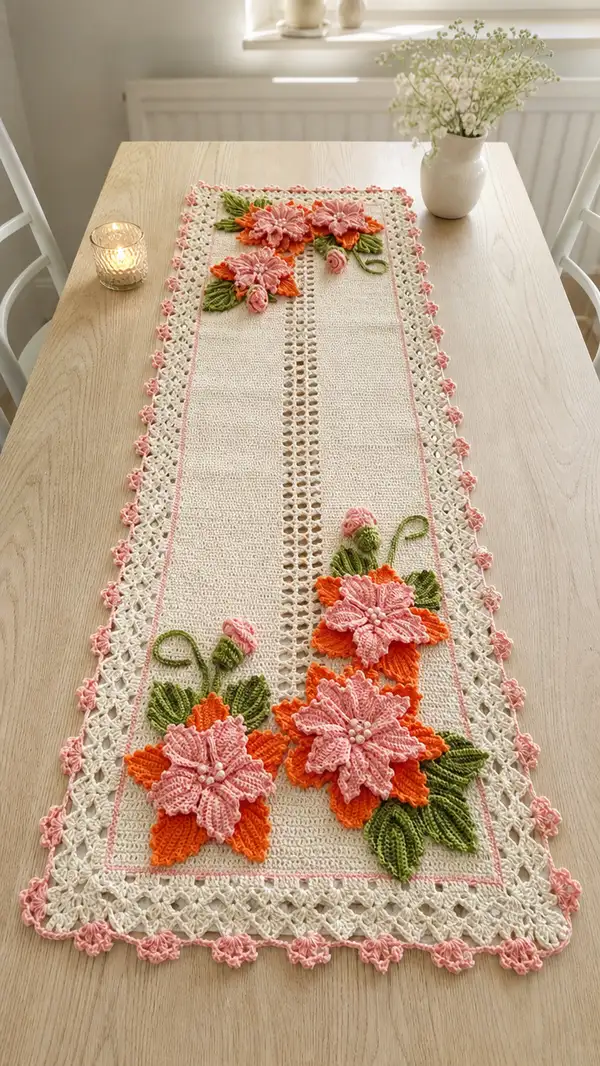
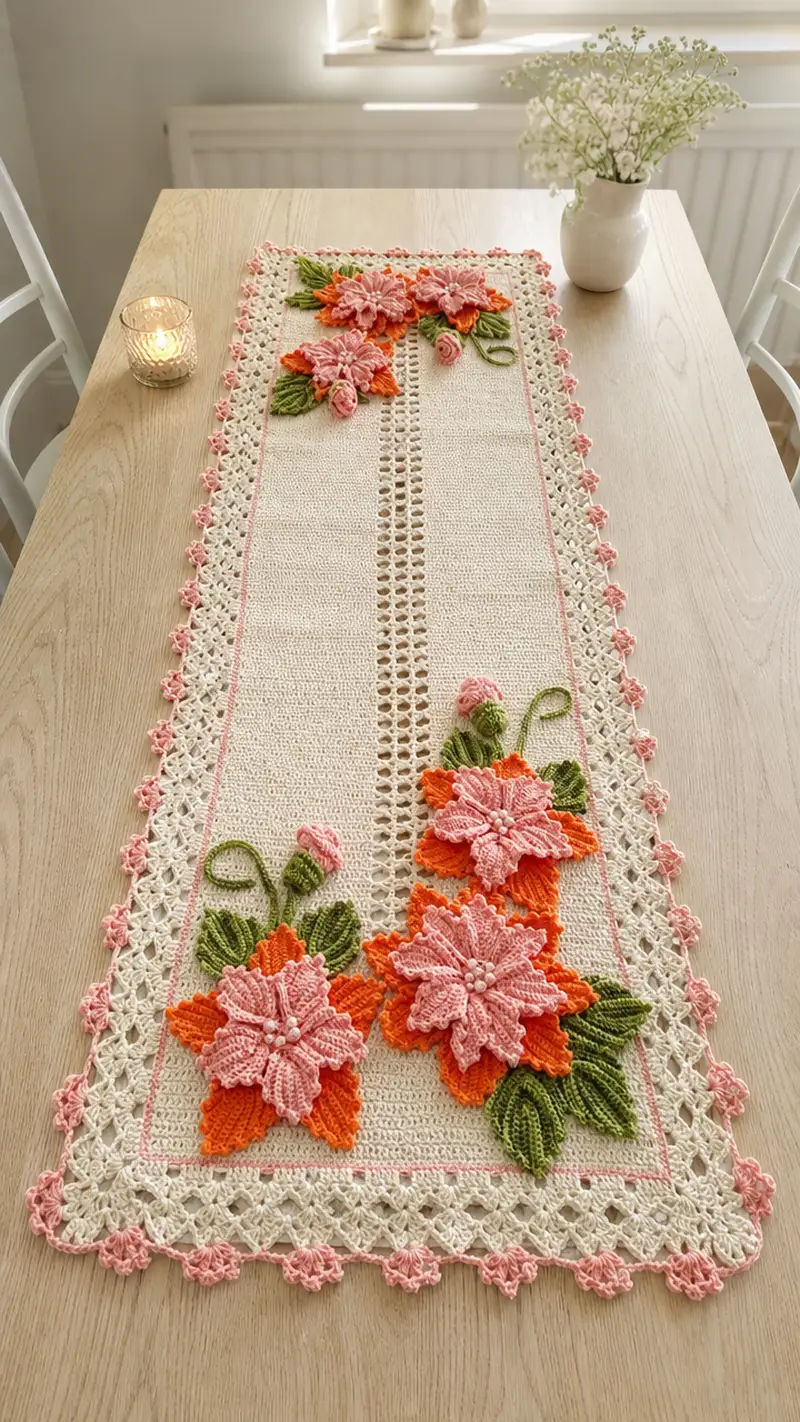
This elegant crochet table runner features a soft cream background with a delicate openwork central stripe, lacy scalloped borders and layered floral appliques in coral-pink and bright orange with verdant green leaves. Perfect for a dining table centerpiece, the runner combines simple ground stitchwork with decorative motifs and applique assembly for a beautiful heirloom finish. Detailed instructions guide you through the panel, lace edges, flowers, buds and leaves for a polished final piece.
Progress Tracker
0% Complete
— Materials & Gauge :
Info :
Gauge is not critical for this decorative runner but recommended approximate gauge is 16 sc x 20 rows = 10 cm in worsted cotton using 3.5mm hook. Using different yarn or hook will change finished dimensions; adjust foundation chain for desired width.
— Main Panel (worked flat, rows counted as rounds) :
Round 1 :
Foundation chain: Ch 101 (this yields 100 foundation stitches across — change to an odd or even number as you prefer for symmetry). Turn. (101 ch)
Round 2 :
Row 1 (RS): Starting in 2nd ch from hook, 100 sc across the chain; ch 1, turn. (100)
Round 3 :
Row 2 (WS): 1 sc in each st across (100). Ch 1, turn.
Round 4 :
Row 3: 1 sc in each st across (100). Ch 1, turn.
Round 5 :
Row 4: 1 sc in each st across (100). Ch 1, turn.
Info :
We will work 60 rows for a medium-length runner. The central lace stripe begins at Row 6 and runs for 48 rows. Mark the center stitches on Row 1 so you can maintain the lace column symmetrically.
Round 6 :
Row 5: Work sc across until you reach the left edge of the central 12-stitch area (count 44 sc), then begin lace section: *ch 2, sk next 2 sts* repeat 3 times across the central 12-stitch width, then continue sc to row end (complete remaining 44 sc). Ch 1, turn. (100 stitches counted as scs + ch spaces replace sk sts)
Round 7 :
Row 6: RS side: 1 sc in each sc to first ch-space, then in each ch2 space work (ch2, sk ch-space — this continues the open mesh), then 1 sc to row end. Ch1, turn. (100)
Round 8 :
Row 7: Repeat Row 6 maintaining the ch2 openwork center and sc on either side (100).
Round 9-14 :
Rows 8-13: Continue 1 sc to the lace section, maintain ch2 mesh for center 12-stitch column, and sc to the end. Keep counts consistent so each row totals the equivalent of 100 stitches (with ch-2 spaces replacing the skipped stitches). Ch1, turn after each row.
Info :
Place a removable stitch marker at the first stitch of every 10th row to help track length. The lace column gives a delicate vertical line; ensure your ch-2 spaces align by counting the number of spaces every 4-6 rows.
Round 15-24 :
Rows 14-23: Continue the even sc body, maintaining the ch2 central column unbroken. Work 10 more rows like this. (100)
Round 25 :
Row 24: Optional textured row — FLO rib to create a subtle ridge: 1 sc in each st but work in front loops only across entire row. Ch 1, turn. (100)
Info :
Using an FLO row before attaching the border creates a neat line under the lace column. If you prefer a flat look, skip the FLO and work standard sc.
Round 26-40 :
Rows 25-39: Continue sc rows maintaining the central ch2 lace column. Work until you have completed 40 body rows total (including previous rows). Keep tension even and refer to the stitch marker positions to keep edges straight. (100)
Round 41-44 :
Rows 40-43: For the last 4 rows of the central panel before edging, work 2 rows of sc, then 1 row of ch-1 spaces incorporated: sc to center, *(ch1, sk 1)* across the central 12 stitches to introduce a laddering effect that visually ties into the lace; finish remaining sc. Ch1, turn. Maintain counts. (100)
Round 45-60 :
Rows 44-59: Work plain sc rows for an additional 16 rows so that full runner body has 60 rows total (including initial rows). End with a WS row so the edge foundation is even for border joining. (100)
Info :
At this point the main panel should be approximately the desired length for a medium runner (approx 110-125 cm depending on yarn and gauge). If you prefer a longer runner, add extra sc rows in multiples of 2 to keep symmetry.
— Preparing the Edging Base :
Round 61 :
Join cream yarn at corner RS. Working around the perimeter, place 1 sc evenly into each row-end (the short sides) and 1 sc into each sc across the long sides. At corners work (3 sc, ch 2, 3 sc) to create a square corner. Work evenly so you return to join point. Do not fasten off. (Perimeter stitch count will be approximately 240-260 depending on exact row length)
Info :
Count your sc along one long side then multiply by 2 and add the number of row-ends; accurate counts help when designing the filet border patterns so motif placement lines up at corners.
Round 62 :
Round 1 of border: *Ch 3 (counts as dc), skip 2 sc, 1 dc in next sc* repeat along side; at corners work (ch 1, 1 dc) into corner ch-2 space to keep the pattern flowing smoothly. Join with sl st to top of starting ch-3. (dc shell mesh along perimeter)
Round 63 :
Round 2 of border: Work into the dc mesh: *(1 sc in dc, ch2, 1 sc in next dc)* across; at corners, work (sc, ch2, sc) in corner spaces. Join with sl st. This prepares the foundation for the lattice shells.
Round 64 :
Round 3: Shell motif base: *Sk 1 sc, (5 dc) in next sc (shell), sk 1 sc, sl st into next sc* across each long side; at short sides repeat shells so border wraps the runner. Join. Count shells; you should have a regular number to be used as attachment points for picot bobbles later. (approx 40-48 shells depending on measurement)
Info :
Keep shells evenly spaced — pinning the runner to a flat surface makes this step easier. If you have too many or too few shells, consider adjusting Round 62's skip pattern slightly to fit an even number around the runner.
— Lacy Border Detail (Filet & Picot Edge) :
Round 65 :
Round 4 of border foundation: Work 1 sc in each shell center and between shells to fill gaps so shell edges are stable. (maintain count)
Round 66 :
Round 5: Create lattice: *Ch 4, sk 3 sc, sl st into next sc* repeat across each side between shells. At corners adjust chains to fit neatly into ch-2 corner spaces. Join. This chain lattice will create the airy cream border that matches the photo's look.
Round 67 :
Round 6: Work into lattice: in each ch-4 space work (sc, ch3, sc) creating small arches; between arches place 1 sc in the post of the shell to anchor. Join.
Round 68-70 :
Round 7-9: Repeat Round 67 for two more rounds to build a three-row tall lattice border. Work carefully at corners maintaining (sc,ch3,sc) motif and anchoring into corner ch-2. Join each round. This builds the wide cream border shown.
Info :
If you prefer a narrower border decrease the number of repeats here; for a more dramatic border add an extra repeat of the arch row. Keep the number of arches per side consistent by adjusting spacing during Round 65.
Round 71 :
Round 10: Working in pink accent, join at any point and work a slim outline: *1 sc in each sc around, 3 sc in corners* to create a narrow pink frame inside the lace border. Join and fasten off, weave ends. This delicate pink outline visible in the photo frames the runner's center.
Round 72 :
Round 11: Return to cream yarn. Prepare the final edge row for picot flowers: *In each arch space work (sc, ch 3, sc), then 2 sc in the top of the lattice anchor to stabilize.* Join.
Round 73 :
Round 12: Picot bobble edge foundation: *Sc across each st, at every other arch work (sc, ch3, sl st in 3rd ch) to form small picot points that will be embellished with a 3D cluster.* Work evenly across edges and carefully at corners to keep shape square. Join.
Info :
For a tidy look, use a smaller hook or tighten tension when working picots so they sit neatly. The photo shows soft pink picot bobbles spaced evenly across the perimeter — place them every 4-6 stitches depending on your arch count.
Round 74 :
Round 13: Switch to smaller 3.0mm hook and pink yarn. Working into the sl st picot spaces, make picot clusters: in each marked space work *(sc, ch2, 3 sc in same space), sl st to base* to make a small flower-like cluster. This gives the outermost pink bobble trim effect. Fasten off and weave ends.
— Large Layered Flower (Make 4 main flowers) :
Info :
Each large flower is constructed in two layered tiers — a base star (orange) and a ruffled petal tier (pink). Make four large flowers for two clusters shown in the photo (two clusters at each end). Use smaller hook 3.0mm for crisper petals.
Round 75 :
Flower Base (Orange) - Round 1: With orange yarn, MR, 6 sc in magic ring. (6)
Round 76 :
Round 2: Inc in each st around (12). (12)
Round 77 :
Round 3: (1 sc, inc) x 6 (18). (18)
Round 78 :
Round 4: (2 sc, inc) x 6 (24). (24)
Round 79 :
Round 5: (3 sc, inc) x 6 (30). (30)
Round 80 :
Round 6: (4 sc, inc) x 6 (36). (36)
Round 81 :
Round 7: Base star shaping: *[sc in next st, ch 3, sl st into next st]* repeat across to create 12 loops around (work into alternating stitches). Fasten off base leaving long tail for sewing. This creates points to anchor the larger petals.
Info :
Do not close the magic ring tightly — leave a small central hole to be covered by the pink petal layer later. The base should lie flat; if it cups, block lightly with steam.
Round 82 :
Petal Layer (Pink) - Round 1: With pink yarn join in any base loop space. *(Ch 6, sl st into same loop)* x 6 to form 6 long chain loops spaced across the base. After the 6th loop, sl st into the next anchoring point to fasten. (6 loops)
Round 83 :
Round 2: Working into each ch-6 loop: *sc in first ch, hdc in next 2 ch, 3 dc in next 2 ch, hdc next 2 ch, sc in last ch, sl st to base* repeat for each of the 6 loops to form ruffled petals. Fasten off pink leaving long tail for sewing. Each petal should be full-bodied. (6 petals)
Round 84 :
Round 3: For additional ruffle: With pink, work 1 sc in base between petals, then in the body of each petal work a picot row: *(sc in petal edge, ch 3, sl st in 3rd ch)* around outer edge to add texture. Fasten off. The two-tier flower should measure approx 8-10 cm across depending on yarn.
Info :
Sew several small pearl beads or french knots into the center to mimic the clustered pearl centers visible in the photo. Use a small sewing thread and needle to secure beads through the back several times.
— Medium Layered Petal (Make 3 per cluster) :
Round 85 :
Medium Petal - Round 1: With pink yarn MR, 6 sc in ring (6). (6)
Round 86 :
Round 2: Inc in each st (12). (12)
Round 87 :
Round 3: (1 sc, inc) x 6 (18). (18)
Round 88 :
Round 4: Create petal loops by making *(ch 5, sl st into next st)* across to make 6 loops. Round 5: Work into loops: sc, hdc, 3 dc, hdc, sc to shape petals. Fasten off with long tail.
Info :
These medium petals are layered on top of the large orange base to create volume. Vary the number of petals per flower to achieve the clustered look in the image.
— Small Rosebud (Make 6 buds) :
Round 89 :
Bud - Round 1: With deep rose/pale pink, ch 6, sl st into 2nd ch from hook, sc in next, hdc in next, 3 dc in last ch; now working on the opposite side of foundation chain work 3 dc, hdc, sc, sl st. Do not fasten off.
Round 90 :
Round 2: Roll the little strip tightly into a spiral, securing every 2-3 wraps with a small whip stitch through the base with tail. Add a tiny knot of fiberfill before the last wrap for fullness if desired. Fasten off and hide tail through the bottom so it is unseen. Each bud measures approx 1.2-1.5 cm.
Info :
Make 6 buds of varying sizes; these will be placed near larger flowers and along stems to echo the image's composition.
— Sculpted Leaves (Make 12-16 leaves) :
Round 91 :
Leaf - Round 1: With green yarn, ch 11. In 2nd ch from hook: sc, hdc, 2 dc, tr, 2 dc, hdc, sc along the chain, then work along the opposite side of the chain mirroring the stitches: sc, hdc, 2 dc, tr, 2 dc, hdc, sc. Slip stitch to starting st and fasten off leaving tail. This produces a pointed, veined leaf. (approx 10-12 cm long depending on gauge)
Round 92 :
Round 2: To add raised veins, switch to a 3.0mm hook and, using surface slip stitch in a darker green, work center vein lines: bring yarn through at leaf base, sl st along center to tip and back, securing at base. Fasten off.
Info :
Create leaves in two sizes by adjusting the initial chain length (e.g., ch 9 for small leaves, ch 13 for extra-large). Slight blocking will help leaves lay flat and curve gently as in the photo.
— Curved Stem & Tendril (Make multiple stems) :
Round 93 :
Stem: With green, ch 50 for a long stem length (or ch 30 for short stems). Starting in 2nd ch from hook, work 1 sc in each chain back to the base. Fasten off leaving long tail for sewing and shaping. For a raised look, use a thicker yarn or hold two strands and work sc along chain.
Round 94 :
Tendril: For curly tendril create ch 20 then in 2nd ch from hook work 3 sc in each ch across to create a spiral; stretch gently to curl. Fasten off leaving tail for stitching. Make 6-8 tendrils to echo the image detail near flowers.
Info :
If you desire poseable stems, thread a thin wire into the stem before finishing and secure wire ends by weaving stitches over them. Ensure wire ends are folded so they do not poke through the fabric.
— Assembling Floral Clusters (Placement & Attachment) :
Round 95 :
Layout: Place two large flowers near each end of the runner: one cluster near the top-left corner and one cluster near the bottom-right corner as in the photo. Arrange each cluster with a large orange base, two layered pink petal flowers, 2-3 medium petals, 3-4 leaves, and 1-2 buds. Pin into position on the cream panel, keeping the central lace stripe visible.
Round 96 :
Sewing: Using long tails from each motif or a matching yarn and tapestry needle, sew motifs to the panel with small invisible whip stitch at the motif base, catching only a few threads of the panel for a secure but neat attachment. Reinforce areas where multiple layers overlap by stitching through all layers to lock them together.
Round 97 :
Stems & Tendrils: Stitch in the stems and tendrils with thread tails so they weave under and between petals. Use a backstitch technique across two or three attachment points to ensure the tendril curves sit naturally. Anchor both ends of stems to prevent movement.
Info :
Place beads last: sew small pearl beads into the centers of large flowers by stitching up through the front center, adding bead, and stitching back down multiple times. Tie several secure knots on back and hide the knot under the motif base.
— Final Finishing Rows & Blocking :
Round 98 :
Edge tidy-up: Once motifs are sewn, with cream yarn work 1 round of sc along the inner edge adjacent to motifs to tidy sightlines. Insert small stitches through both motif base and panel to secure underside seams. Fasten off and weave ends.
Round 99 :
Blocking: Wet-block or steam-block the entire runner. Pin to dimensions on blocking mats making sure central lace column is straight and border shells are evenly spaced. Allow to dry completely before removing pins.
Round 100 :
Final trim: Weave in all remaining ends and trim extra yarn. Inspect beads and sewn seams, reinforcing any areas that feel loose. Your runner is now complete and ready for display.
Info :
If you intend the runner for heavy daily use, consider adding a small backing fabric using fabric glue or hand-stitching to the wrong side to protect delicate applique edges from catching and to keep the runner flat on the table.
— Optional Variations :
Round 101 :
Alternate Colorways: Change the pink accent to lavender, the orange to peach, or the cream base to soft gray for different moods. To scale the runner, increase the number of initial foundation chains in multiples of 10 to maintain lace column symmetry.
Round 102 :
Extra Flowers: Add additional smaller 3-petal flowers along the runner edges for a more abundant look. Adjust border picot spacing to accommodate their attachment points.
Info :
Keep notes as you work — write down the number of shells, arches and exact placement of motifs so you can replicate or adjust the design in future projects.
Completing this elegant table runner is such a rewarding process — the calm rhythm of the sc rows plus the joyful moments of shaping and placing layered flowers makes every step a pleasure. Each applique adds personality and depth, culminating in a truly special centerpiece you will be proud to display. 🧶💐 Give yourself time to pin and position carefully — the result is a timeless, handmade accent that will brighten any table. Happy stitching and enjoy your beautiful creation! ✨