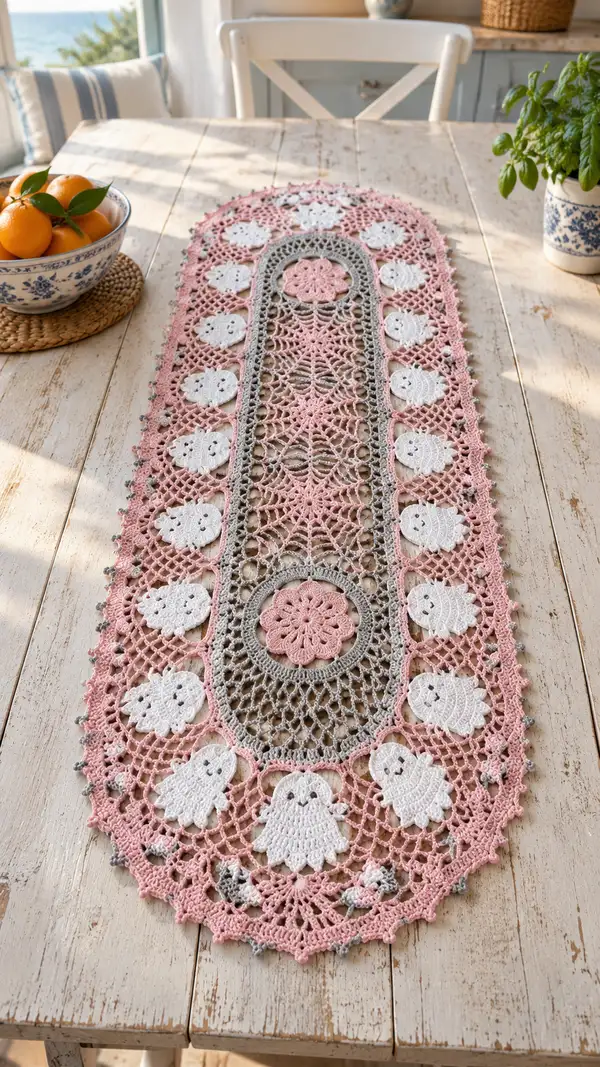
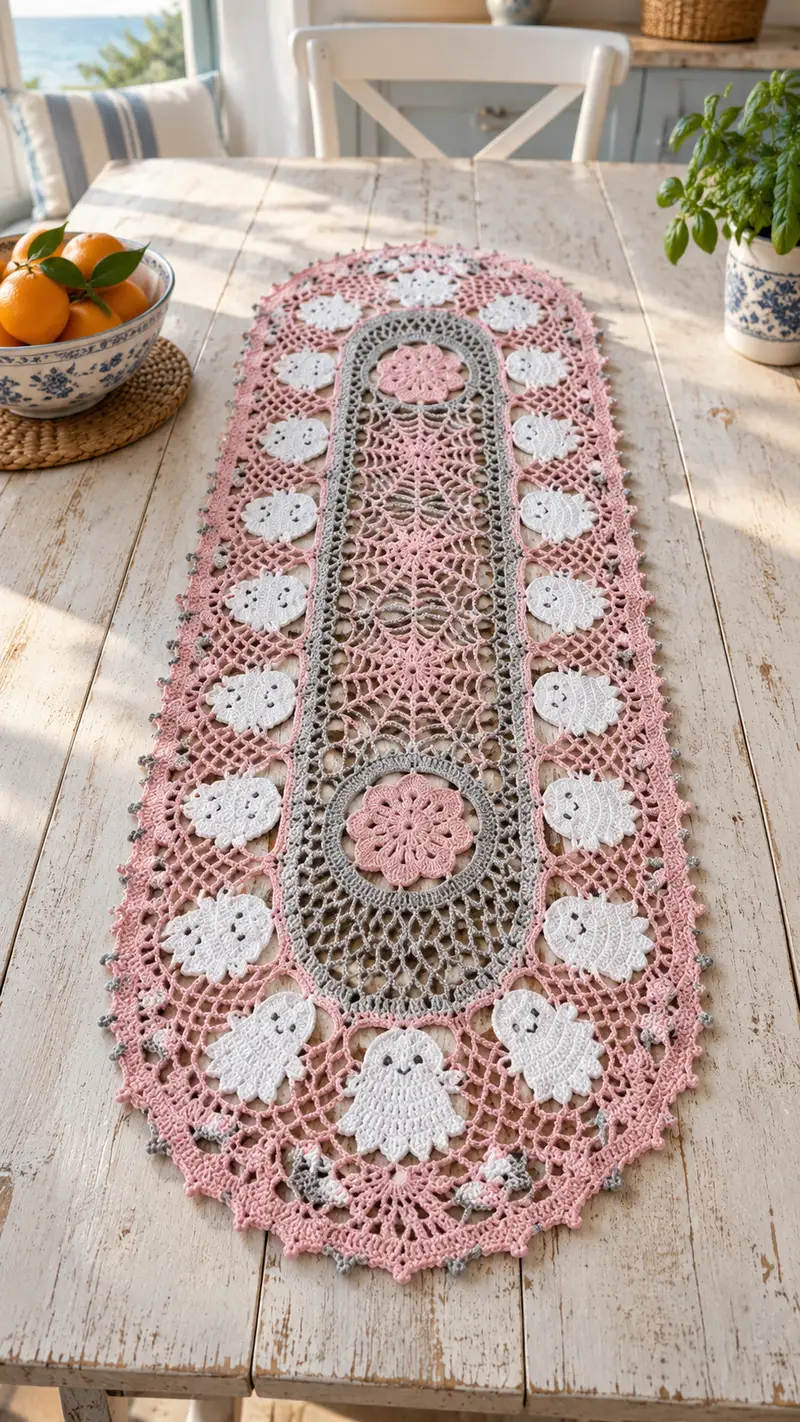
Create a delicate, vintage-inspired lace table runner featuring a central medallion, delicate mesh stripes, and whimsical white ghost motifs paired with soft pink and dove gray borders. The finished runner is perfect as a centerpiece, with openwork stitches that let your table show through. This pattern includes motif instructions, joining techniques, and a layered scalloped edging to give a polished finished look.
Progress Tracker
0% Complete
— Center Medallion :
Round 1 :
Ch 6, join with sl st to form ring, ch 3 (counts as dc), 11 dc into ring, join with sl st to top of ch-3 (12 dc)
Round 2 :
Ch 3, dc in same st, (2 dc in next st) x 11, join with sl st (24 dc)
Round 3 :
Ch 3, dc in same st, (1 dc in next st, 2 dc in next st) x 11, join (36 dc)
Round 4 :
Ch 3, dc in same st, (2 dc, 1 dc in next st, 2 dc in next st) x 9, join — work to create even circular expansion (54 dc)
Info :
Work loosely but evenly for the first rounds to avoid puckering; place a stitch marker at the round join to track the beginning.
Round 5 :
Ch 4 (counts as tr), tr in same st, (ch 2, sk 2 dc, 3 tr in next dc) around to create 18 tr-clusters and chain-spaces, join with sl st to top of ch-4
Round 6 :
Sl st into next tr, ch 3, dc in same tr, (ch 3, sk to next tr cluster, (dc, ch 1, dc) into center ch-2 of cluster) around to form lacy petal connectors, join (18 petal spaces)
Round 7 :
Ch 1, sc into same st, *ch 5, sc into next petal center* repeat around to make 18 ch-5 loops, join
Round 8 :
Into each ch-5 loop: *(3 dc, ch 3, 3 dc), sl st into next sc* repeat around to form pointed lace petals; join (18 petals)
Round 9 :
Ch 1, sc in same st, ch 4, sk to next petal point and sc between petals (work sc, ch-4 across), join — (18 ch-4 mesh points)
Round 10 :
Turn to more open stitch: Into each ch-4 sp: (dc, ch 2, dc), between petals ch 3 and sl st into top point to maintain round shape; join (36 dc with chain anchors)
Info :
Blocking tip: At this stage gently steam or wet-block the medallion flat to open the petals; pin gently to preserve the round shape before continuing.
Round 11 :
Ch 3, dc in same st, *ch 5, skip to next dc cluster and 3 dc into next sp* repeat around to create long chain loops for the medallion rim (18 loops)
Round 12 :
Into each ch-5 loop: sc, ch 5, sc to form elongated loops; join (18 elongated loops)
Round 13 :
Ch 4, tr in same st, *(sk next elongated loop, into next elongated loop work (tr, ch 2, tr, ch 2, tr) to form fan), sl st into next base sc* repeat around (18 fans)
Round 14 :
Ch 1, sc in same st, ch 6, sc into center of each fan to create 18 long mesh arches; join
Round 15 :
Into each ch-6 arch: *(3 dc, ch 3, 3 dc), sl st to next sc* to create decorative large shells around medallion (18 shells)
Round 16 :
Ch 3, dc in same st, ch 3, sk to center of shell and sc to anchor between shells, ch 3, *dc in top of next shell* repeat around creating even openwork (total dc anchors 36)
Info :
If you prefer a more delicate center, switch to the finer 2.25mm hook for these rounds; otherwise continue with 2.5mm for a slightly firmer edge.
Round 17 :
Ch 1, sc in same st, *ch 7, sc in next ch-3 loop between shells* repeat around to make 18 ch-7 loops; join
Round 18 :
Into each ch-7 loop: (dc, ch 3, 2 dc, ch 3, 2 dc), sl st into next sc to stabilize — creates an ornate ring (18 motifs)
Round 19 :
Ch 1, sc in same st, *ch 9, sc between motifs* repeat around to elongate the medallion and prepare for the oval extension; join (18 ch-9 loops)
Round 20 :
Work into each ch-9 loop: (dc, dc, ch 4, dc, dc), sl st into next sc — this rounds out a wider medallion rim (18 sets)
Round 21 :
Ch 1, sc in same st, *ch 3, sk to next dc set, (sc, ch 6, sc) into center ch-4 of previous round* repeat to create anchor points for the oval frame
Round 22 :
Change to dove gray yarn. Join with sl st to any sc. Ch 3, dc in same st, (ch 2, sk to next anchor, 3 dc into next anchor) around to create the start of the inner oval frame (18 dc clusters)
Info :
Change to gray now to create a defined oval frame. Carry a short tail or weave in later; if carrying yarn, twist it neatly to avoid bulk under the lace.
Round 23 :
Ch 1, sc in same st, *ch 4, sc in next dc cluster between groups* repeat around to make 36 ch-4 loops; join
Round 24 :
Into each ch-4 loop: (hdc, ch 2, hdc), sl st into next sc — forming close mesh for the frame; join (36 hdc anchors)
Round 25 :
Ch 3, dc in same st, *ch 3, sk, (5 dc shell) into the center of every third loop* repeat around to create a decorative gray scalloped border that helps transition to the linear mesh panel
Info :
At this point the medallion is complete and will form one end of the runner. Mirror these rounds for the opposite end when assembling; note which side is RS to match the same face when joining opposite medallion later.
— Oval Frame Extension :
Round 1 :
With gray yarn still: From the medallion rim, ch 1, sc evenly around one half of the medallion edge to begin elongating — work 48 sc along each long side to extend into an oval shape (96 sc total)
Round 2 :
Ch 3, dc in same st and across each sc around the oval, placing extra dc at the rounded ends to maintain curvature. Work to make 120 dc around (approximate: add 12 increases evenly at the two rounded ends)
Round 3 :
Ch 1, sc in same st, *ch 3, sc in next 2 dc* repeat around to make a consistent foundation for mesh arches; join
Round 4 :
Ch 4, tr in same st, ch 3, sk 2, dc in fourth st, repeat along for a decorative tall openwork band; aim for a repeat count divisible by 12 to keep symmetry (approximately 40 repeats)
Info :
When counting for the oval, adjust evenly on both ends so the oval stays symmetrical. Use stitch markers at quarter points to distribute increases and maintain shape.
Round 5 :
Ch 1, sc into same st and in each arch, *ch 5, sc into the top of the next arch* around to create 40 ch-5 loops; join
Round 6 :
Into each ch-5 loop: (2 dc, ch 3, 2 dc), sl st into next sc — forming shell clusters along the oval (40 shells)
Round 7 :
Ch 1, sc into same st, ch 7, sc between shells along long sides to create space for mesh strip joining; on end caps add (sc, ch 3, sc) into top of end shell to keep oval curvature
Round 8 :
Change to blush pink yarn. Join with sl st into a side sc and work a row of sc around the oval, placing 2 sc into each end cap sc to maintain the longer shape — aim for 120 sc total
Info :
Switching to pink here visually separates the central oval from the long mesh stripe that will run down the center. Keep a neat join by pulling up a loop and finishing the change with a sl st.
Round 9 :
With pink: Ch 1, sc in same st, *ch 6, sk to next sc and sc* around to create uniform ch-6 mesh loops along the oval (approx. 40 loops); join
Round 10 :
Into each ch-6 loop: (dc, ch 4, dc), sl st into next sc — this creates elongated openwork that will transition to the central mesh panel; join
Round 11 :
Ch 1, sc across, placing sc into the top of each dc and sc between loop anchors to create a solid edging band of approximately 120 sc; join
Info :
Now the oval frame is established. If you need to lengthen the runner, you can add additional mesh panel repeats later before joining the opposite medallion.
— Central Mesh Panel (Long Panel) :
Round 1 :
With pink yarn starting from one side of the oval: Ch 6, join with sl st to the opposite side sc to create a chain bridge across the center (counts as one mesh column), turn and begin rowed mesh. Work 1 sc into each sc across the edge to anchor the mesh foundation; continue back and forth to create a rectangular mesh panel that extends lengthwise between medallions.
Round 2 :
Row 1: Ch 3 (counts as dc), *ch 2, sk next anchor st, dc in next anchor* repeat across. This creates a row of dc with chain-2 spaces; when you reach the end, turn and anchor with sl st into the edge sc to keep a straight panel.
Round 3-10 :
Repeat Row 1 pattern for 8 more rows to build a central open mesh panel approximately 8 rows high per medallion-to-medallion distance; count repeats to match the desired runner length (work until panel measures same length as the gap between two medallion edges when laid flat)
Info :
Work the central panel flat in rows rather than rounds for a more even rectangular mesh; block this panel flat and square to prevent skewing before joining to oval frames.
Round 11 :
On completion of desired length for the central strip, join the far end to the opposite oval with sc evenly around the oval's inner sc anchors. Use mattress stitch technique to create an invisible seam: whip 2-3 mm under edges and pull gentle tension for a flat join.
Round 12 :
Once central strip is joined to both ovals, work 1 full round of sc around the inside of both ovals and the long sides of the mesh panel in pink to tidy the join (approx. 360 sc total across entire joined edge depending on your gauge)
Info :
After joining, place the runner on a large blocking surface and pin into shape — check symmetry and measure both ends; adjust by easing chain spaces with pins before the final border is added.
— Ghost Motif (Make 12) :
Round 1 :
With white yarn: Ch 6, join to form ring, ch 1, 8 sc into ring, join (8 sc). This small circle will become the ghost's head foundation.
Round 2 :
Ch 1, 2 sc in each st around (16 sc)
Round 3 :
Ch 1, *sc in next st, inc* repeat around (24 sc)
Round 4 :
Ch 2 (counts as hdc), hdc in same st, *(hdc in next 2 sts, 2 hdc in next st)* repeat across to form a slightly domed head base (approx. 32 hdc)
Info :
Keep tension even and slightly loose when creating flat applique shapes so they lie flat on the mesh when joined to the runner; block each ghost motif flat before assembly.
Round 5 :
Ch 1, sc around to tidy the edge, placing 3 sc at top center to form the forehead curve (approx. 36 sc)
Round 6 :
Form ghost body scallop: Ch 3, *sk 1, (5 dc shell) into next st, sk 1, sl st into next st* around the lower half of the circle to form 5 scallops (work 5 shells evenly spaced)
Round 7 :
Ch 1, sc around, placing sc between shells and 2 sc into topmost sc to maintain shape (approx. 46 sc)
Round 8 :
Create scalloped fringe (ghost lower edge): In each shell: *(hdc, dc, hdc), sl st into between space* repeat for 5 scallops to create the wavy ghost hem
Round 9 :
Ch 1, sc into top of each scallop and across the head top to tidy edge; join. Embroider two small eyes and a smiling mouth using gray embroidery floss or thin yarn: place eyes approximately 4-6 sts apart centered on Round 3.
Info :
Alternate facial option: Use French knots for eyes or small black beads sewn on after motif is blocked; if using beads on a piece for a child, sew them tightly or embroider eyes instead.
Round 10 :
Fasten off leaving a 15 cm tail for sewing. Block each ghost flat so scallops are crisp. Make 12 identical ghosts and arrange them along both long sides of the runner — 6 per side — spacing evenly.
— Placement and Joining Ghosts :
Info :
Lay the runner flat and position ghosts with the head pointing outward (away from center). Use pins to secure placement: place the first ghost 3–4 cm from the medallion rim, then space remaining ghosts evenly along the sides. Count stitches to match spacing and maintain symmetry.
Round 1 :
Sewing join method: Using white yarn tail and a yarn needle, whip stitch through ghost back edge and into pink mesh anchors, working along the base of scallops and head edge. Use small stitches (approx. 3-4 mm) so join is nearly invisible on front.
Round 2 :
Secure each ghost with 6–8 neat stitches around the perimeter, then weave tail through interior stitches and trim close. Block again after all ghosts are attached to set the joins.
Info :
If you prefer a removable applique, use small slip stitches only at two anchor points and a few loose stitches, allowing the ghost to be unstitched for laundering. For permanent joins, stitch around entire perimeter.
— Outer Lace Border and Scallops :
Round 1 :
With blush pink yarn, join at any side sc and work ch 1, sc evenly along the runner edge, placing 2 sc into each shell or anchor point at curved areas (estimate 420 sc around total depending on exact gauge)
Round 2 :
Ch 3, dc into same st, *ch 2, sk next 2 sc, (5 dc shell) into next sc* repeat around to form decorative shells in the outer band; add 3 dc at corners to maintain curvature (approx. 84 shells)
Round 3 :
Ch 1, sc in same st, ch 6, sc in center of next shell to create chain-loops around edge (approx. 84 ch-6 loops)
Round 4 :
Into each ch-6 loop: (2 dc, ch 3, 2 dc), sl st to next sc to form prominent scallops (84 scallops)
Info :
Ensure you keep equal number of scallops around the curved ends and long straight sides to prevent ruffling; adjust by adding or subtracting a ch-6 loop in discrete spots to balance tension.
Round 5 :
Change to dove gray. Join and work a round of ch-3 picot accents: *sc in top of scallop, ch 3, sl st into first ch to make a picot, ch 2, sl st into next sc* continue around placing a small gray picot between each scallop (84 picots)
Round 6 :
Switch back to pink. In each scallop top: *(sc, ch 3, sc), ch 2, sl st into gray picot to anchor* repeat around to fuse the two-color edging into a single layered lace border.
Round 7 :
Ch 1, sc into same st, *ch 5, sc into center of next scallop* around to create a final openwork chain border. Fasten off and weave ends; block once more to set shape.
Info :
For a crisp finish, lightly spray the border with a fabric-safe starch while blocking. Pin scallop points and picots precisely to ensure a regular edge.
— Final Finishing Rounds :
Round 1 :
Inspect the entire runner: weave in all ends, trim tails to 5–8 mm, and check ghost placements for any loose stitches. Reinforce any joins where threads show slack.
Round 2 :
Optional: Add a final decorative picot row in gray along the outermost edge: Join gray, *ch 3, sl st into base leaving a small picot, ch 2, sl st into next base* repeat around for a subtle dotted outline.
Info :
Final blocking is important: pin the runner into its full oval shape and allow to dry completely (24 hours recommended) for the lace to retain its crispness and even curvature.
Round 3 :
Edge reinforcement: With blush pink, sc around the entire runner once more in a tidy stitch to secure loose picots and even out tension. Fasten off and weave in tails through multiple stitches for secure endings.
Info :
Storage tip: Fold the runner with acid-free tissue between folds or store flat to avoid creasing the lace permanently. Re-block as needed to refresh the shape and keep scallops crisp.
— Customization Notes & Sizing :
Info :
You can scale the runner by altering the length of the central mesh panel: each additional 10-row repeat adds approximately 6-8 cm depending on gauge. To make the runner wider, increase the count of shell repeats in the oval frame rounds symmetry continues.
Info :
Color variation: Replace blush pink with a contrasting color or two-toned yarn for a vintage ombre effect. Make ghost motifs in a soft cream instead of bright white for a subtler look.
Info :
Gauge is not crucial for the lace effect, but keep hook choice consistent across sections to avoid mismatched tension and uneven joins. Block motifs individually before assembly to ensure consistent dimensions.
Completing this runner feels like gifting your table a little bit of romance and whimsy — the layered medallion, delicate mesh, and tiny ghost appliques all combine into a unique centerpiece you will love. The blocking and finishing really make the lace sing, producing crisp scallops and defined picots. Enjoy the peaceful process of joining motifs and watching the long runner come together. 🧶✨ Make one for every season and share your creations — they make lovely handmade gifts! 🎁