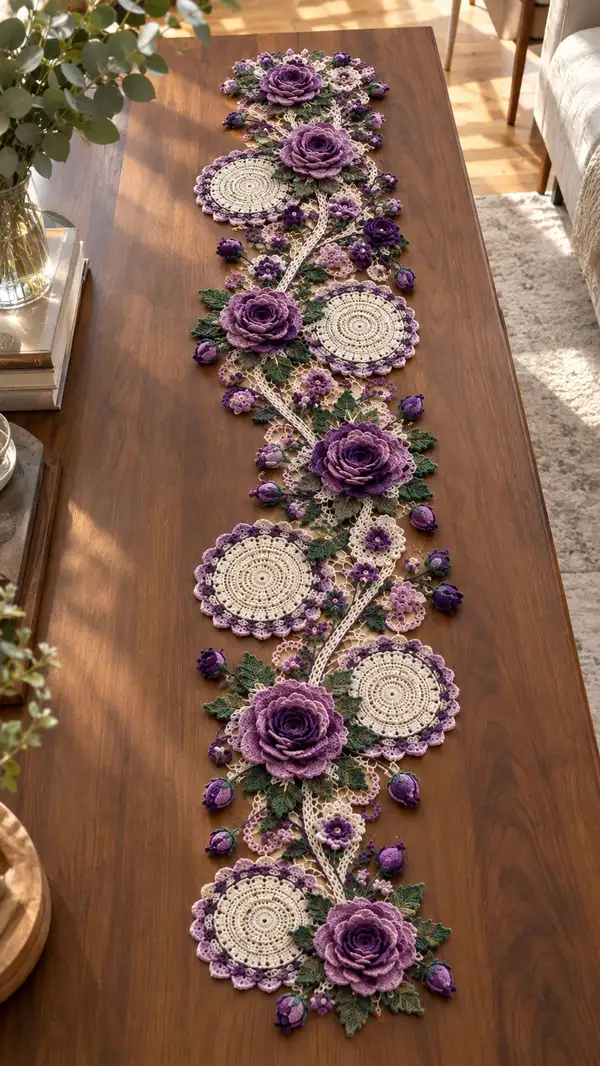
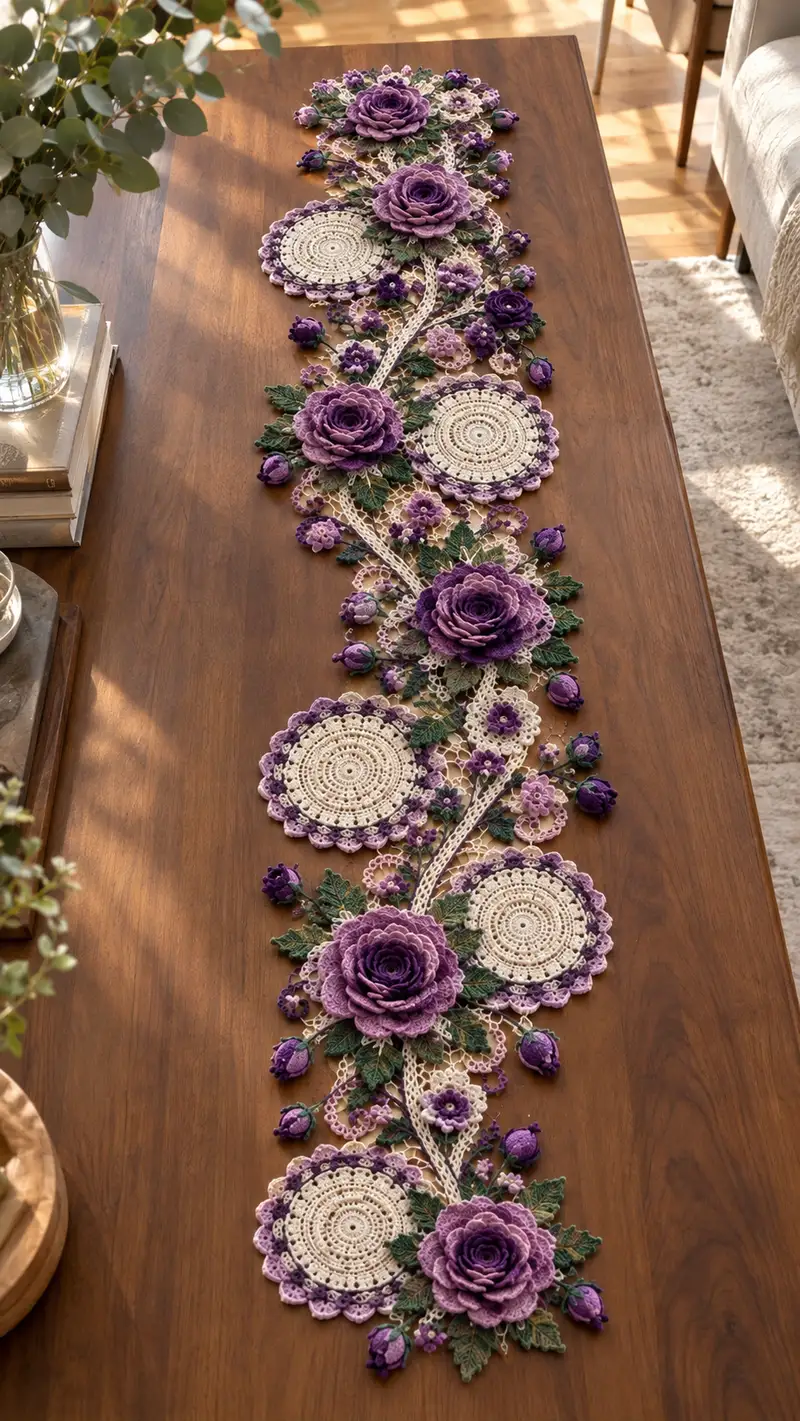
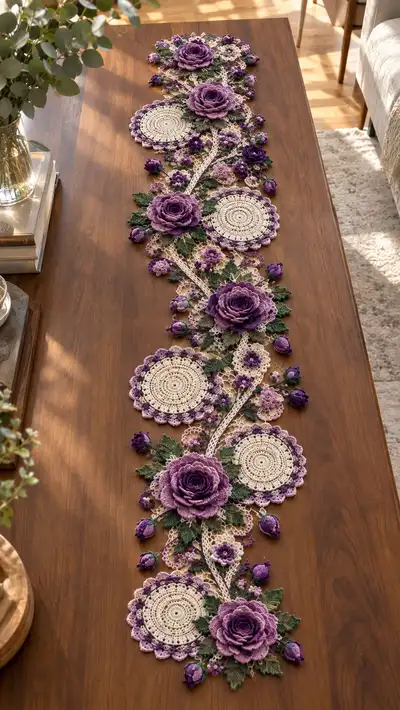
This long, romantic table runner features layered 3D roses, lace doilies, leafy vines and tiny buds in shades of purple and cream. The design combines circular doilies and sculpted roses joined with delicate openwork vines for a refined centerpiece. Perfect for a dining table or narrow console, the runner is richly textured with dimensional flowers and leaves that are crocheted separately and assembled into a continuous lace composition.
Progress Tracker
0% Complete
— Pattern Notes :
Info :
This runner is constructed from modular components: Large Layered Roses (Make 5), Circular Doilies (Make 5), Small 3D Buds (Make 10), Small Five-Petal Flowers (Make 20), Leaves (Make 30), and Lace Vine Connectors (Make 2 long strips). Pieces are crocheted separately and joined by hand-sewing and lace-join techniques. Work tightly for tidy stitches, especially where petals are sculpted. Block flat elements (doilies and leaves) to exact dimensions before assembly.
Info :
Suggested gauge and finished sizes will vary by yarn; the pattern quantities assume a cotton light/DK or fingering held singly with the specified hooks. One runner as shown is approximately 110 cm long and 22-25 cm wide once assembled and blocked. Adjust spacing and quantity to lengthen or shorten.
— Large Layered Rose (Make 5) :
Info :
These roses are created in two stages: an inner spiral disc to anchor and shape layers, then sequential petal rounds worked in short clusters and chains to build forward-curving petals. Use the 2.25mm hook for the disc and switch to 1.75mm for petal rounds for firmer petals. Each rose uses gradients: dark plum for center, mauve mid petals, lavender highlights. Work petals joined into the disc as you go.
Round 1 :
mr, 6 sc in ring (6)
Round 3 :
(1 sc, inc) x6 (18)
Round 4 :
(2 sc, inc) x6 (24)
Round 5 :
(3 sc, inc) x6 (30)
Info :
Work these first rounds in dark plum. Keep the disc flat and dense — tight tension helps shape petals later. If your disc cups, block flat before adding petals.
Round 6 :
(4 sc, inc) x6 (36)
Round 7 :
1 sc in each st (36)
Round 8 :
1 sc in each st (36)
Info :
Switch to 1.75mm hook for petal rounds to make petals firmer and sculpted. Change to mauve yarn at the start of Round 9 if using a gradient.
Round 9 :
*(ch 3, sk 1, sc in next st) repeat around* to create small anchor loops, adjust spacing to have 18 loops (36 sts base creates 18 loops) (18 loops)
Round 10 :
In each loop: (sl st in loop, ch 2, 5 dc in loop, ch 2, sl st) — makes first small petal cluster across 18 petals
Info :
Petal round uses cluster shells; keep tension even. Arrange petals as you go so they slightly overlap previous round to form a spiral. Use a yarn needle to coax petals forward if necessary.
Round 11 :
Work between petals: *sl st to base of next petal, ch 3, (3 dc, ch 1, 3 dc) in ch-2 space of next petal base, ch 3* around to form larger outer petals (18 larger petals)
Round 12 :
Switch to lavender for highlights. In each large petal: (sl st into center of petal, ch 1, sc, hdc, 5 dc, hdc, sc, sl st) — finishing edge to add fullness. Fasten off and weave tail into the disc for stability.
Info :
At this stage petals are layered but flatter; to create volume use a slip-stitch gathering row on the back of the petal rounds: run a length of yarn through the backs of petal bases and gently pull to curve petals forward, knot securely and hide tail.
Round 13 :
Return to mauve; around outer seeded area, form an additional petal layer: *(ch 4, sk 2, sc) across, placing sets every 3 base sts* to create a scalloped foundation (approx 36 foundation loops)
Round 14 :
In each foundation loop: ch 2, (hdc, 3 dc, hdc), ch 2, sl st into base to form medium petals (36 petals)
Round 15 :
Work slip-stitch joins and tiny picot edging: *(sc, ch 3, picot, sc) across petal edges* producing delicate points on each petal
Info :
Block each rose lightly on a flat surface with pins shaping petal curvature. Spritz with water, shape petals forward and allow to dry. This preserves three-dimensional look.
Round 16 :
Create a second concentric petal ring by attaching dark plum under one side of earlier petals and working: *(ch 2, 7 dc cluster in front loop only of base, sl st) around each current petal base*, producing 36 fuller petals
Round 17 :
Finish petal edges with *sc in each dc, ch 3 picot every third sc* to create tiny serrated edges
Round 18 :
Optional: add small seed beads in petal centers by sewing on beads with matching thread for subtle shimmer. Fasten off and weave ends.
Info :
Repeat all of the above rounds to make 5 roses. Vary the gradient order (center darker vs outer darker) to create natural variation. Reserve one rose for the central focal point with slightly larger petal rounds (add 1 additional petal creation round if you want one bigger centerpiece).
— Circular Doily Medallion (Make 5) :
Info :
These flat circular medallions form the cream backdrop behind each rose. Work in cream yarn with 2.25mm hook. Block perfectly round before assembly. The doily here is approx 12-14 cm diameter after blocking.
Round 1 :
mr, 10 sc in ring (10)
Round 3 :
(1 sc, inc) x10 (30)
Round 4 :
(2 sc, inc) x10 (40)
Round 5 :
(3 sc, inc) x10 (50)
Info :
Keep rounds even and flat. If your doily begins to ruffle, slow increases; if cupping, use a slightly larger hook or add one more increase round. This doily creates a stable platform for rose mounting.
Round 6 :
1 sc in each st around (50)
Round 7 :
*(ch 3, sk 2, sc) repeat around to create 17 arches (17 arches)
Round 8 :
In each arch: (sc, ch 3, 3 dc, ch 3, sc) forming decorative scalloped rings (17 scallops)
Round 9 :
Work an open lacy round: *sc in scallop center, ch 5, sl st in next scallop center* repeat (17 chain arches)
Round 10 :
Create outer picot edge: *(sc, ch 3, picot, ch 3, sc) in each arch* producing delicate points (17 points)
Info :
Blocking: pin round to maintain diameter and scallop symmetry. Wet block and allow to dry fully before joining to roses and vines.
— Small 3D Bud (Make 10) :
Info :
Small closed buds are lightly stuffed and sewn onto the runner as accent points. Use darker purple for bud outer wraps and a tiny amount of stuffing.
Round 1 :
mr, 6 sc in ring (6)
Round 2 :
(1 sc, inc) x3 (9)
Round 3 :
1 sc in each st (9)
Round 4 :
(2 sc, inc) x3 (12)
Round 5 :
1 sc in each st (12)
Round 6 :
*(ch 3, sl st in next st) repeat around to make 6 tiny loops for petals*
Round 7 :
In each loop: (sl st, ch 2, 3 dc, ch 2, sl st) to form tiny bud scales (6 tiny petals)
Round 8 :
Fold the bud into a teardrop shape and sew the base together, insert a small pinch of polyester fill (very light). Close with invisible decreases across 3 stitches, fasten off leaving long tail to sew to runner.
Info :
Do not overstuff buds; they should be slightly flattened. Use a few stitches at the base to shape to a realistic closed bud before sewing into place.
— Small Five-Petal Flower (Make 20) :
Round 1 :
mr, 5 sc in ring (5)
Round 2 :
*(ch 4, sl st in next st) x5 to create 5 loops (5 loops)
Round 3 :
In each loop: ch 1, (sc, hdc, 3 dc, hdc, sc), sl st to join — forms 5 petals
Round 4 :
Embellish with French knot style center using tight sc stitches over center stitch or sew a small bead in center; fasten off.
Info :
Make 20 small flowers in varying purple tones and a few in cream to scatter across the runner for contrast. These are flat and require no blocking except a light steam if needed.
— Leaves (Make 30) :
Info :
Leaves are worked flat and shaped with increases and decreases, using BLO or FLO to produce a textured ridge representing the midrib. Use dark green yarn. Vary sizes: small, medium, large. Block each leaf after completion to set shape.
Round 1 :
ch 6, sc in 2nd ch from hook, hdc, 3 dc, hdc, sc (5 center stitches) — turn to work along opposite side of chain
Round 2 :
Working opposite side: sc, hdc, 3 dc, hdc, sc into final ch — do not join (10 sts total)
Round 3 :
Ch 1, sc in next, (inc in next) repeat to tip to create point; then dec down other side to create leaf shape — total approx 14 sts depending on increases
Round 4 :
Working BLO across entire leaf: 1 sc in each st BLO to create midrib texture (14)
Round 5 :
Edge round: sc around with *sc, ch 2 picot, sc* across edges to create serrated realistic texture; fasten off and block flat.
Info :
For larger leaves, begin with ch 10 and expand rows with symmetrical increases up to approx 22-26 sts. Make 30 leaves total with a mix of small (10-12 sts), medium (14-18 sts) and large (20-26 sts).
— Lace Vine Connector (Make 2 long strips) :
Info :
These long strips form the winding cream lace vine that links medallions and flowers. Each strip is worked in the cream color and will be joined to the doilies and roses at specified anchor points. Work two strips to create the double-branch effect seen running the length of the runner.
Round 1 :
Ch 150 (adjust to desired runner length), sc in 2nd ch from hook and across to create foundation row (149 sc)
Round 2 :
Ch 4 (counts as tr), *sk 2, (sc in next, ch 3) repeat across* ending with tr in last st to create airy mesh (approx 50 arches)
Round 3 :
In each arch: (sc, ch 5, sc) to enlarge mesh (approx 50 large loops)
Round 4 :
Work decorative picot chain along both edges: *sc, ch 3, picot, ch 3, sc* across entire strip to create consistent loops for joining (maintain stitches counts across row)
Info :
Make 2 strips. Block both flat and measure placement for medallions and roses. The longer chain allows bending into gentle S-curves; pin into desired shape before sewing motifs to it.
Round 5 :
Optional: work an additional lace edging round: sc across in BLO to create a slight raised stem line along one edge for aesthetic contrast
— Scalloped Joining Motif (connector medallion — Make 8) :
Round 1 :
mr, 8 sc in ring (8)
Round 3 :
(1 sc, inc) x8 (24)
Round 4 :
*(sc, ch 4, sc) in each 3-st group* creating 8 arches for delicate nodes (8 arches)
Round 5 :
In each arch: (sc, hdc, 5 dc, hdc, sc) then join—fasten off and block
Info :
These small rounds are used to fill gaps and create anchoring points where vines and leaves meet. Make 8 and position between doilies and roses for visual continuity.
— Decorative Edge and Final Border :
Round 1 :
Once all components are assembled, work a final border along the outermost seams: with cream yarn and 2.25mm hook, sc around outer edge of combined runner, placing (sc, ch 2, picot, sc) at each petal tip and scallop for harmonious finish
Round 2 :
Work an outer scallop: *(ch 5, sl st in 2nd ch from hook, (dc, tr) in 3rd ch, sl st) repeat at peaks to form delicate scalloped border around entire runner
Info :
Take care while attaching the border to preserve petal shapes. Use blocking pins to hold motifs aligned and maintain consistent tension when crocheting border across joins.
— Assembly & Joining (Comprehensive Instructions) :
Info :
Layout plan: arrange runner left to right as in the image with repeating motif groups: doily + rose cluster + vine segment + doily + rose cluster, etc. Refer to assembly map illustration (conceptual) — space approximately 8-10 cm between major group centers before blocking to final size.
Round 1 :
Pin the first lace vine strip to the blocking board in an S-curve, place doily medallion in the first curve and pin at 6-8 anchor points (scallops), then position a rose overlapping the doily edge by ~3-5 cm and pin petals so that the rose base and doily overlap securely. Repeat placements along entire vine strip creating alternation of doily and rose positions.
Round 2 :
Sew each doily to vine using matching cream yarn and a yarn needle: use whip stitch across each scallop and again through the mesh loops, leaving threads tidy and hidden on the underside. When sewing roses, use the long tails left from the rose centers to sew through the doily base and vine; small hidden stitches through the rose disc base and vine strip anchor the rose so petals remain free.
Round 3 :
Attach leaves and small flowers: arrange clusters of leaves at the base of each rose (3-6 leaves per rose). Secure leaves with small whip stitches along their midrib into the vine or doily. Sew small five-petal flowers and buds around clusters and into open spaces—vary placement for a natural appearance.
Info :
Use a curved upholstery needle for easier sewing through several layers (rose base + doily + vine). Keep stitches small and consistent. Pin everything and photograph both sides to ensure symmetry before final sewing.
Round 4 :
Join the second vine strip: place the second strip alongside the first so that it weaves between medallions and roses and pin the join points using small connector medallions (Scalloped Joining Motif). Sew along the connecting points to create a continuous double-branch runner with vines crossing and interlacing.
Round 5 :
Finish seam tidying: weave in all tails using a yarn needle and secure by passing ends through several stitches and snipping close. If any gaps remain, use small decorative joining stitches in cream to bridge spaces invisibly.
Info :
Once assembled, wet-block the entire runner pinned to desired final dimensions. Allow to dry completely. This step is critical for smoothing joins and setting the runner flat on the table.
— Finishing Touches & Styling :
Round 1 :
Optional beadwork: add a tiny bead or French-knot style embroidered center to small flowers for sparkle, sewing beads with a few thread passes. Avoid heavy embellishment that weighs the runner down.
Round 2 :
Optional wiring: if you prefer slightly lifted petals or posed buds, insert thin wire into the back of a few petals or buds and wrap wire ends tightly with thread so they remain hidden. Do not supply exposed wire tips.
Info :
To launder, gently hand-wash with cool water and mild soap, re-block immediately and lay flat to dry. Avoid machine washing or tumble drying to preserve shape and stiffness of petals.
This stunning floral table runner is a celebration of texture and color, combining layered roses, delicate doilies and graceful vinework into a single heirloom piece. Each motif brings its own charm — from sculpted petals to lacy medallions — and the assembly process is a satisfying puzzle of craftsmanship. Once completed and blocked, the runner becomes an elegant focal point for any table, bringing a handmade, romantic atmosphere to your home. Enjoy the process of stitching and arranging — the result will be a piece you’ll be proud to display and gift. 🧶🌸