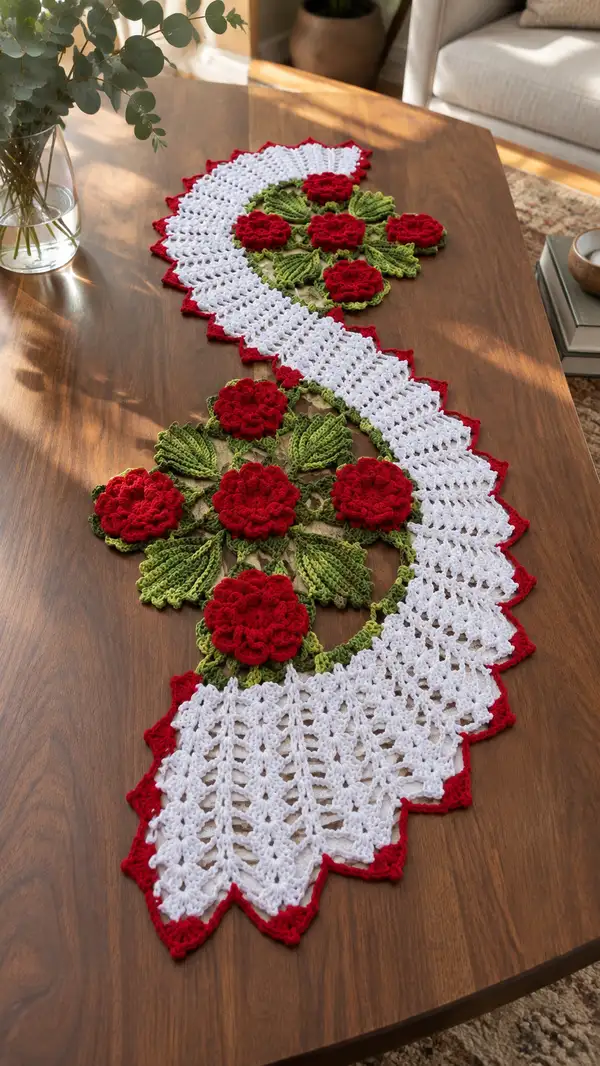
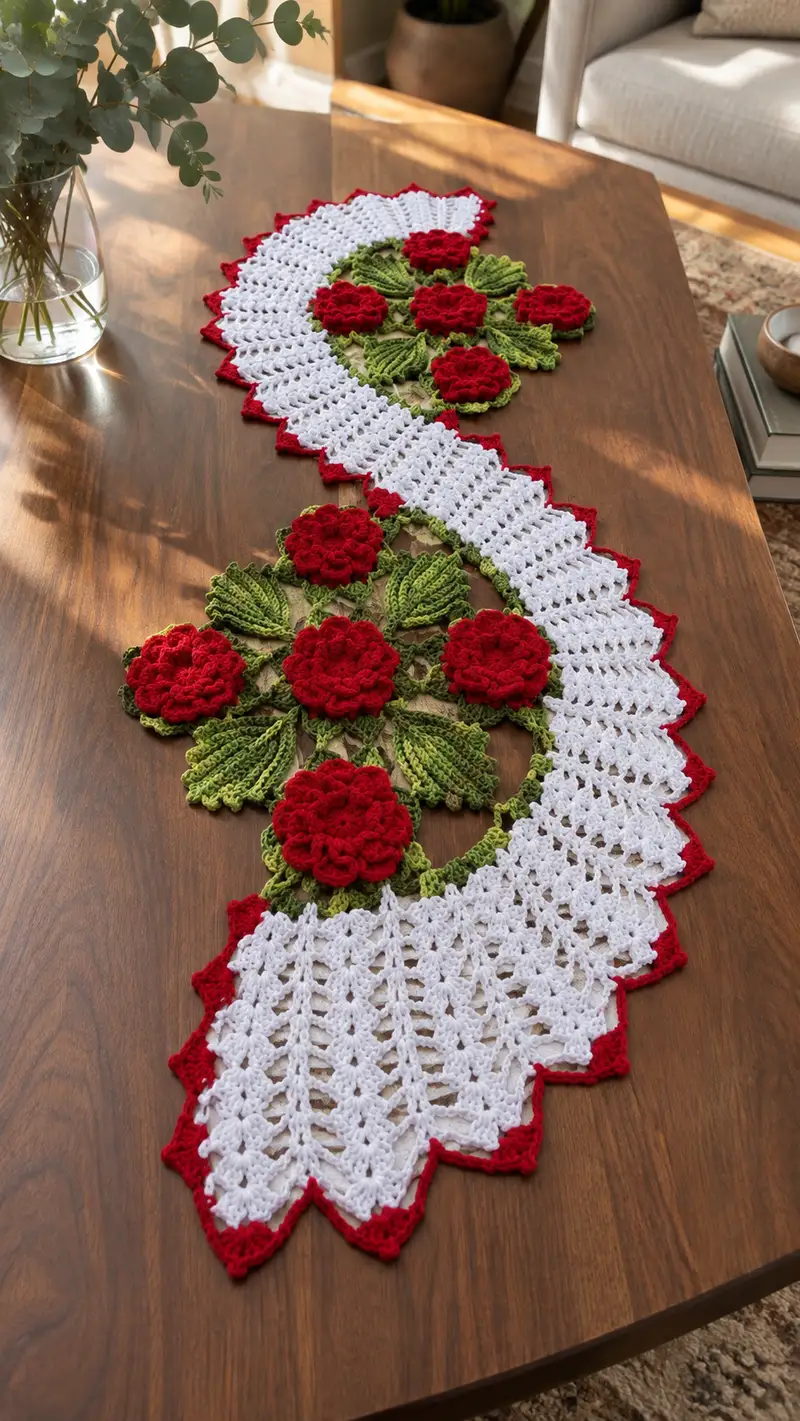
This elegant table runner features deep red 3D roses nestled among sculpted green leaves set into a delicate white lacy panel with a red scalloped edge. The runner is constructed from modular floral motifs joined to long lacy fan panels for a flowing S-shaped composition—perfect for a dining table or a console. The pattern includes clear step-by-step stitch counts, assembly notes, and finishing tips to recreate the texture and movement of the piece.
Progress Tracker
0% Complete
— Overview :
Info :
This pattern is modular: create Flower motifs, Leaf motifs, small Connector rings, and long Lace Panel segments, then join them to form the S-shaped runner seen in the picture. Work Flowers and Leaves individually, block them lightly for shape, and join them with slip stitches or sewing. The Lace Panel is worked in long rows and attached to the floral clusters with join-as-you-go or sewn seams. Use stitch markers liberally to keep symmetry. Finished runner pictured measures approximately 16" (40 cm) wide at the widest floral section and approximately 56-62" (140-157 cm) long; adjust by adding or removing lace segments.
— Flower Motif (Make 7) :
Round 1 :
6 sc in magic ring. (6)
Round 3 :
(1 sc, inc) x 6 (18)
Round 4 :
(2 sc, inc) x 6 (24)
Round 5 :
(3 sc, inc) x 6 (30)
Info :
These rounds form a solid base for the flower center. Keep tension even for a flat center; do not over-tighten the magic ring so center remains slightly domed.
Round 6 :
1 sc in each st around (30)
Round 7 :
Work 6 evenly spaced picot points to mark petal anchors: *ch 3, sl st in same st, sk 4* repeat 6 times. The total stitch count remains 30 anchor points across the row but you will have 6 anchor picots.
Info :
Use these 6 anchor points as the start location for the first petal layer. Place a removable marker in the first picot to keep orientation consistent.
Round 8 (Petal Round 1) :
*Into each picot: ch 1, (1 sc, ch 2, 5 dc, ch 2, 1 sc) sl st to next picot*; repeat around to form 6 petals (work petals into picot loops not into base stitches). Count: petals x6.
Round 9 :
Turn work over to back side and create a second smaller petal layer between first petals: locate the space between petals and *sl st, ch 3, (3 tr) sl st back into same space* repeat 6 times. This adds a subtle ruffle. No change in base stitch count.
Info :
If you'd like a fuller bloom, add a third petal round by repeating Round 8 over the tops of the first petal layer. Lightly steam-block petals upward to create realistic 3D bloom.
Round 10 (Double Petal Sculpt) :
On RS: *Attach yarn at the base between petals, ch 2, (1 hdc, 1 dc, 1 tr, 1 dc, 1 hdc) sl st into next base space* x 6 to add fullness behind petals.
Round 11 :
1 sc in each base stitch around working under petals to secure them to the center (30)
Round 12 :
(2 sc, dec) x 10 (20)
Info :
Round 12 tucks petal base into a more compact form without flattening petals. Use a stitch marker on the start st to keep round alignment for sewing later.
Round 13 :
(1 sc, dec) x 6,(1 sc) x 2 (14) — restructure if your layout needs smaller center; otherwise skip to next shaping round.
Round 14 :
Fasten off leaving 20-25 cm tail for sewing. Weave tail to back of motif and secure. If you prefer a slightly raised center, stuff lightly with a small pinch of fiberfill before final finishing.
Info :
Block flower flat on a foam surface with petals arranged as in the photo. Pin petal edges slightly upward for 3D effect. Allow to dry before joining to leaves and lace panels.
— Leaf Motif (Make 14) :
Round 1 :
Ch 10, sc in 2nd ch from hook, hdc in next, dc in next 3, tr in next 2, dc in next, hdc in next, sc in last. Turn and work along opposite side of foundation chain: sc, hdc, dc, tr, tr, dc, hdc, sc; sl st to first sc to close leaf loop. This creates a single elongated leaf base (counts variable by design: symmetrical leaf).
Round 2 :
In BLO of Round 1, work edging: *sc, hdc, dc in each major post* to build a small raised ridge around leaf edges. Maintain the same number of placement points as Base (counts follow foundation shape).
Info :
Textured ribs are made next using surface slip-stitch lines or raised front-post trebles to mimic veins. Decide whether to use front-post techniques based on desired texture.
Round 3 (Vein Foundation) :
Attach yarn at leaf base center. Ch 1, sl st to center point, ch 5, sc in third ch from hook, sl st back to base; repeat 3 times to create 3 raised vein loops. Fasten off leaving long tail for sewing. Lightly shape with blocking.
Round 4 :
For a layered look: pick up contrasting green and work tiny picot edge around leaf: *(1 sc, ch 3, sl st)* repeat evenly around. This does not change the leaf body counts.
Info :
Work leaves in two green shades if desired—darker near base and lighter at tip. Attach darker green on Rounds 1-3 and a lighter green for picot edging on Round 4 for subtle depth.
Round 5 :
Fasten off leaving long tail for sewing to motif cluster. Slightly stuff leaf base with a small pinch of fiberfill if needed to lift veins.
— Small Connector Ring (Make 8) :
Round 1 :
6 sc in magic ring (6)
Round 3 :
1 sc in each st around (12)
Round 4 :
Ch 3, (sl st in next, ch 3) repeat to create 6 loops around for attaching leaves/flowers. Fasten off leaving tails. These rings will be used to anchor leaf and flower clusters together and to the lace panel.
Info :
Pin connector rings onto blocking surface to keep them flat and open while you join leaves and flower centers to them. These rings create breathable points for join-as-you-go attachments to the lace panel.
— Flower + Leaf Cluster Assembly (Make 3 clusters of 2 flowers each and 1 cluster of single flower) :
Info :
Arrange connector ring as central anchor. Place a flower on three cardinal points and leaves in between flowers so each connector ring holds one flower and 3 leaves or two flowers and four leaves depending on cluster size. Pin layout before sewing to ensure symmetry.
Assembly Step 1 :
With long tail from Flower round 14, sew the flower center to a connector ring by sewing through the back loops and ring loops using whip stitch. Make sure petals remain free and are not stitched down except at the center base.
Assembly Step 2 :
Sew leaves to the ring, spacing them evenly. For clusters with two flowers, the second flower sits opposite the first and leaves fill in gaps creating a compact six-element cluster similar to the photo.
Info :
Use green yarn tails to create small decorative chains (ch 6 – 8) between rings to echo the lace joins and hide seams. Weave and secure tails neatly to backside.
— Lace Panel Segment (Make 4 long segments) :
Info :
The white lace segments form the long fans seen in the S-shape. Each segment is worked flat in rows beginning from a foundation chain and shaped with shell clusters. Final segments are joined to floral clusters and then to each other to make the S curve.
Round 1 (Foundation) :
Ch 78 (this foundation yields a panel ~15-16 cm wide; adjust chain in multiples of 6+2 for desired width). Turn.
Round 2 (Row 1) :
Dc in 4th ch from hook (counts as 1 dc and ch 2 space), *ch 2, sk 2 ch, dc in next* across to last ch, 1 dc in last ch. This creates spaced dc columns. Count: 1 dc + (approx 12-13 dc groups across) total stitches depend on foundation chain length.
Info :
Place a stitch marker at the center chain to maintain symmetry if making mirrored panels. Work the first 2-3 rows loosely to allow for shaping without puckering.
Round 3 (Row 2) :
Ch 3 (counts as dc), turn, *ch 2, sk 1 dc, dc in next dc* repeat across. Maintain the same number of dc posts as previous row; there is no net increase unless you deliberately add 2 dc at fan center to widen. Count remains constant.
Round 4 :
Repeat Row 2. (no count change)
Round 5 :
Start fan shell shaping: ch 3, *in next ch-2 space work (2 dc, ch 2, 2 dc), sk next dc* across to end, dc in last post. This produces small shell fans across. Count: fan groups equal to number of ch-2 spaces (approx 12-13).
Info :
If you prefer an open lacy fan like the photo, increase shell height to (3 dc, ch 2, 3 dc) each shell every 6 rows to get more pronounced fan ribs. Use stitch markers to highlight every 6th shell to track increases.
Round 6-9 :
Repeat rounds 3-5 with shells every other row to build vertical ribs. Keep counts consistent per row. This creates a vertical lacy texture reminiscent of the photo's columned lace segments.
Round 10 (Increase Row) :
At the apex of the fan segment (center of the panel if working a half-fan), increase one shell: work (3 dc, ch 2, 3 dc) into the central ch-2 space to make the central fan slightly larger. This increases the visual curvature when the panels are joined to floral clusters. Overall stitch number increases by 4-6 dc across the work depending on where you place additional dc posts.
Info :
For a stronger S-shape, make the middle lace segment marginally wider by adding one extra shell in rows 10, 16 and 22; these deliberate increases create the pronounced curve in the finished runner.
Round 11-18 :
Repeat open lace pattern: alternate one full row of dc posts with one shell row to build vertical height. Keep counts consistent with initial foundation—if you added central increases, maintain symmetrical increases in following increase rows. After Round 18 each segment should measure ~16-18 cm tall depending on tension.
Round 19 (Edge shaping) :
To shape the scalloped points at the outer edge, in the outermost shell areas work: *ch 1, 5 dc in shell apex, ch 1, sl st to next space* across, creating triangular scallop foundations in the white. Count: one scallop per shell group (approx 12-14 scallops).
Round 20 :
Fasten off white for now; you will attach red scallops later. Block the lace panel segments flat to measurement, pinning scallop points to a consistent size.
Info :
Make four such lace segments (or more/less as desired). The photo composition used multiple segments linked so that the lace snakes in an S-curve; place floral clusters between segments when laying out final assembly.
— Joining Lace Segments to Floral Clusters (Join-as-you-go and Sewing) :
Round 1 (Join Planning) :
Lay out lace segments and clusters on a flat surface following the S-curve composition. Place connectors where clusters will meet panel edges—connector rings should sit at the internal junctions between lace shells for less visible seams.
Info :
Decide whether to use join-as-you-go (JAYGO) slip-stitch method (neater, less sewing) or to sew pieces together with yarn needle (stronger but visible). For first-time builders, pinning and sewing provides more control.
Round 2 (JAYGO Method if preferred) :
On a lace panel edge where a connector ring will attach, position ring and join with slip stitches: *sl st through ring loop, sl st through lace ch-2 space, sl st through next ring loop* repeat around anchor points. Secure tail and weave in. Repeat for all connector rings. For clusters with two flowers, make two ring attachments opposite each other.
Round 3 (Sewing Method) :
Using long tails from flowers and leaves, whip stitch connector ring to lace panel through both ring loops and lace ch-2 spaces, stitching at least 8-10 times around each ring for stability. Weave in ends to back. Repeat for each cluster location.
Info :
When attaching, ensure the floral clusters lie flat against the lace so petals remain visible on top. Adjust orientation so the cluster seams aren't visible from the front.
— Red Scalloped Border (single continuous border around lace outer edge) :
Round 1 :
With red yarn, join at any scallop point on white lace outer edge with sl st. Ch 1, sc evenly around edge to create a red foundation trim - approx 12-14 sc per panel depending on scallop count.
Round 2 :
*In next sc: (ch 2, 4 dc, ch 2, sl st) in same st to form small peak; sl st into next sc to anchor* repeat across to form triangular scallops. Each scallop uses 4 dc, ch2 gaps, and anchors to single base sc. Count: one scallop per base shell (approx 12-14).
Round 3 :
Work a reinforcing round: sc in each st around the base of the scallops, making small picots at scallop tips if desired: *(1 sc, ch 3, sl st in top dc) repeat across to emphasize points*. Fasten off and weave in ends neatly on back.
Info :
This bold red edging frames the white lace and matches the roses. Use a slightly smaller hook (3.25mm) for tidy scallops. For an even finish, block scalloped edge after border is complete.
— Final Assembly & Edging Continuity :
Round 1 :
Arrange all panels and clusters in S-formation: lace segment, cluster, lace segment, cluster, lace segment, cluster, lace segment. Ensure each junction uses at least one connector ring or sewing anchor.
Round 2 :
Sew adjacent lace panels along small ch-2 spaces with mattress stitch or whip stitch for a nearly invisible seam. Work into both loops of the ch-2 to secure. Use matching white yarn for seams to keep joints discreet.
Info :
During final layout and sewing, frequently step back and check balance—ensure clusters are centered along the runner axis and that scallops align along both edges to avoid a cranked look.
Round 3 :
After all seams secured, give the entire runner a final light blocking: spray with water and pin into final shape, paying attention to S-curve flow and scallop uniformity. Allow to dry completely then unpin.
Round 4 :
Weave in any remaining loose ends through the back of lace using yarn needle and trim close. Use fabric glue sparingly for very tiny tails if needed to stop fraying.
Info :
Optional: add small felt pads under clusters if runner will sit on delicate surfaces to prevent abrasion from the textured motifs.
— Alternate Decorative Elements and Variation Rounds :
Info :
You can change flower fullness by repeating petal rounds 8-10 times or adding an extra round of tr clusters behind petals. For a longer runner, add two more lace segments and another flower cluster. To reduce width, use smaller foundation chains for lace segments.
Round 1 (Optional Narrow Lace) :
Ch 60 foundation to create a narrower panel; repeat the same lace and scallop instructions preserving multiple-of-6 repeat. This reduces overall width by ~20-25% per panel.
Round 2 (Optional Full Bloom Flowers) :
For fuller roses, after Round 9 add Round 10: *Around petal edges, work (ch 2, 7 dc in petal apex, ch 2) anchored with sl st* to produce larger ruffles. Secure with Round 11 as normal.
Info :
All optional rounds are additive and will require additional yarn—estimate +20-40g of red per runner depending on fullness choices.
— Finishing Touches :
Round 1 :
Check all seams, ensure all connector rings are sewn with secure long tails. Add final blocking touches for even scallops and flat clusters. Trim any stray fibers.
Round 2 :
If you want the runner to lay extra flat, stitch a very light running stitch in matching thread along the underside through the floral cluster centers to the lace base; do not pull tight—just enough to reduce flip.
Info :
Allow the runner to rest for 24 hours before heavy use to let the blocking and joins settle. Machine washability depends on yarn choice—use machine-washable yarn and gentle cycles if you want easy care; otherwise hand-wash and block gently.
Completing this runner is incredibly satisfying—the rich red roses popping from a cloud of white lace feels celebratory and refined. Each cluster sews into place like a little bouquet, and the scalloped red border gives a polished frame. Whether for a holiday table or a special everyday surface, this runner becomes a beautiful focal point. Enjoy blocking, pinning, and watching your handiwork come to life! 🧶🌹