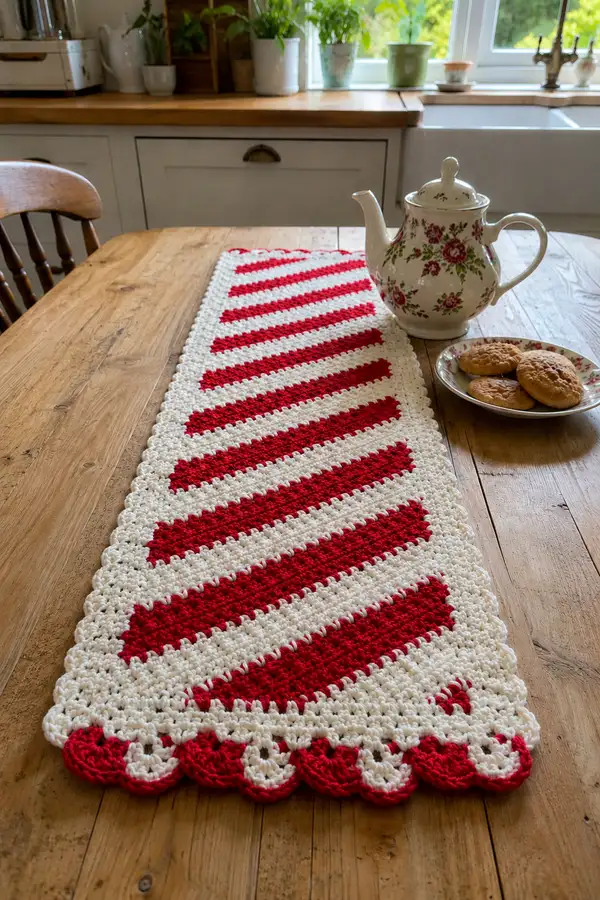
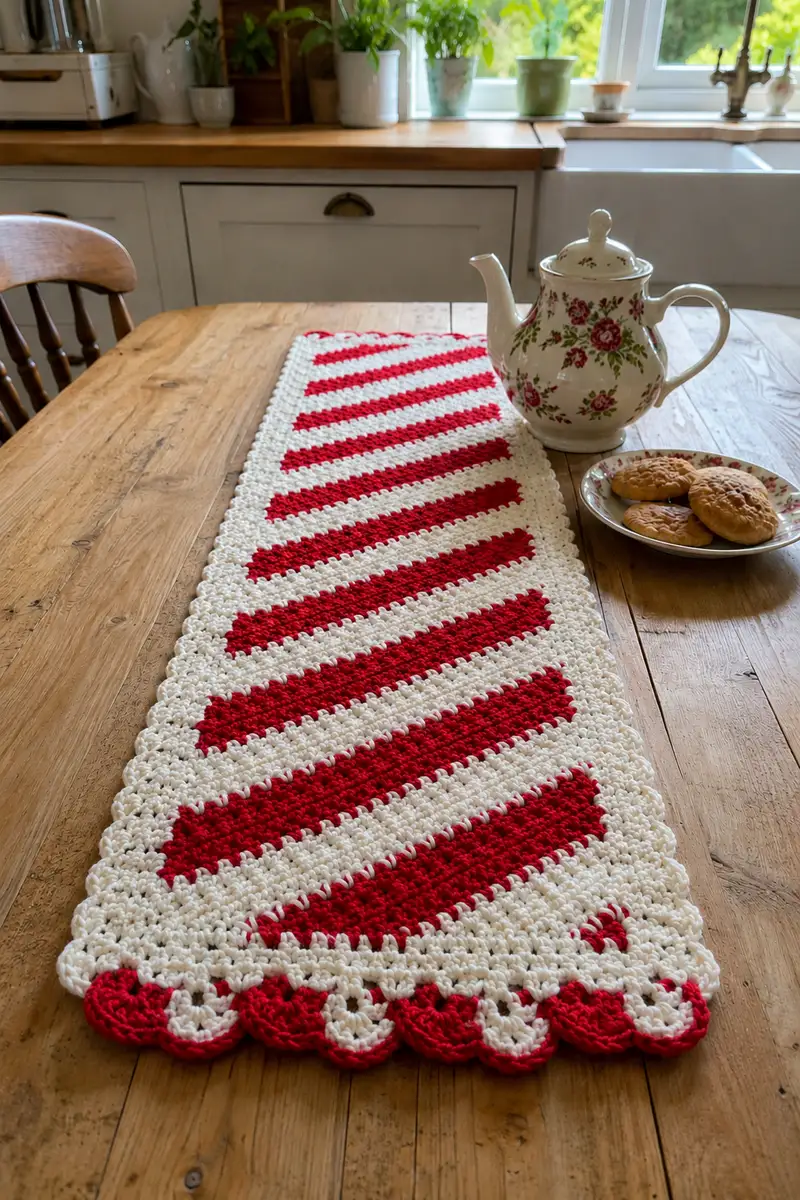
A charming candy-cane inspired table runner worked in classic red and white stripes with a scalloped shell border. This sturdy, textured runner uses granny-cluster rows for bold diagonal stripes and a decorative scallop edge for a handmade holiday touch. It lays flat on a dining table and pairs perfectly with tea sets and seasonal decor. Clear step-by-step instructions and tips make it easy to follow for an experienced crocheter ready to create a festive centerpiece.
Progress Tracker
0% Complete
— Overview & Gauge :
Info :
This runner is worked flat in rows using a basic granny-cluster stitch (3 dc cluster + ch1 spacer). The recommended starting chain is a multiple of 3 + 2; the sample uses a foundation chain of 92 (which gives 30 clusters per row). With worsted weight cotton and a 5.0 mm hook this yields an approximate finished width of 10.5" (26.5 cm). Length is controlled by the number of stripe repeats (the sample shows 120 working rows followed by a scallop border). Make a 12 cm x 12 cm gauge swatch: 3 clusters x 4 rows to check your tension.
Info :
Abbreviations used: cluster = 3 dc worked into same ch or ch-space; ch1 between clusters; ch3 at row start counts as first dc on RS rows when we specify ch3. Maintain a tight-enough tension so stuffing or table items won't show through, but keep fabric slightly flexible.
— Foundation :
Round 1 :
Chain 92 (multiple of 3 + 2). This foundation gives 30 cluster positions across each row (92 - 2 = 90; 90 / 3 = 30 clusters).
Info :
If you want a wider runner, increase foundation chain by 3 for each additional cluster (add 3 chains = +1 cluster). If you prefer a narrower runner, subtract in multiples of 3. Keep the +2 offset at the end of the chain.
— Main Panel (Rows 1-120) :
Round 2 (Row 1) :
With MC (White), work into the 4th chain from hook: ch3 (counts as dc), 2 dc in same ch (form first 3-dc cluster), *ch1, skip next 2 ch, 3 dc in next ch; rep from * across to the end finishing with last 3 dc cluster in last chain. End row with ch1 and turn. (30 clusters)
Round 3 (Row 2) :
Ch3 (counts as first dc), work 3-dc clusters into each ch1 space across: *3 dc in next ch1 space, ch1; rep from * across until you reach final ch1 space; finish with 3 dc cluster in final ch1 space. End with ch1, turn. (30 clusters)
Info :
Keep your clusters centered by always placing them into the ch1 space between the previous row's clusters. This maintains an even, structured fabric and the correct stitch count.
Round 4 (Row 3) :
Repeat Round 3 in MC (White): ch3, 3-dc clusters in each ch1 across, ch1 between clusters, end ch1, turn. (30 clusters)
Round 5 (Row 4) :
Repeat Round 3 in MC (White). (30 clusters)
Info :
These first four white rows form the background field that frames the first diagonal stripe. Always count clusters at the end of each row to verify 30 clusters.
Round 6 (Row 5) :
Change to CC (Red). To create the diagonal offset that gives the candy cane look, shift the cluster placement by beginning the first red row with ch1, not ch3: ch1, turn, work first 3-dc cluster into the ch1 space adjacent to the row-end (this effectively offsets cluster positions by half a cluster). Then *ch1, 3 dc in next ch1; rep across finishing with a 3-dc cluster in the final space. End with ch1, turn. (30 clusters)
Info :
Changing the starting chain behavior (ch1 start vs ch3 start) is the key technique to create diagonal stripes. When you begin with ch1 and place your first cluster into the first ch1 space instead of counting ch3 as a dc, each cluster row will sit slightly offset from the previous color block, producing a diagonal slant.
Round 7 (Row 6) :
In CC (Red) work ch3 (counts as dc), then 3-dc clusters into each ch1 space across as usual: *3 dc in next ch1, ch1; rep across, end ch1, turn. (30 clusters)
Round 8 (Row 7) :
Repeat Round 7 in CC (Red). (30 clusters)
Round 9 (Row 8) :
Repeat Round 7 in CC (Red). (30 clusters)
Info :
Work 4 rows of each stripe color for a bold candy-cane effect. The first row of every red block uses the ch1-start offset; the remaining rows in that block use ch3-start so clusters stack cleanly. For the white blocks that follow, reverse the offset so the diagonal continues steadily across the runner.
Round 10 (Row 9) :
Change to MC (White). To continue the diagonal, start this first white row with ch1 (offset start): ch1, turn, 3 dc cluster in the first ch1 space, *ch1, 3 dc in next ch1; rep across; end ch1, turn. (30 clusters)
Round 11 (Row 10) :
MC (White): ch3, then 3-dc clusters into each ch1 space across, ch1 between clusters; end ch1, turn. (30 clusters)
Round 12 (Row 11) :
MC (White): Repeat Round 11. (30 clusters)
Round 13 (Row 12) :
MC (White): Repeat Round 11. (30 clusters)
Info :
Alternate blocks in this way: 4 rows Red (first row offset with ch1), 4 rows White (first row offset with ch1), repeat. This repeat produces a steady diagonal stripe running from one short edge toward the opposite short edge across the runner length. The sample uses 15 repeats (120 rows) to reach the displayed length; adjust repeats to change overall length.
Round 14 (Row 13) :
Change to CC (Red). Begin this red block with ch1 offset: ch1, turn, 3 dc in first ch1 space, *ch1, 3 dc in next ch1; rep across. End ch1, turn. (30 clusters)
Round 15 (Row 14) :
CC (Red): ch3, 3-dc clusters in each ch1 across; end ch1, turn. (30 clusters)
Round 16 (Row 15) :
CC (Red): Repeat Round 15. (30 clusters)
Round 17 (Row 16) :
CC (Red): Repeat Round 15. (30 clusters)
Info :
Always fasten-off and weave in ends neatly at each color change if you prefer not to carry the yarn. If carrying, carry the unused yarn along the WS and catch it under the ch1 spaces (catching every 4-6 stitches) so floats are secure and invisible on the RS.
Round 18 (Row 17) :
MC (White): begin this white block with ch1 offset: ch1, turn, 3-dc cluster in first ch1, *ch1, 3 dc in next ch1; rep across, end ch1, turn. (30 clusters)
Round 19 (Row 18) :
MC (White): ch3 then 3-dc clusters across; end ch1, turn. (30 clusters)
Round 20 (Row 19) :
MC (White): Repeat Row 18/19. (30 clusters)
Round 21 (Row 20) :
MC (White): Repeat Row 18/19. (30 clusters)
Info :
At all times maintain 30 clusters per row. If a row ends with a short space at the edge, do not add extra ch1s; instead place the final cluster into the last ch or ch1 space available—the initial foundation chain math ensures evenly spaced clusters.
Round 22 (Row 21) :
CC (Red): ch1 offset start, work first 3-dc in the first ch1 space, then *ch1, 3 dc in next ch1; rep across. End ch1, turn. (30 clusters)
Round 23 (Row 22) :
CC (Red): ch3, 3-dc clusters across, end ch1, turn. (30 clusters)
Round 24 (Row 23) :
CC (Red): Repeat round 23. (30 clusters)
Round 25 (Row 24) :
CC (Red): Repeat round 23. (30 clusters)
Info :
If carrying yarn, make sure floats are caught in WS gaps and are no longer than 5-6 cm. Long floats can snag and create tension inconsistencies across such a long runner.
Round 26 (Row 25) :
MC (White): ch1 offset start for the first row of the white block, placing first 3-dc into first ch1 space, *ch1, 3dc in next ch1; rep across; end ch1, turn. (30 clusters)
Round 27 (Row 26) :
MC (White): ch3 then 3-dc clusters across; end ch1, turn. (30 clusters)
Round 28 (Row 27) :
MC (White): Repeat round 27. (30 clusters)
Round 29 (Row 28) :
MC (White): Repeat round 27. (30 clusters)
Info :
Continue this 4-row color block repeat until the runner reaches your desired length. The sample uses 15 repeats of 8-row sets (120 working rows) for an approximate length of 48" to 50" depending on gauge. Count and mark stripe repeats with a row counter to avoid losing track.
Round 30 (Row 29) :
CC (Red): ch1 offset start, then clusters across; end ch1, turn. (30 clusters)
Round 31 (Row 30) :
CC (Red): ch3 then clusters across; end ch1, turn. (30 clusters)
Round 32 (Row 31) :
CC (Red): Repeat round 31. (30 clusters)
Round 33 (Row 32) :
CC (Red): Repeat round 31. (30 clusters)
Info :
At halfway mark, check the runner on the table surface for straightness. Adjust tension if you see warping. Use blocking lightly after finishing to even the scallops and straighten edges.
Round 34 (Row 33) :
MC (White): ch1 offset start, clusters across; end ch1, turn. (30 clusters)
Round 35 (Row 34) :
MC (White): ch3 then clusters across; end ch1, turn. (30 clusters)
Round 36 (Row 35) :
MC (White): Repeat round 35. (30 clusters)
Round 37 (Row 36) :
MC (White): Repeat round 35. (30 clusters)
Info :
Keep consistent turning chain practice: on ch3-start rows always count the ch3 as the first dc and place the following 2 dc to form your first 3-dc cluster in the first ch1 space after the turning chain as necessary to preserve alignment.
Round 38 (Row 37) :
CC (Red): ch1 offset start, clusters across; end ch1, turn. (30 clusters)
Round 39 (Row 38) :
CC (Red): ch3 then clusters across; end ch1, turn. (30 clusters)
Round 40 (Row 39) :
CC (Red): Repeat row 39. (30 clusters)
Round 41 (Row 40) :
CC (Red): Repeat row 39. (30 clusters)
Info :
If you prefer thinner stripes, change the block size: use 2 rows per stripe color instead of 4. The diagonal effect remains but becomes narrower. The sample instructions below continue with the 4-row blocks for visual match to the photo.
Round 42 (Row 41) :
MC (White): ch1 offset start, clusters across; end ch1, turn. (30 clusters)
Round 43 (Row 42) :
MC (White): ch3 then clusters across; end ch1, turn. (30 clusters)
Round 44 (Row 43) :
MC (White): Repeat row 43. (30 clusters)
Round 45 (Row 44) :
MC (White): Repeat row 43. (30 clusters)
Info :
When changing color, carry CC/MC along the WS if you're comfortable; otherwise, break yarn and leave a 6" tail to weave in later. Carrying saves ends but adds some thickness to WS—choose based on finished look preference.
Round 46 (Row 45) :
CC (Red): ch1 offset start, clusters across; end ch1, turn. (30 clusters)
Round 47 (Row 46) :
CC (Red): ch3 then clusters across; end ch1, turn. (30 clusters)
Round 48 (Row 47) :
CC (Red): Repeat row 47. (30 clusters)
Round 49 (Row 48) :
CC (Red): Repeat row 47. (30 clusters)
Info :
If you notice your edges creeping in or out, gently stretch the foundation chain edge when wet-blocking later and pin a straight line to the board; small adjustments will make scallops sit evenly.
Round 50 (Row 49) :
MC (White): ch1 offset start, clusters across; end ch1, turn. (30 clusters)
Round 51 (Row 50) :
MC (White): ch3 then clusters across; end ch1, turn. (30 clusters)
Round 52 (Row 51) :
MC (White): Repeat row 51. (30 clusters)
Round 53 (Row 52) :
MC (White): Repeat row 51. (30 clusters)
Info :
At this point you are approximately halfway through a 15-repeat sample. Continue the same block rhythm until you reach your desired length. The pattern below continues explicitly to Row 120 for a complete sample runner.
Round 54 (Row 53) :
CC (Red): ch1 offset start; clusters across; end ch1, turn. (30 clusters)
Round 55 (Row 54) :
CC (Red): ch3 then clusters across; end ch1, turn. (30 clusters)
Round 56 (Row 55) :
CC (Red): Repeat row 55. (30 clusters)
Round 57 (Row 56) :
CC (Red): Repeat row 55. (30 clusters)
Info :
If you change the number of clusters per row (by altering foundation chain), recalculate: (foundation chain - 2) / 3 = number of clusters per row. Always keep that cluster number consistent each row.
Round 58 (Row 57) :
MC (White): ch1 offset start; clusters across; end ch1, turn. (30 clusters)
Round 59 (Row 58) :
MC (White): ch3 then clusters across; end ch1, turn. (30 clusters)
Round 60 (Row 59) :
MC (White): Repeat row 59. (30 clusters)
Round 61 (Row 60) :
MC (White): Repeat row 59. (30 clusters)
Info :
Work gently and consistently, keeping the runner flat as you work. Large projects sometimes grow unevenly in tension; pause every 10-20 rows to smooth the fabric and check alignment.
Round 62 (Row 61) :
CC (Red): ch1 offset start; clusters across; end ch1, turn. (30 clusters)
Round 63 (Row 62) :
CC (Red): ch3 then clusters across; end ch1, turn. (30 clusters)
Round 64 (Row 63) :
CC (Red): Repeat row 63. (30 clusters)
Round 65 (Row 64) :
CC (Red): Repeat row 63. (30 clusters)
Info :
When you are approaching the desired length, measure the runner on your table and plan the final color so that the scalloped border complements the last stripe. The sample finishes with a white field then a scalloped red edge to echo the candy-cane motif.
Round 66 (Row 65) :
MC (White): ch1 offset start; clusters across; end ch1, turn. (30 clusters)
Round 67 (Row 66) :
MC (White): ch3 then clusters across; end ch1, turn. (30 clusters)
Round 68 (Row 67) :
MC (White): Repeat row 67. (30 clusters)
Round 69 (Row 68) :
MC (White): Repeat row 67. (30 clusters)
Info :
At every color change, leave a tail of at least 6" (15 cm) to weave in later if you intend to fasten off; otherwise, carry yarn on WS and twist periodically to keep floats tidy.
Round 70 (Row 69) :
CC (Red): ch1 offset start; clusters across; end ch1, turn. (30 clusters)
Round 71 (Row 70) :
CC (Red): ch3 then clusters across; end ch1, turn. (30 clusters)
Round 72 (Row 71) :
CC (Red): Repeat row 71. (30 clusters)
Round 73 (Row 72) :
CC (Red): Repeat row 71. (30 clusters)
Info :
At the short edges (ends of the runner) you will have the decorative scallop border. For now continue working even rows across until you reach Row 120 or your chosen length. The border instructions follow after finishing the panel.
Round 74 (Row 73) :
MC (White): ch1 offset start; clusters across; end ch1, turn. (30 clusters)
Round 75 (Row 74) :
MC (White): ch3 then clusters across; end ch1, turn. (30 clusters)
Round 76 (Row 75) :
MC (White): Repeat row 75. (30 clusters)
Round 77 (Row 76) :
MC (White): Repeat row 75. (30 clusters)
Info :
If you prefer a reversible runner, keep color changes minimal and mirror color blocks so both sides look similar. The sample is RS-focused and will be shown RS-up on the table.
Round 78 (Row 77) :
CC (Red): ch1 offset start; clusters across; end ch1, turn. (30 clusters)
Round 79 (Row 78) :
CC (Red): ch3 then clusters across; end ch1, turn. (30 clusters)
Round 80 (Row 79) :
CC (Red): Repeat row 79. (30 clusters)
Round 81 (Row 80) :
CC (Red): Repeat row 79. (30 clusters)
Info :
When you reach the last stripe repeat before adding the border, choose whether to fasten off and weave in ends or to carry yarn up the short edge to use for the scalloped border. The sample finishes on a white block and then works border in White and Red scallops.
Round 82 (Row 81) :
MC (White): ch1 offset start; clusters across; end ch1, turn. (30 clusters)
Round 83 (Row 82) :
MC (White): ch3 then clusters across; end ch1, turn. (30 clusters)
Round 84 (Row 83) :
MC (White): Repeat row 83. (30 clusters)
Round 85 (Row 84) :
MC (White): Repeat row 83. (30 clusters)
Info :
Your runner should now be nearly the length seen in the photo if you followed 120 rows total. If you prefer a shorter runner, end here and proceed to border. If longer, continue the 8-row stripe repeat until desired length achieved.
Round 86 (Row 85) :
CC (Red): ch1 offset start; clusters across; end ch1, turn. (30 clusters)
Round 87 (Row 86) :
CC (Red): ch3 then clusters across; end ch1, turn. (30 clusters)
Round 88 (Row 87) :
CC (Red): Repeat row 87. (30 clusters)
Round 89 (Row 88) :
CC (Red): Repeat row 87. (30 clusters)
Info :
Stop here if you prefer the short-edge scallops to be red as shown in the photo. The sample switches to white for the penultimate row and then adds red scallops as the final accent; follow the border instructions below to reproduce that look.
Round 90 (Row 89) :
MC (White): ch1 offset start; clusters across; end ch1, turn. (30 clusters)
Round 91 (Row 90) :
MC (White): ch3 then clusters across; end ch1, turn. (30 clusters)
Round 92 (Row 91) :
MC (White): Repeat row 91. (30 clusters)
Round 93 (Row 92) :
MC (White): Repeat row 91. (30 clusters)
Info :
This completes another white block near the runner end. At the very last two short-edge rows we will prepare the fabric for a scalloped shell border (two rows of foundation for shells then the shells themselves).
Round 94 (Row 93) :
CC (Red): ch1 offset start; clusters across; end ch1, turn. (30 clusters)
Round 95 (Row 94) :
CC (Red): ch3 then clusters across; end ch1, turn. (30 clusters)
Round 96 (Row 95) :
CC (Red): Repeat row 95. (30 clusters)
Round 97 (Row 96) :
CC (Red): Repeat row 95. (30 clusters)
Info :
Finish the last working row and fasten off neatly leaving a 12" tail if you plan to use the same color for the scallop shells. Otherwise fasten off and weave ends into the WS before beginning border rounds.
Round 98 (Row 97) :
MC (White): With MC, work one final neat even row if needed to make the last field white. Ch1 offset start: 3-dc clusters across; end ch1, turn. Fasten off and weave in ends on WS if you plan to work the border in contrasting color. (30 clusters)
Info :
Make sure the RS is showing and all color ends are woven in on the WS before starting the border. If carrying yarn across rows, tuck in floats or catch them with a loose crocheted chain to avoid bulk at the edge.
— Short-Edge Scalloped Shell Border (Both Short Ends) :
Round 99 :
With MC (White) and RS facing, attach MC with a sl st to the top-left corner loop (short edge). Ch1, work 1 sc in the first ch1 space of the top cluster row, then *ch2, skip one cluster, sc in next ch1 space; rep across short edge to the other corner placing final sc in final edge space. Fasten off leaving a tail for weaving. This creates a small picot-style chain foundation for shells. (approx 30 sc positions along short edge)
Info :
This short-edge foundation gives evenly spaced spots to attach scallop shells on both short ends. You will work shells into every other ch-space to yield scallops matching the sample photo.
Round 100 :
Turn to work scallops across the short edge using CC (Red). Attach CC to the first foundation sc with a sl st, ch1, then in the first foundation sc work: (sc, hdc, 3 dc, hdc, sc) = full shell. Skip the next foundation sc space, then in the next foundation sc work the same shell. Repeat across short edge until you reach the final sc; fasten off and weave in ends. (approx 15 shells per short edge depending on spacing)
Info :
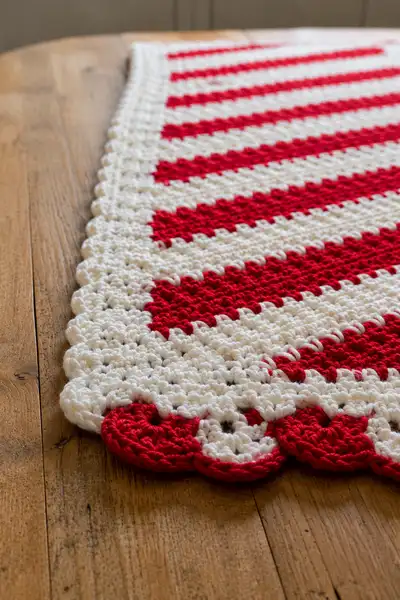
The shell stitch is (sc,h dc,3 dc,h dc,sc) into a single foundation sc. The shell width will be about 5 stitches wide; adjust spacing by skipping or adding a foundation sc between shells to keep the scallops uniform. Match the photo by placing shells tightly for a dense scallop look.
— Long-Edge Border (Both Long Sides) :
Round 101 :
With RS facing and MC (White), join with a sl st at the corner of one long side. Ch1, sc evenly into the side edge through the ch3 turning chains and the ch1 gaps between clusters. Aim for about 60-64 sc along the long side depending on exact tension; space evenly so scallops will line up when worked in the next round. Fasten off and repeat on the opposite long side. (approx 60-64 sc per long side)
Info :
Spacing sc along the long edge is critical to achieve scallops that match the short-edge scallops. Count your long-edge sc positions and divide by the desired number of shells (example: place shells every 4th or 5th sc depending on how full you want the scallop). The sample uses shells every 4 sc on the long edges.
Round 102 :
Attach CC (Red) to the first sc on the long side with sl st. Ch1 then work shells along long side: *(sc in next sc, hdc in next sc, 3 dc in next sc, hdc in next sc, sc in next sc) - this is one shell; skip 0 or 1 sc depending on spacing; rep from * to the corner. Work identical shells up the side and around the corner to a few sc across the short edge so shells look continuous. Fasten off and weave ends. Repeat on opposite long side. (approx pattern repeat across side)
Info :
For rounded scallops like the photo, crowd the shells a bit (work shells with just one sc between them). For a looser look, skip more sc between shells. Always maintain consistent spacing on both long sides for symmetry.
— Final Finishing Touches :
Round 103 :
Weave in any remaining yarn tails on the WS using a yarn needle. Trim close to the fabric but avoid cutting the knot if you used any. Pull all ends to the WS and weave through several clusters for security.
Round 104 :
Lightly block the runner: pin to a flat surface and steam-block or wet-block gently to even out scallops and relax the fabric. Do not overstretch; pin to the desired straight edge and allow to dry thoroughly for best shape retention.
Info :
Blocking is recommended for cotton yarn to help scallops open and to flatten any slight ripples from the foundation chain. Use rust-proof pins and a breathable blocking mat.
Round 105 :
Optional tidy: run a row of single crochet in MC around the entire perimeter to neaten any irregularities before working scallops if desired. Work sc evenly into edges and through ends of clusters to create a neat frame.
Info :
If you add a perimeter sc, reduce shell spacing accordingly. This provides a tidy border base for scallops and helps the runner keep its rectangular shape over time.
Round 106 :
Final inspection: lay the runner flat, ensure shells align on each corner, and check that diagonal stripes look continuous and pleasant. Reweave any visible tails to the WS and lightly steam the RS for a finished sheen.
Info :
Store your runner flat or gently rolled to avoid creases. If laundering, hand wash or machine-wash gentle cycle with cold water and lay flat to dry to preserve shape and color.
This festive candy cane runner brings cozy handmade charm to holiday tables and everyday tea times alike. The bold diagonal stripes and scalloped edge work together to create a polished, cheerful centerpiece that feels classic and fresh. Each cluster and shell adds texture and soul — a crafted accent you'll be proud to display or gift. 🧶❤️🍪