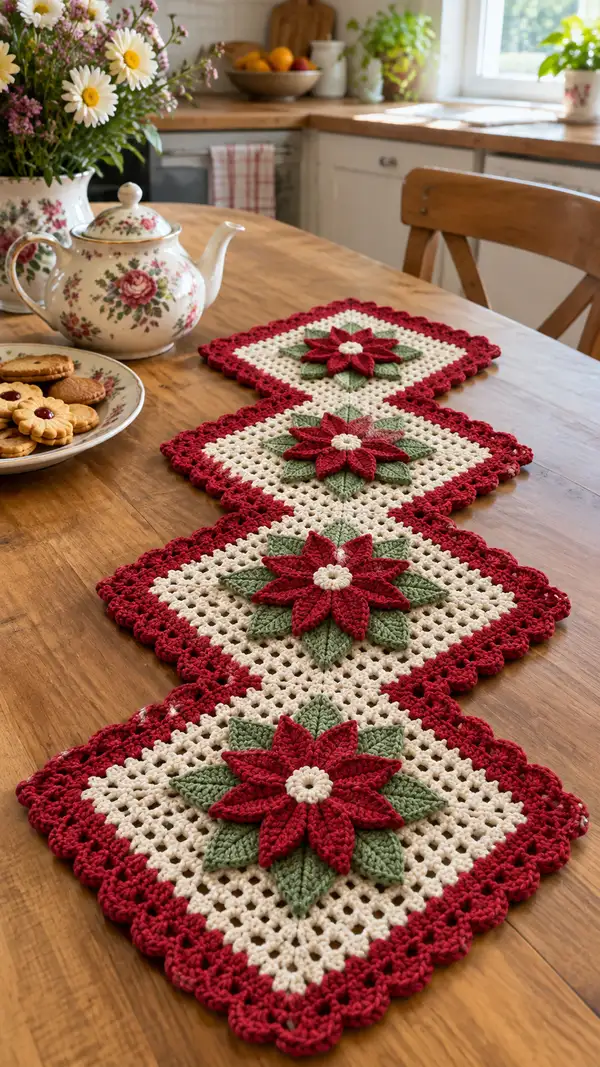
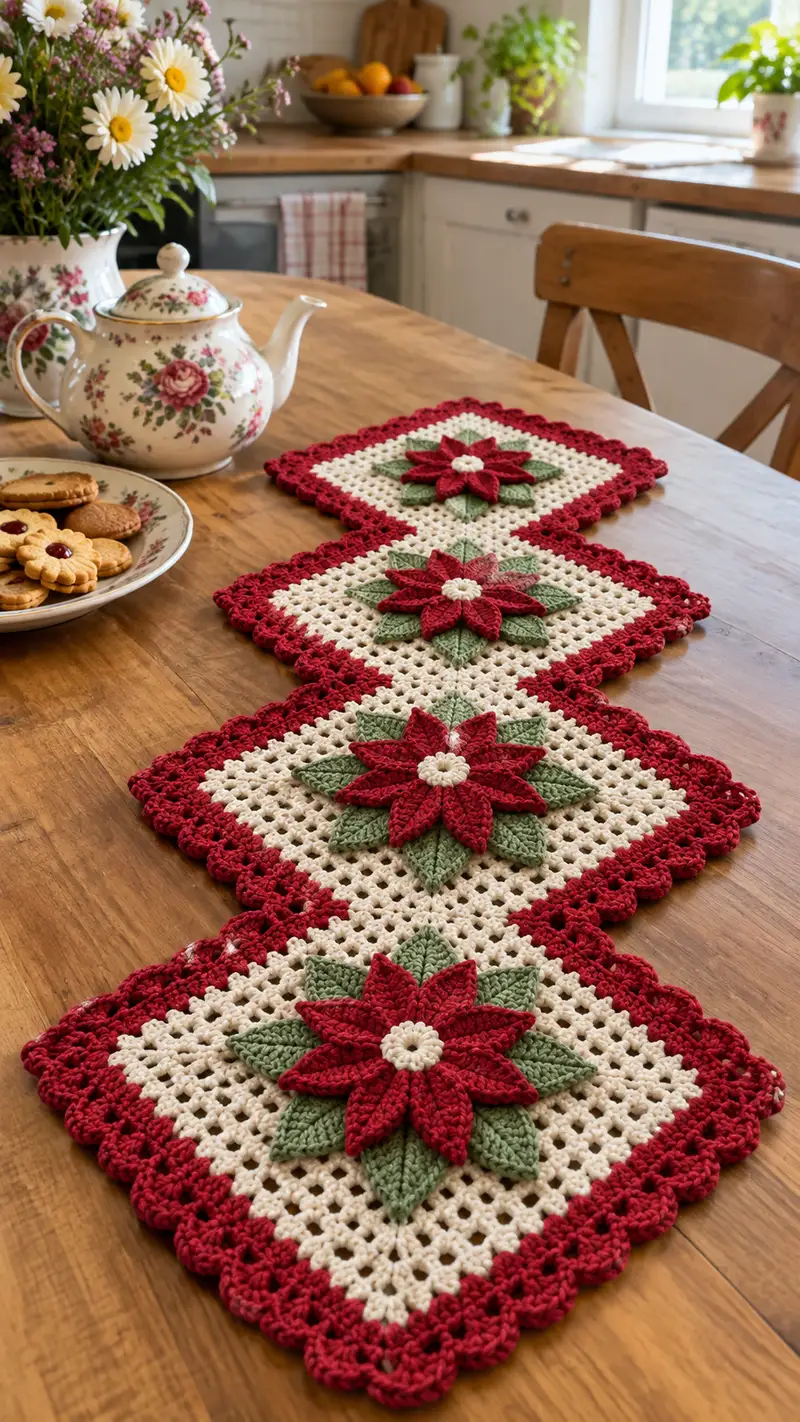
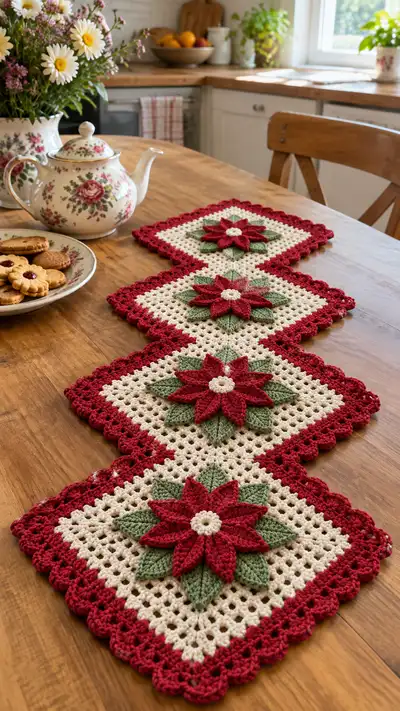
Create a warm, vintage-inspired poinsettia table runner featuring four connected lacy cream granny squares, layered green leaves and sculpted red petals, finished with a scalloped red border. This pattern gives step-by-step, stitch-accurate instructions for each square, each leaf and each petal so you can reproduce the elegant layered flower detail shown. Perfect for holiday tables, this runner combines classic granny mesh with dimensional appliqued flowers for a timeless look.
Progress Tracker
0% Complete
— Overview & Module Plan :
Info :
This runner is built from four identical square modules arranged in a zigzag/diamond layout. Each module is a lacy cream square (the background) with a layered poinsettia appliqued on top (green leaves, then red petals, then cream bud). After making four modules you will join them join-as-you-go, then work a scalloped outer border in red. Work tightly enough so the mesh is stable but not so tight that the raised petals won't lie flat.
Info :
Gauge/finished module size: Using worsted yarn and a 4.0mm hook each finished square will measure approximately 8.5" (21.5cm) across when blocked. The finished runner shown is four squares joined end-to-end in a zigzag to create a diamond row approximately 34" (86cm) long and 8.5" (21.5cm) wide. Adjust hook or yarn to change size.
— Square Background (make 4) :
Round 1 :
mr, 4 sc into ring, sl st to first sc to join (4)
Info :
We start small and add 4 sts each round to create 4 flat corners. The first 4 sc acts as the base for corner placement. Keep the stitch marker in the first stitch to identify round starts.
Round 2 :
inc in each st around (8)
Round 3 :
(1 sc, inc) x4 (12)
Round 4 :
(2 sc, inc) x4 (16)
Round 5 :
(3 sc, inc) x4 (20)
Info :
Keep tension even. These rounds give a small solid centre to stabilize the later mesh rounds. Place an extra stitch marker in the corner increases if you like to help identify corner positions for future rounds.
Round 6 :
(4 sc, inc) x4 (24)
Round 7 :
(5 sc, inc) x4 (28)
Round 8 :
(6 sc, inc) x4 (32)
Round 9 :
(7 sc, inc) x4 (36)
Info :
The square is taking shape. At the end of Round 9 you will see four mild corner bumps where increases sit; these are corner positions. If you prefer a looser mesh switch to a hook 0.25-0.5mm larger from Round 11 onward.
Round 10 :
(8 sc, inc) x4 (40)
Round 11 :
(9 sc, inc) x4 (44)
Round 12 :
(10 sc, inc) x4 (48)
Info :
Change color now if you want the central rounds in a contrasting tone. For the pictured runner stay with cream until Round 16 to create a consistent background for the flower mounting.
Round 13 :
(11 sc, inc) x4 (52)
Round 14 :
(12 sc, inc) x4 (56)
Round 15 :
(13 sc, inc) x4 (60)
Round 16 :
(14 sc, inc) x4 (64)
Info :
From Round 17 we will begin to convert the solid sc rounds into an open mesh to reflect the airy lacy background in the photo. If you prefer a denser background, stop increasing at Round 16 and continue even rounds in sc; adjust counts accordingly for later joining and edging.
Round 17 :
Ch1, *sk 1 st, dc in next st, ch1* repeat to end, sl st to first dc (32 dc, 32 ch-1 sps)
Round 18 :
Ch3 (counts as dc), dc in same sp, ch1, *2 dc in next ch-1 sp, ch1* repeat around, sl st to top of ch3 (approx 64 dc clusters)
Round 19 :
Ch4 (counts as tr+ch1), *tr in next ch-1 sp, ch1* repeat around, sl st to top of starting ch (maintain mesh)
Info :
These mesh rounds produce even openwork. Keep your counts by treating each chain-space as the working 'stitch' to place clusters into. If you prefer traditional granny mesh, you may substitute dc clusters separated by chain-1 spaces here.
Round 20 :
Ch3, *dc, ch1, dc in next ch-1 sp* repeat to end, sl st to join (this rounds smooths the mesh)
Round 21 :
Ch1, *sc in next dc, ch3, sk next ch-1 sp* repeat to form larger lacy holes around the centre, sl st to join
Round 22 :
Ch3, *2 dc in ch-3 sp, ch2, sk next sc* repeat to create four corner ch-2 sps for stability, sl st to join
Info :
At this stage you can lay out where the poinsettia will sit — center it over the square. The ch-3 and ch-2 spaces help position petals and leaves evenly. Block this square flat before attaching appliques for easiest alignment.
Round 23 :
Ch1, sc in each dc and each ch space around maintaining the mesh pattern as you go (stitch count approx 64-72 depending on exact spacing)
Round 24 :
Ch1, BLO sc in each st around to create a subtle ridge that will anchor the flower center (same stitch count as Round 23)
Round 25 :
Ch1, *sc in next 2 sts, ch4, sk 2 sts* repeat to create decorative open lattice toward the edges, sl st to join
Round 26 :
Ch3, *dc in next sc, ch1, dc in next sc* repeat to fill lattice evenly, sl st to join
Round 27 :
Ch1, sc around evenly working 3 sc into each corner ch-4 space to maintain squared shape (approx stitch count 80-92)
Round 28 :
Ch1, sc in each st around (same count)
Round 29 :
Ch1, *sc in next 3, ch2, sk next 2* repeat to frame the area where the petals will be sewn (approximate count shown)
Round 30 :
Ch1, sc in each st around. Fasten off, weave in ends. Block square flat and pin to measurements to keep right angles.
Info :
Make 4 identical background squares. Blocking now helps the later join-as-you-go and ensures edges are uniform. Use rust-proof pins and a steam iron or spritz lightly with water and pin to shape.
— Leaf Layer (green) : (Make 8 leaves per square, 32 total)
Info :
These leaves are made flat and shaped with increases and post stitches for a central ridge. You will make 8 full leaves for each square and arrange them in a circular ring. Use the green yarn and a 3.5–4.0mm hook for slightly tighter shaping.
Round 1 :
mr, ch1, 6 sc into ring, sl st to first sc (6)
Round 3 :
(1 sc, inc) x6 (18)
Round 4 :
(2 sc, inc) x6 (24)
Info :
We now shape into a teardrop/leaf by working rows back and forth along a foundation instead of in the round. Slip-stitch to the next st and work the leaf body in rows attached to the centre later when sewing.
Round 5 :
Ch1, turn, hdc in next 6 sts along one side, hdc2tog at tip to form point, continue hdc along other side returning to base (work a total of 18 hdc along the arc)
Round 6 :
Ch1, turn, 1 sc in each hdc across to define the edge (18 sc)
Round 7 :
Ch1, *sc2tog, sc in next 2* repeat across to create a tapered shape (approx 14 sts)
Round 8 :
Ch1, sc across decreasing toward the tip: sc in first 2, sc2tog across until formation of leaf tip (approx 10 sts)
Round 9 :
Ch1, sc in each st returning to base. Fasten off leaving a long tail for sewing (10)
Info :
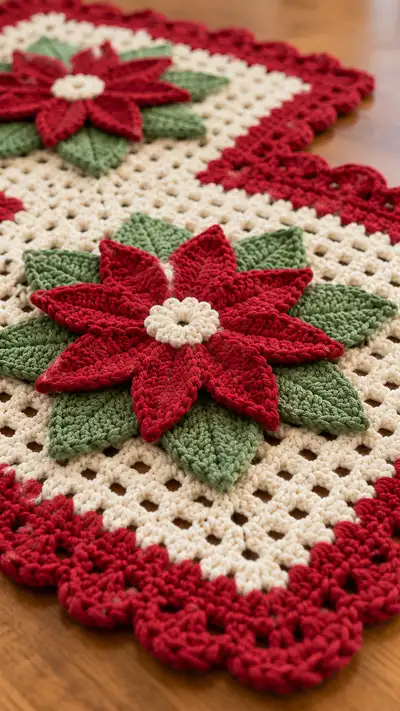
Make 8 leaves per square. Before attaching, block each leaf flat and use a single running stitch down the center with matching yarn to create a slight ridge/vein. Pin leaves to the background in a circular star formation, overlap leaves slightly as in the picture.
— Petal Layer (red) : (Make 8 petals per square, 32 total)
Info :
Petals are slightly larger than leaves and worked using front post/dc combinations to create raised ribs. Use red yarn and the 3.5mm or 4.0mm hook for sculpted shape. You will make 8 petals and sew these on top of the leaf ring, staggering them to sit between leaves for fullness.
Round 1 :
mr, ch1, 8 sc into ring, sl st to first sc (8)
Round 3 :
(1 sc, inc) x8 (24)
Round 4 :
Ch3 (counts as dc), dc in next 2 sts, ch1, turn to work along the petal body in short rows: dc3, fpdc around the post below, dc2, ch1 (this creates a slight raised rib)
Round 5 :
Ch1, turn, sc across the body to define the edge and shorten tip slightly (maintain about 18 sts after shaping)
Round 6 :
Ch1, *dc in next 3 sts, fpdc around corresponding post from previous round, dc in next 2 sts* to add a central ridge and thickness (approx 18-20 stitches)
Round 7 :
Ch1, sc across, decreasing two sts evenly to create a tapered tip (approx 16 sts)
Round 8 :
Ch1, sc2tog near the tip to create a crisp point, then sc along base (approx 14)
Round 9 :
Ch1, sc around full petal to tidy edges. Fasten off leaving long tail for sewing (14)
Info :
Make 8 petals per square. When stitching petals down, position so that each petal sits between a pair of green leaves, staggering to create an 8-point star. Use a ladder stitch or small whip stitches on the underside to hide joins.
Round 10 :
Optional: If you want more sculpted petals, make a second thinner layer of petals using rounds 1-6 above but stop short for smaller inner petals and offset them slightly inward.
— Center Bud (cream) :
Round 1 :
mr, 6 sc in ring, sl st to first sc (6)
Round 3 :
Ch1, sc around, working into back loops only to create a slight flange (12)
Round 4 :
Ch1, *sc2tog across to create a slightly flat polished disc shape (6)
Round 5 :
Fasten off leaving a tail. Use tail to sew bud through the middle of the petals anchoring the two layers together (if made).
Info :
Sew center bud so its underside meets the backgrounds' BLO ridge; this will secure the petals and leaves to the square. Add a drop of clear fabric glue if you prefer extra hold, but stitch first for durability.
— Attaching Appliques & Pinning :
Info :
Arrange the eight green leaves in a circular ring on the blocked square. Pin them so they overlap slightly — each leaf base should sit inside the central 6-8 stitches of the square. Next, place the eight red petals so each petal tip sits between two green leaves and the petal bases overlap the center slightly.
Round 1 :
Sew each leaf base down using a strong whip stitch through the leaf tail and the background over two or three stitches to secure (no visible knots). Repeat for all eight leaves.
Round 2 :
Sew petals on top using an invisible ladder or whip stitch at the petal base only; avoid stitching through petal tips to keep them free and dimensional.
Round 3 :
Sew the cream bud in the center securing through the petal bases and into the background center. Weave ends into the underside and trim.
Info :
When sewing petals, use matching red yarn and stitches no more than 2-3 mm apart to avoid visible gaps. Pin and inspect placement before making permanent stitches.
— Square Edge & Scallop Frame (around each square) :
Round 1 :
With red yarn join at any corner, ch1, sc evenly around the square working 3 sc into each corner ch-space to maintain right angles (approx stitch count 96)
Round 2 :
Ch3, *sk next sc, 5 dc shell in next sc, sk next sc, sl st into next sc* repeat around placing 3 shells at each corner for stability (shells create the scallop texture)
Round 3 :
Ch1, sc in each dc and sc across to even out shells and create a neat base for the final scallop (same stitch count)
Round 4 :
Ch2, *2 dc, ch1, 2 dc in top of each shell to reinforce scallop* repeat around; sl st to join
Round 5 :
Ch1, sc around to neaten edge. Fasten off leaving long tail for join-as-you-go if you plan to join now.
Info :
Make the scallops prominent as in the photograph — larger shells give a vintage look. If attaching runner squares with join-as-you-go, leave the joining side unfastened on the last round to perform joining.
— Join-As-You-Go & Runner Assembly :
Info :
The pictured runner is four squares joined into a zigzag/diamond formation: square 1 attaches to square 2 at one side corner, square 2 attaches to square 3 offset, etc. Use join-as-you-go (JAYG) to create an invisible seam and preserve scalloped continuity. Alternatively, sew squares together with whip stitch on the wrong side.
Round 1 :
Lay two squares right sides up. Join red in the corner ch-space on the unjoined side of square A, ch1, sc across the edge of A until you reach the corresponding stitch on square B. For each sc on A, sl st into the matching sc on square B to join, then continue around the seam until the side is joined (repeat for all adjoining seams)
Round 2 :
Work shells (as used in the scallop) across the joined seam so the pattern flows uninterrupted; where shells meet a seam work sl sts through both squares to make the join invisible
Info :
Pin squares carefully before joining. Ensure the scallop shell pattern lines up so there is visual continuity along the runner. If squares are slightly different sizes after blocking, ease the shorter into place with even joining stitches to avoid puckering.
Round 3 :
Repeat join for all adjoining pairs until all four squares are connected in the desired zigzag layout. Fasten off and weave ends.
— Outer Scalloped Border (finish entire runner) :
Round 1 :
With red yarn join at any outermost scallop point, ch1, sc evenly around the entire runner working 3 sc in each corner/point where two squares meet to maintain shape (approx stitch count variable)
Round 2 :
Ch3, *4 dc shell in next sc, sk next sc, sl st to next sc* work big shells around entire outer edge to emphasize large scallops
Round 3 :
Ch1, sc around to tidy the shells, placing 3 sc into the top of each outer shell for reinforcement
Round 4 :
Optional: For a more ornate finish, add a picot round: *sc, ch3, sl st into 3rd ch from hook* repeat along edge of shells
Info :
Block the entire assembled runner to final measurements to relax joins and even the scallops. Use a light mist of steam and pins. Allow to dry completely before use to set shape.
— Finishing Touches & Embellishments :
Info :
Embroider small veins on leaves with a simple backstitch if you want more texture, or sew a tiny glass bead into the center bud for sparkle. Avoid heavy embellishments if the runner will be laundered often.
Round 1 :
Weave in all loose ends on the wrong side and trim. Use a yarn needle to pass each tail into fabric at least 2 inches before trimming for secure weaving.
Round 2 :
If necessary, press lightly with a steam iron across a cloth to finish gently, taking care not to squash petal shapes — pin petals to shape during blocking if you prefer a dramatic dimensional effect.
Info :
Store the runner flat to preserve scallops and petal dimension. For cleaning, hand-wash gently in cool water and dry flat or spot-clean as needed.
This festive poinsettia table runner brings classic holiday charm to your home with dimensional flower appliques and a lacy cream background. Each square is a little work of art that comes together as a beautiful heirloom runner you'll be proud to display. The layered petals and scalloped border catch the light and add depth — perfect for the seasonal table or as a handmade gift. 🧶🌿❤️