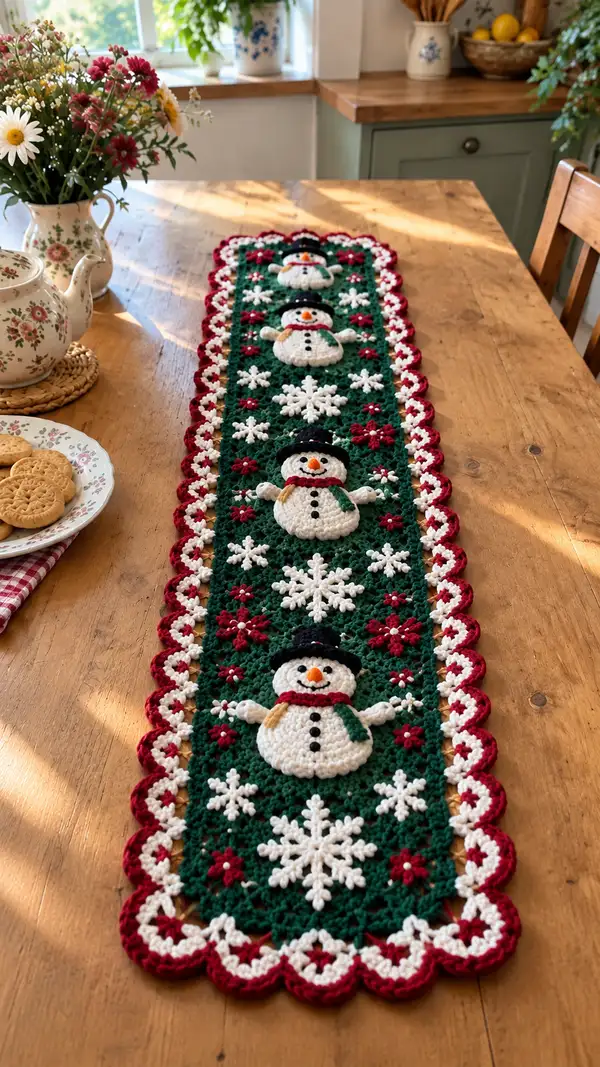
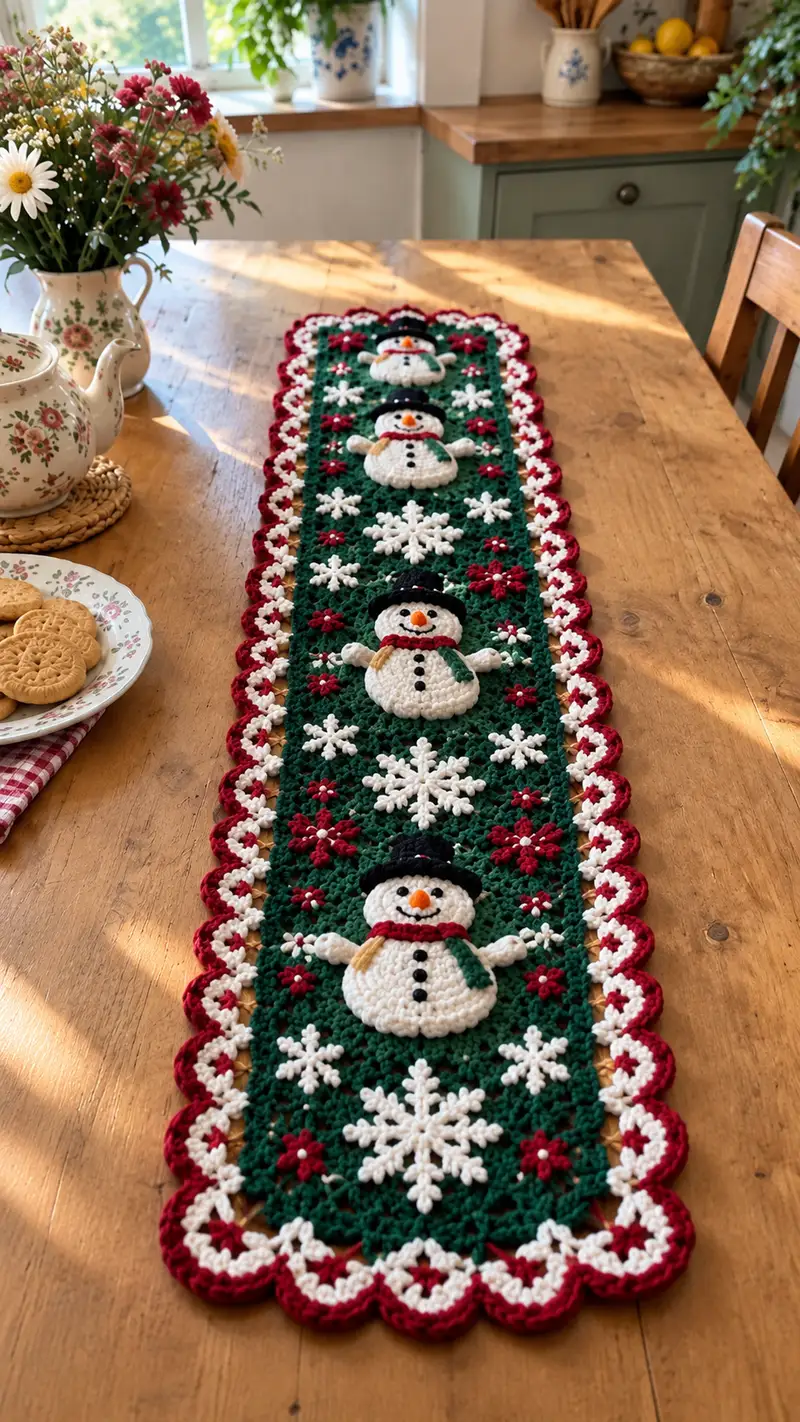
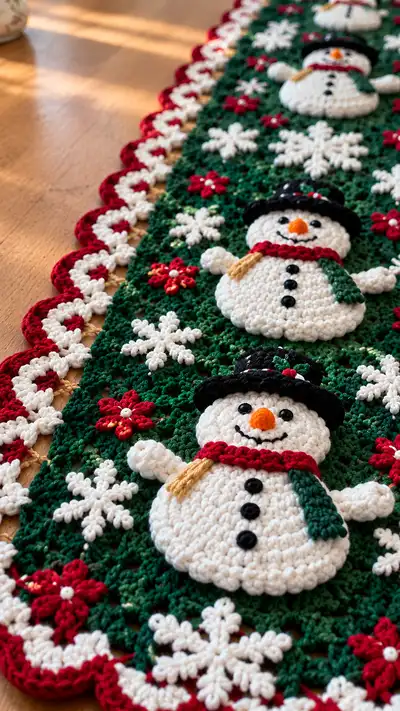
A charming, vintage-inspired Christmas table runner featuring three puffed snowman appliques, layered snowflakes, tiny poinsettia-style flowers and a scalloped red-and-white border. Worked in rich evergreen green with bright white, cranberry red, black and orange accents, this runner adds cozy holiday cheer to any table. The raised snowmen and textured snowflakes create a warm, handcrafted centerpiece that looks delightful in natural light.
Progress Tracker
0% Complete
— Notes and Overview :
Info :
This runner is built from modular rectangular granny panels worked in green, each panel has space for one snowman applique and surrounding decor. You will make 3 identical panels (or repeat to desired length), 3 snowman appliques, 6 large snowflakes, multiple small snowflake clusters and small red flower motifs, then join and add a double scallop border. Work tightly enough to hide stuffing and to let appliques sit proud of the background. Photos show a runner approximately 90-100cm (35-40") long and 20-22cm (8-9") wide when made with worsted yarn and a 4.0mm hook.
Info :
Gauge is flexible for this decorative item, but if you change yarn or hook the size will change; track the width of one finished panel to adjust number of panels for your desired runner length.
— Granny Rectangle Panel (Make 3 for central runner) :
Round 1 :
Make a small granny square base: ch4, sl st to form ring. Work 3 dc, ch2, (3 dc, ch2) x 3 into ring. Join with sl st to first dc cluster. (4 cluster corners)
Round 2 :
Sl st into first corner ch-2 sp. *(3 dc, ch2, 3 dc) in corner ch-2 sp, ch1, skip next cluster, sc in centre ch-2 of next cluster, ch1; rep from * around. Join. This starts a row-to-row granny texture (counts vary by row).
Round 3 :
Change to evergreen green if not already. Work each corner as (3 dc, ch2, 3 dc) in corner ch-2 sp; along each side work clusters of 3 dc separated by ch1 and a sc in the centre ch-2 of previous cluster to keep a flat rectangle. After Round 3 you will have a small granny approximately 6-7cm across.
Round 4 :
Continue expanding rectangle shape rather than square: On two opposite sides add extra cluster repeats to extend length. Work corners as (3 dc, ch2, 3 dc) and sides with (3 dc, ch1) cluster repeats; aim for panel dimension of roughly 22-24cm by 8-9cm after completing rounds below.
Round 5-10 :
Repeat expansion rounds adding clusters to the long sides only until your panel measures approx 22-24cm long and 8-9cm wide. Maintain even corners. After Round 10 you should have a rectangular panel with consistent granny-lacy holes suitable for appliques to attach to. (Stitch counts will vary with tension; ensure edges are straight by measuring.)
Info :
Make 3 identical granny rectangular panels. Block each panel lightly to straighten edges before joining. Leave long tails for joining in Round 10-11 or use join-as-you-go method described later.
— Snowman Head (Applique) :
Round 1 :
With bright white, mr, 6 sc in ring (6)
Round 3 :
(1 sc, inc) x 6 (18)
Round 4 :
(2 sc, inc) x 6 (24)
Round 5 :
(3 sc, inc) x 6 (30)
Round 6 :
(4 sc, inc) x 6 (36)
Info :
Place safety eyes between Rounds 4 and 5, about 6-8 sts apart depending on desired expression. If embroidering eyes, mark placement with pins before stitching.
Round 7 :
1 sc in each st around (36)
Round 8 :
1 sc in each st around (36)
Round 9 :
1 sc in each st around (36)
Round 10 :
Start subtle shaping: (4 sc, dec) x 6 (30)
Round 11 :
(3 sc, dec) x 6 (24)
Info :
Begin light stuffing now with polyfill. Stuff until head is softly firm but still a little compressible so the head sits flat against the body applique later.
Round 12 :
(2 sc, dec) x 6 (18)
Round 13 :
(1 sc, dec) x 6 (12)
Info :
Fasten off leaving a long tail for sewing to the background panel. Finish closing hole if needed using yarn needle and weave tail through remaining stitches and pull tight. Weave tail through several rounds for security.
— Snowman Body (Applique, puff-textured) :
Round 1 :
With bright white, mr. Work 8 dc into ring (8 dc)
Round 2 :
8 inc (16 dc) — for a wider base for puff stitches
Round 3 :
(1 dc, inc) x 8 (24)
Round 4 :
(2 dc, inc) x 8 (32)
Round 5 :
(3 dc, inc) x 8 (40)
Info :
To create a raised, puffy texture similar to the photo, we will alternate rounds of dc and puff rounds. Puff rounds are worked into the top of the stitch below to create a bobbly look.
Round 6 (Puff Round) :
*yarn over, insert hook, pull up loop; repeat 3 more times in same st (5 loops on hook); yo and draw through all 5 loops; ch1 to close puff; ch1 between puffs; repeat around. End with as many puffs as fit evenly around the circle (approx 40 puffs). Count puffs as stitches for subsequent rounds.
Round 7 :
Work 1 dc in top of each puff (40)
Round 8 :
(4 dc, inc) x 8 (48)
Round 9 (Puff Round) :
*Make puff in each st around as before (48 puffs). Ch1 between puffs to define them. These puffs create the rounded body shape.
Round 10 :
1 dc in each puff top (48)
Info :
After Round 10 the body should be visibly domed and slightly larger than the head. Use a smaller hook (3.5mm) if you want more compact puffs; use the same hook for uniformity if preferred.
Round 11 :
(6 dc, dec) x 6 (42)
Round 12 :
(5 dc, dec) x 6 (36)
Round 13 :
1 dc in each st around (36)
Round 14 :
(4 dc, dec) x 6 (30)
Round 15 :
(3 dc, dec) x 6 (24)
Info :
Lightly stuff the underside of the body to help it sit flat on the panel; the body should be firmly stuffed at the bottom but not so firm that the puff texture compresses.
Round 16 :
(2 dc, dec) x 6 (18)
Round 17 :
(1 dc, dec) x 6 (12)
Round 18 :
6 dec (6). Fasten off leaving long tail for sewing. Weave tail through remaining sts to close if needed and secure.
— Snowman Arms (Make 2 per snowman) :
Round 1 :
With bright white, ch6, sc in 2nd ch from hook and across (5 sc). Turn. (5)
Round 2 :
Ch1, sc across (5)
Round 3 :
Ch1, (sc, inc, sc) across center to create a tiny mitten shape: sc in first, inc in second, sc in third, sc in fourth, sc in fifth (6)
Round 4 :
Ch1, sc in each st (6)
Round 5 :
Fold the piece short-end to form a small rounded arm; sc through both layers across short edge to close (approx 6 sc). Fasten off leaving tail for sewing.
Info :
Make 2 arms for each snowman. Stuff lightly if you want slightly raised arms, otherwise leave flat for a sewn-on look. Position arms at the sides of the body with gentle outward curve.
— Snowman Hat :
Round 1 :
With black, mr, 6 sc in ring (6)
Round 3 :
(1 sc, inc) x 6 (18)
Round 4 :
1 sc in each st around (18)
Round 5 :
Switch to 3.5mm hook. Work FLO 1 sc in each st around to create a small brim ridge (18)
Round 6 :
Ch1, *(3 sc, ch1) in each st around to create a slightly wider brim texture; sl st to first sc to finish (approx 18 sets; counts will result in a broader brim)
Round 7 :
Fasten off leaving tail. Sew hat onto top of snowman head so it tilts forward slightly. Add a tiny holly accent by chaining 6 and creating 3 small sc leaves in holly green and one tiny red pom or embroidered berry.
— Carrot Nose :
Round 1 :
With orange, ch4, sl st to join and make a small ring. Work 6 sc into the ring (6)
Round 2 :
(1 sc, inc) x 3 (9)
Round 3 :
1 sc in each st around (9). Fasten off leaving tail; shape carrot by tapering one end with stitches when sewing to head.
— Scarf (Make two-tone scarf per snowman) :
Round 1 :
With red, ch18, sc in 2nd ch from hook and across (17)
Round 2 :
Ch1, turn, sc across (17)
Round 3 :
Switch to green for fringe end: ch1, sc across (17). Fasten off leaving tails for weaving and finishing. Add a few short ch3 fringes on one end in tan / gold to mimic the photo small tassel.
Info :
Fold scarf around neck between head and body appliques; sew ends under body to secure. Add fringe by threading yarn through edge and knotting small bundles.
— Buttons and Facial Embroidery :
Round 1 :
Sew three small black buttons down the center of the body applique spaced evenly. If using yarn, embroider three small French knots or embroidered dots using black yarn or embroidery thread.
Round 2 :
Embroider smile with black yarn using backstitch or small straight stitches. Use tiny stitches to create a friendly smile similar to the photo.
Round 3 :
Attach carrot nose at center of face using long tail and secure with stitches through panel. Add small black beads or embroidered French knots for eyes if not using safety eyes.
— Large Snowflake Motif (Make 6) :
Round 1 :
With bright white, mr. ch2 (counts as first sp), work 12 dc into ring, join (12)
Round 2 :
Ch3 (counts as tr), *sk next st, (tr, ch3, tr) in next st to form arm tip; rep around to make 6 arms; sl st to join. You will now have 6 arm bases.
Round 3 :
Working into each arm base, ch4, sc at tip, ch4, sl st back to join base, creating a lacy branch; rep for each arm to form a detailed snowflake shape (6 arms finished).
Round 4 :
Reinforce with small picot details: on each arm ch3, sl st into third ch to create tiny points. Fasten off and weave ends. Block snowflakes flat to open arms for matching the scale in photos.
Info :
Make 6 identical snowflakes. Blocking is essential — pin each snowflake into a star shape and spray lightly with water or starch and allow to dry flat for crisp edges.
— Small Red Flower Motif (Make 12-16) :
Round 1 :
With cranberry red, mr, ch1, 6 sc in ring (6)
Round 2 :
*(ch3, sl st in next st) around to create 6 small petals. Fasten off and sew a 3mm white bead into the center of each flower for the bright center dot visible in the photo.
Info :
These small flowers fill the gaps around snowmen and snowflakes. Make 12-16 depending on how dense you want decoration in each panel.
— Small White Snowflake / Asterisk (Make many) :
Round 1 :
With white, ch6, join to form ring. Work *ch3, sl st in ring* to create 6 arms. On each arm ch3 and sl st back to make small star points. Fasten off. Make 12-18 small snowflakes to tuck between motifs.
Info :
These tiny stars are quick and create a frosty scatter effect between the larger snowflakes and around the snowmen.
— Joining Panels and Motifs :
Round 1 :
Arrange three granny rectangle panels lengthwise in a row. Match decorative holes and ensure orientation of stitch pattern is consistent. Decide whether to join with whip stitch or join-as-you-go slip-stitch method.
Round 2 :
Using matching green yarn and a yarn needle, sew panels together with mattress stitch or whip stitch along long edges, spacing seams flush. Use pins to keep edges even; weave tails into seam so they are invisible on the right side.
Info :
When joining panels, leave a small seam allowance so the runner lies flat and does not pucker. If you prefer a visible seam, use contrasting gold yarn to create a decorative running stitch between panels like the photo shows a faint gold accent.
Round 3 :
Pin snowman appliques into position on top of the green background: place one applique centered in each panel about 3-4cm from the top inner edge so that space for snowflakes above and below is balanced. Use pins to hold head, body and arms in place before sewing.
Round 4 :
Sew each applique to the panel through the outermost rounds only so the raised puff texture remains proud. Use whip stitch with white yarn, passing through the applique edge and the panel's surrounding stitches. Sew arms at the sides and hat on head. Weave all tails securely.
Info :
Sew small snowflakes and flowers into position between and around snowmen. Place the large snowflakes in the negative spaces as in the photo (one between each pair of adjacent snowmen and one on each end). Use pins to test spacing and symmetry before final sewing.
— Double Scalloped Border (White inner row then Red outer scallop) :
Round 1 (Inner white edging) :
With white and a 3.5mm hook, sc evenly around the entire runner edge to create a clean base edge. Work 1 sc in each stitch or space along sides, and 3 sc in each corner to keep corners flat. Join with sl st. Count total stitches around and note this number for the scallop round.
Round 2 (White scallop foundation) :
Ch1, *(skip 2 sts, 5 dc in next st, skip 2 sts, sl st in next st) repeat around.* Adjust by working smaller shells where necessary to ensure even spacing. This creates a white scallop ridge to be accented by red outer scallops.
Info :
If your stitch count doesn’t divide evenly, close with a smaller shell or a cluster of 3 dc in one spot so the pattern remains visually even. Keep track of how many shells you created so the red outer scallops will align.
Round 3 (Red outer scallop) :
Change to cranberry red. Work in the spaces between white scallops: *sl st in centre of white shell, ch1, (3 dc, ch2, 3 dc) in same spot to form a deep red shell; sl st to the next centre.* Repeat around for bold red scalloped border. Fasten off and weave ends.
Round 4 :
Optional final round in white: sl st along base of red scallops to create a layered look similar to the photo, or add a picot edge for extra texture. Block the entire runner again if necessary to sit flat.
Info :
Use a slightly smaller hook for the final outer scallop if you want a neat, firm edge. Blocking this border while wet and pinned helps scallops open evenly and remain uniform.
— Finishing Touches and Blocking :
Round 1 :
Weave in all ends by threading tails through several rounds of stitches, trimming flush. Use a small amount of textile glue under buttons or delicate attachments if you want extra security (allow to dry fully off table surface).
Round 2 :
Lightly steam-block or wet-block the runner. Pin scallops and snowflakes into shape on a blocking board and let dry completely to achieve the crisp edges similar to the sample photos.
Info :
For easy care, hand wash gently in cool water and reshape while damp. Avoid machine drying which can distort puff textures and scallops.
This festive runner brings handmade holiday charm to your table with playful snowmen, crisp snowflakes and a classic scalloped edge. The 3D appliques add cozy texture and the modular construction makes the runner easy to customize for different table lengths. Bring out a cup of tea, admire your stitches, and enjoy the warm glow this piece brings to holiday gatherings. 🧶🎄✨