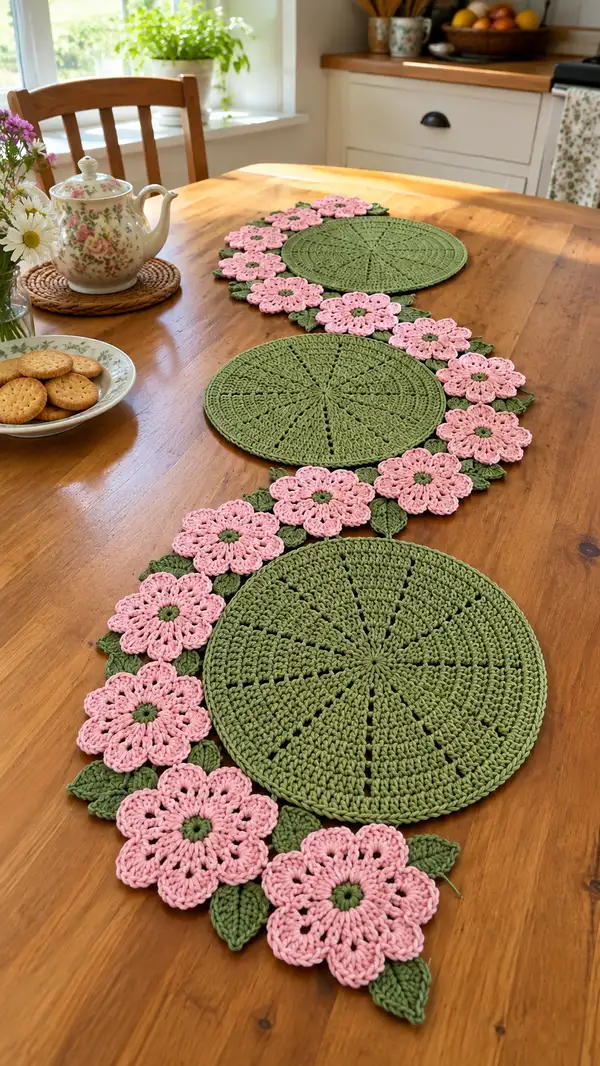
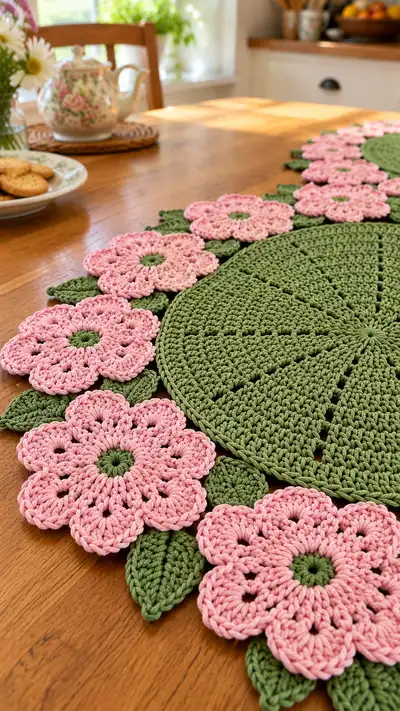
Create a charming floral table runner made from round placemat motifs, pink layered flowers and sculpted green leaves. This pattern builds three large circular placemats edged with scallops and joined by clusters of delicate six-petal flowers and textured leaves. The finished runner adds a soft, cottage-style accent to any table and is worked in sturdy cotton yarn for a flat, washable finish.
Progress Tracker
0% Complete
— Materials & Gauge :
Info :
Gauge is not critical for structure but affects finished diameter. Using worsted cotton and 4.0mm hook, one finished round placemat measures approximately 26-28cm (10-11in) across. If you change yarn/hook, check gauge and adjust number of increase rounds to reach desired diameter.
— Circle Placemat (Make 3) :
Info :
Each placemat is worked flat in the round from the center out. We will create a slight wedge texture to echo the photos by alternating dc and hdc rounds and by working paired increases spaced evenly. Make 3 identical placemats and block lightly before joining. Stitch counts are given at the end of each round.
Round 1 :
Make a mr, ch1, 6 sc into ring. Pull tight and join with sl st to first sc. (6)
Round 2 :
Ch1, 6 inc (2 sc in each st) — or (inc) x6. Join with sl st. (12)
Round 3 :
Ch1, (1 sc, inc) x6. Join. (18)
Round 4 :
Ch1, (2 sc, inc) x6. Join. (24)
Round 5 :
Ch1, (3 sc, inc) x6. Join. (30)
Round 6 :
Ch1, (4 sc, inc) x6. Join. (36)
Round 7 :
Ch1, (5 sc, inc) x6. Join. (42)
Round 8 :
Ch1, (6 sc, inc) x6. Join. (48)
Info :
At this point you have a flat disc. If your disc is cupping, switch to a slightly larger hook or work the next round in BLO to flatten. Use a stitch marker to mark the start of each round.
Round 9 :
Ch2 (counts as hdc), hdc in same st, *hdc in next 5 sts, (hdc, inc) in next st; rep from * around. Join. (56)
Round 10 :
Ch2, hdc in each st around. Join. (56)
Round 11 :
Ch3 (counts as dc), dc in same st, *dc in next 7 sts, (dc, inc) in next st; rep from * around. Join. (64)
Round 12 :
Ch3, dc in each st around. Join. (64)
Info :
The alternating hdc/dc rounds create subtle ridges that mimic the wedge visual. Keep joins tidy by sl st into top of starting ch.
Round 13 :
Ch2, hdc in next st, *(ch1, skip 1 st, hdc in next 6 sts) across to create small radial gaps aligned every 8 stitches, join. (64 with ch-spaces retained)
Round 14 :
Ch3, dc in each st and into each ch-space around, working 1 dc into each previous stitch to fill fabric. Join. (64)
Round 15 :
Ch1, sc in each st around working in BLO to create a slightly firm base for outer texture. Join. (64)
Round 16 :
Ch3, *dc in next 7 sts, 2 dc in next st; rep from * around. Join. (72)
Round 17 :
Ch2, hdc in each st around. Join. (72)
Info :
If you prefer a slightly smaller final diameter, stop increases at Round 15 and work even rounds until you reach the size you prefer.
Round 18 :
Ch3, dc in next 10 sts, (dc, inc) in next st; rep from * around. Join. (78)
Round 19 :
Ch1, sc in each st around. Join. (78)
Round 20 :
Ch2, *hdc in next 11 sts, (hdc, inc) in next st; rep from * around. Join. (84)
Round 21 :
Ch3, dc in each st around. Join. (84)
Info :
Check diameter now: you should be around 25-28cm. Block lightly if needed to flatten. Trim any long tails and weave them in later after assembly for neatness.
Round 22 :
Ch1, sc in each st around in BLO to create defined border ridge. Join. (84)
Round 23 :
Ch2, hdc in next st; *skip 1 st, picot shell: (5 dc in next st) to create subtle scallop, skip 1 st, hdc in next 2 sts; rep from * around. Join. (84 with shell spaces)
Round 24 :
Ch1, sc in each st and in shells evenly to flatten shells slightly and bind them into a neat scalloped edge. Join. (approx 84)
Round 25 :
Ch1, sl st neat finishing around the last round to create smooth edge. Fasten off and weave ends. (finish)
Info :
Make 3 identical placemats. Block them flat using pins to emphasize scallops and spokes. Light steam blocking on cotton is effective; test first on a small scrap.
— Flower Motif (Make 18 or as needed to fill runner) :
Info :
Flowers are worked in two steps: a small green center disc, then pink petal round(s) worked into the center base to form six large petals. Each flower is worked flat and unstuffed. Use a slightly smaller hook (3.5mm) if you want tighter petals, or 4.0mm for a looser petal edge like the photos.
Round 1 :
With green, mr, ch1, 6 sc into ring. Join with sl st. (6)
Round 2 :
Ch1, 6 inc (2 sc in each st). Join. (12)
Round 3 :
Ch1, sc in each st around. Join. (12)
Info :
Change to pink with sl st into any st on Round 3; carry green tail inside or weave in as you go. Flower center should measure about 1.5-2cm across depending on yarn.
Round 4 :
With pink, ch4 (counts as tr), *skip 1 st, in next st work (1 tr, ch1, 1 tr) to create a small V-stitch; rep from * around for 6 V-spaces. Join with sl st in top of starting ch-4. (6 V-spaces)
Round 5 :
Ch1, *(in V-space) work: sc, hdc, 3 dc, hdc, sc across each V-space to form a long petal; sl st to next V-space to move; rep for each petal. Fasten off pink leaving tail for sewing if desired. (6 petals)
Info :
The long petals are formed by a tall 3-dc cluster to create the puffed petal look. Keep petals consistent in tension so the flower lays flat.
Round 6 :
Optional decorative round: join pink in any base stitch, ch1, sc in each stitch around including petal edges to tidy and provide a small rim. Join and fasten off. (approx 30-36 depending on petal shaping)
Info :
Block flowers flat on a mat to open petals. Pin each petal into gentle curve if you want the petals to slightly overlap when assembled.
— Leaf Motif (Make 20 or as needed) :
Info :
Leaves are worked flat in green to tuck beneath flowers and create the scalloped green border visible in photos. These are small pointed leaves using ribbed stitches for texture.
Round 1 :
Ch8. In 2nd ch from hook, sc, hdc, 3 dc, hdc, sc — shaping to a point; continue down other side: sc, sl st to join at base. (final leaf length about 4-5cm)
Round 2 :
Turn, work along one side only: ch1, sc in same st, *sc in next 2 sts, hdc in next, dc in next 3 sts; rep along other side reversing stitches to mirror. Fasten off leaving tail for sewing. (approx 12-14 sts)
Round 3 :
Optional ribbing: rejoin at leaf center base, ch1, work sc in BLO across leaf surface to create ridge down the center. Fasten off. (visual ridge)
Info :
If you prefer larger leaves, start with ch10 and add more dc in center. Make leaves in two sizes for a more organic look as in the photos.
— Small Connector Discs (Make matching small green discs for some flower centers or to fill gaps) :
Round 1 :
mr, ch1, 6 sc. Join. (6)
Round 2 :
Ch1, (sc, inc) x3. Join. (9)
Info :
These small discs are used to tuck behind flowers or to attach leaves. Make about 6-8 for best coverage.
— Joining & Runner Assembly :
Info :
Lay out your three placemats in the desired S-shaped arrangement matching the photos. Arrange flowers in clusters between the placemats, leaves tucked around each flower. Pin each motif in place before sewing to ensure even spacing.
Step 1 :
Place the three placemats in a row with about 6-8cm overlap for the floral chain to sit snugly between them. Position clusters of 5-7 flowers between each adjacent placemat edge, and scatter leaves beneath to fill gaps.
Step 2 :
Sew flowers to placemats using matching yarn and a yarn needle. For each flower, insert needle through back of flower center into placemat edge, whip stitch around center 6-8 times and knot securely on the back. Hide ends through fabric. Repeat for each flower. Use extra stitches on outer petals to hold them flat against placemat when needed.
Info :
Sew leaves underneath flowers so their tips peek out between petals. Use small whip stitches along the base of the leaf and the placemat or adjacent flower centers for a secure join. Pin and check alignment often.
Step 3 :
Where flowers meet flowers (chain areas), use small connector discs or direct whip stitch between adjacent flower centers. Overlap small amounts of petal or center to create continuity. When sewing multiple layers, sew through two to three layers of yarn to make seams secure but not bulky.
Step 4 :
Fill any small gaps with extra leaves or small discs. For a balanced look, alternate large and small leaves and angle them slightly outward from the floral chain. Weave and trim all tails after sewing.
Step 5 :
Once all motifs are sewn into place, gently steam-block the whole runner flat. Pin edges to ensure scallops and petal heads lay as desired. Allow to dry completely before unpinning.
Info :
Use a thread color that matches the motifs when sewing for invisible joins. If you prefer more decorative joins, visible blanket stitch can be used along the boundary between placements to emphasize the handmade look.
— Outer Edge & Final Scalloped Border :
Info :
The outer edge around the entire runner ties all pieces together and gives a finished look. Work a simple sc border around the visible outer edge, then a decorative scallop round to mirror the placemat scallops.
Round 1 :
With green, join in any outermost stitch, ch1, sc evenly around entire runner edge through both motifs where they meet, placing approx 1 sc per 3-4 mm depending on yarn. Join with sl st. (st counts vary; work evenly.)
Info :
Take care to keep even spacing where petals meet placemats. If petals create deep gaps, work additional sc into those areas to pull edge smooth.
Round 2 :
Ch3, *skip 1 st, 5 dc in next st (shell), skip 1 st, sl st in next st; rep from * around to create scallops that echo the placemat shells. Join and fasten off. Weave ends. (shell count depends on circumference)
Info :
If shells feel too open, add a following single crochet round across shells: sl st into the center of each shell, sc into each dc of the shell to compress slightly and secure the scallops.
— Decorative Topstitching (Optional) :
Info :
You may add light topstitching using contrasting thread to outline petals, or chain embroidery on leaves for veins. Use a tapestry needle and single strand of cotton for subtle lines.
— Pattern Notes & Alternative Options :
Info :
To lengthen the runner, add additional placemat circles and continue the floral chain pattern. To shorten, remove one placemat and reduce flowers accordingly. Change flower colors seasonally: bright corals, soft creams or yellows all work beautifully.
Info :
For a denser look, use a 3.5mm hook for all components. For a lighter, airier runner, use a 4.5mm hook and slightly thicker cotton — adjust number of flowers and leaves to maintain scale.
Info :
Care instructions: hand wash gently or machine wash on delicate in a mesh bag; reshape while damp and dry flat. Cotton will soften after washing but maintain decorative shape when pinned and dried flat.
Completing this floral table runner is such a rewarding experience—each placemat and flower comes together to form a charming, vintage-inspired statement piece. The soft sage and dusty rose colors create a calm, inviting table setting that feels both handmade and refined. I hope you enjoy the meditative rhythm of working the rounds, shaping petals and placing leaves just so. 🧶🌸 Happy stitching — your table will look gorgeous with this floral touch! ✨