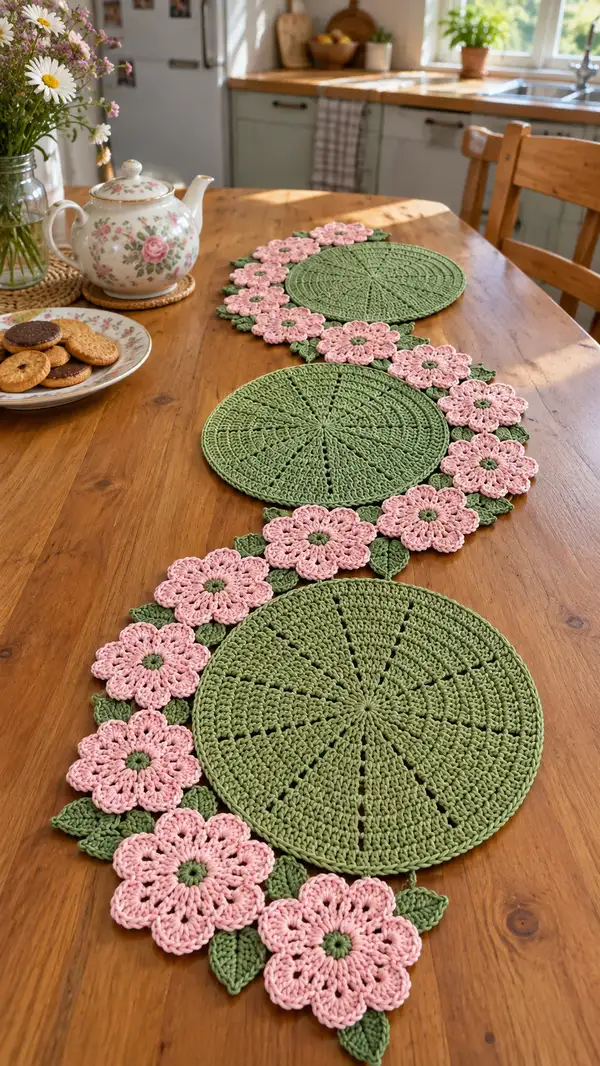
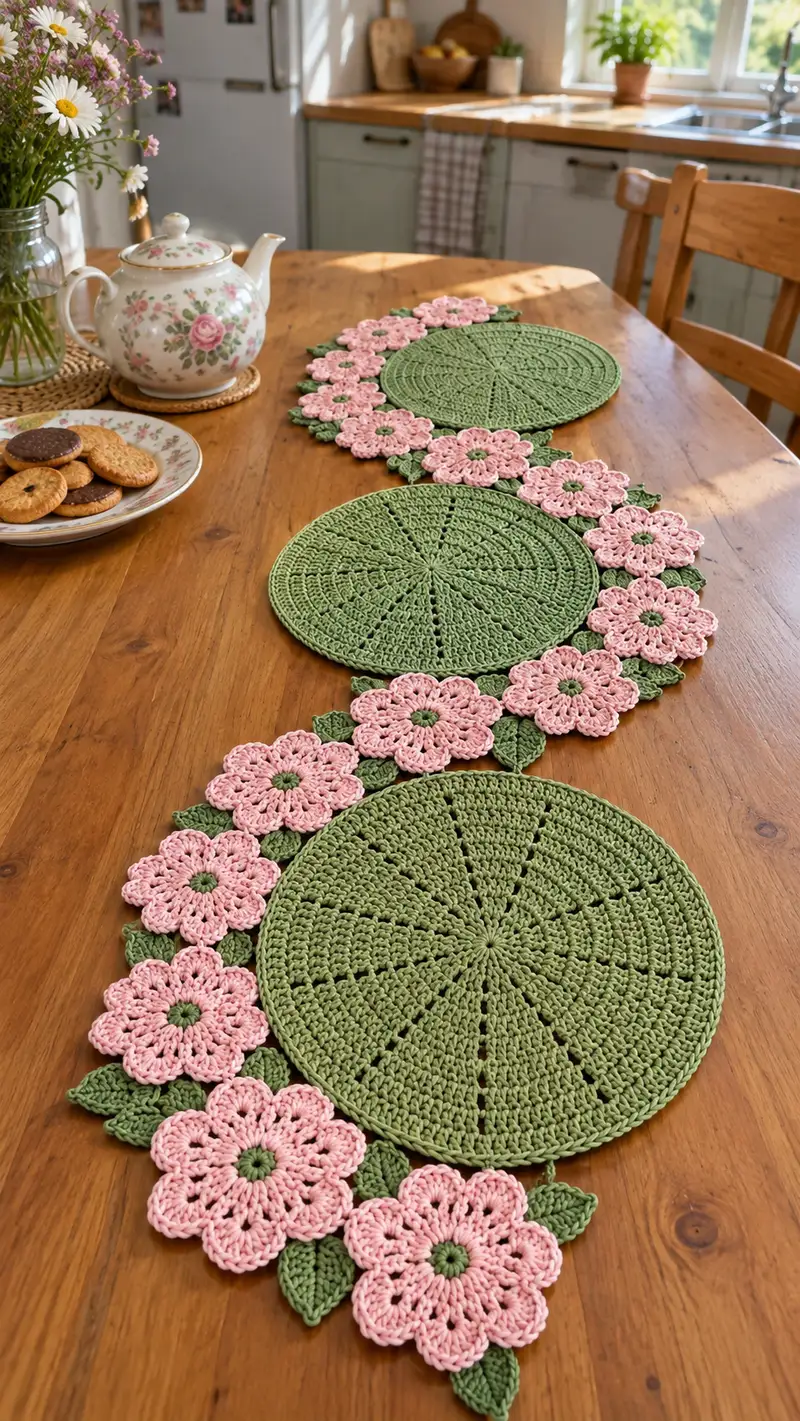
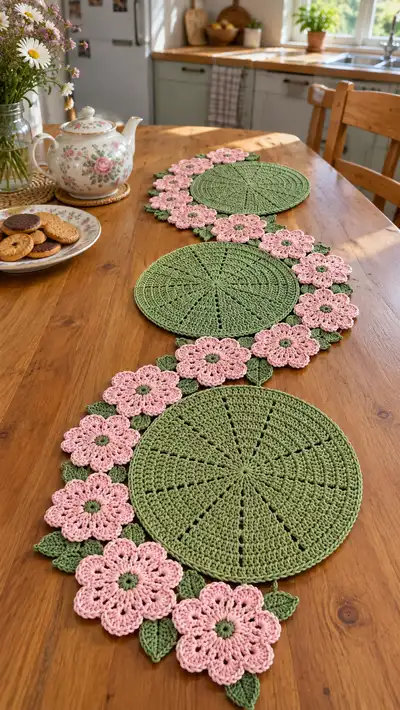
A charming floral table runner made from circular placemat motifs, delicate pink crochet flowers and layered green leaves. This pattern creates three large round placemats joined by rows of pretty open flowers and leaves to form a flowing runner. Designed in soft leaf-green and blush-pink cotton for a crisp, vintage-inspired look — perfect for spring tables and tea parties. Detailed construction, joining and finishing instructions included for a polished, flat, durable result.
Progress Tracker
0% Complete
— Notes & Gauge :
Info :
Gauge: For the large circular placemat, using 4.0mm hook and worsted cotton, 12 rounds should give approximately 12cm diameter. Finished placemats in this pattern are worked to ~26-28cm diameter each. Adjust hook size to achieve desired diameter and fabric drape. Work tightly enough that petal clusters hold shape but not so tight that petals pucker.
Info :
Abbreviations used are standard US terms. All motifs are made flat in rounds and joined by slip-stitch sewing or whip stitch as indicated. Use stitch markers at the beginning of each round and to mark 12 radial spokes for even decorative gaps.
— Large Circular Placemat (Make 3) :
Round 1 :
6 sc in magic ring (6)
Round 3 :
(1 sc, 1 inc) x 6 (18)
Round 4 :
(2 sc, 1 inc) x 6 (24)
Round 5 :
(3 sc, 1 inc) x 6 (30)
Round 6 :
(4 sc, 1 inc) x 6 (36)
Round 7 :
(5 sc, 1 inc) x 6 (42)
Round 8 :
(6 sc, 1 inc) x 6 (48)
Info :
From round 3 onward, place 12 evenly spaced stitch markers to mark each 'segment' for later decorative spokes. When placing markers, count stitches carefully: for 48 sts use a marker every 4 stitches (48/12=4).
Round 9 :
1 sc in each st (48)
Round 10 :
1 sc in each st (48)
Round 11 :
1 sc in each st (48)
Round 12 :
Start spoke pattern: *3 dc in next 3 sts, ch2, sk 2 sts* rep around (48 with ch-spaces forming decorative gaps)
Info :
Round 12 creates the radial segmentation you can see in the photo; ch2 spaces act as thin 'spokes'. Adjust ch count to ch1 or ch3 if you want smaller or larger gaps. Keep tension even.
Round 13 :
1 sc in each st and in each ch2 sp (48)
Round 14 :
1 hdc in each st (48)
Round 15 :
(6 sc, 1 inc) x 6 (54)
Round 16 :
1 sc in each st (54)
Round 17 :
1 sc in each st (54)
Round 18 :
(8 sc, 1 inc) x 6 (60)
Round 19 :
1 sc in each st (60)
Info :
Check that the disc is lying flat. If it cups, add an extra increase round; if it ruffles, decrease one increase round. Make adjustments before moving to denser stitch rounds.
Round 20 :
1 hdc in each st (60)
Round 21 :
1 dc in each st (60)
Round 22 :
Work decorative spokes round: *[1 sc in next 4 sts, ch3, sl st into center of disc at start of segment to create a radial line]* rep 12 times finishing with sl st to join (keeps disc visually segmented)
Info :
On round 22 you create shallow surface chains that connect to the central area - this provides the visible radial lines. Use a contrasting technique by catching a post at the earlier center if you want a stronger line.
Round 23 :
1 sc in each st (60)
Round 24 :
Working in BLO: 1 sc in each st BLO (60)
Round 25 :
1 sc in each st (60)
Round 26 :
(9 sc, 1 inc) x 6 (66)
Round 27 :
1 sc in each st (66)
Round 28 :
1 sc in each st (66)
Round 29 :
Round to smooth edge: *sc3tog over next 3 sts, sc in next 9 sts* rep around (66 -> check counts remain even)
Info :
Round 29 reduces slight bulk at edge and prepares a stable edge for joining. If you prefer a crisp edge, switch to a final round of sc in blo or sl st work now.
Round 30 :
1 sc in each st (66)
Round 31 :
Edge finishing round: *sc in next 4 sts, picot (ch3, sl st into 3rd ch), sc in next 6 sts* rep around to create low scallops (maintain 66 or adjust slightly)
Round 32 :
Fasten off and weave in ends. Lightly block disc flat using pins and steam or wet blocking to reach final diameter (~26-28cm)
Info :
Make 3 identical placemats. Block them to identical dimensions. Blocking is essential for clean joins.
— Small Filler Circle (Make multiple) :
Round 1 :
6 sc in magic ring (6)
Round 3 :
(1 sc, 1 inc) x 6 (18)
Round 4 :
1 sc in each st (18)
Round 5 :
1 hdc in each st (18)
Round 6 :
1 sc in each st (18)
Round 7 :
Edge round: *sc2, picot* repeat around (approx 18)
Round 8 :
Fasten off and block flat. These small discs sit behind flower clusters to give depth.
Info :
Make as many filler circles as needed to sit between flowers and overlap placemats (approx 10-14 depending on spacing).
— Flower Motif (Make ~16-20) :
Round 1 :
With darker green (center): 6 sc in magic ring, sl st to join (6)
Round 2 :
Ch1, 2 sc in each st around (12)
Round 3 :
Change to blush pink. *Sc1, ch2, sk1* around to make 6 small ch2 loops (12 loops including chs)
Round 4 :
Work petal bases: Into each ch2 loop: (sc, hdc, 4 dc, hdc, sc) sl st to base: repeat around to make 6 petals (each petal uses 8-9 stitches but counts remain decorative)
Info :
Round 4 is where petals take shape. Keep tension slightly looser for petals to lie flat rather than cupping. Use a smaller hook (3.5mm) if you want tighter, denser petals.
Round 5 :
Ch1, sl st into the top of each petal to smooth edges; in the space between petals work picot: (sc, ch3, sl st into 3rd ch) to create delicate separation (6 picots)
Round 6 :
Working behind petals: Join to the back base of a petal and sc evenly around the petal bases to create a tidy back (approx 30 sc) Fasten off and weave in ends
Round 7 :
Optional extra texture: Rejoin to petal edges and work 3 sc in the top of each petal to give more body and volume (18 sc total across 6 petals). Fasten off.
Info :
Block petals flat or give them a gentle dome depending on preference. Make approximately 16-20 flowers to match the length and overlap shown in the photo (this runner uses roughly 18 flowers).
Round 8 :
Optional smaller petal round: In blossom edge work *ch2, sl st* to create light scallop; fasten off and weave ends (decorative only).
Round 9 :
If you want larger 8-petal flowers, increase petals by creating 8 ch2 loops in round 3 and proceed with the same petal cluster (resulting petal count = 8).
Info :
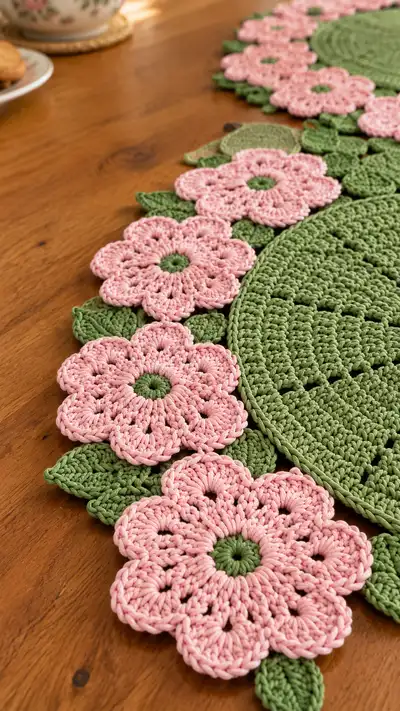
For the look in the photo use 6-petal blooms with slightly chunky double and triple crochet petals. Use cotton yarn to give petals crisp edges that overlap nicely when joined.
— Leaf Motif (Make many) :
Round 1 :
Ch 9, sc in 2nd ch from hook, hdc in next, dc in next 3, hdc in next, sc in next, sl st in last ch to form leaf ridge (8 sts)
Round 2 :
Work along one side of chain: *sc in next st, hdc in next, dc in next 3, hdc in next, sc in next* then repeat along opposite side to mirror and sl st to join (approx 16 sts)
Round 3 :
In BLO: sc around entire leaf working a tighter edge; at the tip work (sc, picot, sc) to form a pointed tip; continue back to base and fasten off (approx 20 sts)
Info :
For a more sculpted leaf use an extra round of back-loop slip-stitch shaping: sl st in BLO around to create a slight curl towards the center vein.
Round 4 :
Optional vein: Using darker green and tapestry needle, embroider a central vein with a few straight stitches; tuck ends and secure on back.
Round 5 :
For larger leaves increase chain to 11 and mirror the shaping to create broader leaves. Fasten off and block on the reverse curve for natural lay.
Info :
Make leaves in two sizes (small & large) to tuck under petals and to create layered depth. The pattern in the photo uses roughly a 2:1 ratio of small:large leaves.
— Runner Joining Base (Connecting discs with flowers & leaves) :
Info :
Layout: Arrange three placemats in a staggered, S-shaped layout and position flowers and leaves along their outer edges to form the garland. The photo shows flowers around the outer third between each circle; replicate by placing 5-7 flowers between each circle edging, overlapping slightly.
Round 1 :
Mark join points on placemat edges: count across edge and mark 12 equal join points around the outer half where flowers will attach; leave inner half free for flat tabletop use.
Round 2 :
Sew small filler circles to the placemat edge using tapestry needle and matching green — attach at alternating join points to form base under each flower (use whip stitch through edge rounds).
Round 3 :
Position flowers: place a flower with its back on the filler circle so the center overlaps the placemat edge by approx 4-6 sts. Pin in place.
Info :
When pinning, stagger flowers so petals overlap slightly. Aim for aesthetic flow where petals sit over the placemat edge and some petals extend outward to form the runner border.
Round 4 :
Sew flowers to filler circles and to the placemat simultaneously: use ladder stitch or whip stitch through flower back and filler circle edge, catching 2-3 placemat stitches for each flower anchor (approx 4-6 stitches per flower).
Round 5 :
Attach leaves: tuck leaves under petals and sew down by their base to the filler circle or placed adjacent flowers; use two stitches at the leaf base to hold without pulling petals out of alignment.
Round 6 :
Between flowers: use small sc bridges (in matching green) to join petals of adjacent flowers for stability. With hook, insert through back loops of both flower edges and sc 3-5 sts to create a small connecting bridge. Fasten off and weave ends.
Info :
These sc bridges are subtle and sit behind petals, preventing the garland from shifting. Space evenly and keep tension relaxed to avoid puckering.
Round 7 :
Continue attaching flowers and leaves until all three placemats are linked in the desired S-shaped formation. Check alignment frequently by laying runner flat.
Round 8 :
Where two flowers from adjacent placemats meet, overlap petals and either tack together at 1-2 points or add an extra small filler circle under both and secure for reinforced join.
Info :
Use additional leaves to hide stitches and create a continuous foliage look. Trim ends carefully after weaving and press joins gently with steam to set shape.
— Decorative Outer Border & Scallops :
Round 1 :
Working around entire runner perimeter (flowers & placemat outer edges), pick up loops where petals and leaves meet and work *sc2, ch3, sl st in 3rd ch to make picot shell* at petal tips to create a unified scalloped border.
Round 2 :
Across placemat edges not covered by petals, create low scallops: *sc4, picot* repeat to visually match petal shells (adjust counts to fit spacing).
Round 3 :
Work one more finishing round in sl st to tidy joins: sl st between shells and along join stitches to flatten and lock border.
Info :
If the join area is bulky, use BLO sl st to compress and make the border sit flat. A final light blocking will unify scallops and curl edges slightly under for a neat look.
Round 4 :
Optional: Add a lace chain fringe by working ch loops between scallops and anchoring with sl st to add movement (decorative).
Round 5 :
Weave in all ends, trim and steam-block the entire runner. Use pins to keep petals and leaves arranged and allow to dry fully.
Info :
Final blocking is essential. Pin petals to lie slightly outward and leaves under them to achieve the layered look in the photos. Use gentle steam from an iron or damp blocking depending on yarn instructions.
— Finishing Touches & Variations :
Info :
Variation ideas: Swap colors for seasonal runners (bright orange & deep green for autumn, whites & blues for winter). Make smaller runners by using 1 or 2 placemats or by reducing rounds on placemat to make smaller discs.
Info :
For a less stiff result, substitute a lighter weight cotton and use a slightly larger hook; note that motif sizes will change — follow same stitch counts but measure frequently.
Info :
Store runner flat when not in use. For dining use, lay a heat-resistant pad under hot items to protect cotton fibers and stitches.
This floral circle table runner brings a touch of garden charm to your table — every blossom and leaf is a small celebration of handmade detail. Working modular discs, delicate petals and shaped leaves makes assembling the runner a relaxing, rewarding process. The finished piece feels like a curated table centerpiece that will make tea time extra special. 🧶🌸 Enjoy making and gifting this joyful runner — and take a moment to block and admire each flower you create!