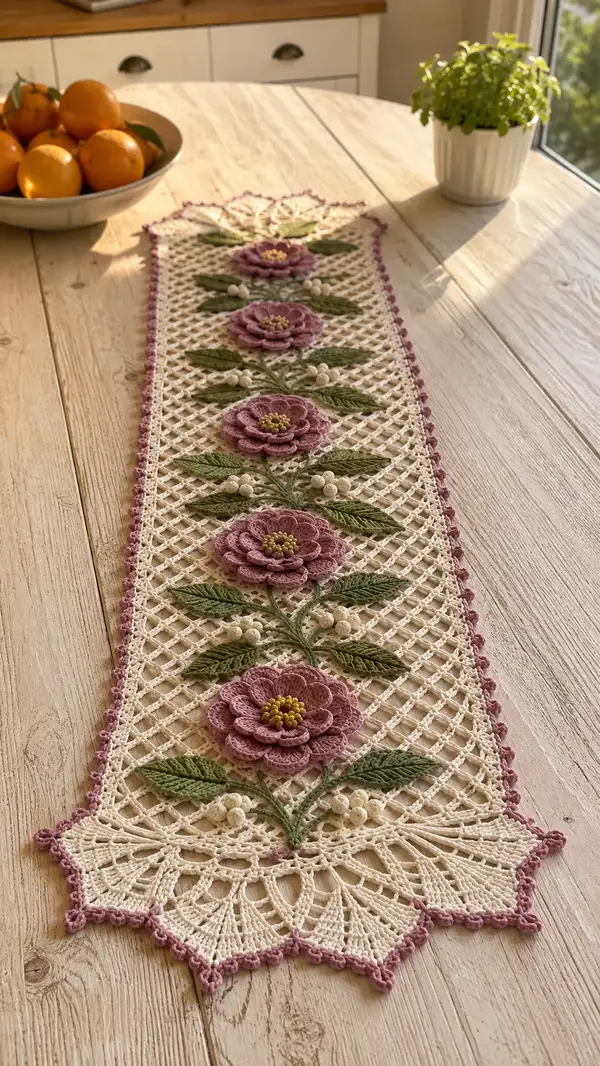
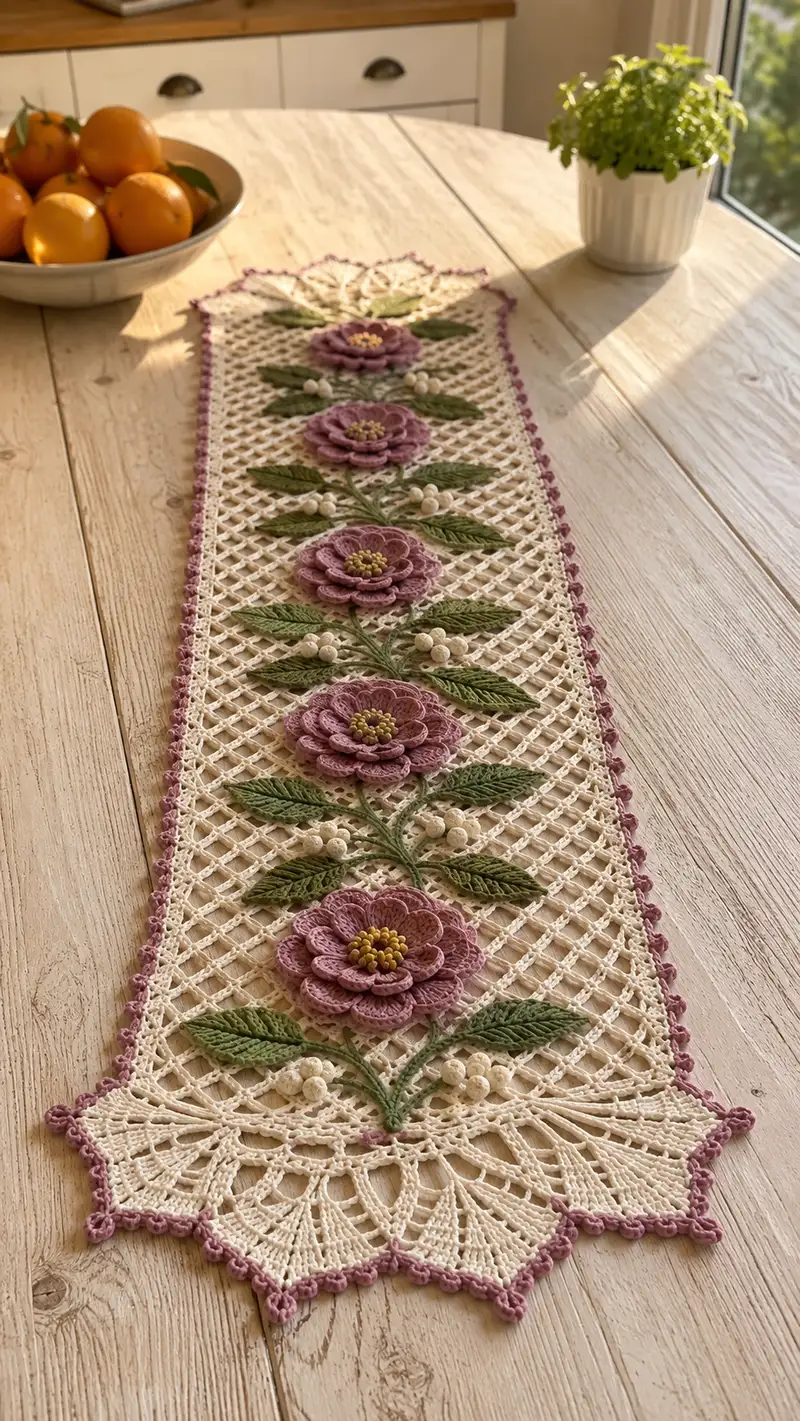
Create a timeless, elegant table runner with a delicate cream lattice mesh, layered dusty-rose floral applique9s, leafy vine stems and soft white berry clusters. This pattern combines filet-style netting, scalloped fan ends and three-dimensional flower and leaf appliques for a stunning centerpiece. Clear step-by-step instructions guide you through each motif, join and finishing edge for a project you will be proud to display.
Progress Tracker
0% Complete
— Project Overview :
Info :
This pattern creates a long lace table runner approximately 14" (35 cm) wide by 48" (122 cm) long when blocked, made from five layered floral appliquE9s mounted on an open lattice mesh with scalloped fan ends. Work is carried out in cotton thread size 10 with a 1.5 mm or 1.75 mm hook for best definition. The project is assembled by making the central mesh panel first, crocheting all appliquE9s (flowers, leaves, berries) separately, pinning them in place, sewing them down and then working the final edging and picot trim.
Info :
Gauge is not critical for length (adjust foundation chain if you want a longer or shorter runner), but maintain consistent tension for the mesh pattern and appliquE9 scale. Block all pieces carefully to finish dimensions and alignment before final assembly.
— Materials & Measurements :
Info :
Approximate finished measurements: Width = 14" (35 cm) ; Length = 48" (122 cm) (from scalloped tip to scalloped tip). This includes both fan ends with picot trim. Make adjustments to foundation chain in multiples of the mesh repeat to increase or decrease width, and add or remove mesh repeats in length to change runner length.
— Main Lattice Panel :
Round 1 :
Foundation chain: Chain 111 (this is a workable width for 14" final width; chain in multiples of 6 + 3 to change width). Turn, ch 3 (counts as first dc).
Round 2 :
Row 1 (establishing base row): Dc in 4th chain from hook, *ch 3, skip 3 ch, dc in next ch; rep from * across until last 3 ch; dc in final ch/turn. (You will have created alternating dc and ch3 spaces across the foundation. The number of ch3 spaces will be 18 repeats when using ch111.)
Info :
This row establishes the first row of double crochet anchors that will form the net. If you change foundation chain, ensure your repeat count keeps your ch3 spaces consistent across the width.
Round 3 :
Row 2: Ch 3, turn (counts as first dc). Dc into first dc from previous row, *ch 3, skip to next dc and dc into top of that dc; rep across to end. Finish with dc in turning ch-3. (Mesh repeat established.)
Round 4-40 :
Repeat Row 2 (ch 3, turn, dc into each dc below, with ch3 spaces between), working a total of 37 more rows of mesh. This will produce a long open lattice panel. At the end of Round 40 you will have built the central mesh measuring the desired length between fan ends. (Total mesh rows = 40 when following here.)
Info :
Add or reduce the number of mesh rows to lengthen/shorten runner. Each additional mesh row adds approximately 1/2" (1.2 cm) to length depending on tension, so be sure to block to final length.
Round 41 :
After last mesh row (Row 40), fasten off leaving a long tail for joining to fan-end base. We will construct fan scallop end panels separately and seam them to the mesh opening.
Info :
Work both fan end panels identically; make 2 fan ends (one for each short edge). Make sure mesh is squared and blocked before joining to fan panels.
— Fan Scalloped End (Make 2) :
Round 1 :
Using cream thread, start with a magic ring, ch 3 (counts as first dc), work 12 dc into ring. Pull tight and sl st to top of ch-3. (12)
Round 2 :
Ch 3, dc in same st, *2 dc in next st; rep around. Sl st to top of ch-3. (24)
Round 3 :
Ch 4 (counts as tr), tr in same st, *ch 2, skip 1 st, 3 tr in next st; rep around to create 8 groups of 3 tr separated by ch-2 picot arcs. Sl st to top of ch-4. (8 shell groups)
Round 4 :
Ch 1, sc in the top of first shell, *ch 3, sc in the top of next shell; rep around to create small chain arcs between shell peaks, end with sc in top of last shell. Join with sl st. (8 ch-3 loops)
Round 5 :
Turn to work into each ch-3 loop: *[sc, hdc, 3 dc, hdc, sc] into ch-3 loop (this creates a fan petal); rep across all loops. Sl st to first sc. (8 fans)
Info :
These 8 fans create the outer scalloped edge. When attaching to mesh, position the fan peaks to match every 5 mesh repeats so the scalloped tip aligns with mesh diamonds for a smooth join.
Round 6 :
Edge finish: With dusty rose thread, join at outer point of any fan, ch 1, sc evenly around each fan edge, placing 3 sc at fan valleys, and add a small picot at each top point (ch 3, sl st into first ch) to create the rose-colored picot trim. Fasten off. Repeat for opposite fan end. Make 2 fan ends total.
Info :
When sewing fan ends to mesh, use the long tail left from mesh Row 41. Align the fan base evenly across the width of the mesh opening and sew with invisible whip stitch, anchoring at each dc base and through chain spaces to prevent gaping.
— Flower Motif (Make 5) :
Info :
Each flower is a layered applique consisting of a small center cluster (yellow), an inner petal round, a middle petal round and an outer petal round. Make 5 identical flowers spaced evenly along the runner. The following rounds describe one full flower.
Round 1 :
Center cluster: Using mustard yellow thread, ch 2 and make 8 hdc into second ch from hook. Join with sl st. (8 hdc)
Round 2 :
Switch to dusty rose thread. Ch 1, work 2 sc in each st around for a tight cup to hold the bead-like pistil arrangement. Join with sl st. (16 sc)
Round 3 :
Ch 2, *in next st work [1 sc, ch 3, 1 sc] (small loop-petal); rep around into each st creating 16 small loop petals. Join and fasten off inner layer yarn tail for sewing. (16 loops)
Info :
These small loop petals form the inner, more compact layer. Keep tension even so loops sit nicely when layered.
Round 4 :
Middle petal base: Rejoin dusty rose to the base between two loop petals, ch 3 (counts as dc), *skip 1 base sc, (2 dc, ch 2, 2 dc) in next base st to form a shell, skip next base st, dc in next base sc; rep around to create 8 shells. Join with sl st. (8 shells + dc anchors)
Round 5 :
Work into each shell from Round 4: [sl st into shell, ch 1, 7 sc around shell (working into spaces and stitches to form a petal), sl st back to shell center]. This creates 8 thicker petals. Fasten off and weave tail inside. (8 petals)
Round 6 :
Outer petal round: Rejoin dusty rose behind the petals, ch 3, *in the top of next petal work [1 dc, ch 2, 1 dc], ch 1, skip to next petal top and repeat; rep around forming 8 larger arches; join.
Round 7 :
Make large outer petals: Into each arch work [sc, hdc, 5 dc, hdc, sc] to shape an outer petal. Work evenly to make the petals fan slightly outward. Fasten off leaving a long tail for sewing onto mesh later. (8 outer petals)
Info :
Stagger the placement of rounds so middle petal round is slightly beneath the outer petal round. Press with steam-blocking lightly (use a damp cloth and low iron from the wrong side) or pin-block to shape petals neatly.
Round 8 :
Embellish center: With mustard yellow, embroider small French knots or very small chain loops into the central hdc cup to create a tight cluster of pistils. Make approx. 12-16 knots closely packed. Fasten off and tie ends inside the cup.
Round 9 :
Finishing: Optionally add a tiny ring of sc behind the flower to create a small cup for sewing; ch 1 and make 12 sc in the base round behind the petals, join and leave long tail for sewing. This tail will be used to sew flower in place on mesh.
Info :
Make 5 flowers and block each flat with petals slightly curved up for natural dimension. Position flowers along the central vertical axis of the mesh, leaving equal mesh repeats between them (approx every 7-8 mesh rows depending on length used).
— Leaves (Make 10) :
Info :
Leaves are long layered appliquE9 leaves with central veins made with surface crochet/embroidered ribbing. Work one leaf pattern and make 10, pairing them around flowers symmetrically (two leaves per flower cluster where visible, plus extras to balance design).
Round 1 :
Using olive green, ch 12. Row 1: sc in 2nd ch from hook and in next 9 ch (10 sc). Turn. (10)
Round 2 :
Ch 1, (working down opposite side of foundation chain) 1 sc in same turning loop, sc in next 9 sts across; do not join—you have created an oval tube base. (20 sc around)
Round 3 :
Ch 1, sc in first 3 sts, hdc in next 2, 2 dc in next 2, hdc in next 2, sc in next 3 to shape leaf point. Work evenly back down the leaf base mirroring the increases: sc, hdc, 2 dc, hdc, sc. Sl st to first sc. (Slightly shaped leaf; 20 sts total)
Round 4 :
Edge round: Ch 1, sc evenly around leaf edge, placing 2 sc in the points at each tip to smooth corners. Sl st and fasten off leaving long tail for applique. (Approx. 24 sc)
Round 5 :
Vein embroidery: With the same green thread or a slightly darker shade, use a yarn needle and surface slip-stitch technique along the center line to add a raised vein: Insert needle from back to front at leaf base, make surface sl st up to tip pulling slightly for a raised corded vein. Repeat symmetrical sl st veins branching off center to mimic natural leaf ribs. Secure and weave tails on the back.
Info :
Make 10 leaves total; block each flat and shape with pins and steam or water-spray. Leaves should measure approx. 2.75-3.5" (7-9 cm) long depending on foundation ch and tension.
— Berry Clusters (Make 5 clusters) :
Round 1 :
Using cream thread, ch 2, make 6 sc into second ch from hook to form a tight ring. (6)
Round 2 :
Popcorn bead: Ch 1, *make 5 dc in next st, remove hook from last loop, insert hook through first dc of that 5-dc group, pull loop through and sl st to form a popcorn; secure with sl st into next st; rep to make 3 to 4 popcorn beads clustered on a short stem. Fasten off each bead's tail and tack beads together in small clusters of 3-4 beads using short green stems.
Round 3 :
Stem: In green, ch 10, slip stitch back along chain to create a rope stem approximately 6-8 stitches long. Use this to attach berry cluster to mesh and sew a secure knot behind cluster. Make 5 clusters total.
Info :
Keep berries small and slightly stuffed (tiny amounts of fiberfill or a small dab of glue) if you want them slightly rounded. Many crocheters leave them unstuffed for a flatter look; choose per your aesthetic.
— Assembling AppliquE9s to Mesh :
Round 1 :
Layout: Lay the blocked mesh flat RS up. Mark the center vertical axis with pins. Measure and mark five evenly spaced placement positions for the centers of the flowers. Approximate spacing: Place first flower center 2" from end scallop, then space each subsequent flower center roughly 8.5-9.5" apart depending on total mesh length to distribute evenly (adjust as needed).
Round 2 :
Pinning: Position each flower with a lightly curved vine between them. Pin leaves in pairs around each flower (one leaf left, one leaf right) and tuck small berry clusters beneath and between leaves as seen in photo. Use extra pins to hold everything in place precisely.
Round 3 :
Sewing flowers: Using the long tail left on each flower base (or a fine tapestry needle with matching thread), sew the flower base to the mesh by passing needle through the base round we left in Round 9 of the flower and catching the mesh dc bases or chain spaces beneath. Work neat small whip stitches around the base to hold securely, making sure petals sit naturally above the mesh and are not flattened.
Info :
Sew leaves by matching their long tails and stitching at two or three anchor points: near the flower base, the leaf midspan, and the leaf tip. This prevents leaves from flapping free after wash or use.
Round 4 :
Attach berry stems by couching the green stem to the mesh with a few very small, nearly invisible stitches so the berries appear to float just above the mesh. Conceal knots on the back side of the mesh and weave tails through several stitches.
Info :
Take your time pinning and try placement variations before stitching; the photo shows flowers arranged along a central vine with alternating leaf placements and berries grouped in threes. You may customize spacing to taste.
— Central Vine (Surface Crochet) :
Round 1 :
With green thread and a small hook or tapestry needle, surface-slip stitch a continuous vine from one fan end to the other along the centers of the flower placements. Start at one fan seam and surface-slst up the mesh, creating a flowing vine line approximately 1-2 chains wide and curved slightly between flower anchors.
Round 2 :
Branching: At each flower position create short offshoot branches (3-5 slst long) to which you will sew leaves and berries. Secure ends with small express knots on the back and weave tails into the mesh to hide them.
Info :
Surface crochet improves stability and gives a stitched vine look without making bulky seams. Use two strands of thread if you want a more robust vine; otherwise single strand creates a delicate line.
— Border/Edging Around Mesh :
Round 1 :
With cream thread, join at one long side corner of mesh, ch 1, work sc evenly into the top of each dc and into each ch-3 space along the mesh edge to build a tidy foundation. Work across long side and repeat down opposite side and both short sides. Place 2 sc in each corner to keep edges square. Fasten off at end and weave tails in. (Edge foundation row complete.)
Round 2 :
Ch 1, turn; work 1 sc into each sc from previous row along the long edges to create a flat edge rail. On the short sides where the fan end is attached, work sc into the seam and into the fan base to smooth transition. Fasten off and weave tails.
Round 3 :
Decorative scallop trim: With dusty rose thread, join at one corner and ch 4, *skip 1 sc, sl st into next sc, ch 4; rep to form chain loops all around both long edges and both short straight seams between fan ends. At each corner work an extra ch-4 to keep consistent curve. Join and fasten off.
Round 4 :
Picot final edge: Join dusty rose to each ch-4 loop and work into each loop: [sc, picot (ch 3, sl st into first ch), sc] to create small bobble-picot trims along the long edges and short seams. At fan tips add an extra picot cluster for a beaded edge look. Fasten off and weave in ends.
Info :
For a more pronounced edge, add a second pass of sc between picots in dusty rose to create a thicker decorative outline. If you prefer subtlety, use cream thread for a neutral edge and only use dusty rose at the scalloped tips.
— Finishing :
Round 1 :
Weave in all ends: Use a tapestry needle to weave thread tails into nearby stitches on the reverse side and trim close. Secure any loose applique edges with tiny stitches hidden beneath petals and leaves.
Round 2 :
Blocking: Wet-block the entire runner and appliquE9s pinned into final position on a blocking board. Use rust-proof pins to shape fan ends and petals precisely. Allow to dry fully; steam-block lightly if needed to set edges.
Info :
Final press: After blocking and drying, check that all appliquE9s are securely sewn with no lifting petals. Add a few invisible tack stitches under petals if necessary. The runner is now ready for display or gifting.
Congratulations! You now have a beautifully detailed floral lattice table runner that blends delicate lacework with three-dimensional appliquE9 detail. This heirloom-style centerpiece will bring warmth and handcrafted charm to any table setting. I hope you enjoyed crafting each flower, leaf and scallop as much as I did designing them. Display proudly or gift to someone special—every stitch tells a story. 🧶🌸