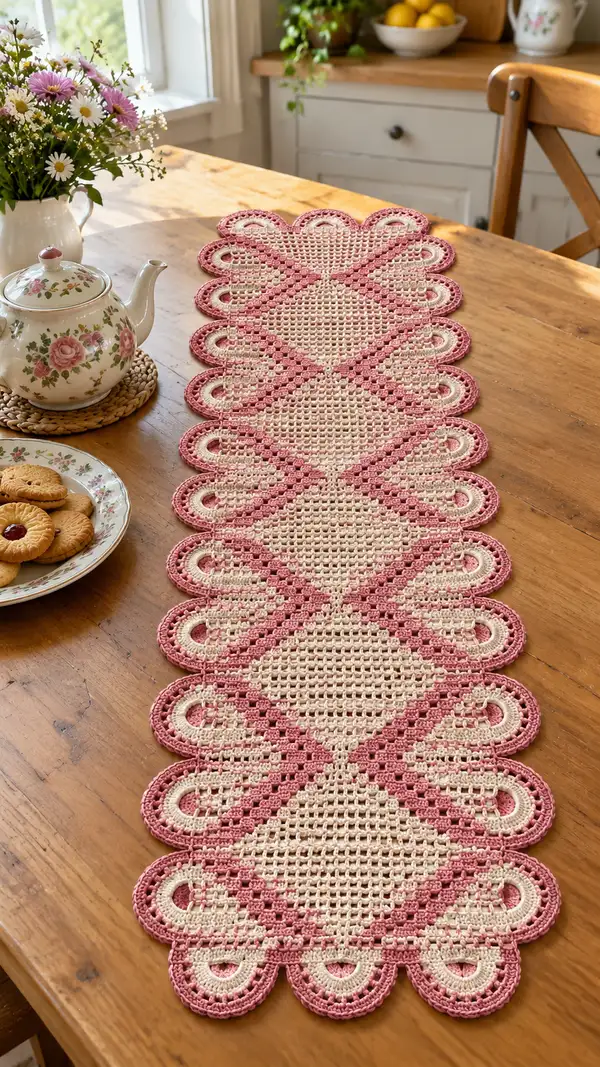
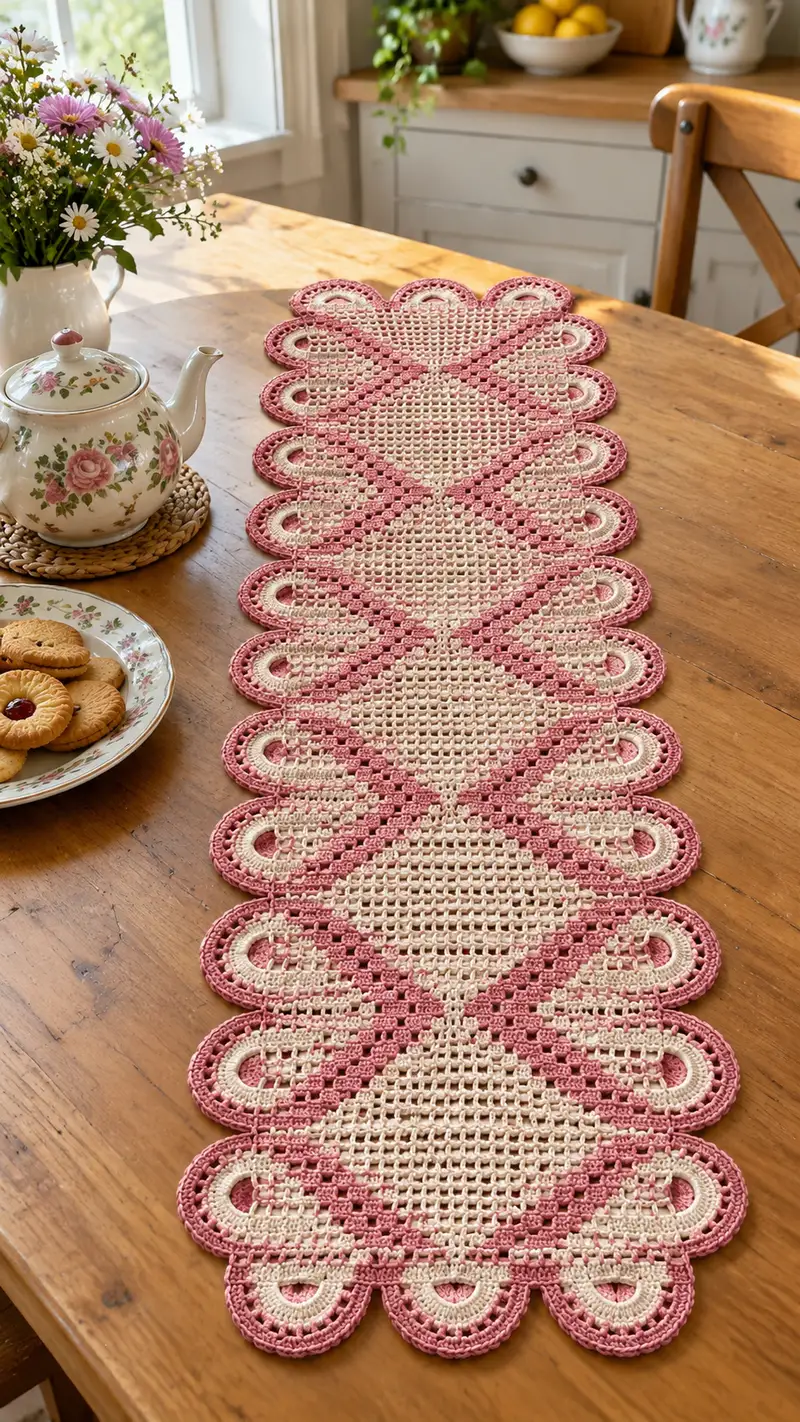
A long, elegant table runner worked in soft cream and dusty pink cotton with an open filet mesh center and scalloped oval loops along both long edges. The runner features an alternating diamond motif that travels the length of the piece and a three‑round scallop border that frames each loop. This pattern combines filet mesh, granny cluster accents and layered edging for a vintage cottage look perfect for tea time or seasonal decor.
Progress Tracker
0% Complete
— Notes & Gauge :
Info :
GaugeTip: 12 mesh squares (12 dc + chain spaces across) x 6 rows = approximately 10cm (4in) using 3.5mm hook and DK cotton. Adjust hook size to achieve a firm open mesh that still lays flat. This pattern uses joined rounds (each round is a joined row) worked in the round to keep orientation consistent; rounds are numbered for convenience.
Info :
Foundation chain multiple: The pattern uses a foundation multiple of 12 + 0 (i.e., divisible by 12). The sample foundation chain is ch 132 (12 x 11 loops) giving the width shown in the images. If you wish to widen or narrow the runner, change in multiples of 12.
— Foundation & Starting Mesh :
Round 1 :
Using cream yarn, ch 132, join with sl st to first ch to form a large loop, being careful not to twist chain (132 ch foundation).
Round 2 :
Ch 3 (counts as dc), dc in same ch, *ch 1, sk next ch, dc in next ch; rep from * around, ending with dc in last ch, join with sl st to top of ch-3. (132 dc positions / 132 stitches felt as 132 dc/mesh positions)
Info :
When working this looped foundation, treat each chain as either a dc placement or a chain-1 space to keep a consistent filet mesh. Mark the first stitch of each round with a removable marker to maintain consistent joins.
Round 3 :
Sl st into next dc, ch 3, *dc in next dc, ch 1; rep from * around, join with sl st to ch-3 (132)
Round 4 :
Repeat Round 3: ch 3, *dc in next dc, ch 1; rep around, join. (132)
Round 5 :
Repeat Round 3 maintaining mesh. (132)
Info :
Keep your tension even and consistent. The ch-1 spaces create the visible square mesh; count the dc across on a few rounds to confirm you remain at 132 positions. If you dropped a dc, correct before continuing to keep diamonds aligned later.
Round 6-15 :
Work even in cream: ch 3, *dc in next dc, ch 1; rep around, join. (132)
Info :
These rounds create the base mesh area. At the end of Round 15 you will be ready to begin laying in the first diagonal band using dusty rose clusters. Decide whether you prefer your first band to begin at the short end center or slightly inset; sample places the first band centered approximately at rounds 22-27 of the full length.
— Diamond Band Setup (first band) :
Round 16 :
Change to dusty rose: join dusty rose with sl st in any dc, ch 3, *dc in next dc, ch 1; rep around, join. (132)
Round 17 :
In dusty rose: ch 3, *dc2tog cluster pattern: work a 3-dc cluster over the next three dc positions to build a blocky granny effect, then ch 1, sk 1 dc; for clarity: *[3 dc cluster in next 3 dc], ch 1, sk 1 dc; rep across band region for 11 repeats across width, then switch back to simple mesh across remaining dc so the clusters form a diagonal band. Overall counts remain 132 positions.
Info :
To form a diagonal band, you will stagger the cluster placement by shifting the cluster start one mesh to the left or right each successive round. Mark the beginning of each cluster group to keep alignment as you progress down the runner length.
Round 18 :
Change back to cream for 2 rounds: ch 3, *dc in next dc, ch 1; rep around, join. (132)
Round 19-20 :
Even cream mesh: ch 3, *dc in next dc, ch 1; rep around, join. (132)
Round 21 :
Return to dusty rose and begin staggered cluster shift inward by 1 mesh: ch 3, *[3 dc cluster in next 3 dc], ch 1, sk 1 dc; move cluster group 1 mesh to the right relative to Round 17 so a diagonal line begins; across width replicate cluster groups in the same numbered repeats as Round 17 but shifted by one mesh. (132)
Round 22 :
Dusty rose: repeat Round 21 shifting clusters again to continue diagonal slant. (132)
Info :
You will work dusty rose cluster rounds for approximately 6 rounds total to build one diagonal band. Each dusty rose round moves the clusters one mesh to the right (or left) forming a stepped diagonal that reads as a soft diamond when seen from a distance.
Round 23-26 :
Alternate dusty rose cluster rounds with cream mesh rounds to create spacing and texture. Use the sequence: R23 dusty rose clusters (shift), R24 cream mesh, R25 dusty rose clusters (shift), R26 cream mesh. (132)
Round 27 :
Dusty rose: finish the diamond band apex round by placing clusters packed slightly closer over a 3-round sequence, then secure color and change back to cream. (132)
Info :
After completing the first diamond band, work 8-10 even mesh rounds in cream to provide breathing space before the next diamond band. This is where the eye reads long diamond shapes in the center. Maintain stitch marker at the start of each round.
Round 28-37 :
Even cream mesh: ch 3, *dc in next dc, ch 1; rep around, join. (132)
Info :
Repeat the diamond band sequence (Rounds 16-27) periodically down the length of the runner. In the sample runner there are 6 diagonal diamond bands alternating direction to create a mirrored X motif down the length. Plan band placement so diamonds are evenly spaced; mark the round numbers where bands begin for future repeats.
— Continuing Diamond Repeats :
Round 38-54 :
Repeat the following band module twice: 10 rounds cream mesh, 8-10 rounds dusty rose staggered cluster sequence (as described in R17-R27). Maintain total stitch positions at 132 each round. (132)
Info :
Goal: replicate the visual travel of diamonds along the runner. Keep notes on which rounds used cluster starts on even-numbered mesh or odd-numbered mesh so the pattern mirrors across the runner center for an 'X' appearance.
Round 55-72 :
Work alternating cream mesh and dusty rose band modules to complete the desired length. Continue checking alignment of diamonds across the width; make small corrections in cluster placement by shifting starting cluster one mesh on following dusty rose round if alignment drift occurs. (132)
Info :
If you want a shorter runner, reduce the number of repeated modules. If you want a longer piece, continue repeating the band module until the runner reaches the desired length. Keep the same number of mesh rounds between bands for a balanced look.
— Approaching Edge Cluster Turn (final diamond band) :
Round 73-80 :
Complete remaining full modules so that the last dusty rose band ends approximately 12 rounds before the final edge sequence. Finish final cream mesh rounds to even out the body. (132)
Info :
At this stage, count across the runner width and mark every 11th mesh unit along one short end; this will be the anchoring points for the scalloped loops. We used 12 scallops per side in the sample, spaced evenly around the body using the ch-1 mesh columns as guides.
— Scalloped Loop Placement Prep :
Round 81 :
Finish with a final 2 rounds in cream mesh to set the body: ch 3, *dc in next dc, ch 1; rep around, join. (132)
Info :
We will now work outward from the body to create the oval loop scallops; each scallop will take 8-12 foundation stitches from the body across the ch-1 spaces. Mark positions every 11 mesh units (or as needed to make your desired scallop count) with removable markers on Round 81 while the runner lies flat.
— Scalloped Loop Foundations (both long sides) :
Round 82 :
Working in cream, sc around body edge to create a slightly compact edge base: sl st into next st, ch 1, *sc in each dc and each ch-1 space around for one round; space counts remain 132 placements; join with sl st. (132)
Round 83 :
Change to dusty rose. We'll make oval loop foundations: *ch 12, skip 11 mesh units along body edge, sl st into next base st; rep across long side creating 12 oval chain loops; when you reach the short turn, continue working down the opposite long side mirroring loop spacing. Join at the end. (12 loops each long side)
Info :
Tip :
Keep loops slack while making them so they lie easy when you stitch around them. If a chain of 12 feels too large or too small for your gauge, test a loop of ch 10-14 and choose the size that visually matches the image loops. Ensure loops are evenly spaced across both sides.
Round 84 :
Working into each chain-12 loop: join dusty rose with sl st into first ch of loop, ch 1, work 30 sc evenly around the chain loop into both sides of chain (approx. 15 sc per side) to form an oval band; sl st to join. Repeat for each loop around both sides. (This round does not change the base 132 count but creates 24 small oval bands)
Round 85 :
In dusty rose: ch 3, *dc evenly around each loop (approx 10-12 dc per loop) working through the previous round's sc shell, sl st to join at each loop crown; between loops along the body edge work 1 sc in the base edge to connect loops to the mesh body. (connection points per loop: 2-3) Maintain consistency around each loop.
Info :
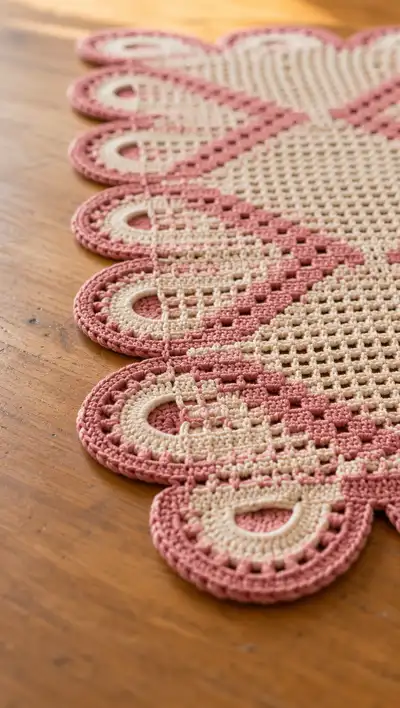
At this stage you have formed the solid oval shapes that show the inner cream oval and the dusty rose external shell seen in the images. The next rounds create the layered rim and the squares of color that step diagonally toward the runner center.
— Scallop Layering & Outer Edge Rounds :
Round 86 :
Switch to cream: join in the inner sc of each oval and work 1 round of sc around each inner arch, leaving a small cream inset visible inside each oval loop. Where loops meet the body, work 1 sc into the mesh base to secure. (visual effect: cream inner arch inside dusty rose loop)
Round 87 :
Switch back to dusty rose: around entire runner edge (both loops and short ends), sc evenly around the dust-rose outer edge: work (sc, ch 2, sc) at each oval top to create small picot or ridge spacing between scallops and sc around the short ends for a tidy finish. Join. (maintain smoothness; no stitch count change required)
Info :
Take care to place (sc, ch2, sc) at the top of each loop to keep scallop roundness. Use pins to shape each scallop and even out spacing before working the final rounds so the scallops are uniform and symmetrical.
Round 88 :
Dusty rose: Work one round of dc around the outermost edge of the scallops for definition: join in any outer sc, ch 3, dc around tops of each scallop (approx 10-12 dc per scallop), working 3 dc at the highest crown to smooth the curve. Join. (visual count per scallop consistent, overall runner perimeter increases slightly but base mesh remains anchored to 132 base positions)
Round 89 :
In dusty rose, finish scallop rim with a round of slip stitch and small single crochet ridges: sl st into next st, *ch 1, sc in next st, sl st to next sc to create a tidy edge around all scallops and across short ends. Fasten off and weave in ends. (edging complete)
Info :
If you want an alternate edge: instead of sl st and sc finish, work a delicate crab stitch (reverse sc) for a slightly twisted rope look. Use a smaller hook for this round for a crisper edge.
— Optional Decorative Raised Squares (accent rows) :
Round 90 :
To reproduce the raised blocky square steps visible along the diagonal bands, return to dusty rose and work surface slip-stitch square accents along the band area: working on RS, with yarn held along the top of the mesh, surface sl st in a 3x3 grid pattern spaced across the dusty rose band area to create raised square texture. Repeat across each band region. (decorative; no base count change)
Info :
Surface stitching should be done after all primary rounds are complete and before blocking. Use a contrasting thread or same dusty rose yarn for raised look. Keep stitches even and mirror across both sides of runner for consistent diamond lines.
— Final Border & Short End Treatment :
Round 91 :
At each short end, after completing scallops on long sides, create a tidy short-end border by working 3 rounds: R1 cream sc around short end and into body base (approx. 12-14 sc), R2 dusty rose dc around short end for a neat roll, R3 sl st in dusty rose to finish. (approx counts variable to the short-end width)
Info :
Short ends are balanced to the scallop shape by creating a three-tiered finish that visually ties the long scallops into the runner ends. Measure and pin short ends to ensure symmetry before finishing this border.
Round 92 :
Weave in all ends at this stage: use tapestry needle and weave tails through 6-8 stitches on the wrong side to secure. Trim ends close to work. (finishing)
Round 93 :
Wet block the entire runner: dampen or spray with water, pin flat on blocking mat, stretch gently to even out scallops and diamonds, use pins at scallop apexes to hold shape until dry (12-24 hours). Optionally use light starch for crisper shape. (finishing)
Info :
Blocking is essential to get flat mesh and rounded scallops. While pinned, inspect the runner for minor asymmetries; if a scallop needs reshaping, adjust pins slightly and allow to dry fully.
— Advanced Variation Tips :
Info :
You can replace the dusty rose with any accent color for seasonal looks (sage green, navy, mustard). For a narrower runner, reduce foundation chain by 12 for each scallop removed and adjust loop counts proportionally. To add weight for table stability, sew a thin cotton backing on the wrong side after blocking.
Info :
For a lacy, more delicate version, use a 2.75mm hook and fingering/sock cotton; reduce loop chain to ch10 and reduce sc counts around loops accordingly. For a sturdier mat, use aran-weight cotton and a larger hook, adjusting chain counts and loops larger.
Completing this runner is such a joy — every scallop you pin and every diamond band you stitch brings the piece closer to the vintage-inspired beauty in the photo. It’s a project that rewards patience with an heirloom-quality finish and lots of compliments. 🧶 Pin, block, and place it proudly on your table for instant cozy charm. Happy stitching and enjoy the process — each stitch tells a little story! ✨