🧶 Beautiful ✨ Detailed 💝 Adorable

Floral Garden Table Runner Pattern

Floral Garden Table Runner Pattern
4.6★ Rating
8-10 Hours Time Needed
1.6K Made This
✂️

Intermediate Level

Ideal for those with basic crochet experience, featuring slightly more advanced stitches and techniques to expand your skills.

⏱️

All-Day Adventure

Requires 8-10 hours, ideal for a full day of immersive crocheting.

🏡

Cozy Accent

A warm touch for your space that transforms ordinary corners into inviting nooks filled with handmade charm.

🧶 Jump to Pattern ↓

About This Floral Garden Table Runner Pattern

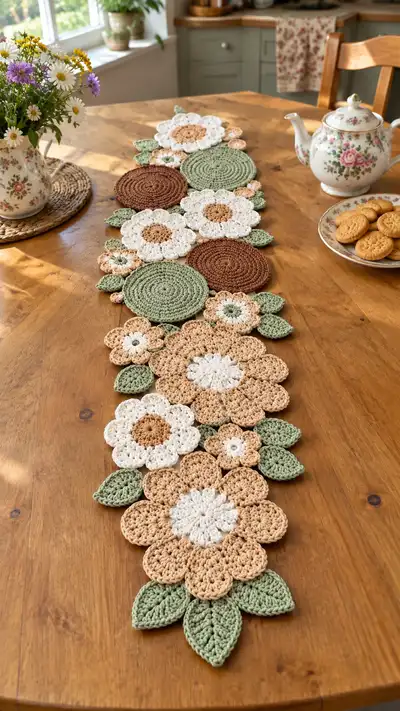
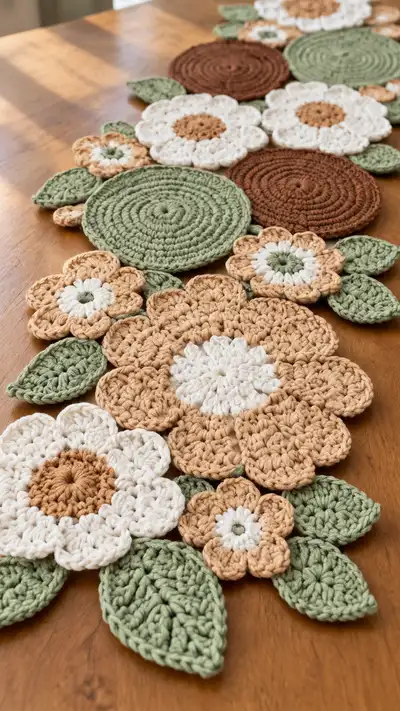
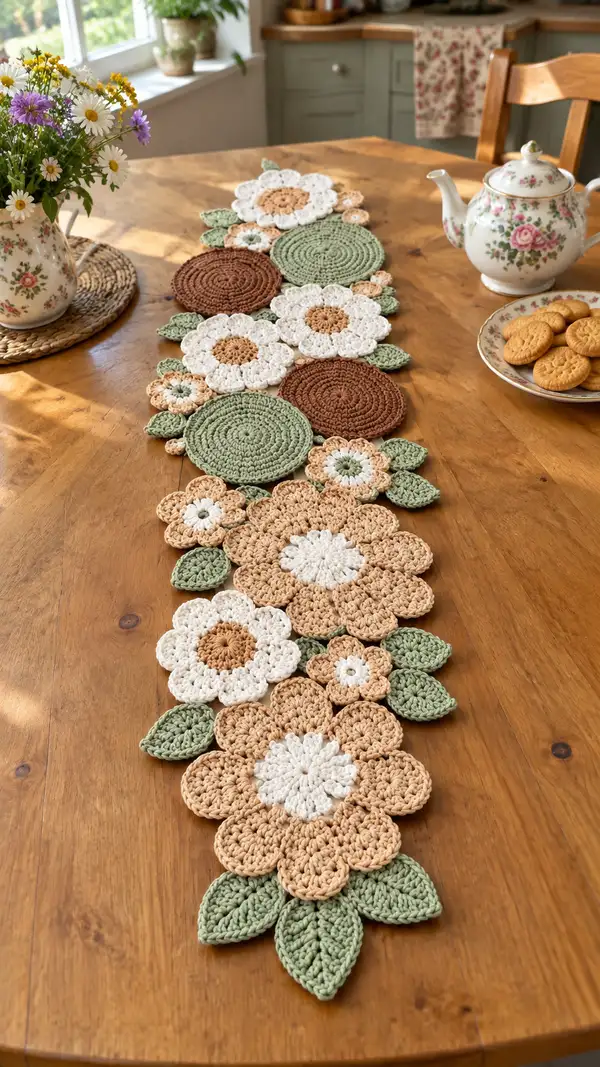
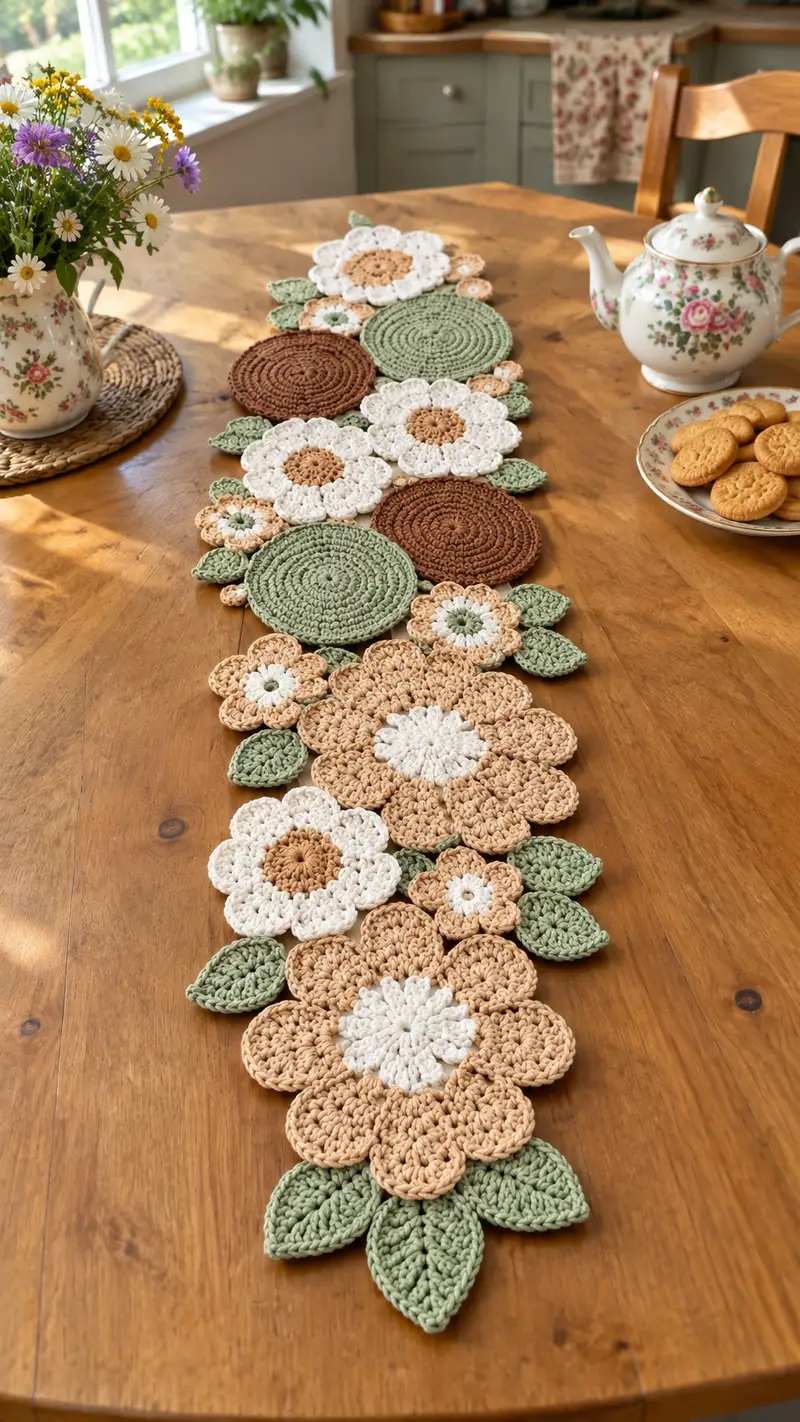
This Floral Garden Table Runner is built from a collection of circular medallions, layered petal flowers and sculpted leaves arranged into a long runner. The palette uses soft sage green, warm tan, cream and deep rust-brown to create a timeless cottage look. Each motif is worked flat and then joined with invisible whip stitches to create an organic, flowing layout. The texture comes from shell stitches and front-loop petals to give petals extra body and definition.

Floral Garden Table Runner Pattern crochet pattern - detailed view of completed project

The motifs are sized to nest together with minimal gaps—larger flowers, medium flowers, small rosettes, full circles and leaves combine to make a continuous runner. No blocking is strictly necessary, but a light steam press (with cloth) will help the motifs sit flatter on your table.

Why You'll Love This Floral Garden Table Runner Pattern

I love this pattern because it turns simple circles and petals into a beautiful, layered centerpiece. I enjoy the mix of bold round medallions and scalloped flower petals—each piece is quick to work and satisfying to assemble. The soft, neutral palette and tactile stitches make the runner cozy and elegant at once; it photographs beautifully and dresses any table with effortless charm.

Floral Garden Table Runner Pattern step 1 - construction progress Floral Garden Table Runner Pattern step 2 - assembly progress Floral Garden Table Runner Pattern step 3 - details and accessories Floral Garden Table Runner Pattern step 4 - final assembly and finishing

Switch Things Up

I absolutely love how this runner takes simple motifs and turns them into a cohesive centerpiece—it's perfect for tweaking to match the season. Try deeper jewel tones for autumn or pastels for spring; changing just one color family will completely alter the mood.

I often switch the large medallions to a contrasting textured stitch (hdc or dc rounds) to create more visual weight, and sometimes I add a thin crochet border in a darker shade to make the runner 'pop' against a light table. You can also increase spacing and add extra small rosettes to lengthen it for a larger table.

Don't be afraid to play with motif count and placement—move small flowers under petal edges for a layered look, or rotate leaves so they point outwards for more organic flow. Making these small changes keeps the structure intact while giving you lots of creative freedom.

Common Mistakes & How to Fix Them

✗ Skipping stitch markers at round starts can cause misaligned motifs and uneven joining; always mark your first stitch of each round ✗ Working with inconsistent tension between motifs will make joining difficult; keep your tension steady across all pieces ✗ Not changing colors cleanly leads to messy join-ins; finish last stitch before a color change in the old color and pull new color through to begin next st ✗ Failing to block or steam motifs can cause petals to curl; pin motifs lightly and steam-block to flatten if needed ✗ Joining motifs without pinning first can result in awkward spacing; lay out the whole runner and pin before sewing ✗ Using a hook too large for the yarn creates floppy motifs with gaps; use a slightly smaller hook for dense stitches ✗ Forgetting to weave in ends securely will make seams look untidy; weave ends through several stitches and knot if necessary

Floral Garden Table Runner Pattern

A long, elegant table runner made from joined crochet flowers, rounds and leaves in soft cottage tones. This pattern uses circular medallions, layered flower motifs and sculpted leaves to create a flowing floral arrangement that sits beautifully along the center of a dining table. Worked in sturdy cotton/cord yarn with simple color changes, the runner has a relaxed rustic look perfect for everyday or seasonal decor.

Intermediate 8-10 Hours

Materials Needed for Floral Garden Table Runner Pattern

— Main Fabric

  • 01
    Worsted/aran weight 100% cotton or cotton-blend yarn (approx. 5.0mm hook recommended) — approximate totals for a runner 100-120cm long
  • 02
    Warm Tan (main flower color) — 200-250g
  • 03
    Cream (petal/flower contrast) — 150-200g
  • 04
    Sage Green (leaves and green circles) — 150-200g
  • 05
    Rich Brown (accent round medallions) — 100-150g
  • 06
    Small amounts (20-50g) of light beige or secondary accent color for small flower centers

— Tools Required

  • 01
    5.0mm (H) crochet hook for main motifs
  • 02
    4.0mm (G) crochet hook for tighter edges and smaller motifs (optional)
  • 03
    100g+ spool of cotton yarn in each color as listed above
  • 04
    Yarn needle for sewing and weaving ends
  • 05
    Stitch markers (6-8)
  • 06
    Scissors
  • 07
    Pins and blocking mat (for optional steam blocking)
  • 08
    Measuring tape or ruler
  • 09
    Optional: fabric glue for securing tricky ends

Progress Tracker

0% Complete

— Large Layered Flower (Make 3)

Round 1 :

mr, 6 sc into ring, pull tight (6)

Round 2 :

6 inc around (12)

Round 3 :

(1 sc, inc) x 6 (18)

Round 4 :

(2 sc, inc) x 6 (24)

Round 5 :

(3 sc, inc) x 6 (30)

Round 6 :

(4 sc, inc) x 6 (36)

Round 7-8 :

1 sc in each st (36)

Info :

Change to petal color now. The center is complete — use two rounds of even sc to create a stable base before building petals

Round 9 :

*Sc in next 4 sts, in next st work (sc, ch2, 3 dc, ch2, sc)* repeat from * to * 6 times (36) — petals are anchored every 6th stitch

Round 10 :

*Into the ch2 space of each petal: sl st, ch1, 7 dc, sl st into same ch2 space; sc in each sc anchor between petals* x6 (36)

Round 11 :

Work 1 sc in each base stitch, working into petal shells as you reach them to anchor petals and maintain 36 base sts (36)

Round 12 :

Petal detail: In each petal shell, (sl st in shell, ch1, 1 hdc, 3 dc in same shell, 1 hdc, sl st) — this rounds adds sculpting but does not change base stitch count (36)

Info :

Work petals firmly but not over-tightened so they lift slightly from the center. If you prefer a fuller petal, add one extra dc in the Round 10 shell (be consistent across petals)

Round 13 :

Turn to base: 1 sc in each st (36)

Round 14 :

BLO 1 sc in each st to create a small ridge at petal base (36)

Round 15 :

Edge: *(sc, ch2, sc) into the tip of each petal shell to create scalloped edge* x6 (36)

Round 16 :

Finish row of scallops by placing 1 sl st in each sc around to secure shape (36)

Round 17 :

Optional: Add a third petal layer by slip-stitching into the base between petals and working *(ch 2, 5 dc, ch2, sl st)* into the new anchor 6 times (36)

Info :

Weave in tail from center neatly or leave long for joining. Make sure petals are arranged evenly; pin onto blocking mat if needed to shape

Round 18 :

Check motif: rotate and ensure no twisted stitches. Finish off, leave 20cm tail for sewing (no stitch count change)

Round 19 :

Optional surface crochet: With contrasting color, work slip-stitch outline along outer edge of scallops to emphasize petal edges (36)

Round 20 :

Optional: With hook in hand, add single crochet picot between petals for texture: *(sc, ch3, sl st into top of last sc)* repeat 6 times

Round 21 :

Secure ends and trim excess; large layered flower complete

— Medium Flower (Make 4)

Round 1 :

mr, 6 sc into ring (6)

Round 2 :

6 inc (12)

Round 3 :

(1 sc, inc) x 6 (18)

Round 4 :

(2 sc, inc) x 6 (24)

Round 5 :

1 sc in each st (24)

Info :

Change to petal color. This medium flower is smaller than the large layered flower — petals will be worked as small shells to create six rounded petals

Round 6 :

*sc in next 3 sts, (sc, ch2, 3 dc, ch2, sc) in next st* repeat 6 times (24)

Round 7 :

Into each ch2 space: sl st, ch1, 5 dc, sl st; anchor with sc between shells to keep base stitch count (24)

Round 8 :

1 sc around base (24)

Round 9 :

Edge: *(sl st into top of petal shell, ch1, sc)* repeat around to give a neat finish (24)

Info :

Weave in center tail neatly. Leave 15-20cm tail for joining motifs into runner

Round 10 :

Optional center contrast: with a darker shade, embroider small French knots or a tight round of sc in the center to mimic flower disk

Round 11 :

Fasten off and weave ends; medium flower complete

— Small 5-Petal Flower (Make 6)

Round 1 :

mr, 5 sc into ring (5) — use 5 for a compact small flower

Round 2 :

5 inc (10)

Round 3 :

(1 sc, inc) x 5 (15)

Round 4 :

Change to petal color. *sc in next st, (ch2, 3 dc, ch2, sc) into next st* x5 (15)

Round 5 :

Into each ch2 space: sl st, ch1, 5 dc, sl st to form five rounded petals (15)

Info :

Small flowers are excellent fillers between larger motifs. Leave long tail for joining so you do not need to rethread later

Round 6 :

1 sc around base to tidy (15)

Round 7 :

Optional: surface slip stitch around petal edges to create definition (15)

Round 8 :

Fasten off leaving 15cm tail for assembly

— Large Flat Round Medallion (Make 4)

Round 1 :

mr, 6 sc into ring (6)

Round 2 :

6 inc (12)

Round 3 :

(1 sc, inc) x 6 (18)

Round 4 :

(2 sc, inc) x 6 (24)

Round 5 :

(3 sc, inc) x 6 (30)

Round 6 :

(4 sc, inc) x 6 (36)

Round 7 :

(5 sc, inc) x 6 (42)

Round 8 :

(6 sc, inc) x 6 (48)

Round 9 :

(7 sc, inc) x 6 (54)

Round 10 :

(8 sc, inc) x 6 (60)

Round 11 :

1 sc in each st (60)

Info :

These rounds create a flat disc. If the medallion ruffles, either add a few increases to flatten or tighten tension to make it cup slightly; adjust by +/- 1 increase round

Round 12 :

Optionally work one round BLO sc to create a subtle ridge that helps lying-flat join (60)

Round 13 :

Finish off leaving long tail for joining

— Small Flat Circle (Make 6)

Round 1 :

mr, 6 sc into ring (6)

Round 2 :

6 inc (12)

Round 3 :

(1 sc, inc) x 6 (18)

Round 4 :

(2 sc, inc) x 6 (24)

Round 5 :

1 sc in each st (24)

Info :

Small rounds act as filler medallions between flowers—leave tails for joining

Round 6 :

Fasten off leaving a generous tail for sewing into runner

— Large Textured Circle (Make 2 — Brown)

Round 1 :

mr, 6 sc into ring (6)

Round 2 :

6 inc (12)

Round 3 :

(1 sc, inc) x 6 (18)

Round 4 :

(2 sc, inc) x 6 (24)

Round 5 :

(3 sc, inc) x 6 (30)

Round 6 :

(4 sc, inc) x 6 (36)

Round 7 :

1 sc in each st (36)

Round 8 :

1 hdc in each st (36) to produce a slightly raised spiral texture

Round 9 :

1 dc in each st for one round to accentuate ridges (36)

Round 10 :

Finish with a round of sc around to tidy edges (36)

Info :

Use a slightly larger hook for this medallion to create a looser, rug-like texture. Work flat and keep tension even

Round 11 :

Fasten off and leave long tail for sewing

— Leaf (Make 18 - various sizes)

Round 1 :

ch 11, sc in 2nd ch from hook and across until last ch (10)

Round 2 :

At end of chain: 3 sc in last ch to turn work and work down opposite side of chain; sc in each chain back to start (10 + 2) = 12 anchor points (12)

Round 3 :

Along edge: (sc, hdc, 3 dc, hdc, sc) into the tip to shape point, then sc across other side. Work a second 3 dc cluster at the tip ensures round leaf shape (12)

Round 4 :

Work 1 sc all around leaf to tidy edges and create base stitch count consistent for shaping (12)

Round 5 :

BLO 1 sc across for a vein ridge down the center of the leaf (12)

Round 6 :

Optional: Surface stitch a central line using contrasting thread to mimic leaf vein

Info :

Vary chain length for small and large leaves (suggested chains: small ch7, medium ch9, large ch13). Always work same shaping sequence so leaves match style

Round 7 :

Finish off leaving 12-20cm tail for sewing; block lightly if you wish leaves to lie flat

— Small Leaf (Make 10)

Round 1 :

ch 7, sc in 2nd ch from hook and across (6)

Round 2 :

3 sc in last ch, then sc across other side (6 + 2) = 8

Round 3 :

Edge shaping: (sc, hdc, 3 dc, hdc, sc) at tip, sc back (8)

Info :

Small leaves are used between petals and around small fillers—leave tails for joining

Round 4 :

Fasten off leaving a tail for assembly

— Assembly & Joining Method

Info :

Layout the runner before joining: arrange large flowers spaced evenly, tuck medium flowers and circles between them, then add small flowers and leaves to create an organic line. Use a flat surface with pins to hold placement

Round 1 :

Join motifs using whip stitch: bring two motifs edges together, align stitches, and sew through both loops to create a flat invisible seam (no numerical stitch count)

Round 2 :

When joining rounds to petals, sew in the center base stitches rather than the outer scallop edge to create a more secure connection

Round 3 :

For small filler pieces: overlap edges slightly and sew down through both layers leaving a slight gap to create depth (this makes the runner look layered)

Info :

Use matching color yarn for joining to keep joins subtle. If you want visible stitching, use a slightly contrasting shade and long even stitches following the motif curve

Round 4 :

Press lightly after joining with a warm steam from an iron (use a cloth between iron and motifs) to flatten and set the runner shape

Round 5 :

Weave in all tails across several stitches on the underside for a tidy finish

— Edging & Finishing Touches

Round 1 :

Optional border: with working color, sc around outer edge of entire runner following curves; add picot or scallop every 6 sc for a neat edging

Round 2 :

Scallop border: *(sc in next 3, 5 dc in next st, sc in next 3)* repeat along outer seams create a decorative finish

Info :

If you prefer the runner more rigid, work a lining using iron-on interfacing on felt sewn to underside; otherwise runners will drape naturally

Round 3 :

Final check: pin runner on table to ensure it lies straight; adjust if any motifs pull—undo and resew those joins

Round 4 :

Trim stray ends and give a final steam press — the runner is ready to display

Assembly Instructions

  • Attach large flowers to form the main spine of the runner: position each large layered flower approximately 20-25cm apart depending on your table length. Pin motifs and check alignment before sewing.
  • Sew medium flowers into the spaces between large flowers at round base positions. Use the long tail left from each motif to whip stitch through base rounds; anchor so petals overlap slightly over medallions for a natural look.
  • Insert round medallions (green and brown) between and alongside the flowers to add variety. Sew through the edge stitches of the medallion and corresponding base stitches on the flower to keep seams flat.
  • Position small filler flowers (5-petal and small rounds) around gaps and sew using hidden whip stitch across the base stitches. Tuck some small flowers underneath petal tips to create layered depth.
  • Arrange leaves around the perimeter and between motifs. Sew leaves by inserting needle through a couple of stitches at leaf base and into underside of flower/motif so leaves sit angled outward.
  • If adding a border, join all motifs first, then work a single round of sc around the entire outer edge to unify the runner before adding decorative scallops.
  • Secure all loose ends by weaving tails through at least 8-10 stitches on the underside and trimming close; if seams show a gap, add a small extra whip stitch for reinforcement.
  • Steam-block gently after assembly: pin motifs into final shape on a towel or blocking mat, cover with a cloth and steam lightly to set the shape; do not press directly with the iron.

Important Notes

  • 💡Use stitch markers consistently at the beginning of each round to avoid counting errors and maintain proper shaping
  • 💡Work motifs in batches by type (all large flowers, then all medium, etc.) to maintain consistent tension and size
  • 💡Stuffing is not required for this runner; keep motifs flat and dense by using tight stitches and a slightly smaller hook if needed
  • 💡When joining motifs, line up base rounds rather than outer scallops to create invisible joins and a flat runner surface
  • 💡Vary chain lengths for leaf sizes and keep the shaping sequence the same to ensure visual consistency
  • 💡Pin the entire runner layout before sewing any pieces to ensure you like the final arrangement and spacing
  • 💡If motifs curl, adjust by adding or removing a single round of increases in circular medallions to flatten or relax them
  • 💡Weave in ends on the underside and secure with an extra knot if the runner will be laundered frequently

This Floral Garden Table Runner brings handmade charm to any dining space with layered petals, textured medallions and sculpted leaves. Each motif is quick to make and fun to arrange, and the finished runner creates a soft, cottage-style centerpiece that will delight guests. I hope this pattern inspires you to mix colors and shapes to make a runner uniquely yours. 🧶🌿☕
You ask,

we answer.

FAQs

What is the finished size of this table runner?

Based on the suggested yarn and hook, the finished runner in the photos measures approximately 100-120 cm (39-47 inches) long and 25-30 cm (10-12 inches) wide. Length will vary depending on spacing and how many motifs you choose to include.

Can I use different yarn weights for this pattern?

Yes—switching to bulkier yarn will increase motif size and the final runner length. Use a hook sized 1-2 sizes smaller than the yarn label recommends for dense, flat motifs. Lighter yarns will produce a more delicate, smaller runner.

Do I need to block the motifs?

Blocking is optional but recommended if motifs cup or curl. Pin motifs flat on a towel or blocking mat and steam lightly using a cloth barrier. Cotton yarn responds well to gentle steaming to help motifs sit flatter.

How much yarn will I need?

Approximate totals: 200-250g warm tan, 150-200g cream, 150-200g sage green, 100-150g brown and small 20-50g accents. Totals will vary by runner length and motif count.

Can I machine wash the finished runner?

If you use washable cotton, you can hand wash or machine wash on a gentle, cool cycle and lay flat to dry. Avoid hot water and high heat when blocking or drying, and secure ends tightly before laundering.

How do I make the motifs lie flat when joining?

Join motifs through the base rounds rather than the outer scallop edges, and use a consistent whip stitch tension. Pin motifs into final position before sewing and steam-block if needed after joining.

Can I make a longer or shorter runner?

Absolutely—add or remove motifs to change length. Arrange and pin motifs until you like the layout, then join accordingly. For a table centerpiece, allow some overhang at both ends.

How can I customize the colors?

Swap any listed color for your preferred palette—think seasonal shades or match your home decor. Use contrasting centers or monochrome petals for a variety of looks.