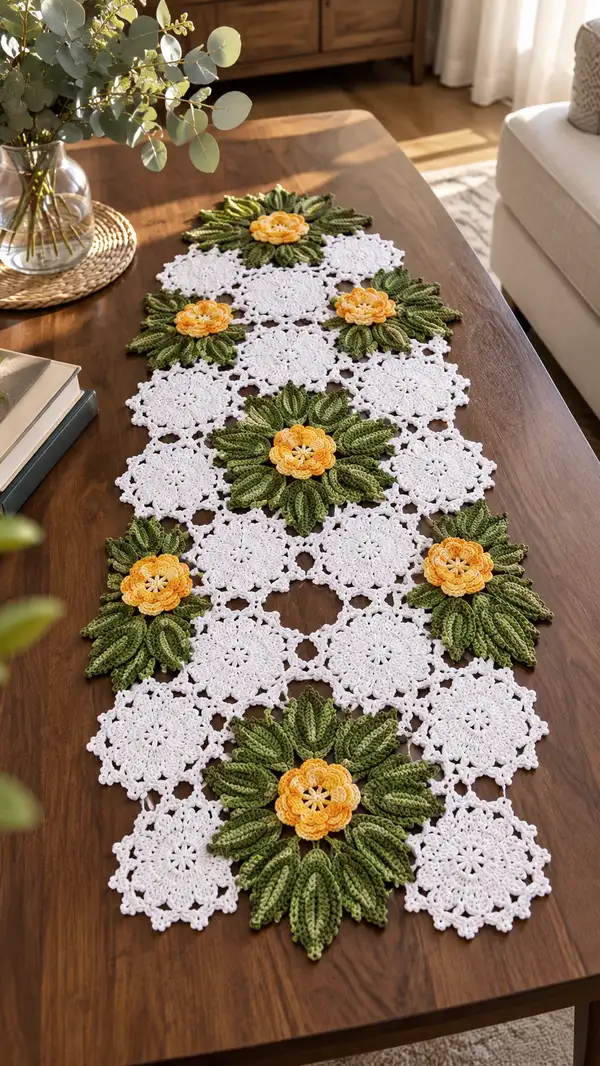
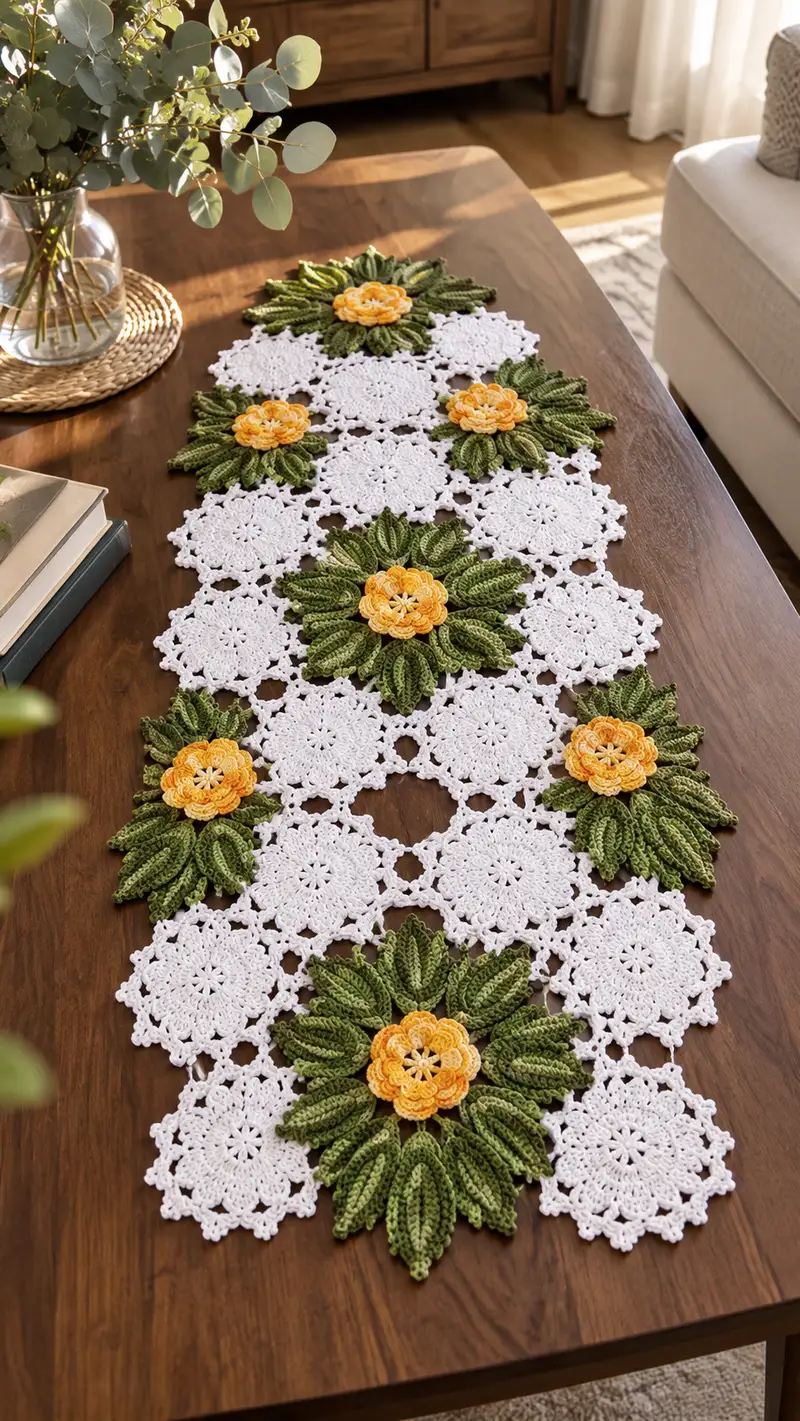
A delicate floral lace table runner featuring crisp white lacy motifs joined with lush green layered leaves and sunny yellow rosette centers. This runner uses modular motifs—white background medallions, sculpted leaves, and multi-layered flowers—that are joined to create a long, elegant centerpiece. The finished piece creates rich texture and three-dimensional flowers that sit prettily above the lace background. Perfect to dress a dining table for spring or to give as a thoughtful handmade gift.
Progress Tracker
0% Complete
— Background Medallion (white) :
Round 1 :
ch4, join with sl st to form ring (counts as ch4 loop), ch3 (counts as dc), 11 dc into ring, join with sl st to top of ch3 (12 dc) (12)
Round 2 :
ch4 (counts as dc+ch1), *dc in next st, ch1* around, join with sl st to 3rd ch of beginning ch4 (12 dc, 12 ch-1 sps) (24 counting ch-1 spaces)
Round 3 :
sl st into first ch-1 sp, *(ch3, 2 dc, ch3, sl st) in same ch-1 sp (creates small petal cluster), sl st into next ch-1 sp* repeat around forming 12 small petals. Join to first sl st (12 petals)
Round 4 :
sl st into center of first petal, ch1, sc into center, ch4, sc into center of next petal, ch4, sc in center of each petal around for 12 sc and 12 ch-4 loops. Join (12 sc, 12 ch-4 loops)
Info :
This round builds the small open loops that will allow the medallions to be joined to one another. Keep tension even so the loops lay flat and uniform.
Round 5 :
Work in each ch-4 loop: *(ch3, 4 dc, ch3) all in same ch-4 loop, sl st in next sc* repeat around to create 12 lacy arches. Join to first dc (48 dc in arches)
Round 6 :
sl st to the top of an arch, ch1, *(sc, ch2, sc) across arch center, sl st in next sc between arches* repeat around forming 12 scallops. Join (24 sc, 12 ch-2 sps)
Round 7 :
Into each ch-2 sp: ch3 (counts as dc), 2 dc, ch2, 3 dc, sl st into top of next sc. Repeat around creating raised picot-like shells around the medallion (12 shells) (12*(6 dc + ch2) = 72 dc)
Round 8 :
ch1, sc in same st, *(ch5, sc in center of next shell) repeat around to create a lacy connecting ring; join to first sc (12 sc, 12 ch-5 loops)
Info :
Work lightly at the end of this round; these ch-5 loops are the points where small medallions will join and where leaf clusters will be attached. Blocking will square them into nice points.
Round 9 :
Into each ch-5 loop: sl st, ch3, (2 dc, ch3, 2 dc) all in same loop, sl st into next sc. Repeat around to form petal clusters at the points. Join (12 petal clusters)
Round 10 :
ch1, sc in same st, *(ch3, skip cluster center, sc at base between clusters) repeat around; this creates airy openings between background motifs while maintaining stability. Join (24 sc, 12 ch-3 sps)
Round 11 :
Round of joins: sl st into next sc, ch1, sc, *(ch2, sc) into each sc around but in every fourth sc work (sc, ch3, sc) to create corner points for hex-like joining. Join. Count should be uniform—24 sc and 6 ch-3 corner loops (24)
Round 12 :
Edging round: sl st into each st and in each ch-2 space (or ch-3 corner) work (sc, ch2, sc) to emphasize the corners and create a slightly lacy picot edge. Join to first sl st. Fasten off and weave ends. Final approx stitch count around 36 small sc clusters and 6 corner ch-2 sps for joining per medallion.
Info :
Make multiple of these background medallions. In the runner photographed there are alternating medallions joined in a geometric layout. Make at least 18 medallions for a long runner or adjust to desired length.
— Small Connector Motif (white, smaller round) :
Round 1 :
mr, ch3 (counts as dc), 11 dc in mr, join with sl st to top of ch3 (12)
Round 2 :
ch1, sc in same st, *ch3, sc in next dc* around to create 12 ch-3 loops. Join (12 sc, 12 ch-3 sps)
Round 3 :
Into each ch-3 loop: (3 dc, ch2, 3 dc) all in same loop to make small round petal clusters. Join (12 clusters = 72 dc)
Round 4 :
ch1, *sc in first dc of cluster, ch1, sc in next dc of cluster* repeat around forming close shells. Join. Fasten off. Final small connector motif is flatter than main medallion and used to occupy the spaces between larger medallions.
Info :
Make many of these small motifs to join the spaces between large medallions. They act as linkers and give the runner the lacy lattice look.
— Leaf Motif (green) :
Round 1 :
mr, ch2 (counts as hdc), 8 hdc in mr, join with sl st to top of ch2 (8)
Round 2 :
ch2, (2 hdc in next st) x8 (16) - expand base for leaf length
Round 3 :
ch1, sc in same st, *(sl st, ch4, sl st) in next st to create small ridge beginnings, sc in next st repeat across base to form 8 ridges. Join (16 sts including sl st ridges)
Round 4 :
Work along one side for shaping: ch3 (counts as dc), dc in next 3 sts, (2 dc in next st) repeat until center point, then turn and work back along other side mirroring to create elongated leaf shape. End with sl st to first st. Approx 22 dc total depending on increases (22)
Info :
We are building a foundation to attach ribbed rows. Keep the center slightly raised to accept front post stitches that create the ribbing.
Round 5 :
ch1, sc around entire leaf edge (including ends) to tidy. Join. (22-24 sc approx)
Round 6 :
Begin ribbing: turn work so one face is upward. *fpdc around next st, ch1* across for 10 fpdc ribs (10 raised ribs). Fasten off color A if you plan to use variegation or continue in green. (10 fpdc)
Round 7 :
Attach yarn at center base and work elongated puff clusters: *ch2, (yarn over twice, insert hook, yarn over, pull up loop) 5 times in same base point, yarn over and pull through all loops, ch1 to secure, sl st to next center base* Repeat to create 5-6 deep puff ridges across center. These will form the veined look on the leaf.
Round 8 :
Work edging: sc around leaf edge in BLO to make edge more pronounced, in tip work 3 sc, in base work 5 sc. Join. Fasten off. Approx sc count 36.
Info :
For the photographed runner, each leaf is worked to be fairly long and narrow and has deep ribbing. Adjust the number of puff clusters to match the length you need. Make many leaves (3–8) for each flower cluster depending on layout.
Round 9 :
Optional contrast ridge: With a slightly lighter or darker green, work slip stitch lines along each puff ridge to emphasize the veins. Insert hook behind puff and sl st in place along each ridge. Fasten off and weave ends.
Round 10 :
Make additional smaller leaf units: mr, ch2, 6 hdc, join — ch3, *2 dc in same st* around to produce smaller sprigs. These are used between big leaves at cluster edges. Fasten off.
Info :
Create 6 large leaves per large flower cluster in the photo, with additional 3 smaller sprigs to fill edges. Making consistent leaf size is important for a balanced cluster.
— Flower Center & Petals (two-tone yellow) :
Round 1 :
Using pale yellow: mr, ch1, 6 sc into mr, join (6)
Round 2 :
ch2 (counts as hdc), hdc inc in each st around (12) - (hdc in each st, 2 hdc in each) Repeat pattern so (1 hdc, inc) x6 produces 18 if you need slightly larger center; pick one consistent increase. For this pattern we'll do (1 hdc, inc) x6 for 18 total stitches. (18)
Round 3 :
Change to golden yellow (Info before round: change to golden yellow). ch3 (counts as dc), (dc, ch1, dc) in each st around to create small lacy petals; join. This creates 18 small petal arches.
Info :
Round 2 establishes a sturdy small circle that will support the layered petals. Change color at tail end of round 2, fastening off pale yellow if desired or carry for subtle shading.
Round 4 :
Into each ch-1 sp: *(ch2, 3 dc, ch2) all in same sp, sl st into next base st* repeat around to make 18 outer petals. Join. (18 petals — 3 dc clusters)
Round 5 :
ch1, sc in same st, *(ch3, sc in tip of next petal) repeat around creating decorative loops above petals; join. This round sets the base for the second petal layer that nestles between first petals.
Round 6 :
Second petal layer: change to a slightly darker golden-orange. In each ch-3 loop: work (tr, dtr, tr) to form elongated petals that arch over the first layer. Join. (18 elongated petals)
Round 7 :
ch1, sc around the base to secure second layer; in the picot points at each petal tip work a small picot (ch3, sl st in 3rd ch) to add texture. Join and fasten off darker shade if using more than one yellow tone.
Round 8 :
Third petal frill: With pale yellow again, attach yarn at center between two petals and work groups of (ch2, 5 sc cluster, ch2) to add rounded tiny petals atop the larger ones. Arrange 18 small rounded petals evenly for a rosette look. Join. (18 small clusters)
Info :
Petal layering is what gives the flower its dimensional bloom. Use stitch markers on three anchor points to keep the layers symmetric as you add row upon row of petals.
Round 9 :
Surface detail: Use contrasting thin embroidery yarn to stitch small veins radiating out from center into the base of each petal. Use a yarn needle to tuck and tie ends securely on the underside.
Round 10 :
Optional raised center: Make a small French-knot-like nub by doing: mr, ch1, 8 sc in mr, pull tight and fasten off; sew this little ball to center of flower for a raised middle. Secure well. Fasten off and weave ends.
Round 11 :
Make 3 sizes of flowers as seen in photo by varying the number of petals and rounds: small (use rounds 1-6), medium (rounds 1-8), large (1-10). Mix these for dimensional interest when assembling clusters.
Info :
Work flowers flat and do not stuff; they are sewn on top of leaf clusters so they should remain supple. Make sure centers are consistent for neat clusters.
— Secondary Small Petal Sprig (yellow filler) :
Round 1 :
ch6, sl st to form ring, ch1, 8 sc in ring, join (8)
Round 2 :
ch2, (2 dc in each st) around to create a small rosette, join (16)
Round 3 :
ch1, sc in each st around with small ch-2 loops every fourth stitch to add little points for surface texture; fasten off. These small sprigs fill space near clusters.
Info :
Create several of these small sprigs to tuck under larger flowers and leaves for the layered look seen in the runner.
— Leaf Variant (deep ribbed, assembled leaf fan) :
Round 1 :
ch8, working back along chain: sc in 2nd ch from hook, hdc, dc, tr, dtr, tr, dc, hdc, sc across to create long ribbed leaf; join ends with sl st or work two symmetrical halves joined at base. (approx 9 major steps)
Round 2 :
Attach yarn at base and work fpdc around each major stitch to create pronounced ribs: *fpdc in next st, ch1* 9 times. Fasten off. These leaf variants are used in the large fans beneath the large flower centers.
Info :
The photographed runner uses large fans of 12–14 leaf variants for major clusters. Arrange them in an overlapping radial pattern and tack in place before final sewing.
— Edging & Final Border (worked after joining all motifs) :
Round 1 :
With white and using a slightly larger hook (optional), work a round of sc around the entire joined runner edge to unify joins. Maintain even tension. Count stitches to ensure evenity; expect approx 4-5 sc per small medallion side. Join. (varies)
Round 2 :
Work decorative scallop: *(5 dc in same st, skip 2 sts, sl st in next) repeat around to create rounded scallops along runner edge. Join. This gives the runner the classic finished scalloped look.
Round 3 :
Picot finishing: ch1, sc into each st, and in each scallop center work (sc, ch3, sc) for a subtle picot point. Join and weave ends securely.
Info :
If you prefer a delicate finish, block lightly and then steam-press edge to flatten scallops. Do not over-stretch during blocking as the floral units may distort.
— Suggested Motif Counts & Layout :
Info :
Photographed runner layout (example): Row A: large cluster medallion + 2 small medallions alternating for edge. Make 5 large floral clusters and 18 background medallions and 10 small connectors to fill lattice. However you may scale to desired length by repeating the motif pattern shown: big cluster, three medallions, big cluster, three medallions, big cluster etc.
Info :
Suggested production list for pictured runner: 5 large flower assemblies (each with 6 large leaves and 6 small sprigs + 1 large multi-layer flower + 2 small filler flowers), 18 background medallions and 10 connector motifs.
— Join-As-You-Go Method (JAYG) for medallions and connectors :
Info :
I recommend joining motifs using the JAYG technique on the last round of the medallion: when working round 11 or 12 of a medallion, instead of completing a full ch-loop, join into corresponding ch-loop of adjacent completed motif with a sl st or sc to permanently link them. This creates a seamless look and prevents bulky seams.
Round 1 :
When you reach a ch-3 corner of a medallion that needs to connect, do: insert hook into ch-3 loop of completed neighbor, sl st to join, then continue your ch loops as written. Each join reduces the amount of sewing afterward. Use pins to hold motifs steady before joining.
Info :
Work slowly when first learning JAYG; it's easiest to pin two motifs in final layout and practice a single join before attempting an entire runner.
— Attaching Leaves & Flowers to Background :
Info :
Attach leaves in radial arrangement to selected medallions by sewing the base of each leaf to the medallion base using a mattress stitch or whip stitch. Place heavy-duty pins to hold each leaf and flower in place before sewing. Use matching yarn for near-invisible joins.
Round 1 :
Place large flower center on top of the radial leaf fan, adjust petals so petals sit naturally over leaves and sew around the base of the flower to the medallion with multiple passes for strength. Make sure the flower center covers the leaf join points.
Info :
Tack small filler sprigs under petals with a couple of stitches to keep them from catching on surfaces. Secure ends by weaving through at least 2 inches into back side of the runner.
— Finishing Steps and Blocking :
Round 1 :
Once all motifs are joined and all leaf and flower clusters are sewn into position, wet-block the entire runner by pinning onto a flat blocking board to the exact shape desired. Use rust-proof pins and a light steam or spray with water until fibers relax. Allow to dry fully before removing pins.
Info :
Blocking evens out stitches and opens the lace background. Be careful not to over-stretch the leaf shapes—they should remain slightly dimensional and not fully flattened.
Round 2 :
After blocking and drying, inspect seams for loose ends and reinforce any joins that feel weak. Weave all ends under several stitches and trim close to the fabric. Optional: Very small dab of fabric glue on knot can secure it further but is not necessary with good weaving.
Info :
For long-term durability, avoid prolonged exposure to direct sunlight to prevent color fading, and hand-wash gently in cool water only when needed.
— Variations & Sizing Tips :
Info :
To lengthen or shorten the runner, add or subtract repeating sequences of medallions and clusters. To make a table runner narrower, remove a column of motifs and rework joining layout. You can also turn this design into a placemat or doily by using fewer medallions and a smaller number of leaves per cluster.
Round 1 :
For a more subtle look, use tone-on-tone greens and yellows or pastel shades. For a bold look use deep forest green and bright sunflower yellow as in the photographed sample.
Info :
Switch to mercerized cotton for a shinier, more formal finish; use organic cotton for a rustic, matte texture. Gauge will vary; make a sample medallion then block to determine whether you need to change hook size.
Completing this floral table runner is a delightful journey — each medallion, leaf and petal adds a little victory until the whole runner blooms under your hands. The intricate lace background and dimensional flowers create an heirloom-quality centerpiece that brightens any room. Enjoy blocking, assembling and styling it on your table — the textural contrast and vibrant flower centers are real showstoppers. 🧶🌼 Your guests will love the handmade charm, and you’ll love how satisfying the modular process is. Happy crocheting! ✨