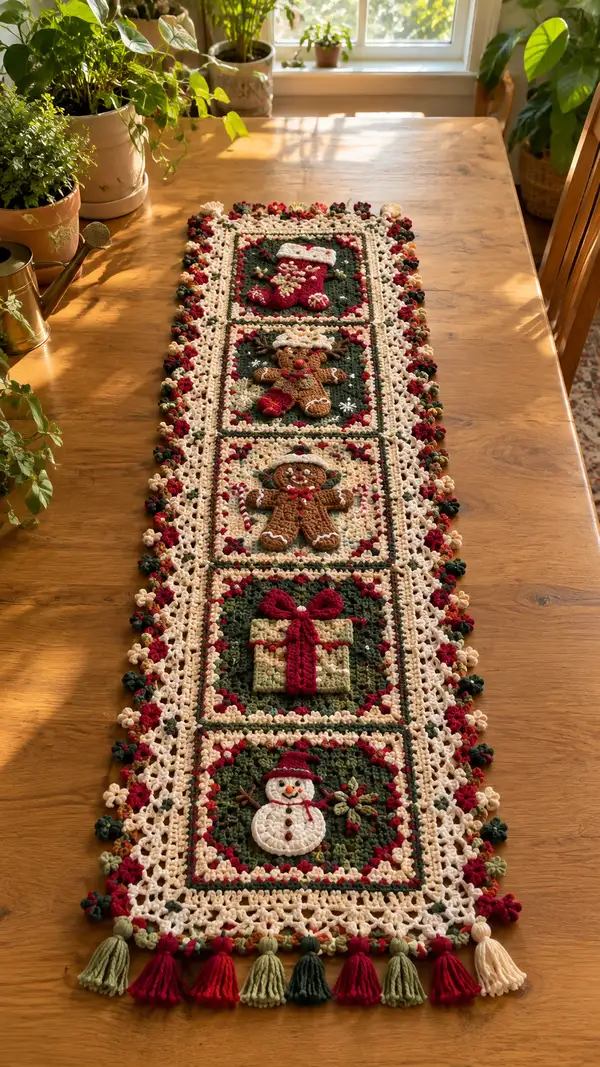
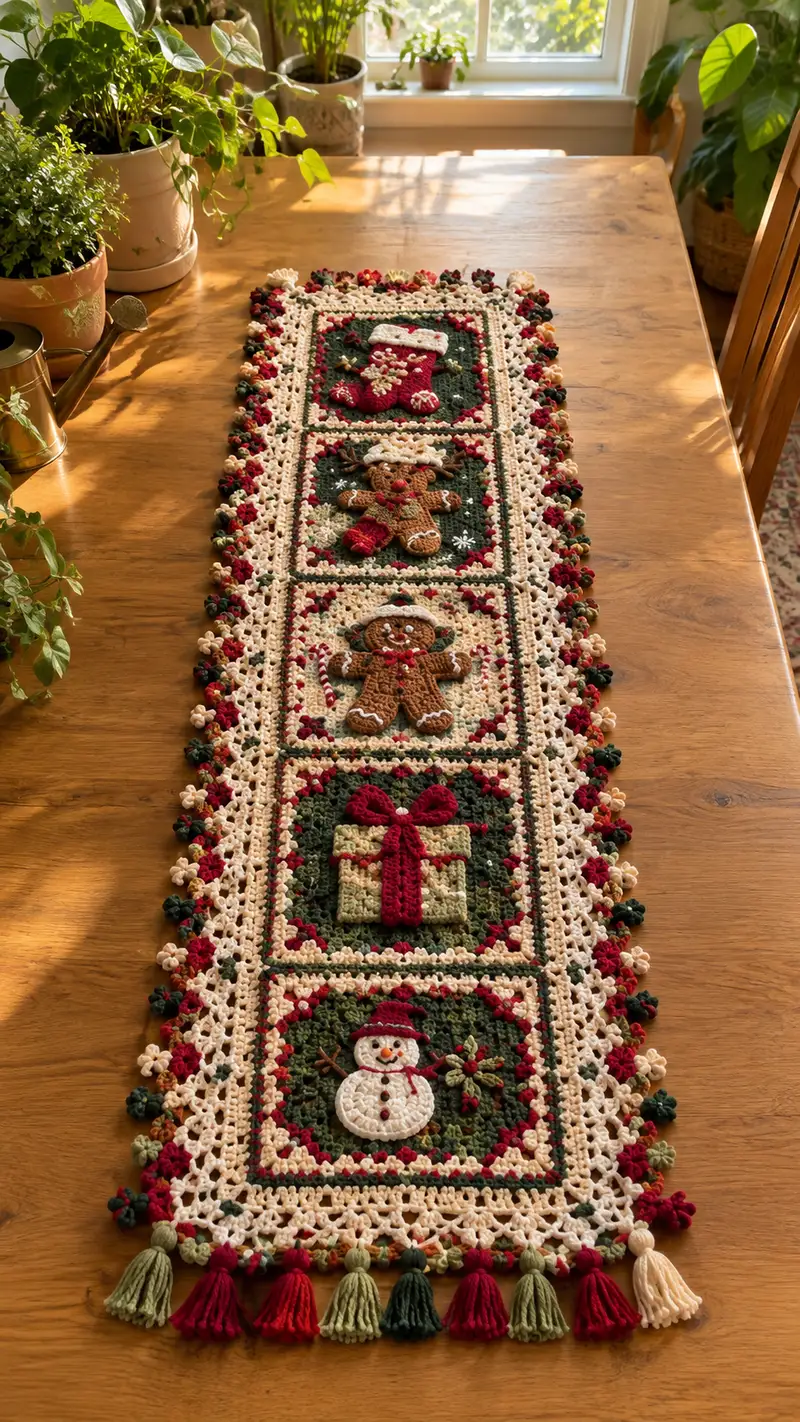
A festive, handcrafted table runner featuring five detailed square panels: snowman, present, gingerbread man, reindeer and stocking. Each square is richly textured with layered applique9 motifs, contrasting green and cream backgrounds, and a lacy cream border with bobble clusters and tassels. Perfect for adding vintage holiday charm to your table or dresser.
Progress Tracker
0% Complete
— Overview :
Info :
This runner is constructed from five equal-sized square panels joined in a row. Each square is worked as a layered square with a central applique9 sewn to the surface. The sequence from one end to the other in the reference photo is: Snowman, Present, Gingerbread, Reindeer, Stocking. After all squares are made they are joined with a slim cream joining strip, then a lacy cream border is worked around the full rectangle, finishing with bobble cluster edging and tassels at both short ends.
Gauge/Finished Size :
Each finished square measures approximately 7.5-8" (19-20 cm) square. Assembled runner measures approximately 8" wide x 40-42" long (20 x 102-107 cm) including border and tassels. Gauge may vary; blocking squares to uniform size before assembly is recommended.
Info :
Work tension slightly firmer than usual to keep applique9s crisp and to prevent stuffing from showing through. Use a 3.25mm hook for applique9s if you prefer tighter work.
— Base Square (Make 5 - one for each motif) :
Round 1 :
With cream or designated square border color, ch4 and join with sl st to form a small ring, ch3 (counts as first dc), work 11 dc into ring, join with sl st to top of ch3 (12 dc total)
Round 2 :
Ch3, dc in same st, (dc in next 2 sts) x3, [2 dc, ch2, 2 dc] in next st (first corner), (dc in next 3 sts) x3, [2 dc, ch2, 2 dc] in next st, join with sl st to top of ch3. Note: This round begins corner construction; stitch count will read as groups rather than single stitch totals; you'll have four corner groups.
Round 3 :
Change to deep forest green for square center now. Ch3, dc in same st, dc in next 3 sts, [2 dc, ch2, 2 dc] in corner ch2 space, *dc in next 4 sts, [2 dc, ch2, 2 dc] in corner* repeat around, join (each side now has 5 dc between corners)
Info :
Place a removable stitch marker in the first dc of this round to mark the top of the square and keep track of rounds. Change colors with a last-yarn-over method to create tidy joins.
Round 4 :
Ch3, dc in same st, dc in next 5 sts, [2 dc, ch2, 2 dc] in corner ch2 sp, *dc in next 6 sts, [2 dc, ch2, 2 dc] in corner* repeat around; join. Each side now has 7 dc between corners.
Round 5 :
Ch2 (counts as hdc), hdc in same st, hdc in next 9 sts, [hdc, ch2, hdc] in corner ch2 sp, *hdc in next 10 sts, [hdc, ch2, hdc] in corner* repeat around; join. Change to BLO if you want a ridge prior to applique9 attachment.
Round 6 :
Ch1, sc in same st, sc in each st across sides working (sc, ch2, sc) into corner spaces to maintain square shape; join. (This creates a tidy edge to sew applique9s onto.)
Info :
At this point you have a solid square background. Block this square to 7.5-8" if needed before adding applique9s. Repeat Rounds 1-6 for all five squares using green for the field and cream for the outer shell where specified here.
Round 7-8 :
Optional decorative rounds: (Round 7) ch3, dc around in each st and 3 dc in corner spaces, join. (Round 8) Switch to cream and work one round of sc around for contrast (work 3 sc in corner spaces). These rounds add a narrow cream inner frame that shows behind each motif.
— Snowman Applique9 (Place on one square) :
Info :
Snowman is assembled from two flat circles (body and head), a hat, carrot nose, scarf and tiny embroidered eyes/mouth. Work pieces on smaller hook for compact stitches.
Head Round 1 :
With white, mr, 6 sc in mr (6)
Head Round 2 :
Inc around (12)
Head Round 3 :
(1 sc, inc) x6 (18)
Head Round 4 :
(2 sc, inc) x6 (24)
Head Round 5 :
(3 sc, inc) x6 (30)
Info :
Work until desired head size. Fasten off leaving a long tail for sewing to body. Do not stuff; these are flat applique9 discs meant to lie flat on the square.
Body Round 1 :
With white, mr, 8 sc in mr (8)
Body Round 2 :
Inc around (16)
Body Round 3 :
(1 sc, inc) x8 (24)
Body Round 4 :
(2 sc, inc) x8 (32)
Body Round 5 :
(3 sc, inc) x8 (40)
Info :
Make size appropriate to fit square center; flatten and fasten off leaving tail. If desired make a slightly smaller body to create a stepped ledge between head and body for dimension.
Hat Brim Round 1 :
With red, ch8, join to form ring, ch1, sc around to make a small round brim approx 8 sc, join (8)
Hat Crown Round 1 :
Switch to darker red, ch3, work 6 dc into ring, join (6)
Hat Crown Round 2 :
(1 dc, inc) x3 (9)
Hat Crown Round 3 :
(2 dc, inc) x3 (12); fasten off leaving tail to sew brim to crown and secure to head.
Info :
Use small black beads or 1-2 black french knots for eyes and a tiny orange embroidered stitch for carrot nose. Sew head to body centered and then seat hat slightly to one side for character.
— Present Applique9 (Center Square) :
Box Base Round 1 :
With light sage/olive, ch5, work in rows to form a small square: Row1: 3 sc in 2nd ch from hook across (3), turn; Row2: ch1, 1 sc in each of 3 sts (3); Row3: ch1, 3 sc across (3). Join ends to form a 3x3 block, sc around for a smooth edge (12 sc perimeter). Alternatively, work flat 4-round square to measure approximately 1.5-1.75" square.
Info :
Present is built as a raised box with a separate bow and ribbon strip. Create box slightly padded with a small amount of fiberfill and then whip-stitch closed to give a plump, dimensional gift.
Ribbon Strip :
With red, ch16, sc across, fasten off leave tail and sew across box vertically and horizontally to form cross; secure ends under box.
Bow :
With red, ch6, sc in 2nd ch from hook across (5), form loop by folding strip and sewing center with a small wrapped stitch; sew bow onto top center of box. Add a small cream bead or picot center with cream yarn (ch3, sl st into first ch) to make center knot.
Info :
Pin bow and ribbon in place before sewing to ensure symmetrical placement. Keep stitches small and neat so seams are barely visible on the treated square background.
— Gingerbread Man Applique9 :
Body Round 1 :
With warm brown, mr, 6 sc in mr (6)
Round 3 :
(1 sc, inc) x6 (18)
Round 4 :
(2 sc, inc) x6 (24)
Info :
This becomes the torso; we will add simple shaped arms and legs by crocheting small rounds and sewing them in place. Use surface slip stitches in cream to make icing details later.
Arms (Make 2) :
With same brown, mr, 5 sc in mr (5), rnd2: inc in each st around (10), rnd3: sc in each st (10), flatten slightly and sew to upper sides of torso. For angled arms, make rounds off-center and bend while sewing to get the posed look.
Legs (Make 2) :
With brown, mr, 6 sc in mr (6), rnd2: inc around (12), rnd3: (1 sc, inc) x6 (18), rnd4: sc around (18) flatten and sew to lower torso with small whip-stitches.
Info :
Add cream surface embroidery to create icing cuffs and smile: work surface slip-stitch lines for icing, and attach small red embroidered gumdrop buttons (tiny red french knots) down the torso.
— Reindeer Applique9 :
Head Round 1 :
With warm brown, mr, 6 sc (6)
Round 3 :
(1 sc, inc) x6 (18)
Round 4 :
(2 sc, inc) x6 (24)
Info :
Create a slightly flatter disc for the face rather than a stuffed head. Embroider or attach tiny black safety eyes and a stitched mouth. Use a small brown or red bobble for the nose (Rudolph style) if desired.
Antlers (Make 2) :
With dark brown or tan, ch6, sc in 2nd ch from hook across (5), ch1 turn; rnd2: sc across (5), fasten off leaving a tail to sew. For branched antlers, make a small central stem ch4 and add tiny ch loops to one or both sides then sc back to base and sew to top of head.
Body Round 1 :
With brown, mr, 6 sc (6); rnd2 inc around (12); rnd3 (1 sc, inc) x6 (18); rnd4 sc around (18) flatten and sew below head. Sew legs (small ovals worked like gingerbread legs) and position a small red heart or bell at chest using red yarn.
Info :
Use lighter yarn to add a cream collar or scarf. When sewing reindeer to square, angle head slightly to create sense of movement.
— Stocking Applique9 :
Stocking Body Round 1 :
With red, ch10, join to work in rounds to form cuff and foot shape: Rnd1: work 18 sc evenly around ch10 loop; join (18)
Stocking Round 2 :
Ch1, sc around in each st (18)
Stocking Shaping Rnd 3 :
Working in rows along one side of the loop for shaping the foot: fold loop and work 3 sc, dec, sc across to make a slight toe curve; join and continue 1-2 more rounds to shape heel and toe as needed; results approx 18-16 sts depending on shaping
Stocking Cuff :
With cream, join to top of stocking and work 2 rounds of sc, then a round of BLO hdc or a row of reverse sc to make a raised cuff. Add cream picot stitches around cuff for decorative edging.
Info :
Decorate stocking with white embroidered snowflakes and a small cord loop for hanging. Sew stocking centered into square field so toe points downwards toward runner edge.
— Applique9 Placement & Sewing :
Info :
Pin each applique9 to the prepared square before sewing. Place motifs centrally: measure from square edges to center and position motif so there is equal spacing to the square frame (approx 1.25-1.5" from each side depending on blocking).
Sewing :
Use matching yarn tails and a yarn needle to sew each applique9 down with small invisible whip-stitches around perimeter. For dimensional pieces (present box, bow), sew the base first, then tack the bow and ribbon on top with several small stitches so it remains secure.
Info :
Use a few stitches through the square background and applique9 to anchor 3D pieces; reinforce stress points with duplicate stitching. Avoid bulky knots on the back to keep the runner flat.
— Joining Squares :
Joining Strip Round 1 :
With cream, join two adjacent squares by placing them right sides together and sc through both layers along the side with a 3.5mm hook, 1 sc per stitch, sew across full side. Repeat for all four joins to make a 5-panel strip (you will join 5 squares into a single row using 4 joining seams).
Info :
Alternatively use mattress stitch with matching yarn for a less visible join. Press joins flat and block entire strip to ensure straight edges prior to outer border.
— Outer Lacy Border :
Round 1 :
With cream, join at a seam and ch3 (counts as dc), work dc evenly into all available edge stitches around entire rectangle, placing (dc, ch2, dc) in each corner to preserve square shape. Work approx 1 dc per 2 sc depending on your join tension so number will vary with gauge.
Round 2 :
Ch1, sc in each st around, making 3 sc in each corner ch2 sp; join. This creates a neat base for lacy rounds.
Round 3 :
Ch4 (counts as tr + ch1), *skip 2 sts, tr in next st, ch1* repeat around forming a ladder lace of treble arches, work (tr, ch2, tr) in corners; join. Adjust spacing if needed to avoid puckering.
Info :
This lacy zone is the panel that visually separates the central panels from the bobble edge. Keep tension relaxed for this openwork so it lays flat.
Round 4 :
Ch1, sc in each tr and ch-space around (this will place sc into ch1 spaces), join. Work one more round of sc if you need a firmer base for bobble clusters.
Round 5 (Decorative Picot Row) :
Ch1, sc in next st, *sc, ch3, sl st into top of sc (picot), skip 1 st, sc in next 3 sts* repeat around to produce delicate picot scallops; join.
Info :
If you prefer a less fussy look, replace picots with simple sc round. The picots add to the vintage look in the photo.
— Bobble Cluster Edge :
Round 6 (Base for bobbles) :
Ch1, sc in each st around working into previous picot spaces where possible; join. This round readies loops for clusters.
Round 7 (Bobble clusters) :
Switch to multi-color bobble palette (cream, red, green, mustard) carried as small motifs. *In next st: (yarn over, insert, pull up loop) x4, yarn over and pull through all loops (bobble made), ch1, sc in next 2 sts* alternate bobble color each cluster. Space bobbles evenly along edge, placing 1 bobble per 6-8 sts depending on gauge. For corners, place a bobble sequence of 3 small clusters to create a rounded corner cluster.
Info :
Use duplicate-color small balls of yarn to change colors quickly; carry unused yarn behind borderline or fasten off and weave ends for the tidyest finish. Keep bobbles small and consistent in stitch count for uniform look.
Round 8 :
Return to cream and work 1 sc in each st around to anchor bobble row and hide joins; join and fasten off.
Info :
Weave in all ends and block runner again to flatten bobbles and relax the lace into its final shape.
— Tassels (Make 10 - 5 per short end) :
Info :
Tassels are grouped in alternating colors (sage, red, dark green, brick red, cream) and tied through the corner loops at each short end. Each tassel length in the photo measures approx 3" (7.5 cm) finished.
Tassel Construction :
Wrap yarn 30 times around a 3" wide card (or desired length). Slip the band off and fold in half. Tie a 3" piece of yarn around the folded top tightly to form the head. Use another piece to create a small wrap near the top to finish. Trim ends to even length. Attach 5 tassels evenly spaced on each short end by knotting through the outermost border ch spaces. Alternate colors as shown (start with sage on the corner, then red, green, brick, cream).
Info :
For fuller tassels, wrap more times; for thinner tassels, wrap fewer times. Secure knots on the back with a dab of fabric glue if you expect heavy use or washing.
— Final Finishing :
Info :
Weave in all ends with a yarn needle, trimming tails close. Lightly steam-block or wet-block the runner flat: pin the outer edges and the tassels into place, allow to dry fully before removing pins. This will give a crisp, professional appearance.
Optional - Adding Bead Accents :
If you want to duplicate the tiny shiny details seen in some runners, use a few small glass or pearl beads sewn to the center of the little floral clusters in the border. Sew through bead holes and tie secure knots on the wrong side; do not use metal beads if you will machine wash.
Info :
For machine washing stability: use superwash yarns and strong secure knots, but hand-washing is recommended to preserve the little embroidered and 3D elements.
This festive table runner is a joyful project that rewards patience with beautiful, tactile results. Each square tells its own little holiday story and when joined together they create a charming, heirloom-quality accent for your table. The border and tassels add the perfect finishing touch. 🎄🧶 I hope you enjoy every stitch—this runner makes a lovely gift or keepsake for cozy holiday gatherings. Happy stitching!