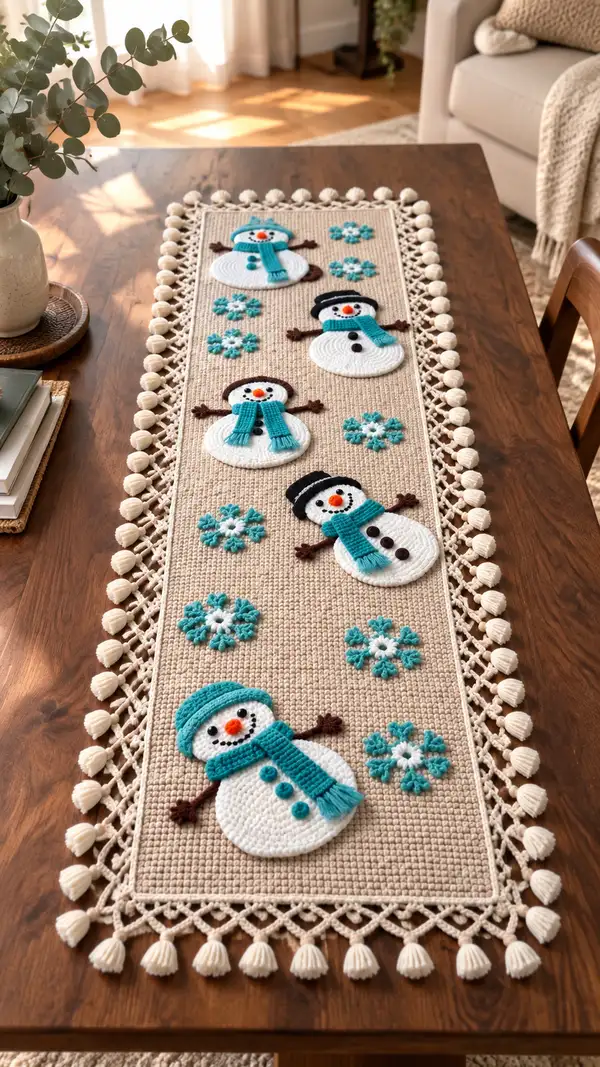
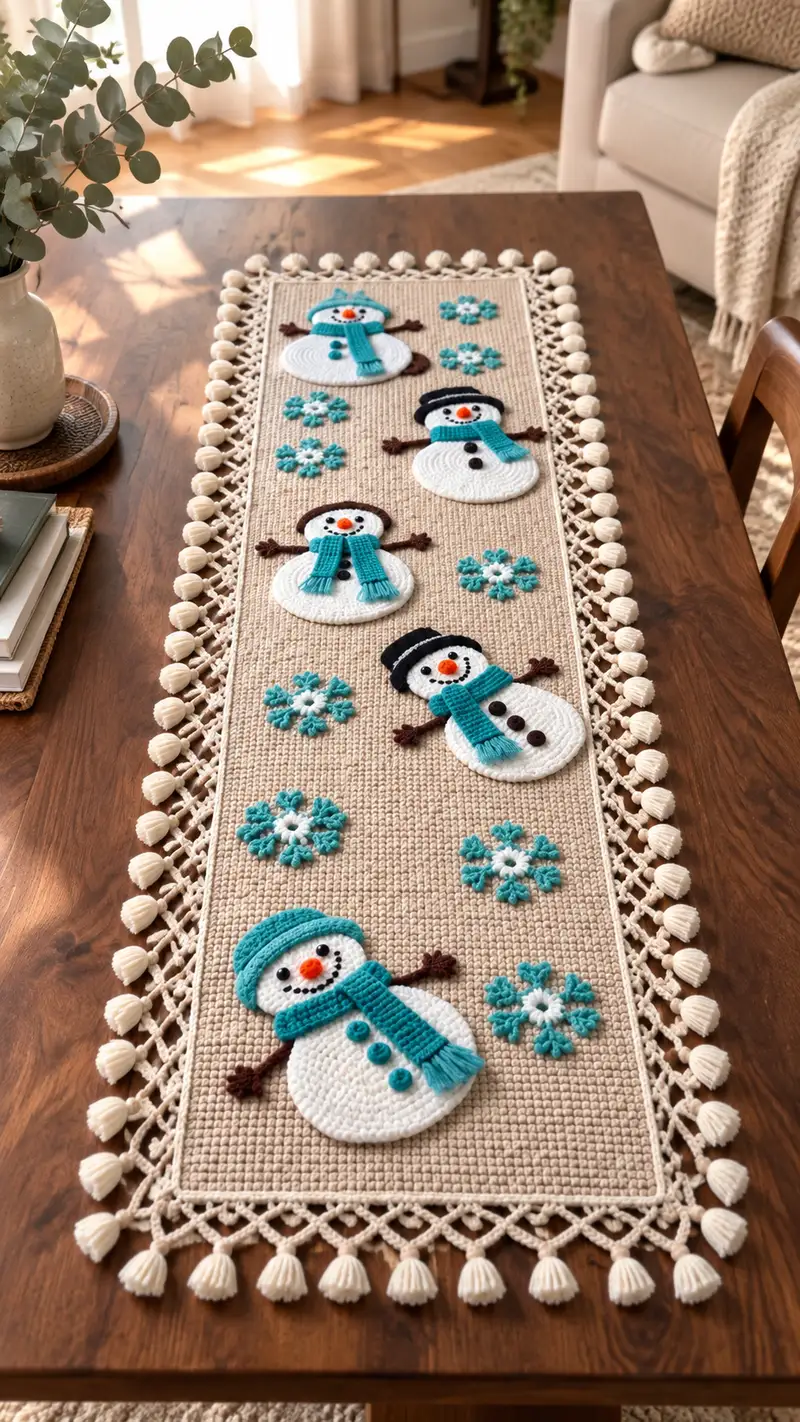
Create a charming winter table runner featuring four applique snowmen, teal snowflakes, and a delicate macrame-style tassel border. This pattern uses dense single crochet fabric for a sturdy runner base, layered with flat crochet appliques for the snowmen, hats, scarves and snowflakes. The neutral background pairs beautifully with teal and chocolate accents for a modern farmhouse holiday look. Detailed assembly and edging instructions make this an approachable, decorative centerpiece.
Progress Tracker
0% Complete
— Gauge & Finished Size :
Info :
Gauge: 18 sc = 4 inches across in worsted weight yarn with 4.0mm hook. Finished runner (as photo) approximately 14" wide x 48" long including border and tassels. Adjust foundation chain and number of rows to change final length.
— Materials & Prep :
Info :
Work the runner base as a dense single-crochet fabric so appliques sew on cleanly. Use a slightly smaller hook for the border to create firm lattice and keep tassels full. Block appliques flat before sewing. Make all appliques while base is drying so assembly is clean and accurate.
— Base Runner (Make 1) :
Row 1 :
Chain 61 (this yields 60 working stitches across). Sc in 2nd ch from hook and in each ch across (60).
Row 2 :
Ch 1, turn. Sc in each st across (60).
Rows 3-8 :
Repeat Row 2 (60). Work tightly and keep edges straight by maintaining the same tension and placing first sc in the first base stitch.
Info :
These first rows form a firm foundation; place a stitch marker in the first st of each row to keep consistent alignment for appliques later.
Rows 9-16 :
Ch 1, turn. Sc in each st across (60). Repeat for each row (60).
Rows 17-24 :
Continue as Rows 9-16. After Row 24 measure length; this is the mid-runner area. Keep consistent counts to position motifs evenly.
Info :
Mark positions for snowmen and snowflakes: divide the length into five equal compartments along the center column and mark center-row positions with pins for each snowman applique placement. For our 48" runner, space the centers about 9.5" apart vertically (adjust if you change number of rows).
Rows 25-40 :
Continue sc in each st across (60). Make sure to weave in any stray tails on the WS as you pass them to keep the surface tidy. (60)
Rows 41-56 :
Continue sc in each st across (60). These rows align with the central 2 snowmen positions. Use stitch markers at the row ends every 8 rows to ensure straight edges.
Info :
If you prefer to do colorwork for the runner background, change color now. For a solid neutral background we remain on cream/beige.
Rows 57-72 :
Sc in each st across (60). Keep fabric flat; if slight cupping occurs, block before attaching appliques. (60)
Rows 73-88 :
Sc in each st across (60). Mark positions for lower two snowmen and remaining snowflakes; pin to check spacing before making appliques permanent. (60)
Info :
For a longer or shorter runner, add or subtract rows in this central block before the border. Maintain full multiples of motif spacing so appliques center properly.
Rows 89-104 :
Sc in each st across (60). This finishes the main flat panel. (60)
Rows 105-120 :
Sc in each st across (60). End panel when it reaches desired length before edging; leave a long tail for securing border if you plan to crochet border directly from panel edge. (60)
Info :
Fasten off, weave in ends. Block the entire panel flat: pin tightly to correct rectangular shape, steam or spray and allow to dry completely. This makes applique alignment simple and professional looking.
— Snowman Applique Set (Make 4 identical sets) :
Info :
Each snowman is made as two flat circular discs (body and head) sewn together slightly offset, then layered with hat, scarf, buttons and twig arms. All discs are worked in joined rounds to form neat spirals; we will use white worsted yarn unless otherwise noted.
Head - Round 1 :
Make a magic ring. 6 sc in mr (6).
Round 2 :
Inc in each st around (12).
Round 3 :
(1 sc, inc) x 6 (18).
Round 4 :
(2 sc, inc) x 6 (24).
Round 5 :
(3 sc, inc) x 6 (30).
Info :
These increases build a flat circle. Check for ruffling—if the circle begins to cup add a few even rounds without increase to flatten.
Round 6 :
(4 sc, inc) x 6 (36).
Round 7 :
(5 sc, inc) x 6 (42).
Round 8 :
(6 sc, inc) x 6 (48).
Round 9-16 :
1 sc in each st around (48). Work 8 rounds total to reach desired head diameter and thickness (48).
Info :
This head is a flat disc (not stuffed). If you prefer a slightly raised head, work 2-3 more rounds even at 48 before finishing. Place safety eyes or embroider eye positions on Round 11 helping with spacing—they should be about 8-10 stitches apart depending on expression.
Round 17 :
(6 sc, dec) x 6 (42).
Round 18 :
(5 sc, dec) x 6 (36).
Info :
Finish with a neat edge; for an invisible seam join use sl st then fasten off leaving a long tail for sewing to body disc.
Round 19 :
(4 sc, dec) x 6 (30).
Round 20 :
(3 sc, dec) x 6 (24). Fasten off leaving long tail for sewing. Weave tail through last round and pull closed slightly if desired to give a defined head edge.
Body - Round 1 :
Make a magic ring. 6 sc in mr (6).
Round 2 :
Inc in each st around (12).
Round 3 :
(1 sc, inc) x 6 (18).
Round 4 :
(2 sc, inc) x 6 (24).
Round 5 :
(3 sc, inc) x 6 (30).
Round 6 :
(4 sc, inc) x 6 (36).
Round 7 :
(5 sc, inc) x 6 (42).
Round 8 :
(6 sc, inc) x 6 (48).
Round 9 :
(7 sc, inc) x 6 (54).
Round 10 :
(8 sc, inc) x 6 (60).
Rounds 11-18 :
1 sc in each st around (60). These rounds determine the full body diameter; work 8 rounds for a generous flat disc to match photo proportions. (60)
Info :
Keep the center of body flat by blocking. If you notice slight cupping, add a round of increases evenly distributed, or if ruffling occurs remove a couple increases near the last increase round.
Round 19 :
Optional decorative edge: 1 sc in each st BLO around (60) to give a slight ridge for sewing. Fasten off leaving long tail for assembly.
Info :
Sew head to body slightly overlapping the top edge of the body disc so snowmen read as two-tiered bodies; use mattress stitch through back loops to make the seam invisible from the front.
— Snowman Hat (Make 4) :
Hat Brim - Round 1 :
With black or dark brown, ch 2, 6 sc in 2nd ch from hook (6).
Round 2 :
Inc in each st around (12).
Round 3 :
(1 sc, inc) x 6 (18).
Round 4 :
1 sc in each st around (18). Fasten off and leave tail for sewing to head. This forms a short brim disk.
Hat Top - Round 1 :
With same color, make a mr, 6 sc in mr (6).
Round 2 :
Inc in each st around (12).
Round 3 :
(1 sc, inc) x 6 (18).
Round 4-6 :
1 sc in each st around (18). For a slightly taller hat work extra even rounds to desired height. Fasten off leaving tail for sewing. Sew the hat top to the brim and position on snowman head slightly tilted as in photo.
Info :
To make a different style hat (beanie), work an even band around the brim in teal before joining hat top, or add a small pom-pom to the hat top using teal/cream yarn.
— Scarf (Make 4) :
Scarf - Row 1 :
With teal, ch 21 (20 working sts). Row 1: Sc in 2nd ch from hook and across (20).
Rows 2-6 :
Ch 1, turn. Sc in each st across (20). Work 5-6 rows depending on desired scarf length and thickness.
Info :
Add a fringe by cutting 4cm lengths of yarn and folding in half; attach every 2 stitches along one short end using a lark's head knot for a dense tassel fringe as in photo. Sew scarf around snowman neck area and tack in place with a few invisible stitches.
Scarf Detail :
Optionally add 1-2 rows of hdc to create a ribbed look on the scarf before adding fringe. Use front loop only on the last row to make a folding edge.
— Buttons & Nose & Face Embroidery :
Button (Make 3 per snowman) :
With teal, make a small circular button: mr, 6 sc in mr (6). Sl st to join and fasten off leaving tail. Optional: Stuff a tiny bit of fiberfill and close to make a slightly raised button. Sew three vertically onto the body center.
Nose :
With orange, embroider a small cone: ch 3, 2 sc in 2nd ch from hook, 1 sc in last ch. Fasten off leaving tail and sew on as carrot nose centered on head. Alternatively crochet a tiny cone using 4 sc total and sew in place.
Eyes & Mouth :
Options: Use 6mm safety eyes placed between Rounds 11-12 on head (approx 8 stitches apart). For child-safe, embroider eyes with black yarn using French knots or small satin stitch. Mouth: embroider small dotted smile using black yarn and backstitch to create a dotted grin like the photo.
Info :
Position facial details before final sewing. If using safety eyes install them while head is flat and before sewing to body. For embroidered features, baste the head to body first so fabric doesn't shift.
— Twig Arms (Make 8 for all snowmen) :
Arm - Round 1 :
With dark brown, ch 12. Row 1: Sc in 2nd ch from hook and each across (11).
Rows 2-3 :
Ch 1, turn. Sc in each st across (11). Fasten off leaving tail for sewing. For forked twig ends make 2 small branches: at the end of Row 1, ch 4, sl st back into 3rd ch to create a fork then recenter and continue body of arm.
Info :
Twist the arm slightly and flatten when stitching to give a natural twig look. Sew arms into side seams of body between Rounds 7-10 of the body disc to appear as if they come from behind the body.
— Snowflake Motif (Make 8) :
Round 1 :
With teal, ch 4, sl st to first ch to form a ring. Ch 1, 8 sc in ring, sl st to join (8).
Round 2 :
Ch 3 (counts as dc), *dc in next st, ch 2, sl st in next st* repeat around to create 8 dc points separated by ch-2 loops. Sl st to join. (8 dc)
Round 3 :
Working in ch-2 loops: *(sc, hdc, dc, picot (ch 3 sl st to same st), dc, hdc, sc) in each ch-2 loop* x 8. Fasten off and weave ends. Add a small white 5-st center: with white, join in center and sl st 5 times to form small dot and secure.
Info :
Block snowflakes flat with pins. These motifs are sewn to the runner between and around snowmen to create a scattered winter effect. Alternate teal and teal-with-white-center for visual interest.
— Decorative Buttons & 3D Accents :
3D Button - Round 1 :
With teal, mr, 6 sc in mr (6). Round 2: 6 sc (6). Pull ring tight, sl st and leave tail. For a fuller button add a small tuft of stuffing before closing. Sew onto body using strong thread to secure.
Info :
Use 2-3 buttons per snowman body as shown. Place key decorative buttons on the lower disc, centered vertically. For the head of the bottom-most snowman in photo, add three stacked buttons for a playful look.
— Border Lattice & Tassel Bobbles :
Edge Prep :
Lay the blocked runner flat. If you left a tail at the panel edge, you can join border yarn by inserting hook into any corner stitch and join with sl st. For a neat corner, work 3 sc into each corner stitch in border rounds.
Border Round 1 :
With cream, join yarn at a corner. Sc evenly around the panel edge placing (3 sc) in each corner stitch. Work 1 sc in each row end across side edges and 1 sc in each st across the top/bottom. Maintain 60 sts across top and bottom. Sl st to join. Fasten off. (approx counts vary by blocking)
Info :
This creates a clean edge to begin the lattice. Count stitches and divide by desired lattice repeats to space the X pattern evenly around the perimeter.
Lattice Round 2 :
Join yarn and ch 6, skip 2 sc, sl st in next sc. *Ch 6, skip 2 sc, sl st in next sc* repeat around. This forms looped arches. Fasten off and weave ends. Space loops consistently; adjust chain length for larger or smaller lattice gaps.
Info :
For the macrame look shown, create a second layer of crossing chains anchored to the panel every third arch to create diamonds. Use the following anchoring repeat to create Xs across the short edge and long edge in even spacing.
Lattice Round 3 :
With same cream, rejoin at a corner, ch 1, *sc in top of arch, ch 10, sc in the next arch top, ch 10, sc in next arch top* to form long chain bridges; after finishing a side, work diagonal connectors by inserting hook into the 5th chain of opposite arches and making a sl st to create an X. Repeat around the runner to form diamond-shaped lattice across the outside edge.
Info :
Take time to pin each X connector in position before committing; this keeps angles consistent. The diamond spacing framed by the bobbles should match the visual scale in the photo.
Tassel Bobble Making :
Cut 10cm lengths of cream yarn. Wrap yarn around a 2.5cm wide template 12 times for a medium bobble. Slide loops off template, tie the top tightly with a contrasting stub of yarn and fold in half. Wrap another piece of yarn around the top to create a neck and trim loose ends to create a rounded tassel bobble. Fluff and trim to uniform size.
Tassel Attachment :
Sew one tassel to each lattice diamond intersection around the perimeter using the top neck loop. Space tassels evenly; for our panel attach 26-30 tassels total (13-15 per long side and 3-4 per short side depending on final counts). Secure with tight stitching and knot, then hide ends inside lattice.
Info :
Ensure tassels hang straight by trimming them to the same length and lightly steaming them after attachment. If you prefer pom-poms instead of tassels, make small yarn pom-poms and sew them to lattice intersections.
— Final Assembly & Sewing Appliques :
Info :
Position snowmen and snowflakes on blocked runner using pins. For the layout seen in the photo, place four snowmen centers in a single column down the center, alternate snowflakes to right and left of each snowman so they appear like scattered clusters. Measure horizontally to make sure the column is centered (use center stitch column as reference).
Sewing Body to Runner :
Use the long tail from each applique or a matching sewing thread. With yarn needle, whip stitch through back loops of body disc and the runner fabric around the perimeter of the applique. Use small, even stitches spaced every 4-6 sts to keep the edge flat and invisible from the front. For heavier security add a few stitches through the center of the disc to keep it from flaring at the edge.
Info :
Sew head to the upper edge of body disc, overlapping slightly so that the seam is hidden. Sew the hat brim around the head top and tack hat top in place with a few discrete stitches. Attach scarf with a hidden slip stitch under the head seam and tack fringe in place to prevent sagging.
Sewing Snowflakes :
Sew each snowflake into place by stitching through the center and anchoring a few stitches into the runner. Keep stitches small and use matching teal thread to avoid visible seams. If a raised look is desired, sew small spots of fiberfill beneath the center before anchoring.
Final Touches :
Embroider small dotted smiles and cheeks, secure all buttons and arms, trim loose ends, and lightly steam the completed runner to set fibers. Hang or lay flat and enjoy!
Info :
For a more heirloom finish, mount a thin craft interfacing on the back of the runner to stabilize the fabric and keep appliques from sagging over time. Use hand-stitching to attach interface near seams only so it remains flexible.
This festive snowman runner brings cozy winter charm to any table — the teal accents pop beautifully against the soft neutral background. Each applique is a small moment of joy, and the macrame-style tassel border gives a handcrafted boutique finish. I hope this pattern inspires you to make one for your holiday table or as a thoughtful handmade gift! 🧶❄️✨