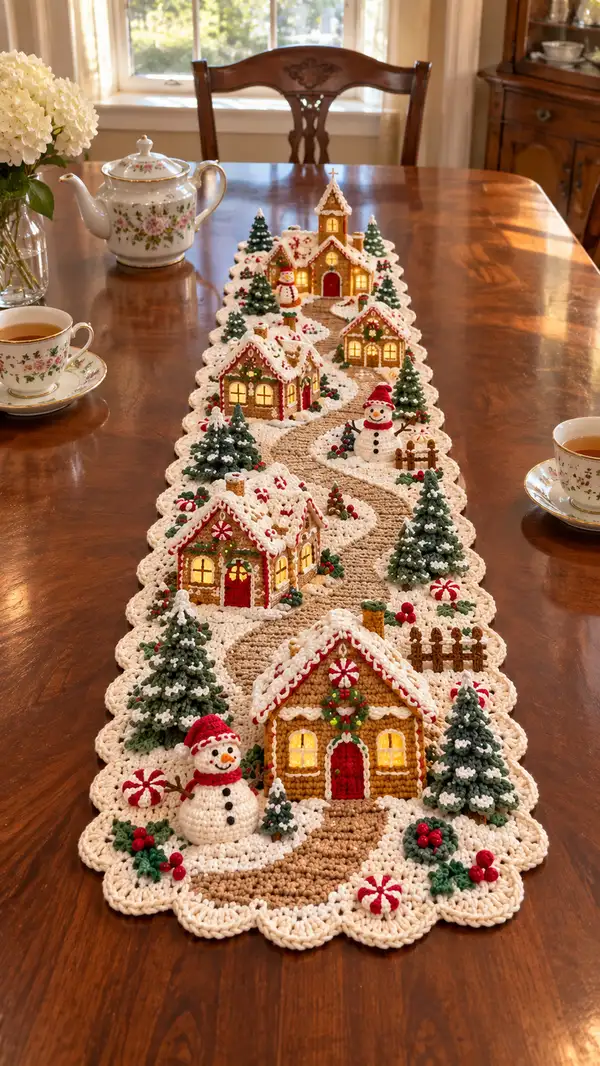
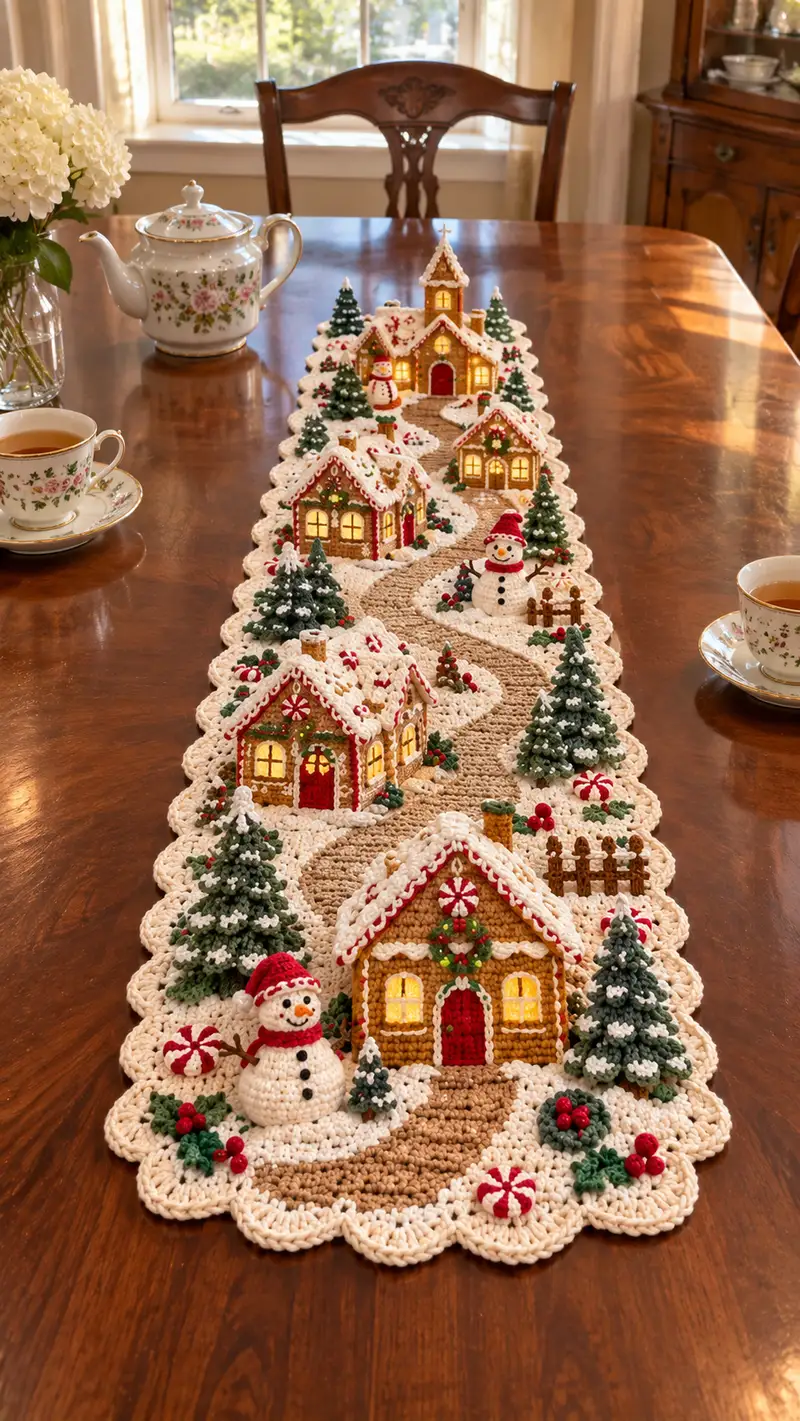
Create a whimsical Gingerbread House Village Table Runner featuring textured snowy paths, tiny lit windows, snowmen, pine trees, candy accents and scalloped edges. This richly detailed home-decor pattern uses small 3D motifs appliqued to a central runner base for a festive, heirloom centerpiece. Designed to display across a dining table, the runner mixes surface crochet, applique, and small amigurumi-style motifs for a charming holiday scene.
Progress Tracker
0% Complete
— Runner Base :
Round 1 :
Ch 61, join with sl st to first ch to form a ring taking care not to twist (61)
Round 2 :
Ch 1, sc in same st and in each ch around, join with sl st to first sc (61)
Round 3 :
Ch 2 (does not count as st), hdc in same st, hdc in each st around, join (61)
Info :
Work runner length as a long strip; this foundation is the central path width. If you want a longer runner, add multiples of 2 chains to the foundation.
Round 4 :
Ch 1, sc in each st around; when you reach the end of round, place stitch marker in the center st of the short edge to help align scallops later (61)
Round 5 :
Ch 3, dc in next st and in each st around producing a slightly taller textured field (61)
Round 6 :
Ch 1, sc in each st around (61)
Round 7 :
Ch 2, hdc in each st around (61)
Round 8 :
Switch to 'path' color (light tan). Info: change to light tan here to begin the winding path. Carry cream inside or finish tails for neater back.
Round 9 :
With tan, ch 1, sc in first 12 sts, hdc in next 37 sts (make a visible contrast path by alternating sc and hdc zones), sc in final 12 sts; join (61)
Round 10 :
Ch 1, sc in each st around (61)
Round 11 :
Ch 2, BLO hdc across 61 sts to create a subtle ridge where the path meets snow (61)
Info :
Use BLO for a ridge that visually separates path and snow fields. Keep tension even. If adding cable or surface slip-stitch path, mark the center line now with a removable marker for later surface slip-stitching.
Round 12 :
Ch 1, sc in each st around (61)
Round 13 :
Ch 2, hdc in each st around (61)
Round 14 :
Ch 1, sc in each st around (61)
Round 15 :
Ch 1, sc in next 6 sts, *2 sc in next st (inc); repeat from * across until last 6 sts, sc in final 6 sts (67)
Round 16 :
Ch 1, sc in each st around (67)
Round 17 :
Ch 2, hdc in each st around (67)
Round 18 :
Ch 1, sc in each st around (67)
Info :
Begin planning placement of houses and large motifs. Measure and mark positions along the center line; photo reference shows five houses spaced evenly with small clusters of trees between.
Round 19 :
Ch 1, sc in next 8 sts, *2 sc in next st (inc); repeat across until 8 sts remain; sc final 8 sts (73)
Round 20 :
Ch 1, sc in each st around (73)
Round 21 :
Ch 2, hdc in each st around (73)
Round 22 :
Ch 1, sc in each st around (73)
Round 23 :
Info: Create textured snow mounds by working 3D rounds in selected zones. Use cream yarn and work small circular mounds that will be appliqued later. For each mound make a 6-round motif: mr and sc increases to 30 sts, fasten off and set aside.
Round 24 :
Ch 1, sc in next 10 sts, *2 sc in next st (inc); repeat until last 10 sts; sc final 10 sts (79)
Round 25 :
Ch 1, sc in each st around (79)
Round 26 :
Ch 1, sc in next 12 sts, *skip 1 st, sc in next 3 sts (creates subtle scallops for later edging spacing); repeat pattern along short edges as needed (count will vary by runner length)
Round 27 :
Ch 1, sc in each st around (79)
Round 28 :
Begin scalloped border: *skip 1 st, 5 dc in next st, skip 1 st, sl st in next st; repeat around. Adjust spacing to make even scallops (approx 13 scallops per short edge zone)
Round 29 :
Work one more round of sc along scallop base to tidy: sc in each st and sl st into dc groups evenly to secure scallops (79)
Round 30 :
Fasten off and weave in ends. Block runner flat and pin scallops to set shape before final assembly.
Info :
Blocking is essential to get the scalloped edge looking neat. Use steam or wet blocking as yarn permits and pin scallops evenly along both long edges.
— Gingerbread House (Make 5 - full house instructions below) :
Round 1 :
With ginger/brown yarn, mr, 6 sc in mr (6)
Round 3 :
(1 sc, inc) x 6 (18)
Round 4 :
(2 sc, inc) x 6 (24)
Round 5 :
(3 sc, inc) x 6 (30)
Round 6 :
(4 sc, inc) x 6 (36)
Round 7 :
(5 sc, inc) x 6 (42)
Round 8 :
Sc in each st around (42)
Info :
This forms the floor/wall base of the house. Continue to build height by working even rounds; count will control wall width. Make a small rectangular house by flattening later.
Round 9 :
Sc in each st around (42)
Round 10 :
Sc in each st around (42)
Round 11 :
Change to tan/beige for inner wall highlight. Info: change color on last yarn over of previous round so new color starts neat. Sc in each st around (42)
Round 12 :
Sc in each st around (42)
Round 13 :
Begin roof shaping: (5 sc, dec) x 6 (36)
Round 14 :
(4 sc, dec) x 6 (30)
Round 15 :
(3 sc, dec) x 6 (24)
Info :
At this stage the top will start to close; leave opening for roof attachment or make roof separately then sew on for dimensional look. Insert small window inserts before closing if using battery lights.
Round 16 :
(2 sc, dec) x 6 (18)
Round 17 :
(1 sc, dec) x 6 (12)
Info :
Fasten off leaving long tail for sewing. Stuff lightly to give walls a slightly cushioned look if you want very 3D houses; for hollow lit houses do not stuff interior if you plan to insert tea light.
Roof - Make 2 per house :
With cream/ivory yarn and a slightly larger hook for drapey icing effect.
Round 1 :
Ch 20, sc in 2nd ch from hook and across (19)
Round 2 :
Ch 1, turn, sc across beginning and end rows to form a flat strip; join short ends together to make a cone when sewn to house top (19)
Round 3 :
Fold strip into a roof and join by sl st through both layers along short seam; now sc around raw edge of roof 19 sc to neaten
Round 4 :
Work icing piping: *ch 2, skip 1 st, sl st in next st; repeat along edge to make piped loops that look like icing drip. Fasten off and weave ends.
Info :
Sew roof to top of house using mattress stitch; attach slightly off-center for a charming hand-made look. Add white piped loops and small picot icings along ridge.
Door :
With red yarn, ch 7, sc in 2nd ch from hook and across (6). Work 4 rows sc to create small rectangle door; round 5: work 6 sc around perimeter to create arched top; attach centered on front wall and embroider wreath above door with green and red stitches.
Window (Make 2 per house) :
With yellow yarn, mr, 6 sc in mr (6); Round 2: inc around (12); Round 3: sc around (12); Fasten off leaving tail. Sew in place and back with matching tan to create 'lit' window look; if using tea lights leave back open and optionally line with thin cardboard behind the window opening.
Chimney :
With tan yarn, mr, 6 sc in mr (6); Round 2: (1 sc, inc) x 3 (9); Round 3-6: sc in each st (9). Fasten off and sew to side of roof. Embroider brick detail with darker brown yarn.
Gingerbread Trim & Candy Details :
Use white yarn to embroider icing scallops along corners and edges. Make small peppermint candies: with red and white yarn, ch 6, join to ring and work alternating sc to create a circle, then surface crochet stripes in red. For holly leaves: ch 6, sl st in first ch to form ring; work 5 hdc into ring, then 3 dc in next loop to create pointed leaf texture; make berry clusters with 3 small picot stitches in red.
Info :
Make five houses in total—slightly vary roof sizes and number of windows for visual interest. Use small battery tea lights set behind windows (inserted after attaching house to runner) for a cozy glow. If you prefer not to use lights, sew mirrored or gold fabric behind window openings to reflect ambient light.
— Evergreen Tree (Large) - Make 6 :
Round 1 :
With dark green yarn, mr, 6 sc in mr (6)
Round 3 :
(1 sc, inc) x 6 (18)
Round 4 :
(2 sc, inc) x 6 (24)
Round 5 :
(3 sc, inc) x 6 (30)
Round 6 :
Sc in each st around (30)
Round 7 :
Info: Begin creating layered branches. Work 3 tiers overall by making small circular 'ruffles' and sewing them onto the cone. For each tier make a scalloped ring that will be applied to the cone body.
Branch Tier A :
Ch 2, work 20 dc in a loop to create a wide ruffle, fasten off. Slightly gather center and tack to cone at lower third.
Branch Tier B :
Make smaller ruffle: ch 2, work 16 dc, fasten off; tack to cone mid-level.
Branch Tier C :
Top ruffle: ch 2, work 10 dc, fasten off; tack near the top leaving a small tip visible. Stuff base lightly before fully closing the top to keep the tree standing flat on runner.
Round 8 :
Optional garland: with contrasting lighter green work chain loops around branches and sew in place. Add tiny white French knots (seed beads) to simulate snow.
Info :
Vary tree sizes by starting foundation with 5 or 7 sc in magic ring to make smaller or larger trees. Use white yarn to add snow tips by dabbing small bobbles on branch edges.
— Snowman (Make 2-3) :
Base Ball Round 1 :
With cream yarn, mr, 6 sc in mr (6)
Round 3 :
(1 sc, inc) x 6 (18)
Round 4 :
(2 sc, inc) x 6 (24)
Round 5 :
(3 sc, inc) x 6 (30)
Round 6 :
Sc in each st around (30)
Round 7 :
Start decreasing: (3 sc, dec) x 6 (24)
Round 8 :
(2 sc, dec) x 6 (18)
Round 9 :
Stuff firmly and round off: (1 sc, dec) x 6 (12)
Round 10 :
6 dec (6) Fasten off. Leave long tail for sewing.
Info :
Make a medium ball for the torso and a small ball for the head. Head: same as above but stop at round 5 and decrease earlier to make a smaller sphere (finish with approx 16 sts at widest point).
Snowman Assembly :
Sew head to torso using ladder stitch. Embroider eyes and carrot nose with orange yarn; add buttons with small black yarn French knots or tiny black seed beads. Make a small hat by crocheting a short cylinder and adding a pompom.
Arms :
With brown yarn ch 6, sc back across (5), sl st for twig look, attach to snowman side and sew in place. Optionally insert short floral wire for shaping and coat with yarn to hide wire.
Info :
Stuff snowmen firmly so they sit upright on the runner. Flat-bottom assembly helps—stitch a few sc across the base to flatten slightly for stability.
— Small Pine & Candy Details :
Small Tree :
Mr, 5 sc in mr, inc around to 15, sc 2-3 rounds even, fasten off and stuff lightly. Make 6-8 small trees to scatter.
Peppermint Candy :
With white, mr 6 sc, change to red and surface stitch 4 stripes from center to edge with 3 sl st per stripe to create swirled candy, fasten off and leave tail for sewing.
Holly Leaf :
With holly green ch 6, sl st to first to form ring, (3 dc, sl st) x 3 to create three-point leaf; make 2-3 leaves per holly cluster and add 3 red french-knot berries.
Fence :
With tan yarn ch 15, sc across to make picket; make 3-4 short pickets and sew together into fence units; attach to runner near houses.
Info :
Create variations in candy by changing stripe color or making mini swirl disks to place near houses and trees. Use small seed beads for berry sparkle.
— Assembly & Surface Finishing :
Info :
Plan motif placement by laying out houses, trees and snowmen on the blocked runner. Leave at least 1.5 inches between large motifs for visual breathing room. Pin each piece in place before sewing.
Step 1 :
Sew houses onto runner at marked positions using strong yarn and a mattress stitch for a flat, nearly invisible seam. Attach roofs last after house is secured so roof overhangs read correctly.
Step 2 :
Sew trees by placing small stitches through runner and tree base; tack each tree with 6-8 stitches around base to secure. For added stability use a dab of fabric glue on underside then sew.
Step 3 :
Attach snowmen with ladder stitch through base. Ensure each base is slightly flattened for stability and add a few anchoring stitches through runner center to prevent tipping.
Step 4 :
Sew smaller embellishments—peppermints, holly and fence units—using short, invisible stitches. Use extra thread in high-traffic areas to prevent accidental loss.
Step 5 :
Optional: Insert small battery tea lights behind windows. Cut a small slit in runner at the back of a house to tuck light housing and tape safe battery pack underside of runner. Ensure lights are not left unattended when on display.
Step 6 :
Final touch: Add white puffed bobbles (small popcorn stitches) to roofs and trees to simulate snow; tack each with a single stitch so they stay secure.
Info :
Weave in all ends and trim. Once fully assembled, block again lightly to ensure all motifs sit flat and the scalloped edges are even.
Completing this Gingerbread House Village Table Runner is such a delight—the tiny houses, snowy trees and peppermint accents come together to create a magical holiday scene. Each stitch becomes part of a cozy centerpiece perfect for gatherings and table displays. I love how the little lit windows glow when you add tea lights, and how each 3D motif invites closer inspection. Enjoy assembling this heirloom runner and sharing it year after year! 🎄✨