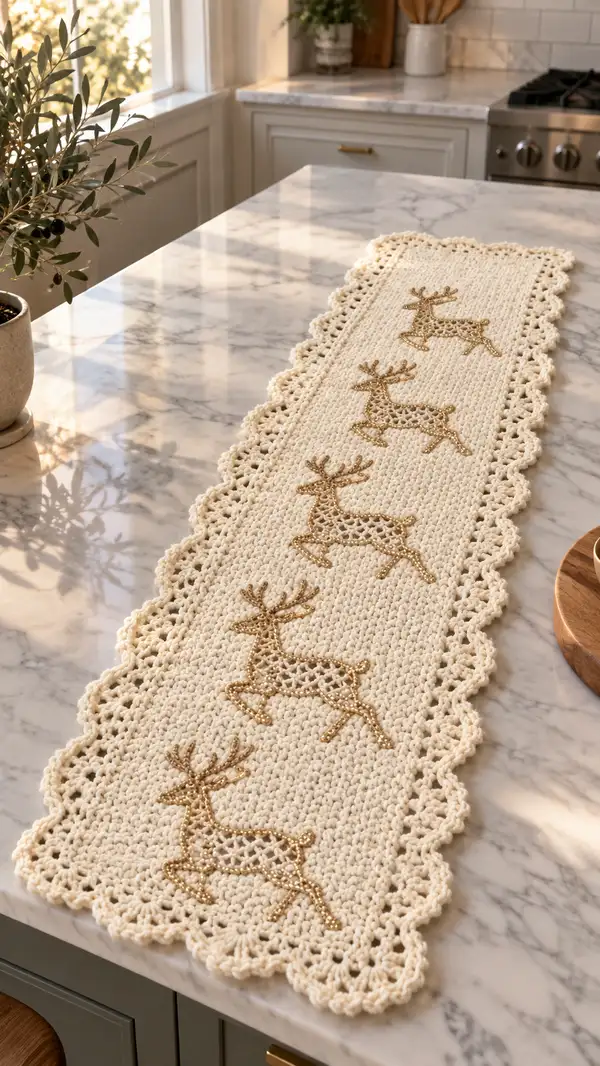
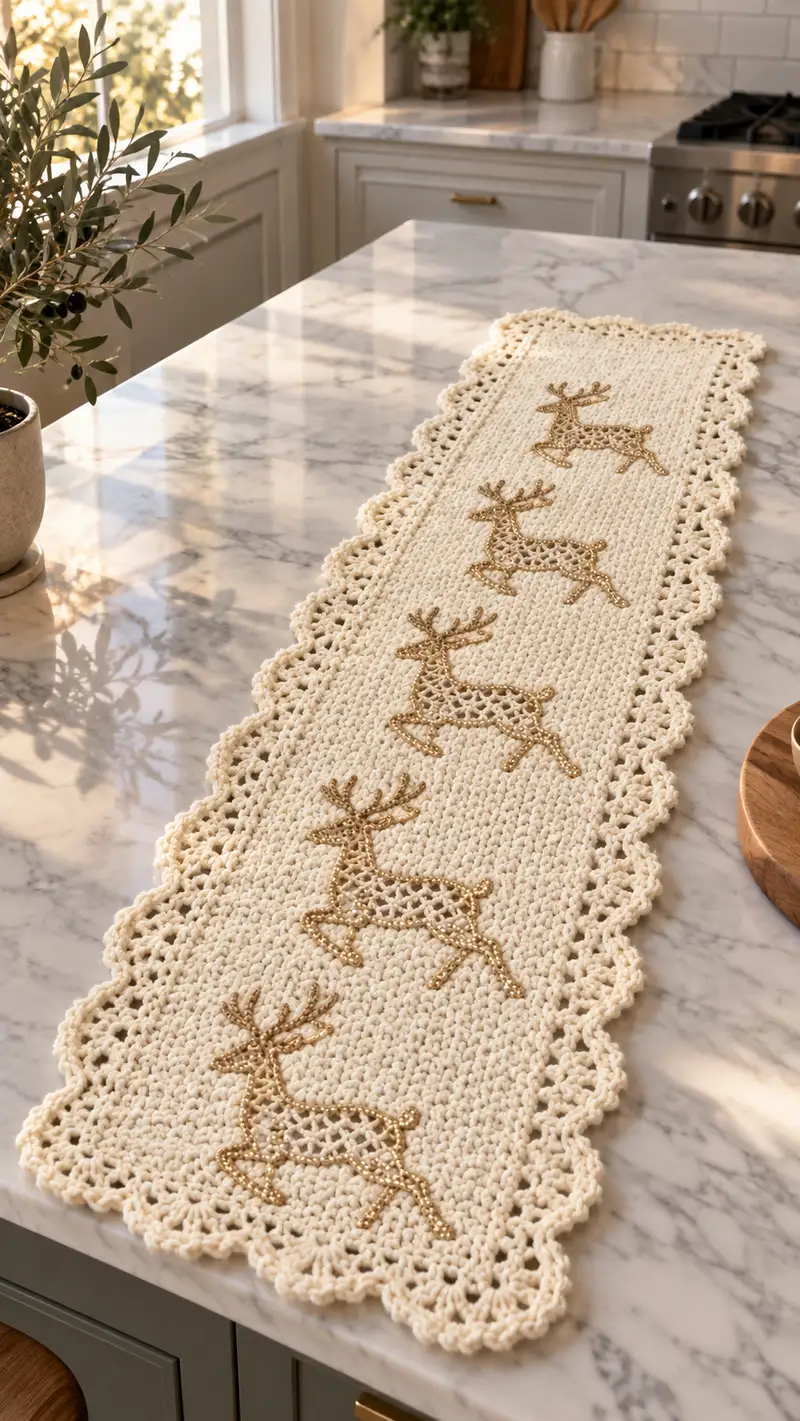
Create a warm, elegant Ivory Reindeer Table Runner with delicate scalloped lace edges and subtle gold reindeer embroidery. This cozy runner features a textured single crochet body in a soft cream yarn and metallic surface stitching to form festive reindeer motifs down the center. The balanced, neutral palette works beautifully with seasonal decor or year-round farmhouse style. Detailed, step-by-step instructions and helpful tips guide you through construction, embroidery, and finishing for a professional-looking result.
Progress Tracker
0% Complete
— Notes & Gauge :
Info :
Runner is worked flat in rows. Gauge is not critical for a decorative runner but recommended gauge for similar look: 12 sc x 16 rows = 4 in (10 cm) in sc BLO using 5.0mm hook with worsted yarn. Final approximate finished size: 12.5 in (32 cm) wide x 54 in (137 cm) long including edging. Adjust width by increasing foundation chain in multiples of 6 to keep shell repeats aligned.
— Foundation & Setup :
Round 1 :
Ch 85. This counts as the foundation chain across width; ch 85 gives 84 usable chain-based stitches for first row (84)
Round 2 :
Row 1: Sc in 2nd ch from hook and in each ch across. Turn. (84)
Round 3 :
Row 2: Ch 1, sc BLO in each st across. Turn. (84)
Info :
Working the second row in back loops only (BLO) creates a subtle ridge texture that reads like the woven look in the photo. Maintain consistent tension and use a stitch marker at each end to mark turning points and keep edges straight.
— Main Panel (Rows 1-80) :
Round 4 :
Row 3: Ch 1, sc in each st across (work in both loops). Turn. (84)
Round 5 :
Row 4: Ch 1, sc BLO in each st across. Turn. (84)
Round 6 :
Row 5: Ch 1, sc in each st across. Turn. (84)
Round 7 :
Row 6: Ch 1, sc BLO in each st across. Turn. (84)
Info :
Alternate sc and sc BLO rows to accentuate texture. Use a turning chain of ch 1 for sc rows and keep counts consistent. Place a removable stitch marker at the center stitch of each row (st 42) for motif alignment; this helps when marking reindeer centers.
Round 8 :
Row 7: Ch 1, sc in each st across. Turn. (84)
Round 9 :
Row 8: Ch 1, sc BLO in each st across. Turn. (84)
Round 10 :
Row 9: Ch 1, sc in each st across. Turn. (84)
Round 11 :
Row 10: Ch 1, sc BLO in each st across. Turn. (84)
Info :
Mark the rows where reindeer motifs will be centered. This runner includes five reindeer spaced evenly down the length. Plan for centers at row positions: 12, 26, 40, 54, and 68. Use scrap yarn or pins to mark the center stitch and the vertical band where the motif will sit (approximately 18 stitches wide centered on st 42, i.e., sts 33-50).
Round 12 :
Row 11: Ch 1, sc in each st across. Turn. (84)
Round 13 :
Row 12: Ch 1, sc BLO in each st across. Turn. (84)
Round 14 :
Row 13: Ch 1, sc in each st across. Turn. (84)
Round 15 :
Row 14: Ch 1, sc BLO in each st across. Turn. (84)
Info :
Begin your first surface embroidery motif after completing Row 14 (centered at Row 12 marker). Embroider while fabric is flat to maintain accurate stitch mapping. See the 'Reindeer Embroidery' section for step-by-step duplicate stitch/surface slip instructions mapped to panel stitch coordinates.
Round 16 :
Row 15: Ch 1, sc in each st across. Turn. (84)
Round 17 :
Row 16: Ch 1, sc BLO in each st across. Turn. (84)
Round 18 :
Row 17: Ch 1, sc in each st across. Turn. (84)
Round 19 :
Row 18: Ch 1, sc BLO in each st across. Turn. (84)
Info :
Complete a motif after each marked center row sequence. Keep motifs vertically centered across approximately 14-18 rows of height and 16-20 sts in width. Before stitching, use a ruler to ensure equal vertical spacing between motif centers; adjust if needed to maintain symmetry.
Round 20 :
Row 19: Ch 1, sc in each st across. Turn. (84)
Round 21 :
Row 20: Ch 1, sc BLO in each st across. Turn. (84)
Round 22 :
Row 21: Ch 1, sc in each st across. Turn. (84)
Round 23 :
Row 22: Ch 1, sc BLO in each st across. Turn. (84)
Info :
If you prefer to carry an accent yarn and work the reindeer using tapestry crochet instead of surface embroidery, change to metallic yarn at the start of each motif band and carry the main color behind. This will alter texture and thickness; surface embroidery is recommended for a delicate metallic line like the photographed design.
Round 24 :
Row 23: Ch 1, sc in each st across. Turn. (84)
Round 25 :
Row 24: Ch 1, sc BLO in each st across. Turn. (84)
Round 26 :
Row 25: Ch 1, sc in each st across. Turn. (84)
Round 27 :
Row 26: Ch 1, sc BLO in each st across. Turn. (84)
Info :
After Row 26, place markers for second motif center at Row 26. Repeat the embroidery steps for the second reindeer motif once Row 26 band is completed; keep motifs aligned to center stitch 42 and the same horizontal width as the first motif.
Round 28 :
Row 27: Ch 1, sc in each st across. Turn. (84)
Round 29 :
Row 28: Ch 1, sc BLO in each st across. Turn. (84)
Round 30 :
Row 29: Ch 1, sc in each st across. Turn. (84)
Round 31 :
Row 30: Ch 1, sc BLO in each st across. Turn. (84)
Info :
Continue working alternating sc and sc BLO rows. The subtle alternation gives the textured appearance similar to the photograph. Keep counting; 84 stitches across will remain constant unless you intentionally increase or decrease to change width.
Round 32 :
Row 31: Ch 1, sc in each st across. Turn. (84)
Round 33 :
Row 32: Ch 1, sc BLO in each st across. Turn. (84)
Round 34 :
Row 33: Ch 1, sc in each st across. Turn. (84)
Round 35 :
Row 34: Ch 1, sc BLO in each st across. Turn. (84)
Info :
Mark the third motif center at Row 40 (after Row 34 you will work towards the middle). Keep the same 18-stitch width marking. If your panel is shorter or longer, redistribute the five motifs evenly, but keep centers symmetric from the vertical midpoint.
Round 36 :
Row 35: Ch 1, sc in each st across. Turn. (84)
Round 37 :
Row 36: Ch 1, sc BLO in each st across. Turn. (84)
Round 38 :
Row 37: Ch 1, sc in each st across. Turn. (84)
Round 39 :
Row 38: Ch 1, sc BLO in each st across. Turn. (84)
Info :
Work until Row 40 and complete the center motif. At this midpoint you may want to check that top and bottom motifs remain evenly spaced. If one side is longer by a row or two, shift subsequent motif centers one row to rebalance visually.
Round 40 :
Row 39: Ch 1, sc in each st across. Turn. (84)
Round 41 :
Row 40: Ch 1, sc BLO in each st across. Turn. (84)
Round 42 :
Row 41: Ch 1, sc in each st across. Turn. (84)
Round 43 :
Row 42: Ch 1, sc BLO in each st across. Turn. (84)
Info :
At the midpoint motif, check your metallic embroidery tension. The metallic thread should lie flat and not pull the fabric. If it puckers, loosen your embroidery stitches and secure with small anchoring stitches at motif edges.
Round 44 :
Row 43: Ch 1, sc in each st across. Turn. (84)
Round 45 :
Row 44: Ch 1, sc BLO in each st across. Turn. (84)
Round 46 :
Row 45: Ch 1, sc in each st across. Turn. (84)
Round 47 :
Row 46: Ch 1, sc BLO in each st across. Turn. (84)
Info :
Proceed to place and embroider the fourth motif at Row 54 and the fifth at Row 68 as marked earlier. If you find motif spacing will conflict with your chosen runner length, adjust by adding or subtracting even pairs of rows between motifs to maintain visual rhythm.
Round 48 :
Row 47: Ch 1, sc in each st across. Turn. (84)
Round 49 :
Row 48: Ch 1, sc BLO in each st across. Turn. (84)
Round 50 :
Row 49: Ch 1, sc in each st across. Turn. (84)
Round 51 :
Row 50: Ch 1, sc BLO in each st across. Turn. (84)
Info :
When embroidering lower motifs, work carefully so the metallic thread on earlier motifs does not snag. Keep the panel flat and anchored with pins if needed, and use small stitches to anchor long metallic thread tails on the underside with your yarn needle.
Round 52 :
Row 51: Ch 1, sc in each st across. Turn. (84)
Round 53 :
Row 52: Ch 1, sc BLO in each st across. Turn. (84)
Round 54 :
Row 53: Ch 1, sc in each st across. Turn. (84)
Round 55 :
Row 54: Ch 1, sc BLO in each st across. Turn. (84)
Info :
Complete the fourth motif after Row 54. Ensure consistent motif width by counting stitches across; each motif sits within sts 33 through 50 (centered on st 42). Use duplicate stitch mapping from the 'Reindeer Embroidery' section.
Round 56 :
Row 55: Ch 1, sc in each st across. Turn. (84)
Round 57 :
Row 56: Ch 1, sc BLO in each st across. Turn. (84)
Round 58 :
Row 57: Ch 1, sc in each st across. Turn. (84)
Round 59 :
Row 58: Ch 1, sc BLO in each st across. Turn. (84)
Info :
Work towards the final motif area. Double-check measurement from top edge to ensure bottom motifs align symmetrically. If necessary, add or subtract paired rows outside the motif bands to shift spacing without affecting motif shape.
Round 60 :
Row 59: Ch 1, sc in each st across. Turn. (84)
Round 61 :
Row 60: Ch 1, sc BLO in each st across. Turn. (84)
Round 62 :
Row 61: Ch 1, sc in each st across. Turn. (84)
Round 63 :
Row 62: Ch 1, sc BLO in each st across. Turn. (84)
Info :
Complete the fifth motif area at Row 68 marker. Once all embroidery motifs are complete, continue with the remaining sc/sc BLO alternation until Row 80 is reached. Trim and weave in tails from embroidery securely on the back side.
Round 64 :
Row 63: Ch 1, sc in each st across. Turn. (84)
Round 65 :
Row 64: Ch 1, sc BLO in each st across. Turn. (84)
Round 66 :
Row 65: Ch 1, sc in each st across. Turn. (84)
Round 67 :
Row 66: Ch 1, sc BLO in each st across. Turn. (84)
Info :
Finish main panel to Row 80. After Row 80, fasten off and block the panel flat to final dimensions using a steam iron (low) or wet block and mat. Blocking ensures a straight edge for attaching the lace scalloped edging and gives the runner a crisp finished appearance.
Round 68 :
Row 67: Ch 1, sc in each st across. Turn. (84)
Round 69 :
Row 68: Ch 1, sc BLO in each st across. Turn. (84)
Round 70 :
Row 69: Ch 1, sc in each st across. Turn. (84)
Round 71 :
Row 70: Ch 1, sc BLO in each st across. Turn. (84)
Round 72 :
Row 71: Ch 1, sc in each st across. Turn. (84)
Round 73 :
Row 72: Ch 1, sc BLO in each st across. Turn. (84)
Round 74 :
Row 73: Ch 1, sc in each st across. Turn. (84)
Round 75 :
Row 74: Ch 1, sc BLO in each st across. Turn. (84)
Round 76 :
Row 75: Ch 1, sc in each st across. Turn. (84)
Round 77 :
Row 76: Ch 1, sc BLO in each st across. Turn. (84)
Round 78 :
Row 77: Ch 1, sc in each st across. Turn. (84)
Round 79 :
Row 78: Ch 1, sc BLO in each st across. Turn. (84)
Round 80 :
Row 79: Ch 1, sc in each st across. Turn. (84)
Round 81 :
Row 80: Ch 1, sc BLO in each st across. Fasten off leaving long tail for seaming to edging if attaching. (84)
Info :
Block your main panel flat to 12.5 in wide by 54 in long (32 x 137 cm) or desired dimensions. Use pins and steam or wet-blocking. Accurate blocking ensures the scallop repeats will sit evenly along the edges.
— Reindeer Embroidery (Surface Stitch Mapping & Steps) :
Info :
Embroider motifs using a metallic gold yarn and duplicate stitch or surface slipstitch. Each reindeer motif occupies 18 stitches in width (sts 33-50 centered on st 42) and 14 rows in height vertically. The following steps use a simple mapping to create a stylized running reindeer comprised of a filled triangular body lattice, legs, head, antlers and tail—work slowly and practice on scrap before committing to the runner.
Round 82 :
Step 1: Thread tapestry needle with metallic yarn. From the back, bring yarn up at center point (row of center marker, st 42) to anchor nose area. Leave a 6 in tail on the back to weave under later. Pull snug but not tight.
Round 83 :
Step 2: Nose and muzzle: Using tiny duplicate stitches, form a small triangular nose occupying 2 stitches width and one row high centered on st 42. Make 2 horizontal duplicate stitches within same row to outline nose then fill with short back-and-forth stitches for shine.
Round 84 :
Step 3: Head: Move one stitch left and one row up; form a head oval by stitching 3 stitches across and 2 rows high. Outline head with surface slipstitch then fill lightly with duplicate stitch. Keep stitches small to avoid bulk.
Round 85 :
Step 4: Antlers: From the top of the head, stitch two branching antlers. For each antler, work a short line 3-4 duplicate-stitches up and then branch into two or three small prongs by stitching short lateral stitches. Repeat symmetrically on both sides of head.
Info :
Antlers are delicate; use a thinner metallic thread or separate plies to reduce bulk. Anchor ends with small knots on the back then weave-in tails for security. Practice antler shape on scrap to get natural curves.
Round 86 :
Step 5: Neck and top of body: From the head base stitch a short diagonal connecting 3-4 stitches forming the neck. Continue into the triangular lattice body beginning with an outline of 10 stitches across and 6-8 rows tall.
Round 87 :
Step 6: Body lattice: Create decorative open lattice within the body by alternating small X-shaped stitches across the interior: anchor at upper-left of body field, stitch diagonally down-right 2 sts, then up-left 2 sts to form an X; repeat to form a net pattern of 3 columns by 3 rows. Keep tension light so the metallic thread does not pucker the fabric.
Round 88 :
Step 7: Legs: From the lower corners of the body, stitch slender leg lines extending down 3-4 rows and angling backward/forward as shown in photo. Each leg is 2-3 stitches in length and finished with a small round hoof (a 2-stitch filled dot).
Round 89 :
Step 8: Tail: At the rear corner, stitch a small dot or short line for the tail and finish with a tiny knot or fill stitch to catch light.
Info :
Use short lengths of metallic yarn and tie/secure on the wrong side frequently to avoid long loose threads. If using metallic thread, thread conditioner or a small dab of clear glue on ends can reduce fraying while weaving in. For a matte gold look use a gold-blend wool rather than metallic film yarn.
Round 90 :
Step 9: Detail dots: Add small decorative dots along the back and chest with one or two duplicate stitches to mimic the spotting/detail in the photograph. Space evenly: for an 18-st wide body, place dots in columns at sts 36, 42, and 48 within the lattice rows.
Round 91 :
Step 10: Secure and finish: Bring the needle to the back after each motif, make a small overhand knot or weave 1-2 in of tail through the back stitches, trim close. Repeat embroidery for each marked motif center (rows 12, 26, 40, 54, 68).
Info :
If you make a mistake in embroidery, carefully unpick by sliding the metallic thread back through the duplicate stitches and rework. Keep motifs consistent by using the first motif as a template; count rows and stitches as you work subsequent motifs.
— Side Scalloped Lace Edging (Make 2 Long Edges) :
Info :
Each long side edging is worked separately and sewn to the runner after blocking to ensure perfect alignment. Edging is worked from a foundation chain equal to the number of rows in the panel plus 1 (to match panel height). For our 80-row panel, foundation ch for the edging = 81. Each scallop occupies a 6-st repeat so 84 stitches across panel width gives 14 scallops (84/6 = 14). We will create 14 scallops along each side to match evenly.
Round 92 :
Edging - Long Side Foundation: Ch 81. (81)
Round 93 :
Row 1: Sc in 2nd ch from hook and each ch across to end. Turn. (80)
Round 94 :
Row 2: Ch 1, sc in each st across. Fasten off. You should have 80 sc—this will align to the 80 rows of the main panel for seaming. (80)
Round 95 :
Row 3: Join at one short end and prepare for scallop shells: Join with sl st to first st, ch 3 (counts as dc), *sk 2 sc, (5 dc, ch 2, 5 dc) in next sc (shell made), sk 2 sc, sc in next sc; rep from * across until you have made 14 shells. End with sc in last st, fasten off. (14 shells)
Info :
Each shell is (5 dc, ch 2, 5 dc) worked into a single base stitch. Between shells we place sc spacers (sk 2 sc, shell in next sc) to create open lacy scallops. Adjust the spacing if your panel height or edging chain differs; ensure shell count equals number of repeats across the panel width (14 shells for 84-st width).
Round 96 :
Row 4: With long side laid against panel, pin scallops evenly and align edges so sc rows line up with panel rows. Sew edging to panel using a mattress stitch or whipstitch through both loops of main panel and edge foundation rows; use main color yarn and sew from wrong side for an invisible seam.
Info :
Start sewing at one end and work steadily; space stitches about every 4-5 rows to prevent bunching. Keep tension even and check scallop alignment frequently. If the scallops look too large for your panel, use a slightly smaller hook (4.0mm) for the edging to tighten shells.
— Short End Corners & Finishing Scallops (Make 2 Ends) :
Round 97 :
End Edging - Foundation: At both short ends, join with sl st into edge foundation and ch 25. (25)
Round 98 :
Row 1: Sc in 2nd ch from hook and each ch across. Turn. (24)
Round 99 :
Row 2: Ch 1, sc in each st across. Fasten off. (24)
Round 100 :
Row 3: Working shell pattern along short end: Join at first corner stitch on long edge and work *sk 1 sc, (5 dc, ch 2, 5 dc) in next sc, sk 1 sc, sc in next sc* across short end until full. Make 4 smaller shells to create rounded corners. Fasten off. (4 shells)
Info :
Sew the short end edging into place matching shells to long side scallops. For a neat corner, ease slightly so shell edges curve naturally. Pin in place and sew with invisible stitches through the base of the shells and main panel edge loops.
— Final Finishing & Blocking :
Round 101 :
Info : After sewing both long side edgings and both short end scallops, weave in all hanging yarn tails using a tapestry needle, running ends along the wrong side of the runner and through the seams to secure.
Round 102 :
Info : Block the entire runner again after sewing edging to ensure shells lie flat and runner dimensions are correct. Mist any stubborn shells with water and reshape gently by hand; allow to dry fully on a flat surface before use.
Round 103 :
Info : If any scallops puff or the embroidery caused puckering, use light steam (no direct iron contact) to relax fibers then gently reshape. For metallic threads that remain stiff, a slightly damp cloth held over the area while steaming helps reduce shine and flatten lines.
Round 104 :
Info : Add light protective pads or felt under areas where heavy dishes will sit to protect the runner. Hand-wash cold and lay flat to dry; avoid machine washing to preserve metallic embroidery and scalloped edges.
Info :
Congratulations! Your Ivory Reindeer Table Runner is complete. Take time to admire the subtle texture and the shimmering reindeer motifs down the center. This runner is designed to be festive yet versatile—display for the holidays or as a year-round neutral accent.
This ivory reindeer runner blends a calm, neutral base with delicate metallic accents to create a timeless tabletop piece. Each scallop and embroidered stitch adds character and charm—perfect as an heirloom-style holiday accent or everyday farmhouse touch. Enjoy the satisfaction of creating something both beautiful and functional—each stitch is a small celebration. 🧶✨🎄