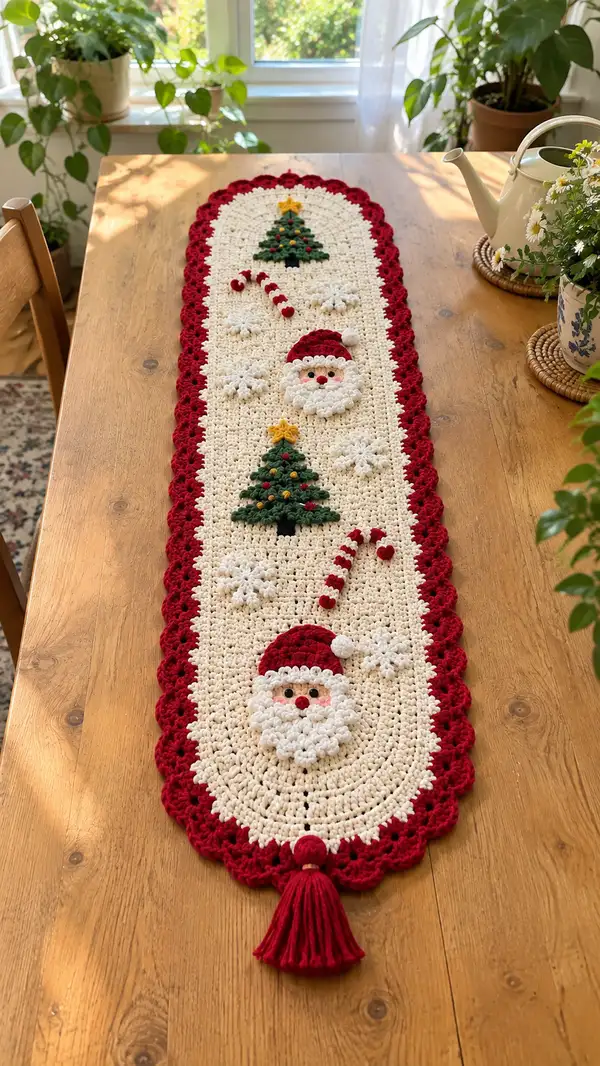
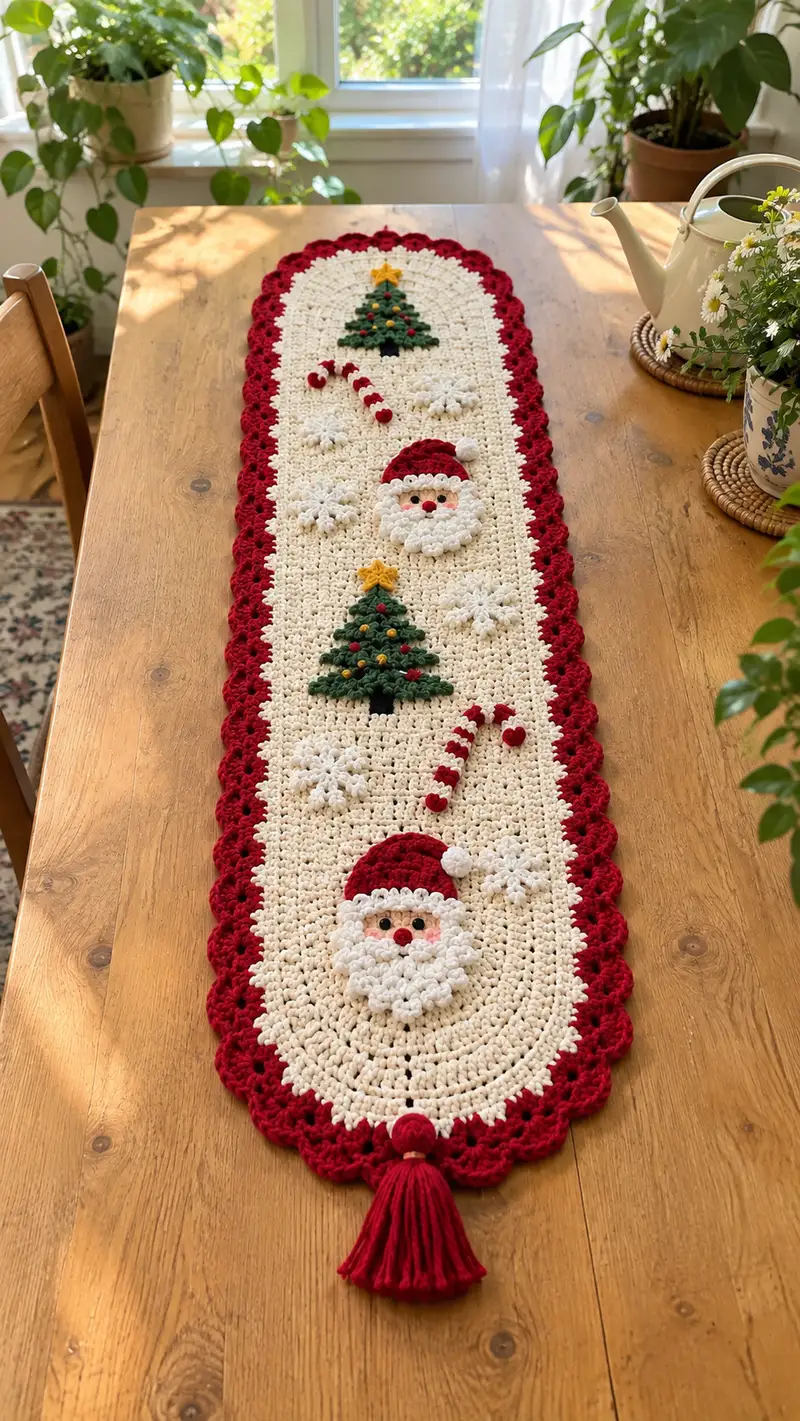
Create a long, oval Christmas table runner decorated with cheerful appliques — two smiling Santa faces, two layered Christmas trees, candy canes, and delicate snowflakes. Worked in a warm cream body with a deep red scalloped border and tassels at each end, this runner is full of texture and holiday charm. The pattern uses simple rounds and appliques assembled on top of the base, perfect for gifting or holiday table decor.
Progress Tracker
0% Complete
— Base Oval Runner :
Notes :
This runner is worked in continuous joined rounds to form a long oval. We divide the oval into 6 equal segments around the ends (3 segments across each rounded end) for consistent increases at the two semicircular ends. Round counts below assume a starting foundation chain of 36 and corner increases of 3 sc at each end; adjust foundation chain length to change starting width proportionally. Use stitch markers to mark the first stitch of each round and to mark the three segment seam points around each curved end if helpful.
Foundation :
Ch 36. This creates the long straight center of the oval. You will work around the chain to form an oval.
Round 1 :
Working in back loops of the foundation chain only if you'd like a faint ridge or in both loops for a smooth base: 1 sc in 2nd ch from hook and in each ch across to end (35 sc), 3 sc in last ch (corner made), now working along the opposite side of the chain, 1 sc in each ch across (36 sc), 2 more sc in the same first chain (to complete the second corner) — total stitches at end of round: 35 + 3 + 36 + 2 = 76. (76)
Info :
Place a stitch marker in the first sc of the round (not in the chain). From now on we will refer to the oval as having 6 segments; each segment length is total sts divided by 6. For Round 1 the segment length is 76/6 ≈ 12.67; practical repeat will use 6 equal segments of 12 or 13 as described below.
Round 2 :
We will begin with gentle increases to form the rounded ends. (12 sc, inc) x 6 = (12+1)*6 = 78 stitches. (78)
Round 3 :
(13 sc, inc) x 6 = 84. (84)
Round 4 :
(14 sc, inc) x 6 = 90. (90)
Info :
Check your work at this point for even curvature at both ends. The increases are spaced to maintain a smooth oval. If your oval is turning lopsided, count each of the 6 segments to ensure equal stitch counts per segment and reposition increases if needed.
Round 5 :
(15 sc, inc) x 6 = 96. (96)
Round 6 :
(16 sc, inc) x 6 = 102. (102)
Round 7 :
(17 sc, inc) x 6 = 108. (108)
Info :
At this stage your runner is widening. If you need a narrower runner, stop increasing earlier and proceed with even rounds instead. For the pictured runner we continue increases through Round 13.
Round 8 :
(18 sc, inc) x 6 = 114. (114)
Round 9 :
(19 sc, inc) x 6 = 120. (120)
Round 10 :
(20 sc, inc) x 6 = 126. (126)
Round 11 :
(21 sc, inc) x 6 = 132. (132)
Info :
From Round 12 onwards we reach intended full width. Count that each of the 6 segments has the expected number of base stitches between increases. Use a contrasting thread to temporarily mark segment boundaries if helpful for later applique placements.
Round 12 :
(22 sc, inc) x 6 = 138. (138)
Round 13 :
(23 sc, inc) x 6 = 144. (144)
Round 14-34 :
1 sc in each st around (144) — Work 21 rounds even to build the long straight central body of the runner. (144)
Info :
These even rounds create the main length of the runner. Place appliques on the flat body after Round 21 (counting from beginning) or wait until the runner is at your desired length. The pictured runner uses several even rounds to create a long length for three motif rows: top tree, middle Santa with surrounding snowflakes, bottom tree and another Santa. Keep even rounds flat and avoid stretching the fabric while working.
Round 35 :
1 sc in each st around (144). Begin to prepare for turning the oval end by maintaining flat rows; we will mirror the increases used at the top to round the opposite end later. (144)
Round 36 :
1 sc in each st around (144). (144)
Info :
If you want a longer runner, work additional even rounds here until you reach desired length. The pictured runner length was achieved by working Rounds 14-36 as even rounds then working mirror increases to terminate the opposite end.
Round 37 :
Mirror shaping: (23 sc, dec) x 6 = 138. (138)
Round 38 :
(22 sc, dec) x 6 = 132. (132)
Round 39 :
(21 sc, dec) x 6 = 126. (126)
Round 40 :
(20 sc, dec) x 6 = 120. (120)
Info :
These decreases round the opposite end of the oval, matching the curvature at the opposite side. Continue decreasing until your oval closes cleanly and the ends match visually. Fasten off and weave in ends once both ends are symmetrical.
Round 41 :
Change to deep red yarn for border. Join with a sl st in any stitch along the edge. Ch 1, sc evenly around the entire oval, placing 2 sc in each corner increase/decrease point to keep edge even — total stitches approx (120). (120)
Round 42 :
BLO Round for a ridge: 1 sc in each st BLO around to create a subtle ridge under the shell border. (120)
Round 43 :
Shell scallop round: *Sk 2 sts, 5 dc in next st (shell made), sk 2 sts, sl st in next st* — repeat around. At the end, adjust spacing with single crochets as needed to complete shells evenly. Expect approx 30 shells total depending on final stitch count.
Info :
Shell round spacing will vary slightly by stitch count. Place a stitch marker at the start of each shell repeat and count shells across one curved end to ensure symmetry. If needed, add or remove a few sc between shells to even out spacing.
Round 44 :
Fasten off leaving a long tail for attaching tassels. Make a decorative tassel and a yarn-wrapped bead or use a wooden bead to create the end finishing detail. See Tassel section below for instructions. Finish weaving in any remaining ends from the border.
— Santa Applique (Make 2) :
Notes :
Each Santa applique is worked flat in joined rounds in three color sections: face (blush/cream), beard (white textured bobbles/clusters), and hat (red with white trim and pom). We'll build the face as rounds of sc, then add beard clusters, hat rounds and a separate pom-pom. The face diameter in the picture is approximately 7-8 cm; adjust hook or yarn to change size. Make two identical Santa motifs and sew them into position on the runner.
Round 1 :
Using blush/cream main for face: MR, 6 sc in MR. (6)
Round 2 :
Inc in each st around — 6 inc = 12. (12)
Round 3 :
(1 sc, inc) x 6 = 18. (18)
Round 4 :
(2 sc, inc) x 6 = 24. (24)
Info :
Place eyes temporarily with stitch markers if you plan to use safety eyes or embroider the eyes later. In the pictured runner, small black felt or embroidered nostrils are used and small black beads or French knots for eyes. Place eyes between Rounds 5 and 6, about 6-8 sts apart depending on desired expression.
Round 5 :
(3 sc, inc) x 6 = 30. (30)
Round 6 :
1 sc in each st around (30). (30)
Round 7 :
1 sc in each st around (30). (30)
Info :
Fasten off blush/cream if you will add a separate white beard; you can crochet beard clusters directly onto this face base or make the beard separately and stitch on. For a puffy beard, we use popcorn or cluster stitches in the next rounds.
Beard Round 8 :
Join white in stitch where beard should begin (usually starting at lower center of face). Ch 1, *popcorn (5 dc popcorn) in next st, sk 1, sc in next*, repeat around lower 12-14 stitches to form semicircle beard texture. Adjust number of popcorn clusters to fit face width. Approx total post-beard sts remain 30 including added surface popcorns. (30 plus textured clusters)
Round 9 :
Work another round of popcorn clusters offset between the first round to make the beard fuller. Where clusters are placed, anchor them with sc or sl st into face base stitches so beard sits securely. (beard textured)
Info :
Stuff very lightly behind the beard area if you want the beard to puff out slightly. Use only a small pinch of fiberfill and distribute evenly so the applique stays flat enough to lay on the runner. Do not overstuff or sewing will be difficult.
Hat Round 10 :
Join deep red yarn at top of face. Ch 1, sc across 6 sts to start hat base, then (inc) at hat curve points to create wideness: (2 sc, inc) x 3 = 9 + previous = structure. For clarity, shape hat as a semicircular cap covering Rounds 10-14 with decreases to form a curved hat top.
Round 11 :
1 sc in each st across the hat shaping round for three rounds to build cap height. (approx 20 sc across shaped hat area depending on how many face stitches used) — Keep the red cap sitting above the brow area. (approx 20)
Round 12 :
Switch to white for hat trim: join white and work 1 sc in each st along the hat base to form a folded-looking trim. For a picot-look trim: *sc, ch 2, sl st in same st* across trim area to create scalloped trim instead of plain sc. (trim)
Round 13 :
Make small pom-pom: wind white yarn around your fingers or a small cardboard template and tie tightly, then trim to form a small pom. Sew the pom to the hat tip or make a crocheted small ball by MR: MR, 6 sc (6), close and stuff slightly, sew to hat. (pom)
Info :
Embroider cheeks with blush/ pink small yarn stitched as two small French knots or with small felt circles glued/safely sewn in place. Place the nose as a tiny red felted circle or sew a small red pom at the center of the face above the beard. Eyes can be tiny black beads sewn on or embroidered small French knots. Reinforce all small embellishments if this runner may be used around children.
Round 14 :
Finish any loose ends. Fasten off leaving tail for sewing applique to runner. Block each Santa flat and trim any stray fibers so the beard clusters look uniform.
— Christmas Tree Applique (Make 2) :
Notes :
Each tree is made of layered small triangular rows to create a small dimensional evergreen. We will build the trunk, then three or four tiers of foliage using dc clusters placed to overlap, adding tiny bobble-ornaments in mustard yellow and red and a small star at top in yellow.
Round 1 :
Trunk base: With black or dark brown, MR, 6 sc. (6)
Round 2 :
1 sc in each st around (6). Fasten off trunk and place to one side. (6)
Tier 1 Round 3 :
Join green where foliage will start (above trunk). Ch 2, 2 dc in same st, turn, sc across to shape a very short triangle: For clarity we will make small V-shaped layered tiers by working into a short chain foundation and joining into the tree base — instructions below create three overlapping tiers.
Round 4 :
Tier A (lowest/widest tier): Ch 5; Row-like: 1 dc in 3rd ch from hook, 2 dc in next, sl st to trunk foundation to anchor. Repeat a series of anchored V-stitches across to create the bottom leafy layer; expect 5-6 small V clusters across the bottom. (layered cluster)
Round 5 :
Tier B (middle tier): Join green slightly above and produce smaller V clusters (ch 4 formations with 2 dc clusters) offset so Tier B sits on top of Tier A. Make 4-5 clusters. (middle)
Round 6 :
Tier C (top tier): Make a small peak of 3 clusters to round out the tree top. (top)
Info :
Sew tiers together by anchoring sl sts into trunk base. Use a few small stitches to bring tiers forward so tree sits dimensional on runner. Add small mustard yellow and red tiny french knot yarn dots or 3 mm beads as ornaments across tiers. Place a small 5-point star on top created from mustard yarn by embroidering a star or crocheting a small flat star: MR, ch 2, (dc, ch 1) x 5, sl st to center, pull tight and weave ends—approx 5 petals.
Round 7 :
Fasten off and leave a long tail for sewing. Block the tree slightly with pins to keep the tiered shape while the applique dries if you used steam blocking. (tree done)
— Snowflake Motif (Make 3) :
Notes :
Small delicate snowflakes are worked using a combination of chains and picot stitches to create an airy motif that can be sewn flat onto runner. Each snowflake is worked in white yarn and is approx 4-5 cm in diameter as pictured. Make three identical motifs to scatter between appliques.
Round 1 :
MR, ch 3 (counts as dc), 11 dc in MR, join with sl st to top of ch3 — total 12 dc. (12)
Round 2 :
*Ch 3, sl st in next dc* around to create 6 loops; join. (6 loops)
Round 3 :
Into each loop: *(sl st, ch 3, picot (ch 3, sl st in 3rd ch), ch 3, sl st)* — work a decorative cluster forming a six-pointed snowflake. Fasten off leaving tail to sew. (6 points)
Info :
If you want more intricate snowflakes, add an additional round of small picots between points. Block each snowflake to open points out and keep them crisp. Wet blocking with pins works best for small motifs like these.
— Candy Cane Applique (Make 2) :
Notes :
Candy canes are small striped tubes shaped into a cane. We'll create a short crocheted tube in red and white alternation, then bend and stitch into cane shape. Optionally add tiny red hearts at the cane tip as a little accent.
Round 1 :
Using white: Ch 8, join with sl st to form a small ring, ch 1, 8 sc into ring — form a narrow tube base. (8)
Round 2 :
Change to red — 1 sc in each st around (8). (8)
Round 3-10 :
Alternate colors every round (white, red) working 1 sc in each st around, building a short tube of 8 rounds total (or desired cane length). Stuff lightly with a thin strand of stuffing or leave flat. (8)
Round 11 :
Bend the top of the tube into a cane curve and sew seam to hold the curve using matching thread. Add a tiny crocheted heart (MR, 6 sc, fasten off) in red and sew to cane tip if desired. Fasten off and weave ends. (candy cane)
Info :
Make two candy canes for symmetric placement. Use small, neat stitches when sewing the cane tip to keep the curve tight and tidy. If you prefer, use pipe cleaners inside for shape retention but remove them if the runner will be washed.
— Snowy Bobble Embellishments & Small Hearts :
Round 1 :
Small bobbles: Using red yarn, make tiny bobble embellishments by working *(2 dc, 1 tr, 2 dc) in same stitch, sl st to secure* at selected spots on runner or on candy cane ends. Fasten off leaving tail for sewing. Each bobble is approximately 0.7 cm diameter and should be secured thoroughly when sewn onto runner. (bobble)
Info :
These tiny bobbles are shown as small berry-like ornaments in the picture and add visual interest. Make many small dots to scatter across trees and spaces — use mustard, red, and a few green bobbles for variety and balance.
— Tassel & End Finishing (Make 2) :
Notes :
Create a thick tassel hanging from each runner end anchored under the scalloped border. The pictured runner has a yarn-wrapped bead or yarn ball cap above the tassel for a finished look.
Step 1 :
Cut 60 strands of red yarn approximately 16 cm long (length doubled). Fold in half and gather to form tassel. Thread the folded loop through a small wooden bead or wrap with yarn to make a bead-like cap and knot tightly to secure. Trim ends even to form tassel. (tassel)
Step 2 :
Sew the tassel loop into the center point of the scalloped edge at each end. Anchor with several tight stitches to secure the tassel under the border so it can hang freely. Weave in ends and trim neatly. (secured)
Info :
For an extra tidy finish, add a small dab of fabric glue or a drop of hot glue inside the bead cap to firmly hold the tassel knot in place. If you plan to launder the runner, avoid glue and use extra stitches to secure instead.
— Assembly & Placement :
Info :
Block the runner flat before assembly so appliques sit nicely on the base. After blocking and drying, pin each applique into place following the layout seen in the photo: Top tree near one end, small candy cane and snowflakes surrounding center Santa, center tree and the second Santa near the other end — leave equal spacing between motifs along the runner length. The photo layout has approximately 8-10 cm gaps between motifs, but place according to your own preference.
Step :
Sew appliques down using a yarn needle and matching yarn. Use invisible mattress stitches for edges of flat pieces (trees, snowflakes) and small whip stitches for dimensional pieces (Santa beard clusters) so they anchor securely. Reinforce high-stress points (like top of hat pom) with a few extra stitches to the base.
Info :
Weave all ends on the backside of the runner and trim any stray fibers. Steam press lightly from the wrong side if necessary to flatten the runner without crushing the appliques' texture.
Assembly Instructions
- Lay the blocked runner flat on a large clean surface and arrange all appliques in the desired positions using the photo as a guide. Space motifs evenly down the center panel and pin each piece in place before sewing.
- Attach Santa appliques by aligning the bottom edge of the beard with the runner surface (approx between rounds 18-22 of the base), pinning carefully, then sewing through the outer plain face rounds and base with small whip stitches around the perimeter for an invisible seam.
- Sew tree appliques so the trunk aligns with the central vertical guideline of the runner. Anchor each tree tier with several tiny stitches through the runner surface; ensure ornaments are sewn on after the tree is attached for neat placement.
- Attach candy cane appliques at an angle by tacking the cane tip first, then sewing along the tube with small stitches hidden under the stripes. Add tiny seam stitches to secure the curved tip to the runner.
- Pin snowflakes in place between larger motifs and use small visible stitch points at the center of each snowflake to hold it flat. Avoid stitching through decorative points to preserve lacy look.
- Sew tassels into the center dip of the scalloped border at each end. Use 6–8 passes of yarn through the border and through the tassel loop to anchor strongly, then weave in the tails and trim.
- Once all motifs are sewn, flip the runner over and reinforce any weak points with additional stitches. Weave in and trim all loose ends on the back for a clean finish.
- Optional: Lightly spray with fabric stiffener or starch if you want the runner to lay extra flat and hold the shape of appliques better.
Important Notes
- 💡Use stitch markers consistently at the start of each round to avoid counting errors and maintain proper shaping.
- 💡Stuff small elements (pom, tiny pom, small cane interior) very lightly; excess stuffing will flatten the applique when sewn.
- 💡For safety and durability, sew small beads or embellishments with multiple secure passes and a final knot tucked into the applique interior.
- 💡Keep tension even during the long even rounds; use a smaller hook if your fabric looks holey to prevent stuffing showing through motifs.
- 💡Pin and block each applique to shape prior to sewing it onto the base; this ensures a smooth, professional placement.
- 💡When changing colors, finish the stitch with the new color by pulling through on the final yarn over to create a clean join and minimal tails.
- 💡For machine washing friendliness, keep appliques very flat and avoid inserting wires; hand wash recommended for best longevity.
- 💡Weave in all ends securely by threading them through several stitches under the applique and then trimming close to the fabric.
This festive table runner brings handmade holiday charm to any table with cheerful Santas, decorated trees, candy canes and delicate snowflakes. Each applique adds character and texture while the deep red scalloped border and tassels frame the piece beautifully. Making this runner becomes a holiday ritual, and the finished work makes a wonderful gift or heirloom centerpiece. 🎄🧶✨
What is the finished size of this table runner?
Using worsted weight yarn and a 5.0 mm hook with the instructions above, the finished runner measures approximately 36-40 cm (14-16 in) wide at the center and about 120-130 cm (47-51 in) long including tassels. Adjust foundation chain and number of even rounds to enlarge or shorten it.
Can I use a different yarn weight for this pattern?
Yes. If you use thicker yarn (bulky), use a larger hook and be aware the runner will be proportionally wider and shorter in round count; thinner yarn will require more rounds to achieve the same size. Always swatch and measure gauge if you need a specific finished measurement.
How should I attach the appliques so they are secure?
Pin each applique in place, then use a yarn needle and matching yarn to sew with small, tight stitches around the edges. Use extra passes under high-stress points (hat pom, tree base). Avoid long visible stitches and weave in tails on the backside.
Can I make the runner machine washable?
Hand washing is recommended to preserve delicate appliques and tassels. If you need machine washability, use colorfast, washable yarns and avoid glued elements; secure appliques with dense stitches and use a mesh laundry bag on a gentle cycle.
How much stuffing is required for the pom-poms and small elements?
Very little stuffing is needed — a few grams only for each pom or small plush element. Use minimal filler to maintain a flat applique profile that lays nicely on the runner.
Can I customize the motifs?
Absolutely. Swap color palettes, change the number or placement of trees and Santas, or add other holiday motifs like bells or stars. The construction method is forgiving and lends itself to many creative variations.
What if my stitch count is off in the oval rounds?
Pause and recount each of the 6 segments; it’s best to unravel back to the last correct round to fix the count. Using multiple stitch markers to mark segment boundaries helps prevent off-by-one errors.
How do I prevent holes showing when attaching appliques?
Use a smaller needle and tighter stitches to sew appliques. Work through only a few loops where possible and avoid pulling yarn too tightly, which can pucker the background fabric and create visible holes.
Stay in the Loop!
Get notified when we release new free crochet patterns and join our crafting community!