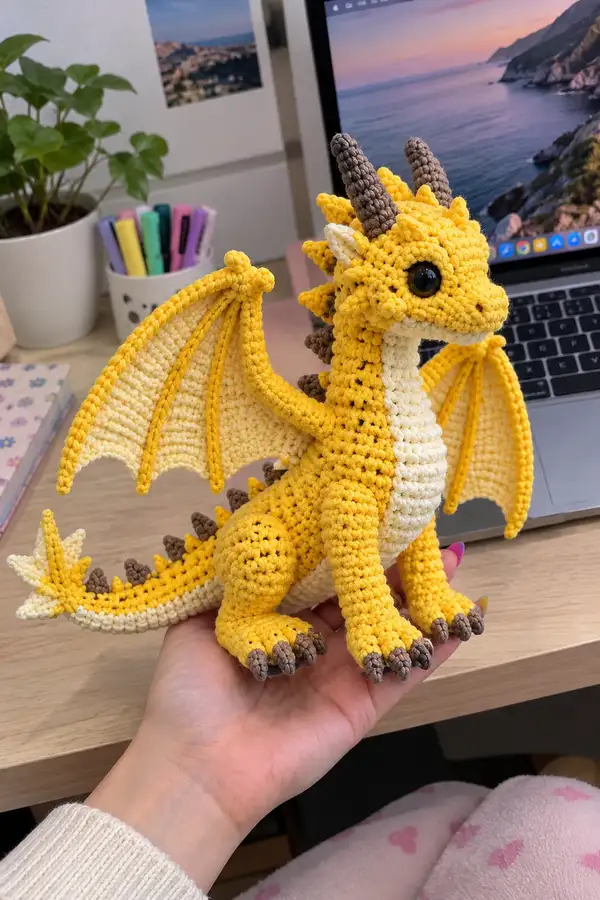
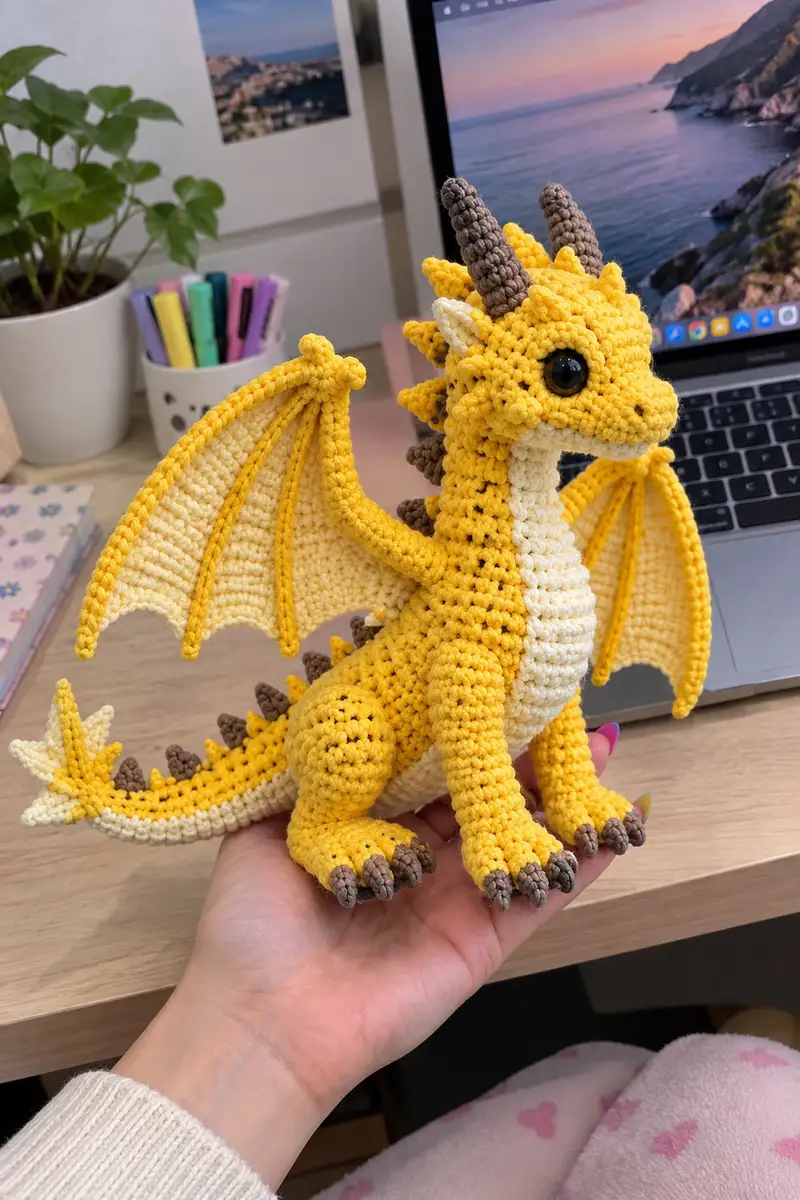
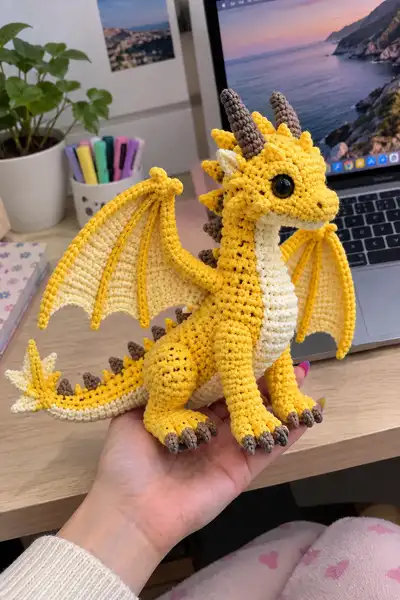
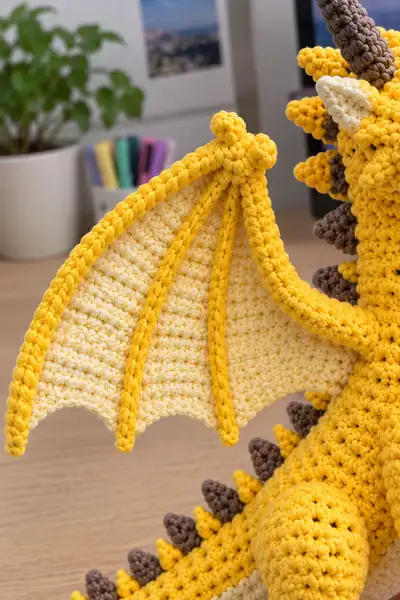
Bring this sunny little dragon to life with a detailed, step-by-step amigurumi pattern. The finished dragon features a creamy belly, bright golden body, brown horns and spikes, sculpted wings with ribbed 'bones', and tiny clawed feet. Perfect for gifting or collecting, this pattern covers shaping, color changes, and assembly with lots of tips for a polished finish.
Progress Tracker
0% Complete
— Head & Neck :
Round 1 :
6 sc in magic ring (6)
Round 3 :
(1 sc, inc) x 6 (18)
Round 4 :
(2 sc, inc) x 6 (24)
Round 5 :
(3 sc, inc) x 6 (30)
Round 6 :
(4 sc, inc) x 6 (36)
Round 7 :
(5 sc, inc) x 6 (42)
Round 8 :
(6 sc, inc) x 6 (48)
Info :
Switch to main golden yellow yarn here if you began in a temporary toy color. Use a stitch marker to mark the first stitch of each round. This base will form the widest part of the head.
Round 9 :
1 sc in each st (48)
Round 10 :
1 sc in each st (48)
Round 11 :
1 sc in each st (48)
Info :
Place safety eyes between rounds 12 and 13, spaced about 10-12 sts apart (adjust to preference). Mark eye positions and do not fasten eyes until head is lightly stuffed and positioned as desired.
Round 12 :
1 sc in each st (48)
Round 13 :
1 sc in each st (48)
Round 14 :
1 sc in each st (48)
Round 15 :
(6 sc, 1 inc) x 6 (54)
Round 16 :
1 sc in each st (54)
Info :
Start stuffing the top third of the head slightly. Use small amounts of fiberfill to avoid lumps; adding more as you shape will produce an even finish.
Round 17 :
(7 sc, 1 inc) x 6 (60)
Round 18 :
1 sc in each st (60)
Round 19 :
1 sc in each st (60)
Round 20 :
(7 sc, 1 dec) x 6 (54)
Round 21 :
(6 sc, 1 dec) x 6 (48)
Info :
When you reach round 21-22, begin shaping the muzzle. For a softer snout, add a little stuffing into the front area. Keep checking symmetry by eye placement guidelines you marked.
Round 22 :
(5 sc, 1 dec) x 6 (42)
Round 23 :
(4 sc, 1 dec) x 6 (36)
Round 24 :
(3 sc, 1 dec) x 6 (30)
Round 25 :
(2 sc, 1 dec) x 6 (24)
Info :
Fasten safety eyes now (if using). After eyes are secured, add more stuffing to shape cheeks and snout. Use your fingers to form a gentle curve under each eye for a friendly expression.
Round 26 :
(1 sc, 1 dec) x 6 (12)
Round 28 :
Fasten off leaving long tail. With yarn needle, sew the small opening closed using the tail to stitch through remaining sts and secure flush. Tuck tail inside head and weave in.
Info :
Neck: We will create a separate neck tube to attach head to body for cleaner shaping. The head base will be sewn to the neck flap created on the body later. Leave head with a long tail for sewing to neck.
— Neck Tube (Make 1) :
Round 1 :
Start with cream yarn. 6 sc in magic ring (6)
Round 3 :
(1 sc, inc) x 6 (18)
Round 4 :
(2 sc, inc) x 6 (24)
Round 5-14 :
1 sc in each st (24)
Info :
The neck will be about 10 rounds long in cream to match belly color. Stuff lightly as you go, keeping the neck firm but flexible. Leave a long tail to sew the neck top to head base and bottom to body opening.
— Body :
Round 1 :
Start with cream yarn: 6 sc in magic ring (6)
Round 3 :
(1 sc, inc) x 6 (18)
Round 4 :
(2 sc, inc) x 6 (24)
Round 5 :
(3 sc, inc) x 6 (30)
Round 6 :
Change to golden yellow in last st of round 5. 1 sc in each st (30)
Round 7 :
1 sc in each st (30)
Round 8 :
(4 sc, inc) x 6 (36)
Round 9 :
1 sc in each st (36)
Round 10-13 :
1 sc in each st (36)
Info :
If you want a slightly chubbier body, add 1-2 rounds of increases here using (5 sc, inc) x 6. Work in the round with a marker at the start. Stuff the body moderately after round 13 to maintain shape as you continue.
Round 14 :
(4 sc, 1 inc) x 6 (42)
Round 15 :
1 sc in each st (42)
Round 16 :
1 sc in each st (42)
Round 17 :
(5 sc, 1 dec) x 6 (36)
Round 18 :
(4 sc, 1 dec) x 6 (30)
Round 19 :
1 sc in each st (30)
Info :
At rounds 18-20 begin leaving stitches free to sew leg and arm bases later. I recommend counting and marking the spots where limbs will be sewn: two front leg positions roughly on round 14-16 sides, two hind legs near the widest round 8-10 area.
Round 20 :
(3 sc, 1 dec) x 6 (24)
Round 21 :
(2 sc, 1 dec) x 6 (18)
Round 22 :
(1 sc, 1 dec) x 6 (12)
Info :
Do NOT finish closing at the bottom. Leave the body opening available for stuffing and for sewing the tail. Fasten off leaving long tail for tail attachment if desired. Stuff body firmly but still soft enough to pose.
— Front Legs (Make 2) :
Round 1 :
With golden yellow: 6 sc in magic ring (6)
Round 3 :
(1 sc, inc) x 6 (18)
Round 4 :
1 sc in each st (18)
Round 5 :
1 sc in each st (18)
Info :
Begin shaping paw: the front legs are relatively short and round. Stuff the paw area firmly to hold shape; leave long tail for sewing to body later.
Round 6 :
(2 sc, 1 dec) x 6 (12)
Round 7 :
1 sc in each st (12)
Round 8 :
Change to brown for claws in last st. 1 sc in each st (12)
Round 9 :
(2 sc, inc) x 4, 4 sc (16) - work in brown to form finger columns
Round 10 :
1 sc in each st (16)
Round 11 :
(3 sc, 1 dec) x 4 (12)
Round 12 :
1 sc in each st (12)
Round 13 :
Fasten off leaving long tail. Sew the top of the leg slightly flattening to create shoulder seam for sewing to body.
Info :
If you prefer articulated legs, you can insert short pieces of wire along the leg before stuffing. Fold and wrap wire ends to avoid poking through stuffing.
— Hind Legs (Make 2) :
Round 1 :
With golden yellow: 6 sc in magic ring (6)
Round 3 :
(1 sc, inc) x 6 (18)
Round 4 :
(2 sc, inc) x 6 (24)
Round 5 :
1 sc in each st (24)
Round 6 :
(3 sc, inc) x 6 (30)
Round 7 :
1 sc in each st (30)
Info :
Hind legs are larger to support sitting pose. Stuff foot area firmly, then continue shaping calf by working fewer increases; the top will be flattened slightly to attach to body.
Round 8 :
(4 sc, 1 dec) x 5, 2 sc (26)
Round 9 :
1 sc in each st (26)
Round 10 :
Change to brown in last 2-3 sts to create claws. 1 sc in each st (26)
Round 11 :
(3 sc, inc) x 6, 2 sc (32)
Round 12 :
1 sc in each st (32)
Round 13 :
(4 sc, 1 dec) x 6 (30)
Round 14 :
1 sc in each st (30)
Round 15 :
Fasten off leaving long tail for sewing. Flatten top 6-8 sts and whip stitch to form a seam that will be sewn to body for stable attachment.
— Tail :
Round 1 :
With cream: 6 sc in magic ring (6)
Round 3 :
(1 sc, inc) x 6 (18)
Round 4 :
Change to golden yellow last stitch; 1 sc in each st (18)
Round 5-12 :
1 sc in each st (18)
Round 13 :
(2 sc, 1 dec) x 6 (12)
Round 14 :
1 sc in each st (12)
Round 15 :
Change to brown in next st and make small cones (see spikes section) along tail by sewing them on. Continue with cream tip rounds below.
Round 16 :
Change to cream for tail tip: (1 sc, inc) x 6 (18)
Round 17 :
(2 sc, inc) x 6 (24)
Round 18 :
1 sc in each st (24)
Round 19 :
Fasten off leaving long tail for sewing to body. Flatten the base of the tail and whip stitch to the body opening you left earlier ensuring a smooth seam for sitting posture.
Info :
Sew tail centered at back opening on body. Position tail angle so the dragon can balance when sitting. Add extra stitches at joint for stability.
— Horns (Make 2) :
Round 1 :
With brown yarn: 6 sc in magic ring (6)
Round 3 :
1 sc in each st (12)
Round 4 :
(2 sc, 1 dec) x 3 (9)
Round 5 :
1 sc in each st (9)
Round 6 :
(1 sc, 1 dec) x 3 (6)
Round 7 :
1 sc in each st (6)
Round 8 :
Fasten off leaving long tail. Stuff lightly and sew base to top-back of head slightly angled back. Add a few surface stitches at the base to make horns sit securely.
Info :
Make horns slightly curved by stuffing one side more than the other or by sewing a few tight surface stitches through the horn to bend it slightly for a natural look.
— Back Spikes & Tail Spikes (Make 10-12 small + 6 medium) :
Small Spike Round 1 :
With brown: 6 sc in magic ring (6)
Small Spike Round 2 :
(1 sc, inc) x 3 (9)
Small Spike Round 3 :
1 sc in each st (9)
Small Spike Round 4 :
Fasten off leaving tail for sewing. Make 10 small spikes for head and along spine. Stuff minimally and sew with tail to the back seam in alternating pattern with small golden filler spikes.
Medium Spike Round 1 :
With brown: 6 sc in magic ring (6)
Medium Spike Round 2 :
6 inc (12)
Medium Spike Round 3 :
1 sc in each st (12)
Medium Spike Round 4 :
(2 sc, 1 dec) x 3 (9)
Medium Spike Round 5 :
1 sc in each st (9)
Medium Spike Round 6 :
Fasten off leaving tail. Make 6 medium spikes for the spine mid and tail base. Sew them on centered along the dorsal line, alternating sizes for a natural tapered look.
Info :
Attach spikes by matching their bases to the center of each stitch row on the body. Use the tail from each spike to whip stitch at least 6-8 times through the body fabric to secure. Add a drop of glue inside the base if desired for extra hold.
— Ears / Small Head Fins (Make 2) :
Round 1 :
With cream: 6 sc in magic ring (6)
Round 2 :
(1 sc, inc) x 3 (9)
Round 3 :
1 sc in each st (9)
Round 4 :
Fold slightly and single crochet along base to flatten. Fasten off leaving long tail and sew behind the eyes near the horn base. Tip the ears to angle slightly forward.
Info :
For the cream inner ear color, stitch a round of cream across the front before flattening. Position ears so they peek between small spikes and horns.
— Wing Membranes (Make 2) :
Round 1 :
With cream yarn: ch 2, 6 sc in 2nd ch from hook (6)
Round 2 :
(1 sc, inc) x 3 (9)
Round 3 :
(2 sc, inc) x 3 (12)
Round 4 :
(3 sc, inc) x 3 (15)
Round 5 :
(4 sc, inc) x 3 (18)
Round 6 :
Ch 1, 1 sc in each st around to create a small circular cap (18)
Round 7 :
Now begin wing shaping: switch to working in rows along a prepared base. Ch 1, turn, sc 10 along one side, ch 1, turn (10)
Round 8 :
Sc across 10, ch 1, turn (10)
Round 9-18 :
Work even rows: sc across 10 (10) making 10 rows total to create membrane length (adjust if you want larger wings)
Info :
Create a scalloped lower edge by making increases and decreases across the last 3-4 rows: (sc5, inc, sc5), then next row work decreases under the inc to make three scallops. Block gently with pins if desired to shape the scallops before assembly.
Round 19 :
Fasten off membrane leaving long tail for joining to wing bones. Make 2 mirror pieces (left and right).
— Wing Bones / Fingers (Make 4 per wing) :
Round 1 :
With golden yellow: 6 sc in magic ring (6)
Round 3-18 :
1 sc in each st (12) – continue straight to create a long tube about 14-18 rounds long depending on desired wing size
Round 19 :
Decrease gradually along last 3 rounds: (3 sc, 1 dec) x 3 (9); (2 sc, 1 dec) x 3 (6); fasten off leaving tail. Insert optional wire into each tube before stuffing lightly to create rigid ribs.
Info :
You will make 4 bone tubes per wing (3 main fingers + 1 smaller leading edge). Attach these to the wing membrane by sewing along the top side with visible raised ribs. If you prefer, stitch them on with a tight slip stitch so they sit raised and mimic real bat-like wing bones.
Round 20 :
With golden yellow, work a single crochet edging around the wing membrane joining membrane and bone tubes together. Work 1 sc in each edge stitch, and 2 sc in corners to keep shape stable. Fasten off and weave in ends.
Info :
Sew wings to sides of body between rounds 10-14 on the body, angling slightly downward for a sitting pose. Reinforce with extra stitches at base so wings stay upright when you pose the dragon.
— Wing Tip Knots and Decorative Edge :
Round 1 :
With golden yellow: ch 4, sl st to form a small knot; work 3 more sl st around to thicken. Fasten off. Make 4 small knots for the tops of each wing finger and 1 for the leading edge tip.
Info :
Sew knots to the wing bone tips to create finished rounded tips as seen in the photo. These add a handcrafted charm as well as hide wire ends if used.
— Claws (Make 10 small) :
Round 1 :
With brown: 4 sc in magic ring (4)
Round 2 :
(1 sc, inc) x 2 (6)
Round 3 :
1 sc in each st (6)
Round 4 :
Fasten off leaving long tail. Make 10-12 claws for all four feet. Sew three claws to each front paw and four to each hind paw as pictured, securing by weaving tails through paw fabric several times.
Info :
Position claws slightly curved downward to simulate talons. For a more realistic look you can embroider small ridges with darker yarn across the top of each claw.
— Decorative Golden Spikes (Make 8) :
Round 1 :
With golden yellow: 6 sc in magic ring (6)
Round 2 :
(1 sc, inc) x 3 (9)
Round 3 :
Fasten off leaving tail. These small golden spikes are sewn between brown spikes for color contrast along the spine and tail base. Alternate sizes to create a lively texture.
Info :
Sew a mix of brown medium spikes, brown small spikes and golden small spikes along the dorsal line from head to tail. Maintain a slight tilt for each spike toward the tail for consistent flow.
— Facial Details & Embroidery :
Info :
Embroider small nostrils with a spare length of brown yarn. For mouth, use an invisible stitch with cream yarn to add a soft smile under muzzle. Use a few small satin stitches for eyebrows if desired, placed just above the eye line.
Round 1 :
Using black yarn and yarn needle, make two tiny satin stitches on each side of muzzle for nostrils. Keep tension light and bury thread ends well.
Info :
Add a small highlight to eyes by stitching a tiny cream dot on the lower outer edge of the plastic eye or by adding a small glued-on acrylic highlight bead for a glossy look.
— Finishing Touches :
Info :
Weave in all ends securely inside body. Add a little more stuffing if seams appear flat. Block wings gently on a flat surface using pins to open scallops and create an elegant curve.
Info :
If you want poseable wings or tail, insert floral wire before final attachment and bend the wire ends into loops and hide inside the fabric using small stitches to anchor them.
Info :
Check all attachment points for stability. Add an extra row of stitches around limb bases if toy will be handled frequently to prevent loosening over time.
This cheerful golden dragon brings a touch of sunshine to any shelf or nursery, combining sculpted shaping with playful textural details. Each tiny spike and ribbed wing is made with care for a polished, display-ready finish. Crafting this dragon is a rewarding journey — enjoy creating a small, mythical friend you can treasure or gift. 🐉🧶