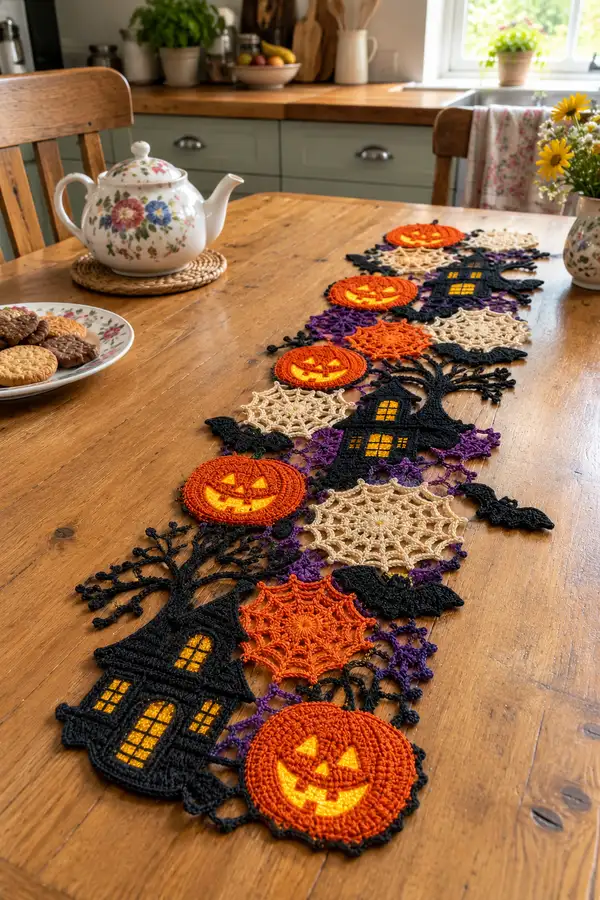
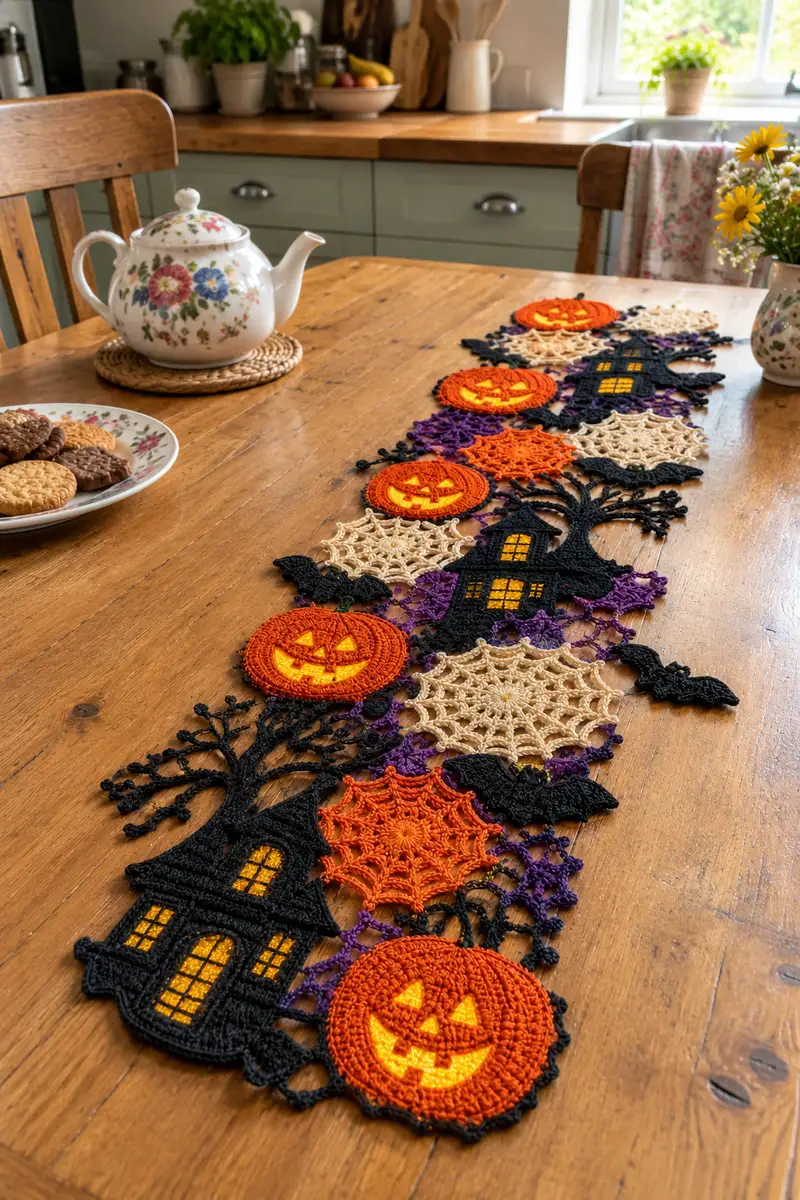
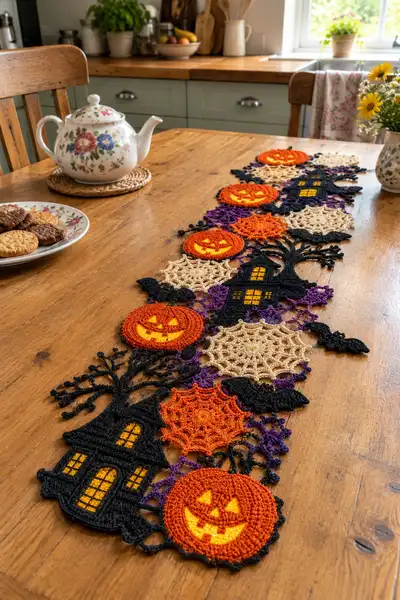
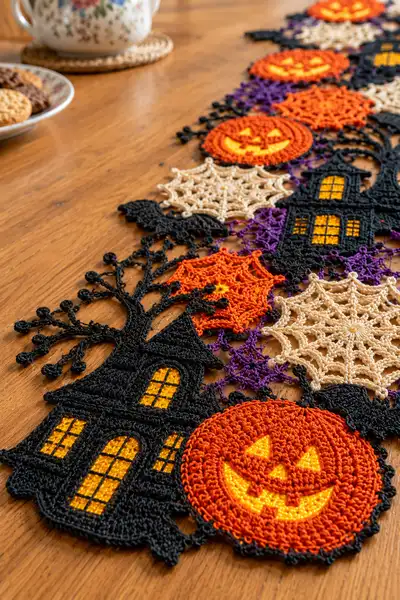
A spooky, lacy table runner composed of interlocking Halloween motifs: glowing jack-o-lanterns, haunted houses with bare trees, delicate spiderwebs, and fluttering bats. Worked in fine cotton thread for crisp detail, this runner layers bright golden 'glow' centers beneath carved pumpkin faces and joins motifs with purple lace connectors. Perfect for tabletops, mantels, or seasonal displays.
Progress Tracker
0% Complete
— Pumpkin: Inner Glow Disc :
Round 3 :
(1 sc, inc) x 6 (18)
Round 4 :
(2 sc, inc) x 6 (24)
Round 5 :
(3 sc, inc) x 6 (30)
Round 6 :
(4 sc, inc) x 6 (36)
Info :
This golden yellow disc is the glowing 'back' of the jack-o-lantern. Keep rounds flat by placing your increases evenly and checking for ruffling. Use a smaller hook if your disc cups.
Round 7 :
1 sc in each st (36)
Round 8 :
1 sc in each st (36)
Round 9 :
1 sc in each st (36)
Round 10 :
Fasten off leaving long tail for sewing. Block flat. Leave this disc to one side for layering under outer pumpkin face.
— Pumpkin: Outer Face Layer (Worked in Rounds, cutout face) :
Round 3 :
(1 sc, inc) x 6 (18)
Round 4 :
(2 sc, inc) x 6 (24)
Round 5 :
(3 sc, inc) x 6 (30)
Round 6 :
(4 sc, inc) x 6 (36)
Info :
Use orange cotton. Make sure this layer will be slightly larger than the inner glow disc so the glow peeks through the carved areas. Keep consistent tension.
Round 7 :
(5 sc, inc) x 6 (42)
Round 8 :
(6 sc, inc) x 6 (48)
Round 9 :
1 sc in each st (48)
Round 10 :
1 sc in each st (48)
Info :
At round 10 you will prepare to form the carved face. Decide where top of pumpkin will be and mark with a removable stitch marker so all pumpkins are oriented consistently when joining to runner.
Round 11 :
(7 sc, inc) x 6 (54)
Round 12 :
1 sc in each st (54)
Round 13 :
1 sc in each st (54)
Info :
Round 13 is the working round where you will start defining the facial openings. Plan approximate stitch positions for two triangular eyes and a smiling mouth. A typical layout: eyes 10-12 sts after top marker, spaced about 10-12 sts apart.
Round 14 :
Work 4 sc, ch3, skip 3 sts, 1 sc in next st, ch3, skip 3 sts, 1 sc in next st, continue 1 sc in each to complete round (54)
Round 15 :
1 sc in each st, except where eye/ mouth openings will be: work sc around ch spaces to secure edges and create small openings. Add 1 sc, ch2, sl st into space for smoothing as needed (54)
Round 16 :
Work shaping for eye triangles: find eye base area and work (sc3tog over 3 sts, ch2, sc in next 2 sts) to narrow and form triangle points; mirror for second eye. Continue sc around (54)
Info :
If you prefer, cut the mouth shape later with embroidery on the inner glow disc rather than cutting openings. Both methods work; the photographed runner uses open face cutouts so golden glow shows through clearly.
Round 17 :
1 sc in each st (54) working around shaped eye openings to firm edges. Add small picots at points of triangle eyes: *sc, picot, sc* into corner stitch.
Round 18 :
(6 sc, dec) x 6 (48)
Round 19 :
(5 sc, dec) x 6 (42)
Info :
These decreases slightly scallop outer edge to mimic natural pumpkin shape. Keep counts exact for even scalloping.
Round 20 :
(4 sc, dec) x 6 (36)
Round 21 :
(3 sc, dec) x 6 (30)
Round 22 :
1 sc in each st (30)
Round 23 :
Edging round: *sc, ch3, sl st into next st* repeat around to create tiny scallop (30)
Round 24 :
Fasten off leaving long tail. Block gently. Position the orange face over the yellow glow disc, aligning eye and mouth openings. Using long tail, sew the two layers together around openings with whipstitch so golden inner shows through. Weave in ends.
— Spiderweb Motif (Beige Neutral) :
Round 3 :
(1 sc, inc) x 6 (18)
Round 4 :
(2 sc, inc) x 6 (24)
Round 5 :
(3 sc, inc) x 6 (30)
Info :
Switch to beige thread for the delicate web look. Keep work flat and lacey. Use picots and chain loops for web spokes.
Round 6 :
*sc, ch5, sl st into next st* repeat around to create 6 loop spokes (30)
Round 7 :
Work into chain loops: (sc, ch3, 5 dc cluster, ch3, sc) into each ch5 loop to create raised petal spokes (30 clusters)
Round 8 :
Join rounded spokes with slip stitches across clusters to form inner circle connection: sl st across, working 2 sl st between clusters (30)
Round 9 :
Outer web: *ch8, sl st to anchor in the next cluster base* around to create outer ring of arches (30)
Round 10 :
In each ch8 arch: sc, 3 dc, sc, tiny picot on top (30)
Round 11 :
Decorative edge: ch2, (picot, ch2) around slipping into each arch top to create star points (30)
Info :
Pin the web flat when blocking; a few drops of starch will keep it crisp. Webs are delicate connectors in the runner and look best when identical in size.
Round 12 :
Fasten off leaving tail for joining. Make as many neutral webs as needed for pattern alternation (photo shows alternating neutral and orange webs).
— Spiderweb Motif (Orange Variation) :
Round 1 :
Follow Rounds 1-5 of beige web (30)
Round 6 :
Work into chain loops using orange: (sc, ch4, 3 dc cluster, ch4, sc) in each loop for tighter, denser spokes (30)
Round 7 :
Outer ring: *ch6, sl st into next cluster base* around (30)
Round 8 :
In each ch6 arch: sc, 2 dc, sc; finish with small picot (30)
Round 9 :
Edging: sc around entire motif and add decorative bobbles where desired (30)
Round 10 :
Fasten off and block. Use this brighter web alternatively to provide color rhythm in the runner.
— Small Bat Motif (Make many) :
Round 1 :
ch6, join with sl st to form small loop. Work 6 sc into loop (6)
Round 2 :
1 sc in first st, (2 sc in next st) x 2, 1 sc in next 3 sts (10)
Round 3 :
Form wings by working along one side: (sc, hdc, dc, tr, dc, hdc, sc) across to wing tip; sl st across center and repeat for second wing mirror image (approx 26 sts total around)
Round 4 :
Edge wings with picots: *sc, picot* around wing tips and body curve to create scalloped bat silhouette
Round 5 :
Fasten off leaving tail for sewing. Bats are intentionally small and flat; tack into position with small whipstitches when assembling runner.
— Haunted House: Main Body (Worked Flat, Rows) :
Info :
Haunted house is worked flat as a tall rectangle with shaped roof and tree extension. Use black cotton thread. You will create window openings by leaving chain spaces and then overlaying golden rectangles with surface embroidery or small separately worked rectangles sewn into openings.
Row 1 :
ch42, sc in 2nd ch from hook and across to end (41)
Row 2 :
ch1, turn, sc across (41)
Row 3 :
Repeat Row 2 for 6 rows to form base ground (41)
Info :
Work tight sc to keep a firm building edge. If you prefer more texture for siding, switch to hdc for alternate rows.
Row 9 :
Begin window placement: ch1, sc 6, ch6 (window opening), sc 6, ch4 (narrow window), sc to end (41)
Row 10 :
ch1, sc across, working sc into top of chain spaces across windows to form framed openings (41)
Row 11 :
Continue sc in rows for 6 rows, stopping for shaped door built on Row 15 (41)
Row 15 :
Door shaping: sc 10, (sc, ch5, skip 5, sc) across to create arched door space, sc to end (41)
Row 16 :
Work arch: in door ch5 space: sc, 2 hdc, 3 dc, 2 hdc, sc to create rounded door top. Continue sc across remaining sts (41)
Row 17 :
Roof shaping begins: decrease 1 st at each end of next 12 rows to taper sides: ch1, sc2tog at start, sc across to last 2 sts, sc2tog at end (reduces by 2 each row)
Info :
Keep window and door stitches aligned vertically; mark their column positions with safety pins to ensure glare-like window grids will line up later when you add gold rectangles.
Row 18-29 :
Repeat Row 17 until roof peak formed (row count will reduce width gradually from 41 down to approx 17 at peak). Fasten off when peak achieved.
Info :
For tree and branches, see next section. Blocking the house flat will make the window overlays fit perfectly; do not attach gold windows until both house and overlays are blocked.
— Haunted House: Roof & Tree Branches (Worked in Rows & Short Rows) :
Row 1 :
With black, ch18, sc across, turn (17)
Row 2 :
Short rows to create peaked roof: ch1, sc10, turn leaving rest unworked (10)
Row 3 :
ch1, sc8, turn (8)
Row 4 :
ch1, sc6, turn (6)
Info :
These short rows are layered to form an overlapping shingle effect. Work each short row so the roof has a stepped look like the photo.
Row 5 :
Continue short rows until roof top formed, then fasten off and sew roof onto house body along the peaked edge using small whipstitches.
Tree Branch Base :
Attach black thread at side of house where tree grows. ch30, sl st back down chain with occasional picot clusters to create branch knobs: *sl st, ch3, picot, sl st* repeat to tip then fasten off. Make multiple branch chains varying lengths and sew in place.
Info :
For the tree with beaded branch tips seen in the photo, make branch ends with small bobbles: (tr, tr, picot) for round bulbous tips. Pin each branch and block so it lays flat before final stitching.
— Window Overlays (Golden Rectangles) :
Piece 1 :
Work small rectangular patches in golden yellow to fit windows. ch6, sc in 2nd ch from hook and across (5)
Row 2-6 :
ch1, turn, sc across (5) for 5 rows total or until rectangle approx 1.2cm x 2.5cm depending on your gauge.
Info :
Embroider black window panes on gold rectangles using a simple grid: stitch 2 vertical and 2 horizontal lines with thin black thread or surface slip stitch. Sew rectangles into window openings from the back so gold appears through the black frame.
Finishing :
Sew gold rectangles into openings using blind whipstitch. On large windows, add two rectangles side by side to create larger panes. Block the entire house once overlays are sewn.
— Bare Tree Motif (Large branch silhouette) :
Round 1 :
ch6, sl st to form ring, 8 sc into ring (8)
Round 2 :
Working outward, ch6 for trunk loop, sc into ring, repeat 8 times so trunk has 8 chain loops radiating (8 loops)
Round 3 :
Work into each trunk loop: (sc, hdc, 3 dc, hdc, sc) to form a thick branch base (approx 8 sections)
Round 4 :
Extend longer branches by chaining 14 then working back down chain with sl sts and picots to form many small twig tips. Repeat across multiple branches to create dense silhouette. Fasten off and shape with blocking.
Info :
Add bobbles to twig ends with small 3-d bobble stitch: {yarn over twice, insert, pull through, y/o and pull through two, repeat to make 3 loops}, secure with small sl st at base.
— Connector Mesh (Purple Lace Links) :
Round 1 :
Make foundation ring: ch8, join to form ring and work 12 sc into ring (12)
Round 2 :
ch6, sl st into next st across to create 6 arches (12)
Round 3 :
Into each ch6 arch: sc, ch4, 2 dc, ch4, sc to create lacy loops (6)
Round 4 :
Join adjacent lace rings with slip stitches and ch3 bridges: *sc, ch3, sl st into previous motif* to form continuous chain connectors. Repeat to desired runner length.
Info :
The purple mesh is a decorative joining technique. Leave long tails at the last motif of each mesh so you can sew them onto motif edges. When joining, weave tails across several stitches to avoid tension distortion.
Round 5 :
Edging on mesh: work small picot loops along outside edges where motifs will attach: *sc, ch3, picot, sl st into next st* around each mesh unit.
— Edging & Final Scallop :
Round 1 :
Once runner constructed, go around entire perimeter with 1 sc in each visible outer stitch using black thread to unify shapes and hide joins. Keep tension even.
Round 2 :
Make scalloped edge: *(3 dc in next st, sl st in next st)* repeat along edge to add decorative ripple where motifs end slightly.
Round 3 :
For extra texture add bobble fringe at intervals: *ch4, 1 bobble, sl st into next edge stitch* repeat every 8 stitches.
Info :
Blocking is crucial for this runner; pin each motif to the measured spacing and use light steam or spray starch for a crisp finish. The runner looks best when motifs are not perfectly rectangular but have gentle, organic edges.
— Optional: Additional Decorative Motifs (Pumpkin variations & extra webs) :
Optional Pumpkin Small :
Work inner disc 1-6 to 24 sts only, outer face 1-12 scaled down accordingly, use fewer rounds to produce small pumpkin medallions for visual rhythm (approx 10-12 rounds total for small version).
Optional Mini Webs :
Follow web pattern but reduce chain arches to ch4 and ch3 loops to make small filler webs for narrow gaps.
Info :
Mix motif sizes across the runner, alternating large haunted houses with strips of webs and pumpkins to achieve the staggered composition shown in the photos.
— Assembly & Joining Guidance :
Info :
Block every motif first. Lay motifs on a flat surface in the composition you want, allowing small overlaps—pumpkins slightly overlap webs, houses sit next to webs. Use pins to hold positions. Sew with matching thread using small whip or mattress stitches to create a nearly invisible seam. For the purple connectors, insert them into picot loops on motifs and secure with hidden stitches. Aim for symmetry but allow natural irregularity to match the pictured organic edge.
Final Touch :
Weave all tails into the back, trim close, and give the runner a final light steam. Optionally, press windows with an iron over a damp cloth to set gold rectangles evenly behind black frames.
This Halloween table runner pattern brings a playful spooky vibe to any table! The layered pumpkins, lacy webs, and silhouette houses combine to make a statement centerpiece that still feels delicate and handmade. With careful blocking and joining your finished runner will look crisp and professional. 🧶🎃 Add a vase of seasonal flowers or a teapot and cookies to complete the scene — it makes a beautiful seasonal display for guests. Happy stitching and enjoy your Halloween decor! 👻