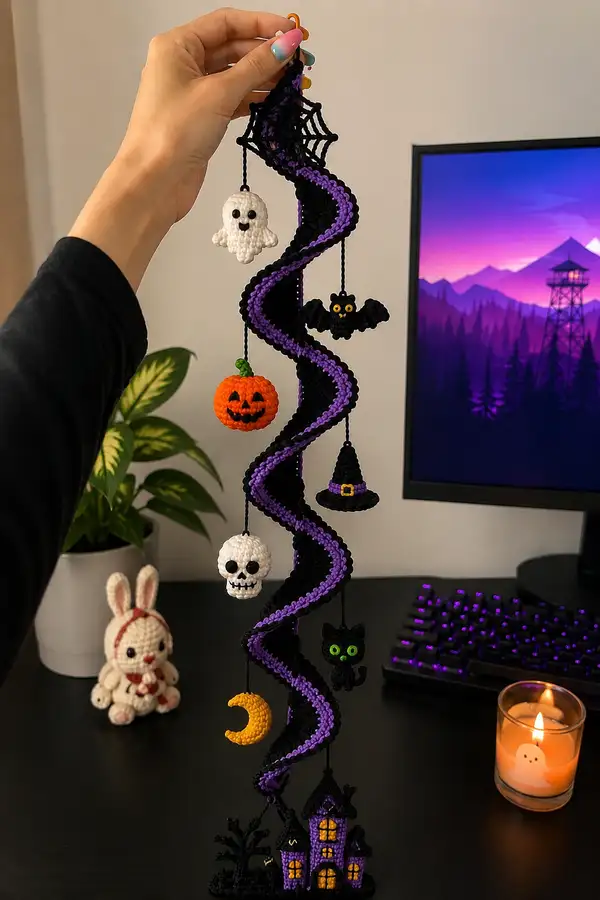
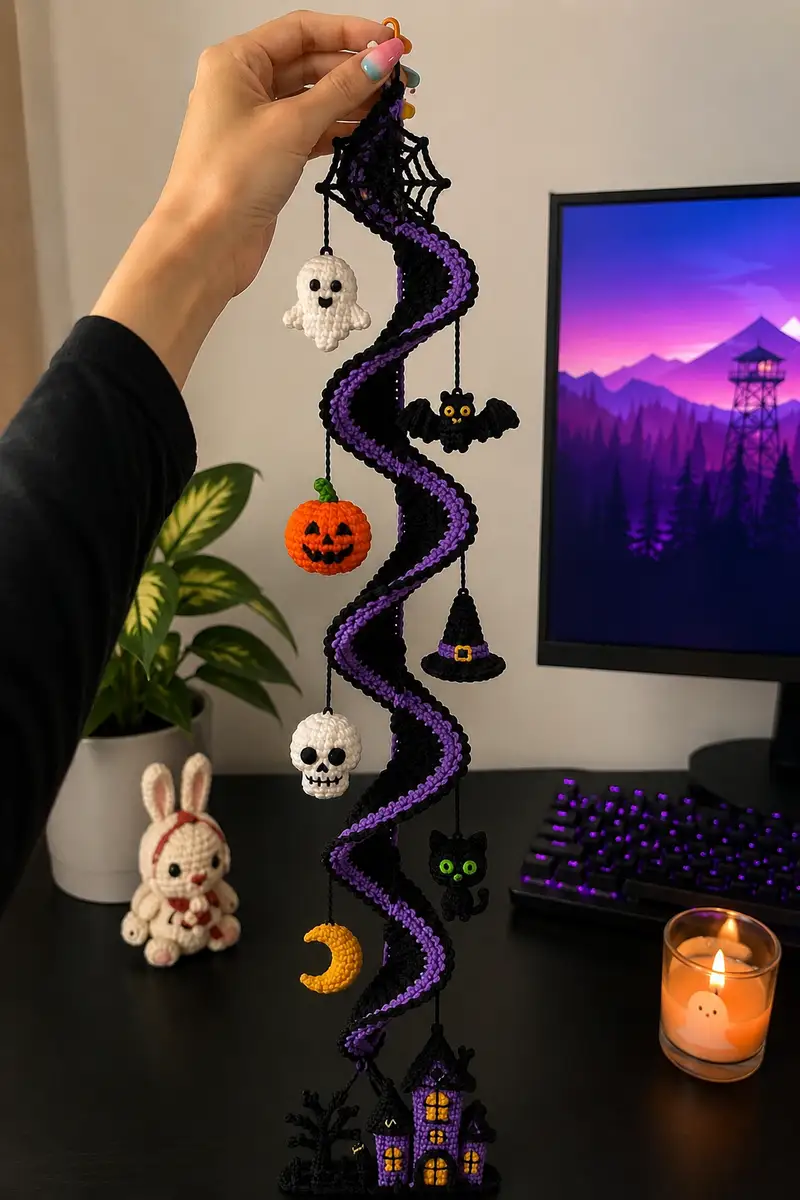
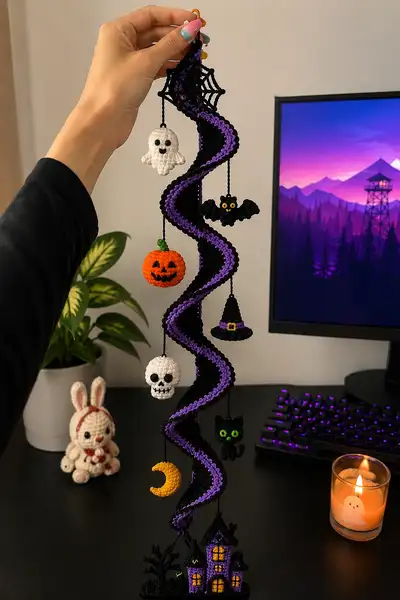
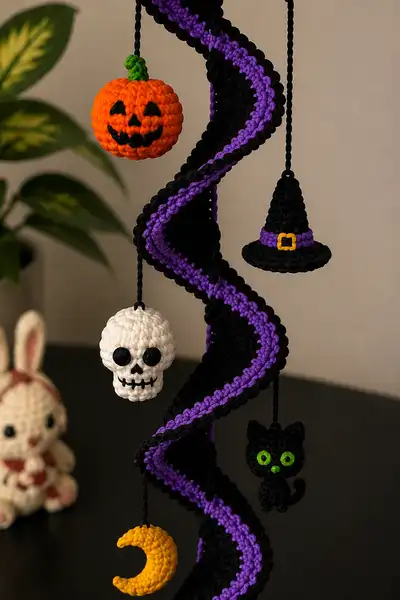
Create a spooky-handed Halloween spiral mobile featuring a twisting black-and-purple ribbon with dangling amigurumi ornaments — pumpkin, ghost, skull, bat, cat, moon, witch hat and a tiny haunted house base. Perfect for seasonal decor, this detailed pattern walks you through building the long spiral column, all ornaments, the spiderweb hanger and assembly. Finished piece hangs freely and measures roughly 40-50 cm long depending on yarn and hook choice.
Progress Tracker
0% Complete
— Materials & Notes :
Info :
Use worsted weight yarn (#4) and a 3.25mm hook unless you want a looser or tighter fabric. This pattern uses amigurumi-style working in continuous rounds for most ornaments (no joining) — use stitch markers to mark round starts. The spiral ribbon is worked as a long tube in-the-round and then shaped into a helix. Stuff ornaments firmly but not overstuffed. Safety eyes should be attached before stuffing.
Info :
Abbreviations used and tools required are listed in the Materials & Tools section. Check gauge by crocheting a small swatch: 12 sc x 10 rows = about 5 cm across with recommended hook and yarn. Adjust hook size if necessary to maintain tight stitches so stuffing does not show.
— Spiderweb Hanger :
Round 1 :
Ch 8, sl st into first ch to form a ring (working around this ring; this is a flat web center)
Round 2 :
Ch 3 (counts as dc). In ring work 11 dc evenly (12 dc total). Sl st to top of ch-3. Fasten off black yarn and weave in end leaving short tail for a top hanging loop if desired.
Info :
We will add radial threads and spiral web lines. Attach black yarn to any stitch; work chains outward to create spiderweb spokes. Use a small crochet hook to create long slip stitch chains between spokes and tack them at intersections to create web shape.
Round 3 :
Attach black yarn to center ring. Ch 12 and sl st into the center ring, repeat 11 more times to create 12 spokes evenly spaced. Fasten off leaving long tail to form the top suspension loop later.
Round 4 :
Using black yarn, work spiral webbing: attach to the base of one spoke, *ch 5, sl st to next spoke; rep around to create a spaced web effect. Fasten off and weave ends. Leave 15-20 cm tail to work into hanging loop and to join central rod or cord for the spiral.
Info :
Pin the web flat and block lightly if desired. This web will be the top anchor for the spiral and will hide the anchor point as you attach the first round of the spiral tube. If you prefer a sturdier hanger, stitch web to a small metal ring or keyring.
— Spiral Ribbon (Main Black Tube) :
Info :
The spiral is worked as a long tube in joined continuous rounds. The sample spiral measures about 35-45 cm in length when finished; your length may vary. Work tightly and keep the same stitch count for long stretches; the twist effect is created later by shaping onto a dowel or suspended cord and by crocheting a thin purple ridge into the inner edge.
Round 1 :
With black yarn, mr, 6 sc in mr (6)
Round 3 :
(1 sc, inc) x 6 (18)
Round 4 :
(2 sc, inc) x 6 (24)
Round 5 :
(3 sc, inc) x 6 (30)
Round 6 :
(4 sc, inc) x 6 (36)
Round 7 :
(5 sc, inc) x 6 (42)
Round 8 :
(6 sc, inc) x 6 (48)
Info :
By Round 8 you have a tube circumference of 48 stitches — this makes a slim but stable ribbon tube. If you prefer a wider ribbon, continue increasing similarly to reach a higher circumference. The sample uses 48 as the consistent tube circumference for about 60 rounds of extension.
Round 9-80 :
1 sc in each st around (48) — work continuously without fastening off. This creates the long tube length. Keep stitch count at 48 for these rounds. Use stitch markers to count groups of 6 or 12 to help keep place.
Info :
At around Round 40 you may want to add a core: insert a thin plastic-coated cord or a flexible wire inside the tube to give the spiral more body. Leave the core free to move slightly — the helix shape will be created by attaching this tube to the purple ridge and blocking on a dowel.
Round 81 :
(6 sc, dec) x 6 (42)
Round 82 :
(5 sc, dec) x 6 (36)
Info :
We decrease at the top few rounds to create a tapered anchor that will sit inside the spiderweb ring and allow the top to be secured. Stuff the tube lightly along the last quarter of the tube if adding any core material for support.
Round 83 :
(4 sc, dec) x 6 (30)
Round 84 :
(3 sc, dec) x 6 (24)
Round 85 :
(2 sc, dec) x 6 (18)
Round 86 :
(1 sc, dec) x 6 (12)
Info :
Fasten off leaving a long tail to stitch through the center of the spiderweb hanger and secure the tube. Pull the tail inside and sew the small tapered end to the underside of the web ring; hide the tail inside the web and secure with tight stitches. We will add the purple ridge separately down the inner edge.
— Purple Inner Ridge (worked as a narrow tube) :
Info :
The purple ridge is a narrow tube that will sit inside the black tube on the inner curve of the spiral and visually create the purple stripe. It should be much thinner — we will make a tube of circumference 18-24 depending on how pronounced you want the ridge.
Round 1 :
With purple yarn, mr, 6 sc in mr (6)
Round 3 :
(1 sc, inc) x 6 (18)
Round 4-80 :
1 sc in each st (18) — work same number of rounds as main tube length to match. If you made 80 even rounds on main tube, make 80 rounds here as well so the ridge lines up along length (round counts will align when sewing).
Info :
Fasten off leaving a long tail. Insert a thin cord inside or lightly stuff the purple tube for stability. Pin the purple tube along the inner curve of the black tube so it sits nested; we will sew through the black tube and purple ridge every 6-10 stitches in a spiral pattern to create the helix look.
Round 81 :
Dec gradually if you tapered the top of the black tube: (4 sc, dec) x 3 if needed to meet black tapered end and fasten off tethering securely to the spiderweb ring.
Info :
Sew the purple ridge into the inner side of the black tube in a continuous spiral stitch. Work neat single crochet whipstitches every 8-10 stitches to attach the ridge so it forms a continuous visible stripe inside the helix. Block and shape on a dowel or hang while wet to retain spiral form.
— Pumpkin Ornament :
Round 1 :
With bright orange, mr, 6 sc in mr (6)
Round 3 :
(1 sc, inc) x 6 (18)
Round 4 :
(2 sc, inc) x 6 (24)
Round 5 :
(3 sc, inc) x 6 (30)
Round 6-8 :
1 sc in each st (30)
Info :
Begin adding surface ridges: you can pull a contrasting thread through at regular intervals to mimic pumpkin grooves, or later embroider vertical ridges. For a carved face, leave a small area for black embroidery or crocheted features after stuffing.
Round 9 :
(3 sc, dec) x 6 (24)
Round 10 :
(2 sc, dec) x 6 (18)
Info :
Stuff firmly with fiberfill to create round pumpkin shape. For a more pronounced pumpkin, add a small disc of cardboard or felt at the bottom inside the stuffing to flatten slightly.
Round 11 :
(1 sc, dec) x 6 (12)
Round 12 :
6 dec (6). Fasten off leaving long tail. Use tail to sew opening closed neatly. Attach a short green stem (see stem rounds below) at top and embroider or attach black eyes/mouth to create jack-o-lantern face.
Stem :
With green yarn: mr, 6 sc in mr (6); 6 inc (12); 1 sc around (12) for 2 rounds; (dec) x 6 if you want a tapered stem. Sew to top of pumpkin. Optionally make a small twisted cord for hanging.
Info :
To make the carved face: use embroidery yarn or black yarn on a yarn needle. Stitch triangle eyes and a jagged mouth. Alternatively create small cut-out eyes using black felt and glue into place.
— Ghost Ornament :
Round 1 :
With white yarn, mr, 6 sc in mr (6)
Round 3 :
(1 sc, inc) x 6 (18)
Round 4-6 :
1 sc in each st (18)
Info :
We will form a little flared skirt for the ghost. Keep rounds even for the 'head' portion, then make the skirt by placing increases at intervals to flare bottom.
Round 7 :
(3 sc, inc) x 4, (2 sc, inc) x 2 (24) — this creates an oval flare where the body fans out slightly
Round 8 :
1 sc in each st around (24)
Round 9 :
*sc in next 2 sts, 3 sc in next st; rep from * around (this creates scalloped frill) (approx 32)
Round 10 :
1 sc in each st (32)
Info :
Before closing, place small safety eyes about 3-4 rounds down from top; place them roughly 4-6 stitches apart depending on desired expression. If embroidering eyes, do so after stuffing and before making final closure.
Round 11 :
Decrease gently to close under the skirt: (4 sc, dec) x 5 (27)
Round 12 :
(2 sc, dec) x 9 (18) — stuff head firmly
Round 13 :
(1 sc, dec) x 6 (12)
Round 14 :
6 dec (6). Fasten off, finish stuffing and close. Add embroidered mouth if desired (small O shape or smile).
— Skull Ornament :
Round 1 :
With white yarn, mr, 6 sc in mr (6)
Round 3 :
(1 sc, inc) x 6 (18)
Round 4 :
(2 sc, inc) x 6 (24)
Round 5-7 :
1 sc in each st (24)
Info :
Skull is similar to a small head; we will shape jaw by adding rounds with slight decreases and then working a jaw flap. Attach two black safety eyes or embroider circles for sockets before significant stuffing.
Round 8 :
(3 sc, dec) x 6 (18)
Round 9 :
1 sc in each st (18). Stuff firmly but leave room to attach jaw later.
Round 10 :
(1 sc, dec) x 6 (12)
Round 11 :
6 dec (6). Fasten off leaving long tail. Use tail to sew a small jaw piece (see below) under the skull or embroider teeth and mouth directly onto the lower front surface.
Jaw :
Make small flat oval for jaw: Ch 6, sc in 2nd ch from hook, sc across (5), ch 1 turn and sc 5 more for 2 rows total; fasten off and lightly stuff and attach under skull with whipstitch. Embroider lines for teeth using black yarn: straight horizontal stitch then small verticals to create teeth segment.
Info :
For the skull's eye sockets, sew small flat black discs (2 rounds of sc on mr) and attach, then sew mouth with black yarn using small neat stitches to create expression. Position the skull about 1/3 down the spiral so it hangs freely.
— Bat Ornament :
Head/Body Round 1 :
With black yarn, mr, 6 sc in mr (6)
Round 3-6 :
1 sc in each st (12). Fasten off leaving tail for sewing
Wings (Make 2) :
Ch 7, sc in 2nd ch from hook and across (6), ch 1 turn, sc across (6); then work increases along one edge to create scallop: 1 sc in next 2 sts, 3 sc in next st, 1 sc in next 2 sts—fasten off. Shape wings by folding and sewing center to body. Attach wings to body so they curve outward like in picture.
Info :
Use small yellow yarn or felt dots for eyes — the sample shows tiny amber eyes that contrast well against black. Sew eyes onto head, then attach a small dangle cord. For the bat's face, embroider a tiny smile or leave as simple silhouette.
— Witch Hat Ornament :
Round 1 :
With black yarn, mr, 6 sc in mr (6)
Round 3 :
(1 sc, inc) x 6 (18)
Round 4 :
(2 sc, inc) x 6 (24)
Round 5-7 :
1 sc in each st (24) — This forms the cone body of the hat
Round 8 :
(3 sc, dec) x 6 (18) — make slight taper if desired
Brim :
Attach black yarn to any stitch at base of cone. Ch 2 (counts as hdc), 2 hdc in same st, *ch 1, skip 1 st, 3 hdc in next st; rep around to create a wavy brim (approx 24 groups). For sturdier brim work a round of sc in FLO to create a ridge.
Hat Band :
With purple yarn, sl st around the base of the cone 2 rounds to create band look. Fasten off and add a small yellow buckle: with yellow yarn ch 4 and sc 3 in chain to make a little square buckle and sew onto band.
Info :
Block brim flat if desired. Lightly stuff the cone if you want a slightly rounded silhouette. Leave a long tail to attach to hanging cord at the hat tip.
— Crescent Moon Ornament :
Round 1 :
With yellow yarn, ch 6, sl st to form tiny loop, then sc 6 in loop (6) — or work a small mr base of 6 sc
Round 3 :
(1 sc, inc) x 6 (18)
Round 4 :
1 sc in each st (18)
Round 5 :
Form crescent shape by decreasing in the inner side over the next 3 rounds: (2 sc, dec) x 6 (12)
Round 6 :
(1 sc, dec) x 4 (8) — shape so you have a noticeable crescent curve. Stuff lightly and fasten off, leaving long tail for sewing onto cord.
Info :
Because the moon is small, bulk up a bit by adding tight stuffing for dimensional look. Alternatively crochet as two halves and sew together for a cleaner crescent profile.
— Black Cat Ornament :
Head/Body Round 1 :
With black yarn, mr, 6 sc in mr (6)
Round 3 :
(1 sc, inc) x 6 (18)
Round 4-5 :
1 sc in each st (18)
Info :
Attach small bright green safety eyes or sew green felt circles for the cat's eyes at Round 3–4, spaced about 4-5 sts apart. Embroider a small nose and mouth or use a tiny green bead for a nose.
Round 6 :
(3 sc, dec) x 3 (15) — this will create a small body
Limbs and Tail :
Make tiny legs by ch 4 and sc 3 in chain for 2 rows, fasten off. Make thin curled tail by chaining 8, sl st back along chain to curl or make a small tube: mr, 6 sc in mr, 2 rounds then sl st. Sew legs and tail to body. Make two pointed ears by 3 sc in mr, inc to 6 sc, work 2 rounds and flatten and sew to top of head.
Info :
Keep cat small (approx 3-4 cm tall) so it visually matches other charms. Lightly stuff body; eyes should be the brightest detail on the cat.
— Haunted House Base & Tree :
House 1 (Main) Round 1 :
With purple yarn, ch 5 and join to form a ring, sc 5 in ring (5)
Round 3 :
(1 sc, inc) x 5 (15)
Round 4-8 :
1 sc in each st (15) — make a tall rectangular box by working even rounds to desired height (approx 5 rounds) then fold and seam to form house walls
Roof :
With black yarn, ch 20, sc across and shape roof by decreasing towards the top — attach to top of house. Add small yellow windows: make 2 small discs with yellow yarn (mr, 6 sc, 2 rounds) and sew on as windows. Use black yarn to outline windows and make door with a small black rectangle.
Additional Houses & Tree :
Create 2 smaller houses in the same way by making shorter rectangles and different widths. For tree: with black yarn work a flat tree silhouette by ch 10 and working sc back and forth with increases to create branches; sew tree to base behind house. Sew all bases to a felt or crocheted base disc for added stability (make disc by ch 6, sc 6 in ring then inc to 24 rounds).
Info :
The home base is small and mainly decorative. Attach a small loop at the back to tether the bottom of the spiral tube to the house so the spiral appears to emerge from the haunted ground. Add tiny surface embroidered highlights (window glows) in yellow for night effect.
— Assembly & Hanging Cords :
Info :
Create 6–8 short hanging cords (approx 10–20 cm) from black yarn using either chain twisted rope or a thin crocheted icord. Each cord attaches to a specific ornament. Plan spacing visually so charms hang at staggered heights along the spiral. The sample shows 7 charms at varying heights.
Attaching Ornaments :
Sew one end of each hanging cord securely into the center top of each ornament (or through the top edge for hats). Use a strong knot and weave the tail inside the charm to hide it. The other end of the cord is sewn through the black spiral tube at desired stitch positions — choose stitches by measuring along the tube and marking where each charm should dangle. Sew through several stitches at the tube to secure.
Info :
To achieve the spiral twist, sew the purple ridge to the inside and then gently rotate the black tube around its axis while pinning it in a helix shape onto a dowel or rod. Sew a few anchor points where the black tube meets the purple ridge to keep shape. You can also insert a central flexible rod inside the tube to help maintain helix consistency.
Top Attachment :
Sew the tapered top of the black tube to the spiderweb ring using the long tail left from Round 87 of the black tube. Weave the tail through the web ring and secure with multiple passes then hide the tail. Use the spiderweb's outer chain to hang the entire mobile with a keyring or ribbon.
Finishing :
Weave all loose ends into the inside of the tubes and charms. Lightly steam block if needed and hang the mobile to check balance — adjust charm positions by moving cords left or right slightly. The mobile should hang with a 3-dimensional spiral twist.
Info :
Be mindful of weight distribution; heavier charms like the pumpkin should be placed nearer the top or center to prevent the spiral from leaning too much. Add a small stitch to the base house to anchor the bottom of the spiral if necessary.
You're now holding a beautifully spooky and playful Halloween spiral mobile — a handcrafted decoration full of personality and charm! Each ornament was made with small, deliberate stitches to create a cohesive, eye-catching piece that will liven up any space. Hang it in a doorway, by a window, or above a desk for a seasonal accent everyone will admire. 🧶🎃✨