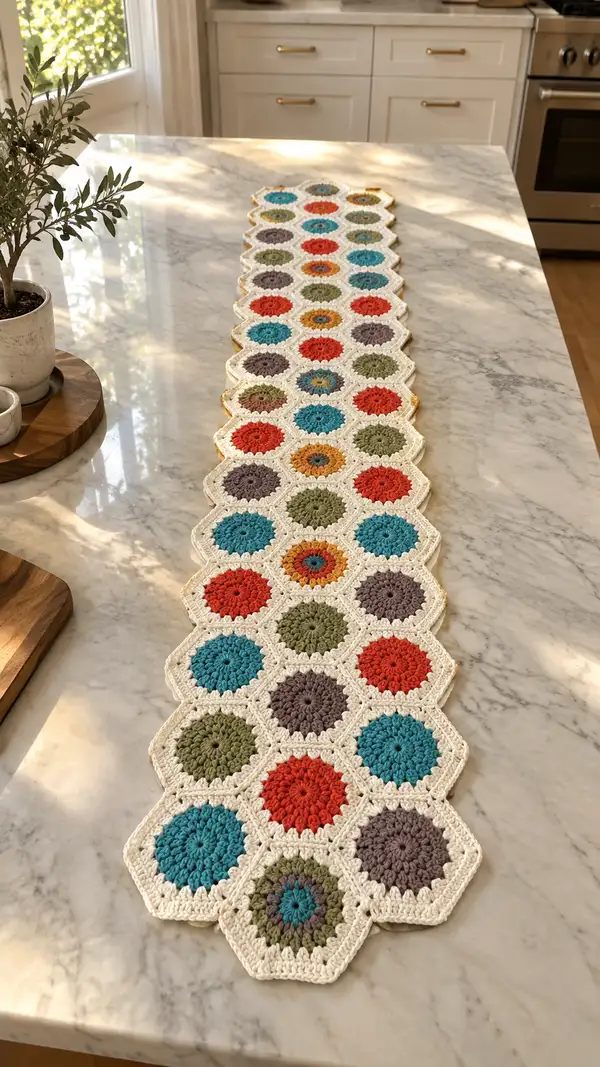
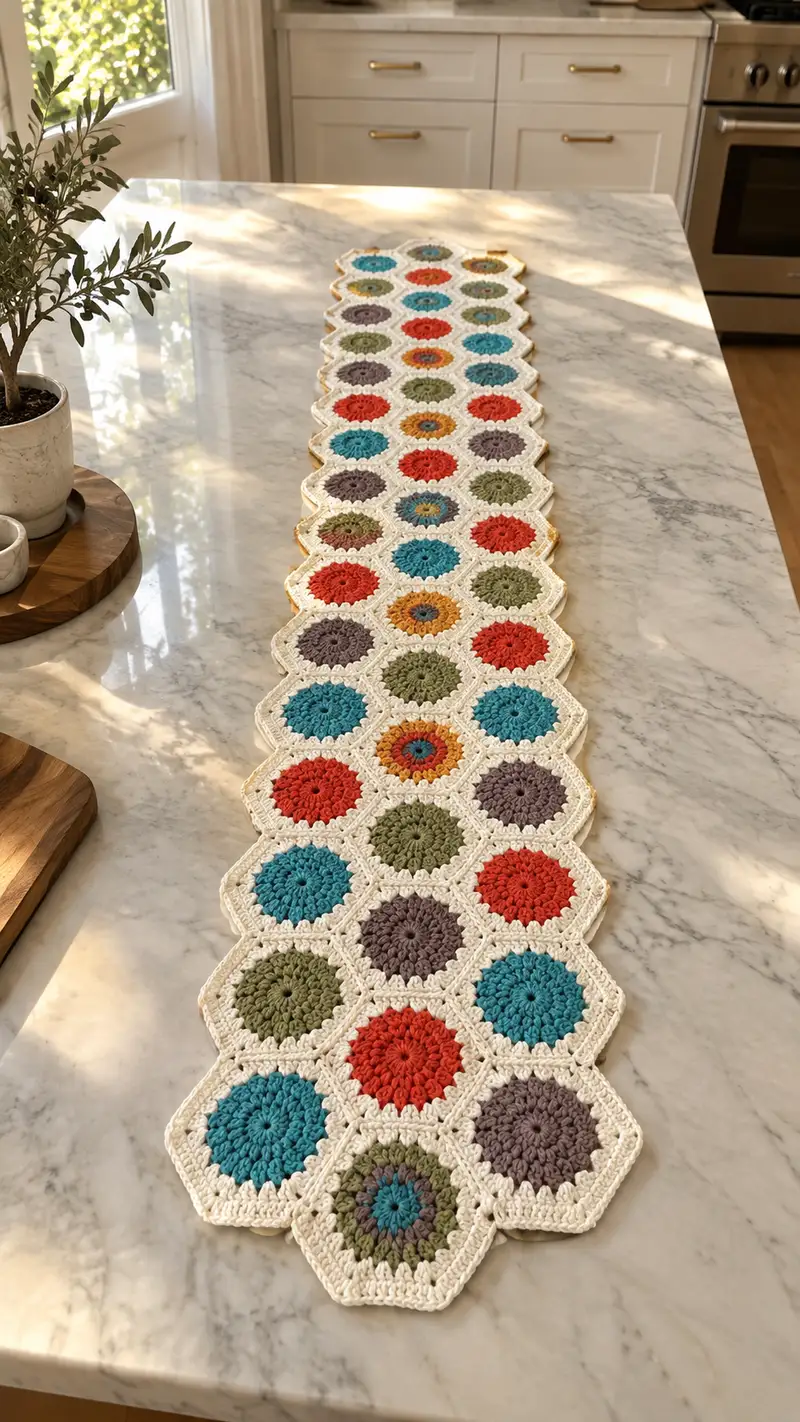
This bright, modern hexagon flower table runner is made from joined sunflower-style hexagon motifs with a soft cream lattice edge. Each hexagon features a textured, puffed center in warm teal, coral, olive, mustard or mauve, framed with a neutral cream hexagon and finished with a delicate scalloped edge. The modular design makes it easy to customize length and color layout. Perfect for farmhouse, mid-century, or contemporary tables, this pattern creates a long, eye-catching runner with tactile texture and cozy charm.
Progress Tracker
0% Complete
— Overview :
Info :
This pattern is modular — you will make a number of identical hexagon motifs, then join them as you go to form a long table runner. The sample runner pictured uses 30 hexagons arranged in a staggered column, but you can add or remove motifs to change the length. Each hexagon begins with a small circular center worked in a colored yarn, then texture is added with puff stitches before switching to the cream color for the hexagon shaping and joining rounds. Measurements will vary with yarn and tension; finished motif diameter is approximately 4.25" (10.5cm) corner-to-corner after blocking using worsted cotton and a 4.0mm hook.
Info :
We use multiples of 6 stitches at the center so that hexagon corners can be created symmetrically. Keep a stitch marker for round starts and read each round fully before you begin. Puff stitch technique: yarn over, insert hook, draw up a loop, repeat to leave 3-4 loops on hook then yarn over and pull through all loops, finishing with a ch1 if instructed. For sturdier runner, use cotton or cotton-blend yarn for less stretch.
— Motif (make 30 or as desired) :
Round 1 :
Using Accent Color (choose one colored yarn for the motif center), make a magic ring. Ch3 (counts as dc), work 5 dc into ring. Pull ring closed and join with sl st to top of beginning ch3. (6)
Round 2 :
Ch3 (counts as dc), dc in same st, 2 dc in each st around, join with sl st to top ch3. (12)
Round 3 :
Ch3, (1 dc, inc) x6 — work 1 dc in next st, then 2 dc in following st. Repeat around and join. (18)
Round 4 :
Ch3, (2 dc, inc) x6 — 2 dc in next two sts, then 2 dc in following st; repeat around and join. (24)
Info :
At this point the center disc is established. If you'd like a multi-colored tiny center, you may change to a second accent color now and slip stitch to the chosen st before starting the next textured round. We used solid single-color centers in the sample but a two-tone center is a nice variation.
Round 5 :
Ch1, puff in first st (yarn over, insert hook, pull up loop; yarn over, insert hook in same st, pull up loop; repeat once more to have 5 loops on hook; yarn over and pull through all loops), ch1, skip next st, *puff in next st, ch1, skip next st* repeat around. Join with sl st to first puff top. (12 puffs if you puff every other st; if you puff in each st, make 24 puffs instead — sample uses each-other puff for a slightly open texture — if working every st, total = 24)
Info :
Puff grouping: if you prefer a denser textured disc, work a puff in every st (24 puffs). For a more open look, use every other st giving 12 puffs. Keep the same choice for all motifs for a consistent runner look.
Round 6 :
Change to cream color (main color). Join cream into any ch1 space or between puffs with sl st. Ch1, sc in same sp, sc in each st or space around to create an even sc round. If you made 12 puffs in Round 5, you will have 12 sc; if you made 24 puffs, you will have 24 sc. (match your earlier count)
Info :
When switching to the cream color, leave a 6-8" tail to weave in later or carry the color along the inside if making several motifs in the same color family. Always tidy ends before joining motifs so finish is crisp.
Round 7 :
If your sc count is 12: 1 sc in each sc, ch2 every 2 sc to create 6 ch2 corner spaces: (1 sc, ch2) x6 -> uses 12 sc and places 6 ch2 spaces. If your sc count is 24: 1 sc in each of next 4 sc, ch2, repeat x6 -> (1 sc in next 4 sts, ch2) x6. Adjust to match your earlier puff choices so you end with six evenly spaced ch2 corners. (creates 6 ch2 corners)
Info :
Hexagon formation requires six corner spaces. Divide your round's stitch count by six and place a ch2 corner after that many stitches. For example, with 24 sts place a corner after every 4 sts; with 12 sts place a corner after every 2 sts.
Round 8 :
Work into corners to create hexagon shape: *[2 dc, ch2, 2 dc] in each ch2 corner space; then dc in each sc along the side across to the next ch2* — repeat for all 6 sides. Count: if sides had 4 sc previously and you dc into each, side contributes 4 dc per side (4x6=24) and corners contribute 4 dc per corner (4x6=24) for a total of 48 dc. (48)
Round 9 :
Ch1, sc in each st around to tidy the round (48 sc). Join with sl st to first sc. (48)
Info :
If your count differs slightly due to using 12 puff vs 24 puff in earlier round, recalculate so you have even spacing creating six side groups. The principle is the same: create corner clusters of (2 dc, ch2, 2 dc) and fill sides with dc across the side stitches.
Round 10 :
Optional textured side: Ch3 (counts as dc), *dc in next 2 sts, (dc, ch1, dc) in corner ch2 space, dc in next 2 sts, dc in each side stitch until corner*, repeat around. This adds a small raised cluster at each corner and forms broader sides. Stitch count will increase depending on number of side stitches; work evenly until you reach consistent corner placement. Join with sl st. (Typical result after this round ~54-60 sts depending on initial puff choice)
Info :
Use this round to refine the hexagon edge so that when motifs are joined they create a snug, flat seam. If your motif puckers, go back a round and work an additional dc across the side to spread the fabric slightly before proceeding.
Round 11 :
Ch1, sc in each st around (work evenly across corners and side stitches). (Count will match the previous round total, typically 54-60 sc)
Round 12 :
Decorative ridge: *[1 sc in next 2 sts, BLO 1 sc in next 2 sts]* repeat around. This BLO round creates a subtle ridge that visually separates the hexagon face from the joining edge. Join with sl st. (Same stitch count as Round 11)
Info :
If you prefer a smoother join for join-as-you-go, skip the BLO and continue in regular sc rounds. The BLO is decorative and helps the motif sit flatter on the table by creating a crisp border.
Round 13 :
Prepare for joining: ch1, sc in each st around working 1 sc into each dc and into each corner cluster. At each corner ch2 space, work (sc, ch2, sc) to keep corner definition. Join and fasten off leaving a 6" tail for weaving. (same count as previous round)
Info :
Weave in short tails from color changes but leave the main long joining tails if you plan to use join-as-you-go seams. Fasten off securely and block the motif lightly to set the shape. Repeat motif instructions for each colored hexagon, alternating colors according to your layout plan.
Round 14 :
Optional small scallop on face: rejoin cream, *skip 2 sts, (5 dc shell) in next st, skip 2 sts, sc in next* repeat around to add a gentle scalloped texture. Work shells only if desired for edge interest. Join and fasten off. (stitch count varies)
Info :
At the photo sample, the face remains mostly smooth with the hexagon border and a final scalloped/raised trim only on the outside edges to keep a clean lattice look between motifs. If you add shells, expect a slightly wider finished motif and plan joins accordingly.
— Motif Variation: Two-Round Center (optional) :
Round 1 :
Magic ring, ch3, 11 dc into ring (12). Join. (12)
Round 2 :
Change color to contrast and work 12 puff stitches around — puff in each st separated by ch1 — join. (12 puffs)
Round 3 :
Change to cream, sc evenly around and continue motif shaping following Rounds 7-13 above; adjust sc-per-side so you have six ch2 corners spaced evenly. This variation yields a tighter multi-tonal center.
Info :
Use this variant to create the occasional multicolor hexagon that adds visual rhythm to the runner — alternate every 4th or 5th motif for interest.
— Join-As-You-Go (JAYG) Method to Build Runner :
Info :
The sample runner is created by joining motifs in staggered columns — each motif connects to up to 3 existing neighbors (left, right, and one diagonal) as you add them. We recommend laying out motifs first and working left-to-right in rows, joining each new motif to previously completed motifs using a join-as-you-go slip stitch or sc technique performed on Round 13 or the last sc round before finishing.
Join Round 1 :
On the completed motif you plan to attach, start Round 13 but when you reach a side that touches a neighbor, instead of sc in the stitch, sl st into the corresponding stitch of the adjacent motif to join, then sl st back into your own stitch to complete the sc. Continue across that side, joining stitch-for-stitch. Repeat for each touching side. When a corner touches two neighbors, join to both by making (sl st into neighbor A, sl st into neighbor B, sc in work) sequence to secure the corner. Work remaining sides normally. Fasten off and weave in tails. Repeat until runner is assembled.
Info :
For clean joins, ensure motifs are blocked and flat before joining. Pin motifs together on a flat surface following your layout and work joins with even tension. If you prefer a visible seam, use sl st joins; for a slightly more embedded seam, join with sc.
Join Round 2 :
Alternative: Whip-stitch join — place motifs RS together and whip-stitch through the back loops only along the side to create a near-invisible seam. This method is especially useful if you have many motifs already completed and prefer sewing to join-as-you-go. Use matching cream yarn.
Info :
When using whip-stitch join you will not be able to use the join-as-you-go edge rounds; instead, block motifs then whip-stitch sides together, maintaining tension and aligning points carefully. Use pins or sewing clips to hold motifs in perfect alignment while sewing.
Join Round 3 :
If your motifs have a final scallop or raised border, join into the loops below that border so the border remains uninterrupted along the outside edges. For an inner grid join (photo look), attach at the flat sc round directly under the decorative edge so the cream lattice remains consistent.
Info :
Join direction tip: Add motifs in rows working left to right across the runner. Place the first motif at the bottom and build upward, attaching each motif to its immediate neighbors as you go so that there are no drifting tails and joins remain even.
Join Round 4 :
Corner joining technique: When a motif corner meets two neighboring corners, slip stitch into each neighbor corner stitch in sequence to make a small triangular join. Count carefully — the corner ch2 space will correspond to one corner on each neighbor; align by eye and test before stitching.
Info :
Take your time on each first join to ensure corner alignment. If corners are off, it will cause the runner to skew. Use blocking pins and re-block motifs if necessary and re-sew if a join looks uneven.
— Joining Sequence Example for Sample Runner :
Info :
Sample runner layout uses a single staggered column 30 motifs long: you will start with a base motif and then attach the next motif adjacent to it, joining along one side. Continue adding motifs by alternating sides so each new motif connects to up to two previously joined motifs. Visual layout helps a lot — lay them out on a table, photograph your layout for reference, then begin joining.
Round 1 :
Start with first motif; no joins. For motif #2, align to the side and join-as-you-go across the single side following Join-As-You-Go instructions above. For motif #3, align on the opposite side and join. Continue building zig-zag columns until you reach desired length.
Info :
Record the color order on paper to maintain consistent color rhythm; the runner in the photo alternates teal, coral, mauve, olive, mustard in a repeating palette that creates a visually balanced effect.
— Final Border and Edge Trim :
Info :
Once all motifs are assembled into the runner and seams are secure, we'll add a final unified border to tidy the outer edges and create a consistent scalloped outline. The border is worked in cream for a cohesive finish.
Round 1 :
With runner laying flat and RS up, join cream yarn at any outer corner ch2 space. Ch1, sc into corner ch2 space, ch2, sc in same corner (this preserves corner ch2). Continue along the outer edge: sc in each exposed side stitch; when you reach a corner (ch2 space between two motifs) work (sc, ch2, sc) to maintain corner. For inward-facing edges where motif sides are flush with other motifs, do not work a sc (these sides are internal) — only work along the outer perimeter. Join and fasten off. (stitch count depends on runner perimeter)
Info :
At this stage, trim any long tails and ensure all inner joins are secure. Pin the runner to a blocking surface to prepare for the final decorative scallop round.
Round 2 :
Join cream in the first sc of the outer perimeter. *Skip 2 sc, work 5 dc shell in next sc, skip 2 sc, sc in next sc* repeat around the entire outer edge. When you reach corners, adjust by placing the shell so the corner is flanked by shells on either side, and keep (sc, ch2, sc) corners intact. Join and fasten off. This creates a uniform scalloped trim that echoes the hex edges in the sample. (stitch count varies)
Info :
For a less pronounced scallop, reduce the shell to 3 dc instead of 5 dc. For a larger border, add a subsequent row of shells offset between the first row shells for a layered look.
Round 3 :
Optional raised ridge: Rejoin yarn at any shell lobe base, ch1, sc in each stitch and in the front loop only of shells to create a raised ridge around the perimeter. Fasten off and weave in ends. This gives the finished runner a defined edge as seen in the photograph.
Info :
If you used whip-stitch joins rather than join-as-you-go, your outer edge might be slightly thicker — use a smaller hook for the border (3.5mm) to keep the trim crisp and proportional.
— Finishing & Blocking :
Round 1 :
Weave in all ends: use a yarn needle to weave each tail into the back of the join or the nearest motif so they are hidden. Trim flush. For color changes within a motif, weave tails into the motif face columns so they won't work loose.
Round 2 :
Lightly block each motif before joining or the entire runner after assembly. For cotton yarn: dampen runner evenly, pin out to exact rectangular/staggered shape on a blocking board, and allow to dry. Gently steam-block if needed but do not press directly. Re-pin until dry to fix shape permanently.
Info :
Blocking is essential to achieve the flat hexagon faces and crisp corners. If you skip blocking, the runner will likely have rounded or inconsistent edges that make the border look uneven.
Round 3 :
Final check: Inspect seams and re-enforce any join points that have gaps with a few small whip-stitches. If any corners are slightly lifted, secure them from the backside with a small stitch into the neighbor motif to pull flat.
Info :
Press lightly (steam) and let rest 24 hours before using the runner on a table. Use coasters and placemats to protect cotton yarn from spills; spot-clean as recommended for cotton yarns.
— Alternate Assembly: Strip-Join Method (for a narrower runner) :
Round 1 :
Make motifs and arrange them in straight strips of desired length, then seam strips together using either whip-stitch or Mattress stitch for a flatter join. This method is faster for build-as-you-go if you plan a long narrow runner composed of columns rather than a single staggered column.
Info :
If your table runner will be laundered frequently, consider sewing a thin interlining beneath the motifs with lightweight fusible interfacing to keep shape and make washing safer for the yarn fibers.
This cheerful hexagon table runner blends textured floral centers and a soft cream lattice into a timeless accent for your home. The modular motifs make it easy to customize length and color placement, while the puff-stitch centers add depth and a handmade charm. Blocking and a thoughtful border finish give the runner a professional, gallery-ready look. 🧶✨ Whether brightening a kitchen island or dressing a dining table, this piece invites compliments and cozy gatherings. Happy stitching and enjoy your new handmade centerpiece! 🌿