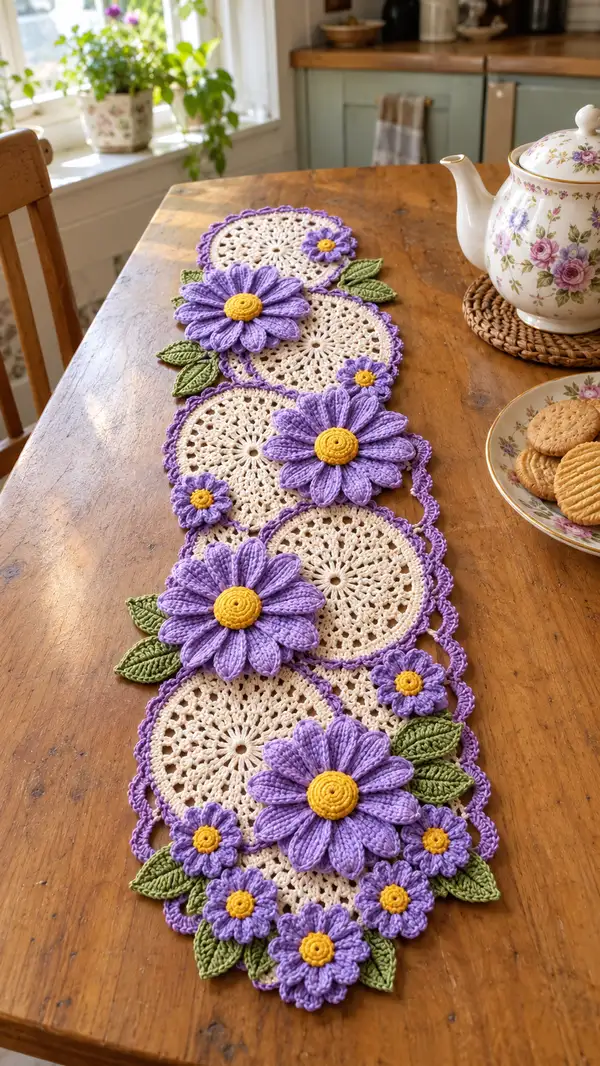
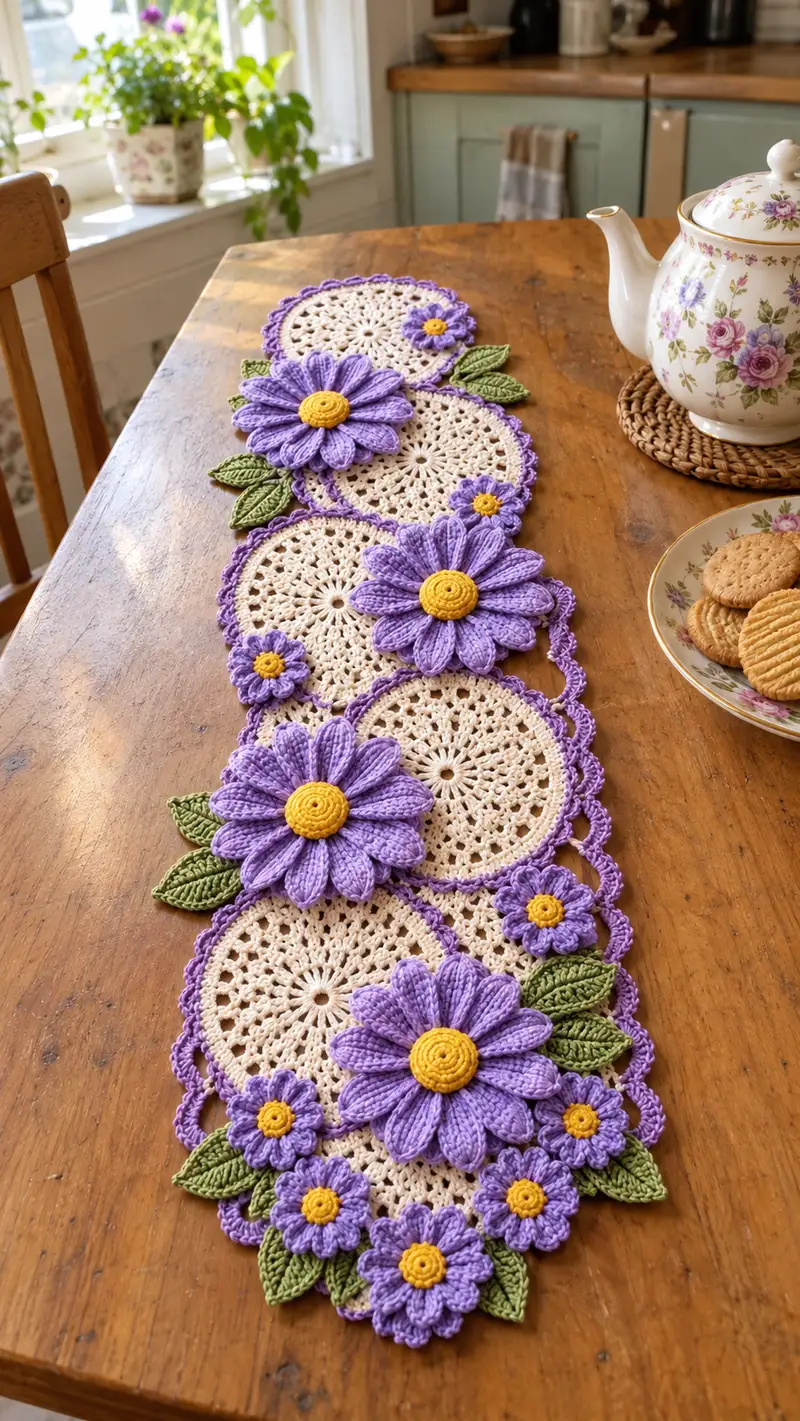
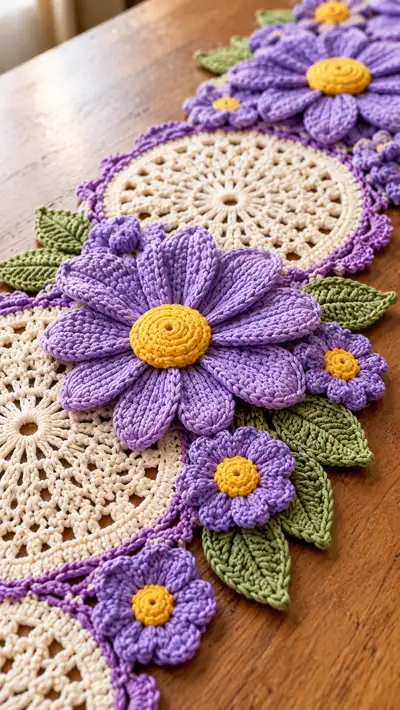
Create a charming vintage-inspired table runner made of stacked crochet doilies, layered lavender daisies, and sculpted green leaves. This pattern uses cotton yarn for crisp stitch definition and features creamy doily circles framed with purple scallops and bright yellow flower centers. Perfect for decorating dining tables, sideboards, or as a centerpiece runner for tea time.
Progress Tracker
0% Complete
— Doily Circle (Make 5) :
Round 1 :
6 sc in magic ring (6)
Round 3 :
(1 sc, inc) x 6 (18)
Round 4 :
(2 sc, inc) x 6 (24)
Round 5 :
(3 sc, inc) x 6 (30)
Info :
Work these early increase rounds tightly; this creates a firm center which improves the stability of later lacework. Use a stitch marker on the first stitch of each round.
Round 6 :
(4 sc, inc) x 6 (36)
Round 7 :
1 sc in each st (36)
Round 8 :
(5 sc, inc) x 6 (42)
Round 9 :
1 sc in each st (42)
Round 10 :
(6 sc, inc) x 6 (48)
Round 11 :
1 sc in each st (48)
Info :
We will begin forming the lacy spokes now. Keep your tension even so the circular shape remains flat. If the doily begins to ruffle, check that you are not over-increasing in lace rounds.
Round 12 :
*ch2, sk 1, dc in next st* around (creates initial spacing) (48 spaces/chains)
Round 13 :
Into each ch2-sp: (dc, ch1, dc) to create small shells around (48 shells)
Round 14 :
*sk next shell, sc in space between shells, ch4, sc in next space* around (48 ch4 loops)
Info :
These ch4 loops will form the base for the round lace motif. Keep loops airy but not too large; adjust by working ch3 if your loops look oversized compared to the sample.
Round 15 :
In each ch4 loop: (sc, hdc, 3 dc, hdc, sc) forming a fuller petal motif (48 petals)
Round 16 :
1 sc in each st and in each petal top to even out the last round (approx 48 sc)
Round 17 :
*ch5, sl st in next 3 sc, ch2, sl st in next sc* around to create decorative arc chain (48 arcs)
Round 18 :
Working through arc chains: *(sc, ch3, sc) in each arc* around (48 small picot arches)
Round 19 :
1 sc in each st around, working through both loops evenly to maintain flat circle (48 sc)
Round 20 :
(sc, ch2, sc) in every 3rd stitch to give an open scalloped ring (48 small scallops)
Round 21 :
*(sc, ch2, sc) in ch2-sp; sl st to next sc* around to lock scallops (48)
Info :
At this point each doily should measure approximately 14-16 cm (5.5-6.25 inches) across depending on yarn and tension. Block each doily flat to correct any slight cupping or ruffling before moving on. Pin on blocking board to exact size and lightly steam or wet-block, then let dry.
Round 22 :
Join to final edging color (purple) with sl st; do not fasten off - prepare for scallop edging in purple
Round 23 :
With purple: *ch3, (3 dc) in same st, sl st in next sc* repeat around to create a delicate scallop border. Count scallops and make sure scallops line up at consistent intervals. Expected scallops: 16-18 depending on earlier lace geometry.
Info :
Make 5 of these doilies following the same tension and blocking process. Keep the purple border consistent so joining will align easily. Label each doily as A-E for easiest placement during assembly.
— Large Daisy Center (Make 5 centers for large flowers) :
Round 1 :
With yellow yarn: 6 sc in magic ring (6)
Round 3 :
(1 sc, inc) x 6 (18)
Round 4 :
1 sc in each st (18)
Info :
The center is coiled. If you want a tighter spiral, use a smaller hook by one size for rounds 1-4. Leave a 10-12 cm tail for sewing to petals.
Round 5 :
Working in BLO for ridged spiral: 1 sc in each st BLO (18)
Round 6 :
Sl st around to compress coil tightly; fasten off leaving long tail for sewing (do not stuff)
Info :
You may wrap a tiny bit of chain and glue inside to maintain coil if your yarn is soft; otherwise the coil sewn tightly to petals holds shape well.
— Large Daisy Petals (Make 5 flowers, 10 petals each) :
Info :
Each large flower has 10 sculpted petals. Petals are worked onto a small petal ring attached to center so you can arrange them evenly. Petal stitch structure uses elongated front-post trebles and slip-stitch shaping for a raised petal look.
Petal Base (Round 1) :
With lavender: ch10, sl st into small ring (or into center sc), repeat ch10 eight more times around to form 10 loops. Join with sl st. This establishes 10 petal starting loops.
Petal Work (Petal 1 - Repeat 10 times) :
Into each ch10 loop: (sc, hdc, 3 dc, tr, 3 dc, hdc, sc) fasten off at end of petal. Count: each petal uses 11 stitches plus turning chains shaped into petal. Repeat for petals 1-10.
Info :
Work each petal with consistent tension. Gently stretch and block each petal by pinning into a slightly convex shape on blocking mat and lightly spraying to set curvature. Blocking greatly enhances the sculpted effect.
Petal Ribbing (Optional finishing round) :
Using BLO around petal base: 1 sc in each st BLO across each petal base to define edges and help petals stand up (approx 10-12 sc per petal)
Assembly :
Center the yellow coiled center onto the petal ring and sew through center rounds using long yellow tail. Sew securely with small neat stitches around the center so coil is slightly raised above petals.
Info :
Make five large daisy flowers. Position them on doilies so larger flowers fall alternatingly along the runner; you can cluster two flowers on one doily or space them evenly by eye.
— Small Flower (Make 8-10) :
Round 1 :
With yellow: 6 sc in magic ring (6)
Round 3 :
Switch to lavender: *ch3, 5 dc in same st, sl st in next sc* repeat around to create 6 small ruffled petals (6 petals)
Round 4 :
Sl st around base to tidy; fasten off leaving tail for sewing
Info :
These small flowers are decorative fillers between large daisies. Make 8-10 of them, and place them in clusters of 2-4 near the large flowers for contrast.
— Leaves (Make 12-16) :
Leaf 1 - Foundation :
With green: ch11, sc in 2nd ch from hook, hdc in next, dc in next 3, hdc in next, sc in next, sl st in last; turn to work on opposite side of chain and repeat symmetrical stitches back to base; sl st to join (approx 18 sts total)
Round 2 :
Working around leaf edge: *ch2, sc in edge, ch2, sl st* around to form small picot-edge for realistic leaf serration (approx 8-10 picots)
Round 3 :
Switch to BLO down center of leaf: with tapestry needle and contrasting thread (or working with green), surface-slip post stitches to create center vein. Use backstitch or surface slip st following center to give raised midrib.
Info :
Make leaves in two sizes by varying chain foundation (ch9 for small leaves, ch13 for larger accent leaves). Block slightly with steam to flatten and hold shape before attaching.
Leaf Count :
Make 12-16 leaves of mixed sizes to tuck under flowers and along the runner edge.
— Joining Doilies into Runner :
Info :
Lay out the 5 blocked doilies in desired order on a flat surface. Place large flowers and small flowers atop doilies to finalize placement before any joining. Pin pieces to hold position.
Joining Method A :
Using purple: position edge scallops of adjacent doilies so scallops align. With right sides facing up, join by slip stitching through outer loop of scallop on Doily A and corresponding stitch on Doily B. Make a slip-stitch every 6-8 stitches to create a secure but decorative join. Expected joins: 4 joins between 5 doilies.
Joining Method B (Sewn Option) :
With tapestry needle and matching purple yarn, whip stitch through scallop edges from top, making small invisible stitches. This is stronger and preferred if runner will receive heavier use.
Info :
When joining, leave about 1-2 cm gaps in join if you plan to tuck leaves or smaller flowers between motifs; otherwise sew close together for a seamless look.
— Decorative Bridge Chains and Accent Loops :
Round 1 :
With purple: join at the inner part of scallop between adjacent doilies with ch12 loops that arc across the seam. Sl st to anchor every 3 chs to create a braided look. Work across all seams for consistent decoration.
Round 2 :
Into each chain arc: *sc, ch3, sc* to create small arches that echo the doily lace. Fasten off and weave ends.
Info :
These decorative bridges serve both an aesthetic and functional purpose by helping to stabilize the runner. Use the same purple as the scallop border to keep a consistent color language.
— Final Scallop Edging Across Runner :
Round 1 :
Work a unified edge around the entire outer perimeter of the combined doilies: With purple, join at any outer scallop and *(ch3, 3 dc in next scallop base, sl st in next) repeat around all exposed outer scallops. Expected repeats: 60-80 depending on pattern size.
Round 2 :
*(sl st, ch4, sl st) around the top of each 3-dc scallop to create airy loops; fasten off*
Info :
If the runner edge still feels floppy, add a round of sc around the very edge in cream to visually tie the runner into the doily centers. This gives a two-tone finish that's very attractive.
— Attaching Flowers and Leaves :
Info :
Arrange large daisies on doilies where you want them. Typically, larger flowers are placed on Doilies 1, 3 and 5 and smaller daisies clustered around Doilies 2 and 4 for balance, but feel free to arrange to suit your table.
Step 1 :
Using long tails from flower centers, sew the yellow center through center rounds into the doily surface with even small stitches. Stitch around the coiled center twice for security.
Step 2 :
Sew petal bases to the doily fabric using ladder stitch or small whip stitches through the base stitches of each petal. Secure every petal at 2-3 points for firm attachment. Hide knot and tail on the back side of the runner.
Step 3 :
Arrange leaves under petal clusters, tucking leaf tips slightly under petals and sewing only at the leaf base into the runner. For a realistic look, angle leaves outward from flower centers.
Info :
To create a raised layered look, you can sew a small felt circle under the flower before attaching to the doily; this lifts the petals slightly and gives a shadowed look that photographs beautifully.
— Optional Surface Embroidery and Final Touches :
Step 1 :
Using green yarn and darning needle, add a few small surface stitches to suggest vines between flowers. Keep lines light and sparse.
Step 2 :
If desired, add tiny seed beads to flower centers using clear thread and needle for a subtle sparkle. Sew beads securely and knot multiple times.
Info :
Weave in all yarn tails and trim. Lightly press or steam once all attachments are completed. Re-block any petals that need reshaping with steam and pins. Your runner is ready for display.
— Alternative Techniques & Notes :
Info :
If you prefer the petals to be stiffer, you can lightly starch them after blocking. For machine-washable finish, use a washable fabric stiffener following manufacturer's instructions. If making a narrow runner for a small table reduce number of doilies to 3 and adjust flower counts accordingly.
This delicate floral runner brings cottage charm to any table with layered daisies and lacy cream doilies. The sculpted lavender petals and bright yellow centers pop against a soft wooden table, creating a centerpiece that feels both handcrafted and timeless. I love how the runner mixes vintage lace with bold dimensional flowers—it's perfect for tea with friends or to brighten everyday meals. 🧶🌸 Add your personal color palette to make it uniquely yours. Happy stitching! ✨