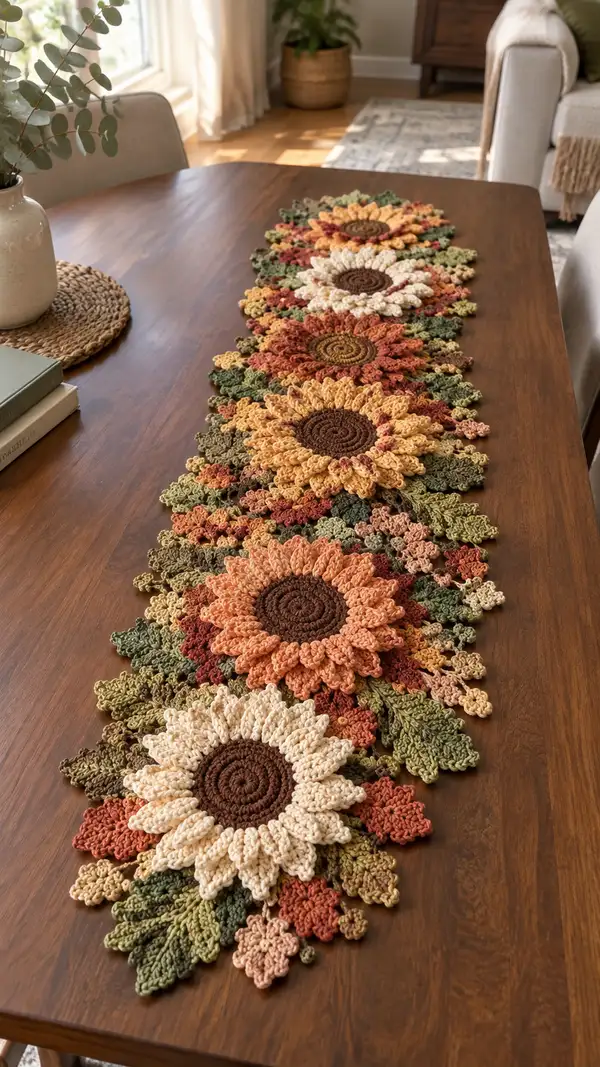
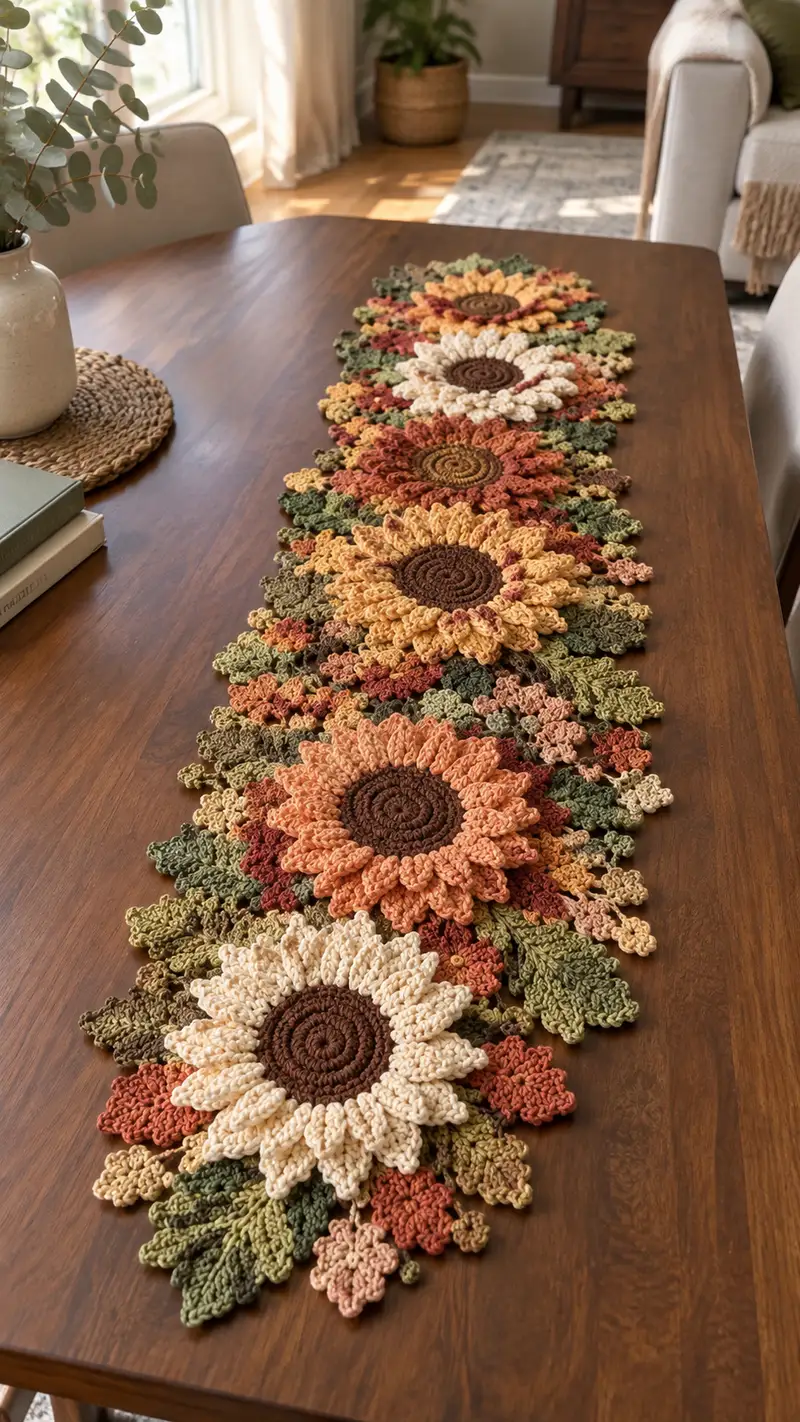
Create a warm, rustic sunflower table runner composed of large layered sunflower motifs, leafy connectors, and tiny cluster blooms. This pattern features textured petals, spiraled centers, and a rich autumn palette of creams, golds, rusts, and olives. The motifs are joined into a long runner with decorative leaf-filled seams for a handcrafted look.
Progress Tracker
0% Complete
— Sunflower Center (make one per sunflower) :
Round 1 :
With dark brown and 3.5mm hook, ch 2, 8 sc in 2nd ch from hook (8)
Round 2 :
Inc in each st around (16)
Round 3 :
(1 sc, inc) x 8 (24)
Round 4 :
(2 sc, inc) x 8 (32)
Info :
Switch to 4.0mm hook here if you prefer a slightly looser center to better accept petal rounds. Carry tail for closure if you want a slightly concave center by pulling the tail later.
Round 5 :
(3 sc, inc) x 8 (40)
Round 6 :
1 sc in each st around (40)
Round 7 :
1 sc in each st BLO (40) — creates a subtle ridge to sit the first petal round against (40)
Round 8 :
Switch to 4.0mm and sc around in FLO to tidy edge for first petal join (40)
Round 9 :
Working in FLO still, (3 sc, sc2tog) x 8 — creates slight scallops for petal anchors (32)
Round 10 :
1 sc in each st around (32)
Info :
Fasten off, leaving long tail for sewing center to petal layer. If you prefer a more raised center, stuff lightly under center before sewing to petals.
— Petal Base Layer (first petal layer, make one per sunflower) :
Round 1 :
Join petal color to any ch-anchored spot at edge of center with sl st. Ch 1, sc in same st (counts as petal anchor), ch 3, sk 1, sc in next st, *ch 3, sk 1, sc in next st; rep around to make 16 ch-3 loops (16 loops)
Round 2 :
*Working into ch-3 loops: (sc, hdc, 3 dc, hdc, sc) in each ch-3 loop to create a petal shell; sl st to first sc to join — 16 petals
Round 3 :
Sl st into the base of the next petal shell, ch 1, 1 sc in base, ch 5, sc in next petal base; repeat around to create longer anchor loops (16 loops)
Round 4 :
*In each ch-5 loop: (sc, hdc, 5 dc, hdc, sc) to create extended petals. Sl st to join — 16 larger petals
Info :
Ensure each petal base is anchored into a consistent stitch on the center to keep petals evenly spaced; use stitch markers every 4 petals to maintain alignment.
Round 5 :
Working behind the petals, sc in each st around the center foundation (32) to tidy and secure petal foundations
Round 6 :
Fasten off petal base color and weave in ends or carry them behind petals if you will add a second petal layer overlapping here
— Petal Texture Layer (creates the visible sculpted petal look) :
Info :
Use a slightly lighter or contrasting petal color for texture. This layer will be worked around and between base petals to create fullness and visible ridging.
Round 1 :
Join color at the base of any petal with sl st, ch 3 (counts as first dc), work 5 dc into the side of the petal shell, sl st to top of same petal; move to next petal and repeat to create a row of short dc clusters on petal faces — 16 clusters
Round 2 :
Ch 1, 1 sc into base of first cluster, ch 7, sk to base of next cluster and sc; rep around to form long loops behind petal faces (16 loops)
Round 3 :
Into each ch-7 loop: (sc, hdc, 7 dc, hdc, sc) to form an elongated textured petal standing proud of the base layer — 16 petals
Info :
When making these tall petal clusters, pull up loops evenly and keep tension consistent so the petals stand uniformly. If petals lean, block or steam lightly while pinning to shape.
Round 4 :
Working behind this layer, join a dark accent (small amount) and sc around the inner edge between petal bases: (1 sc in each gap) — 32 sts
Round 5 :
Fasten off and weave in ends. Ensure the petal layer overlaps slightly over the center to create a realistic sunflower look.
— Petal Layer 2 (optional second row for extra fullness) :
Info :
For extra drama, add a staggered second petal row offset from the first. Use a third color for subtle depth or the same color for uniform petals.
Round 1 :
Join yarn behind the first petal row at a point midway between two first-row petals, ch 3, 1 dc into the back loop of the first-row petal base, ch 4, sc into the base between the next two petals; repeat around to create 16 ch-4 anchors
Round 2 :
In each ch-4 loop: (sc, hdc, 5 dc, hdc, sc) to create a medium-length overlap petal — 16 petals
Round 3 :
Working at the back of both petal layers, sc around to attach the second layer base to the center area, ensuring secure anchoring (32)
Info :
Trim and weave in tails under the petal layers for a neat underside; you can also tack petals together at a few points if they are too floppy.
— Leaf Motif (make multiple; use varied sizes) :
Round 1 :
With olive green and 4.0mm hook, ch 10 (or ch 14 for larger leaf), sc in 2nd ch from hook, hdc in next, dc in next 2, tr in next 2, dc in next, hdc in next, sc in last — turn to work along other side of chain for mirroring (leaf shape base)
Round 2 :
Working along the opposite side of the foundation ch: sc, hdc, dc, tr, tr, dc, hdc, sc. Sl st at base to close leaf base. This creates a simple flat leaf (18 sts total for ch10 leaf)
Round 3 :
Edge the leaf: ch 1, sc around the leaf perimeter evenly placing (sc or hdc) to keep shape; at the tip, work (sc, hdc, sc) to round tip smoothly — count should remain approx 28-32 depending on leaf length
Info :
To add veins, switch to a contrasting thread and use surface slip stitch vines: 1 sl st down the center from base to tip and 1 sl st on each side to mimic veins. Use thin tension for neat surface work.
Round 4 :
Optional BLO round for texture: 1 sc in each st BLO around to create a folded ridge (approx 28 st)
Round 5 :
Fasten off leaving tail for sewing. Make multiple leaves in sizes: small (ch 8), medium (ch 12), large (ch 16) to vary edges between sunflowers
— Small Filler Flower / Cluster (make many) :
Round 1 :
With accent color, ch 2, 6 sc in 2nd ch from hook (6)
Round 2 :
(1 sc, inc) x 3 (9)
Round 3 :
Into each st: *ch 3, sl st into next st; rep around to create 9 small loops (9 petals)
Round 4 :
Into each ch-3 loop: (sc, hdc, 3 dc, hdc, sc) — small clustered petal (9 tiny petals)
Info :
Make these in saffron, blush, rust accents and use them to fill gaps near leaves and between large sunflower motifs for a rich, organic look.
Round 5 :
Fasten off leaving tail for sewing. Make 20–30 of these small clusters to scatter between sunflowers if your runner is long.
— Decorative Connector Panel (join between sunflowers) :
Round 1 :
With green, ch 6, sl st to form small ring, ch 3, 12 dc into ring (12)
Round 2 :
(1 dc, inc) x 6 (18)
Round 3 :
Ch 1, sc in each st around (18)
Round 4 :
*Ch 4, sl st into next st to create 9 decorative loops around the panel; rep around (9 loops)
Round 5 :
Into each ch-4 loop: (sc, hdc, 5 dc, hdc, sc) to make large picot-like petals mimicking small leaves (9)
Info :
Make these connector panels in mixed greens and tuck small filler blooms into the gaps when joining motifs for a continuous, meandering leafy seam.
Round 6 :
Fasten off and make enough connectors to place between each pair of large sunflower motifs along the runner length
— Joining Motif Assembly (join sunflowers, leaves and clusters) :
Info :
Arrange your motifs on a flat surface in the desired runner layout. Alternate sunflower colors and rotate leaf clusters so seams look organic. Block each motif lightly before joining for best results.
Step 1 :
Pin two sunflower motifs right sides up so petals overlap slightly. Use matching yarn and ladder stitch or whip stitch to join the petal bases at 8 equally spaced points around the overlap. Keep stitches small and even.
Step 2 :
Between two joined sunflowers, position 1–2 connector panels and 2–4 leaves/small clusters to fill the gap. Sew connectors to each sunflower petal base at points where petals meet, using the connector ch-loops as anchors.
Info :
For a secure flat join, use mattress stitch or invisible join technique along the petal edges, then tack down leaves and clusters. Avoid bulky knots; weave tails through several stitches and back into the motifs.
Step 3 :
Continue joining in a chain: sunflower - connector - sunflower - connector until the runner is the desired length. Space leaves and filler clusters evenly to mimic the photo's organic scatter.
Step 4 :
When the linear arrangement is complete, sew additional small leaves overlapping petal tips and connector edges to soften the runner's outline, creating the irregular edge shown in the image.
— Outer Edging and Finishing :
Round 1 :
With moss green, join at any exposed edge gap, ch 1, sc evenly along exposed edges where two motifs meet or where petals create scallops — aim for a tidy edge (count will vary per runner width)
Round 2 :
*Ch 3, sl st into next edge st to create picot-lace edging; rep along entire outer perimeter for a delicate crocheted border
Info :
If you prefer a thicker border, work 1 row of sc followed by a scallop row: (5 dc in one st, sl st in next) around. The photo shows small leaf-like edges, so use ch-3 picots or small scallops.
Round 3 :
Fasten off and weave all tails to the backside of motifs. Trim neatly and block the entire runner flat with pins and steam or light wet blocking to open petals and flatten joins.
Info :
Blocking is essential to allow petals and leaves to sit flat and to fuse the runner into a cohesive piece—use a steam iron at safe distance or wet-block and pin until fully dry.
— Gauge and Sizing Notes :
Info :
One full sunflower motif with surrounding leaf joins measures approximately 8–9 inches across when using worsted cotton and a 4.0mm hook. Final runner length depends on number of motifs joined—five motifs in the image create a runner ~48–50 inches long including connectors and edging.
Info :
To alter size: use sport/light worsted and a 3.5mm hook for a smaller, denser runner or bulky cotton and a 5.0mm hook for a larger, airier runner. Adjust motif spacing and connector counts accordingly.
This sunflower table runner brings the warmth of handmade charm to your tabletop with layered petals, textured centers, and organic leaf connectors. Each motif is a small work of art you can arrange and personalize. The rich autumn palette pairs beautifully with wood or neutral settings. Enjoy the meditative process of making and then displaying this heirloom-style accent. 🌻🧶