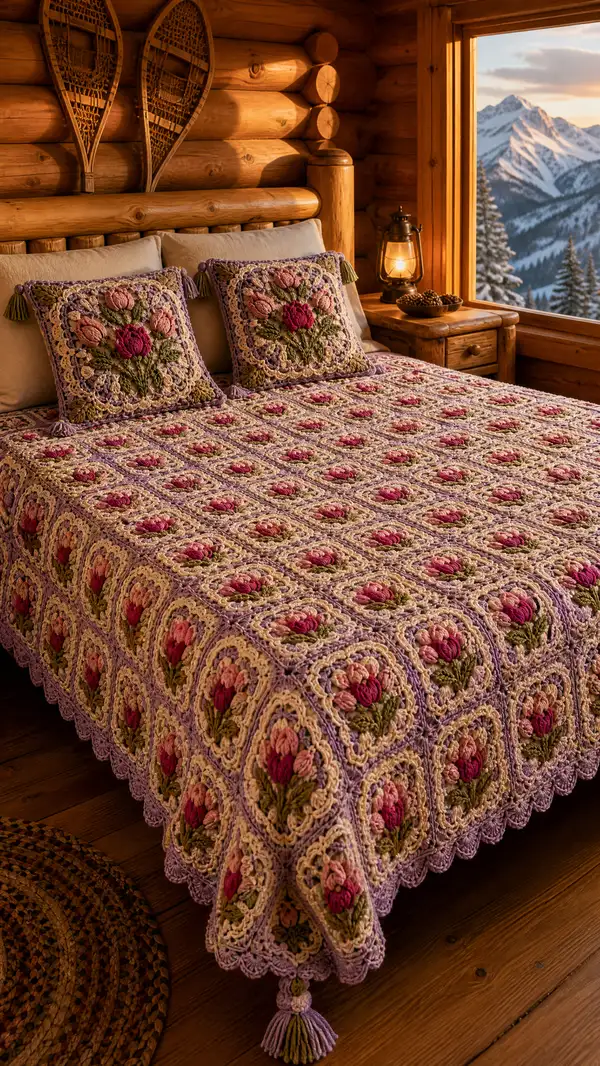
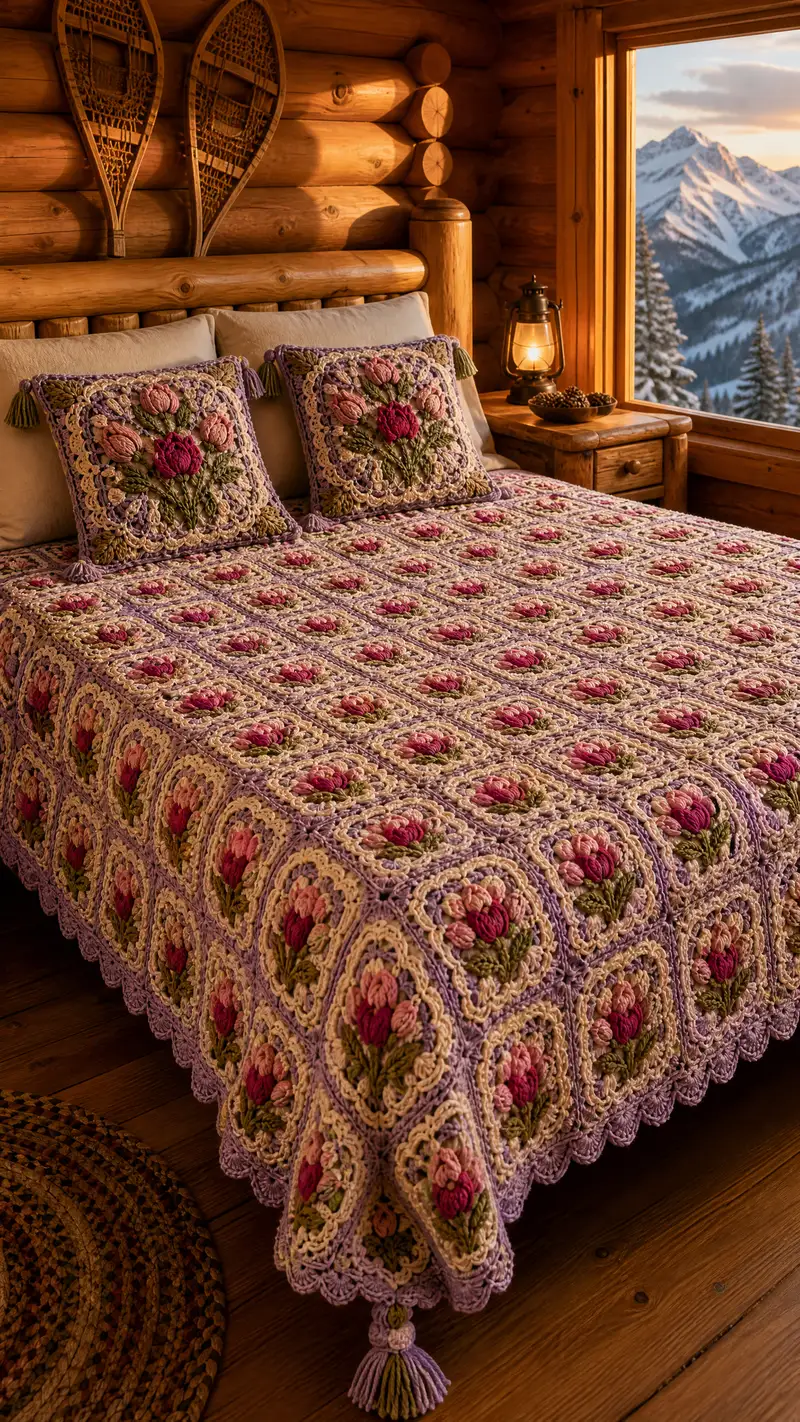
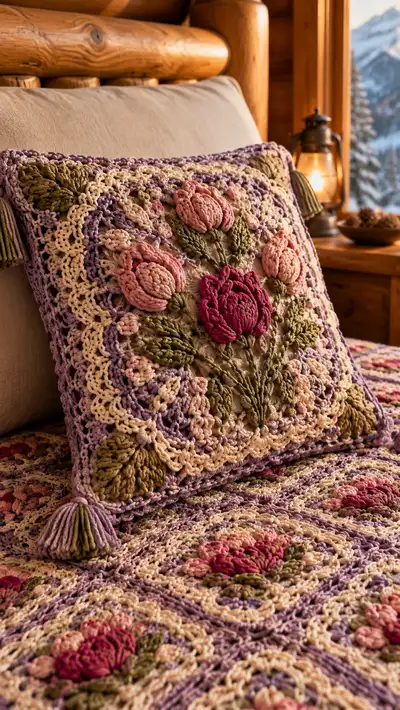
A romantic, vintage-inspired bedspread made from richly textured granny squares featuring raised tulip motifs and leafy vines. Each square showcases layered puff petals, sculpted leaves and a delicate lace frame in soft lavender and cream tones. The finished spread and matching cushion covers create a cozy, heirloom look perfect for a rustic or cottage bedroom.
Progress Tracker
0% Complete
— Motif Overview :
Info :
Each motif is a 12-round (plus assembly) textured granny square featuring a layered tulip center built with puff stitches, sculpted leaves worked in front-post elongated stitches, and a lacy framed square worked in alternating cream and lavender. Make a sample square to confirm gauge: square should measure approximately 10.5" (27 cm) blocked when worked with bulky yarn and 5.5mm hook. Adjust hook if necessary.
— Center Bud (Rounds 1-6) :
Round 1 :
With deep rose (center color), make mr, ch1, 6 sc in ring, pull ring closed (6)
Round 2 :
Inc in each st around (12)
Round 3 :
(1 sc, inc) x6 (18)
Info :
Keep your rounds tight; this small base creates a firm center for the puff petals to attach. Use a stitch marker at the first stitch of each round to maintain count.
Round 4 :
(2 sc, inc) x6 (24)
Round 5 :
1 sc in each st (24)
Round 6 :
Change to deep rose slightly darker or same; ch1, sc in same st and evenly space 8 tiny puff anchors for petal clusters: *(ch2, puff in next st), sc in next st* rep around to make 8 puff anchors (24)
Info :
Puff stitch: YO, insert hook, YO, pull up loop (approx same height as dc), repeat 3 times per puff (4 loops on hook), YO and pull through all loops, ch1 to secure. Keep tension consistent; pull loops snug but not flat.
— First Petal Layer (Rounds 7-12) :
Round 7 :
Change to dusty pink (petal shade 1). Ch2 (counts as first hdc), hdc in same st, *skip next st, (3 puff cluster into next st anchored at previous round anchor: puff, ch1, puff, ch1, puff), ch2, sl st into center of previous puff anchor to shape petal* rep 8 times (forming 8 small petals). End with sl st to join (8 petal clusters)
Info :
Work puff clusters into the anchor stitches from Round 6. Each petal cluster is built from 3 puffs separated by ch1 to create a rounded, layered look. Keep petals slightly loose so they sit above the center.
Round 8 :
Ch1, sc evenly around foundation of petals into gaps and around center, aim for 32 sc total around (32)
Round 9 :
Change to blush (petal shade 2). Ch2, (hdc, puff) in first petal gap, *(ch1, puff in top of next petal cluster, ch1, hdc) in next gap* rep around to create a second layer of slightly taller petals (32)
Round 10 :
Ch1, sc around in each stitch and in each ch-space to stabilize petals (32)
Info :
This second petal layer creates depth. Alternate the placement so new puffs sit between the underlying petal tips for a fuller tulip look. Use small stitch counts for stability—if you get 30 or 34 adjust evenly to keep the square geometry consistent.
Round 11 :
Change to deep rose for a richer center accent: ch1, sc in each st around (32)
Round 12 :
Ch2, (2 dc, ch2, 3 dc) in four cardinal positions spaced evenly to start forming the square's inner frame; sc between these shell units to create 4 corner shells; total approx 40 sts (40)
Info :
Work shells in the top of stitch clusters created by petals to square the motif. Place shell centers at top, bottom, left and right to orient the square for later rounds.
— Leaf and Stem Embellishments (Rounds 13-20) :
Round 13 :
Change to olive green. Ch1, sc around the shell and petal bases to create a neat foundation for leaf placement, aim for 44 sc (44)
Round 14 :
Begin leaf stems: locate two diagonal spaces (lower left and lower right) and work: ch1, sc to first leaf base, *ch3, fpdc around next 3 sts to create elongated stem (work 6 fpdc to lengthen), slip into petal base to secure* repeat for each leaf base to create 6 thin stems total (44)
Info :
Front post double crochet (fpdc) elongated: yarn over, insert hook from front to back around the post, pull up tall loop (approx height of tr), yarn over and complete dc. These raised stitches will be shaped into leaves with later rounds.
Round 15 :
Change to olive green darker. Working in FLO for definition: *(ch2, 3 dc cluster worked around the base of each elongated stem to form the center vein of the leaf), sc around rest of the square.* End with approx 48 sts (48)
Round 16 :
Form leaf body using puff clusters: into each stem base work (puff x3 separated by ch1) to create textured leaf shapes; sc between leaves for spacing; approximately 56 total across square (56)
Info :
Sculpt each leaf by pulling puff clusters slightly to shape a tapered leaf point. Use a small blunt tapestry needle to coax clusters into position if needed before the next round locks them in.
Round 17 :
Ch1, sc evenly around to tidy leaf edges, working 1 sc in each puff top and 2 sc in wider spaces — target 56 sc (56)
Round 18 :
Change to cream. Ch3 (counts as dc), dc in next 2 sts, ch2, sk 2 sts, *(3 dc, ch2, 3 dc) in next sp to create small shell frames in between leaf clusters* rep around, sl st to join (8 shell clusters; approx 64 sts)
Info :
This round starts the square framing. Align shells so they form small scalloped frames around the petals and leaves to give a lacy granny square effect.
Round 19 :
Ch1, sc around including in ch spaces, placing 2 sc in shell troughs to maintain square shape — approx 64 sc (64)
Round 20 :
Change to lavender (main frame). Ch3, (2 dc, ch2, 3 dc) in each of the four main corner shells established earlier; between corners work *(dc, ch1, dc) in the top of each small shell* creating a squared lace frame (roughly 80 sts)
Info :
At this stage the motif should read square-ish; block each square lightly to set shape if progressing slowly. Keep counts consistent to ensure all squares join evenly later.
— Outer Lace Frame and Scallops (Rounds 21-30) :
Round 21 :
Ch1, sc around in each st and ch-space, place 3 sc in each corner ch-2 space to reinforce corners (approx 84 sc)
Round 22 :
Change to cream. *Ch3, sk 2, sc in next, ch3, sc in next* to create tall picot arches around the square; rep across all sides; aim for 88 anchor points (88)
Info :
These arches will receive a decorative scallop round. Keep spacing even by counting chains between anchors. Use stitch markers to mark directional corners if needed.
Round 23 :
Change to lavender. Working into each ch-3 arch: (5 dc, sl st into base) forming scallops; in corners work (7 dc) to round the corner; total scallops approx 22 (230 dc counted as cluster points)
Round 24 :
Ch1, sc around scallop bases placing 2 sc in each corner area to maintain square geometry (approx 96 sc)
Round 25 :
Change to cream. In FLO work 1 sc in each st to create a textured inner ridge and to flatten scallops slightly (96)
Info :
Working in FLO here helps the scallops sit forward and creates a soft ridge backing that will help the motif stack when joined. If you prefer a flatter motif, omit BLO/FLO variations and work regular sc rounds.
Round 26 :
Ch5 (counts as tr + ch2), *sk next 2 sts, tr in next; ch2* across to form a lacy openwork round; in corners make (tr, ch2, tr) to preserve corner openness; total approx 48 tr anchors (48)
Round 27 :
Switch to lavender. Ch1, sc around working 2 sc in corner ch-2 spaces (approx 100 sc)
Round 28 :
Change to cream. Work a decorative picot border: *sc, ch3, sl st in 3rd ch from hook to form picot, sc in next* rep around; corners: sc, ch3, picot, sc, ch3, picot to emphasize corner points (100)
Round 29 :
Change to lavender. Ch3, dc in next 2 sts, *(sk next st, (dc, ch1, dc) in next) rep across to create small shell arches bridging previous picots*; sl st to join (approx 104)
Info :
Finishing outer rounds tightly provides a sturdy edge for joining squares. Keep counts consistent and mark one corner for orientation when assembling the bedspread.
Round 30 :
Ch1, sc around to finish square edge neatly; fasten off and weave ends. Approx final stitch count per square: 104 sc equivalents depending on arch counts.
— Join-As-You-Go (JAYG) Method for Bedspread Assembly (Rounds 31-45 across joining step-by-step) :
Info :
Join-as-you-go is used to connect squares row by row. Work one complete square (the first square in a row) leaving the final round unworked or worked until the last stitch, then JAYG join subsequent squares to the previous row in Round 31 style. This section provides guided rounds for joining and an alternate seam method.
Round 31 :
With RS facing, join new square by working start of final round along one side until you reach a corner adjacent to a completed square, then *ch1, insert hook under corresponding stitch or ch-space of finished square, sl st to join, ch1, continue final round* rep to join along the edge. Work corners with 3 sc into corner ch-space and sl st into corresponding corner of attached square (edge length will match approx 26-28 joins depending on spacing)
Round 32 :
Continue joining each subsequent square in the row by matching scallop bases and picot anchors. For each join: when you reach a space to be joined, ch1, sl st into previous square, ch1, sc into current square to anchor. This secures the lace frames together without bulky seams.
Info :
Keep joins consistent — always join on the RS so the seam sits on the back. If you prefer a visible decorative join, use contrasting yarn and sew over the edges with whipstitch after assembly.
Round 33 :
When joining vertical columns, work the final round across the top edge of the connecting row and anchor into the row below's top ch-spaces using sl st joins every 2-3 sts to maintain alignment.
Round 34 :
To join corners where four squares meet, work: 3 sc in corner ch-space of current square, sl st into corresponding corner ch-space of the three adjacent squares following the same sequence to create a neat four-way intersection.
Round 35 :
After completing a joined row, run a tidy sc round across the top of the entire row to level edge differences before adding the next row. Use 1 sc per stitch and 2 sc in corner spaces (approx number depends on row length).
Info :
Blocking completed joined rows flat before adding the next set of rows will ensure a square, even spread after final assembly. Use steam or wet blocking according to yarn instructions, pinning to a straight edge if necessary.
Round 36 :
If you prefer a non-JAYG method, align squares, pin and whipstitch through back loops only to create an invisible seam. Use matching yarn and mattress stitch for a seamless look (approx 12-16 whipstitches per side depending on square size).
Round 37 :
Info: For stability across the full bedspread, plan out alternate color joins or use a continuous join row across the bed to prevent stretching; work a single joining color (lavender) to tie motifs together visually.
— Full Bedspread Border and Edging (Rounds 38-60) :
Round 38 :
Once motifs are joined into the desired bedspread size (example layout for double/queen pictured is approx 6 x 8 squares), work a continuous round of sc around the entire perimeter, placing 3 sc in each outer corner to keep the spread flat. Fasten off (perimeter sc count will vary with layout).
Round 39 :
Change to cream. Ch3, *(2 dc, ch2, 2 dc) in every 6th sc along straight edges to create large corner shells spaced evenly; between shells sc across* rep across perimeter. This creates a large scalloped frame anchor for next rounds.
Info :
Large scallops help the bedspread fall nicely over mattress edges and give a decorative flourish. Adjust spacing so scallops fall at mattress sides and foot evenly. Mark positions if desired.
Round 40 :
Change to lavender. Work 7 dc in each large shell to define scallops; work 3 dc in corner shells to round edges. Sl st to join when complete.
Round 41 :
Ch1, sc around scallop bases placing 2 sc in between scallops to flatten base (approx count varies)
Round 42 :
Change to cream. Work a lace row: *ch5, sk 3, sc in next* across scallops to form arches in front of scallops, corners ch7 to maintain curvature.
Round 43 :
Change to lavender. Into each ch-5 arch work (5 dc) to create a secondary scallop. Sc around to tidy and secure (this gives a double scallop border).
Round 44 :
Change to cream. Work BLO sc around to create a neat foldable edge that sits well on the bed; 1 sc in each st BLO across and 3 sc in corner ch-spaces (this forms the inner lip of the border).
Info :
If you want a more pronounced scallop, add an extra repeat of dc scallops in contrasting color. For a subtler look, reduce the shell size to 5 dc per scallop instead of 7.
Round 45 :
Change to lavender. Work final decorative edge: *sc, picot (ch3, sl st into 3rd ch), sc* across. In corners add extra picots to emphasize turn. Fasten off and weave ends. The border will create a soft scalloped silhouette around the bedspread.
Round 46 :
Info: For heavier drape, consider adding a second border round in matching or contrasting color. For a lighter, more lacy finish, use a smaller hook for the final scallop round to draw the lace in slightly.
— Cushion Front Motif and Construction (Rounds 47-72) :
Round 47 :
Make a motif as in Rounds 1-30 for the cushion front. Fasten off leaving long tail for joining to cushion back. Block motif flat to 18" square while moist to shape.
Round 48 :
Info: For an 18" cushion, either make a slightly larger motif with an extra outer scallop round or work a second full motif and join two panels. The pictured cushion uses one motif as the front with a tailored back panel.
Round 49 :
Back Panel Option A (single panel): With lavender, ch 62 (or width equal to motif edge when measured), turn and work dc rows until depth equals motif height (approx 18in), finishing with 2-3 rows of sc for a firm seam. Fasten off and block.
Round 50 :
Back Panel Option B (two panels): Make two rectangles equal to half the motif perimeter plus overlap for a zippered or envelope closure: chain to width, dc rows until height 9in for each panel. Overlap edges by 3in for envelope closure.
Info :
Choose zipper insertion or envelope closure. For envelope closure, leave one raw edge on each back panel unworked and sew panels to motif leaving center overlap free for insert.
Round 51 :
Join front motif to back panel by slip-stitching around edges or using whip stitch with yarn needle. Work in lavender, attach at RS through back loops only of motif to create a neat finished front edge (sew 3 sides, insert cushion, close final side).
Round 52 :
Info: Add tassels at corners: cut strands of yarn 6-7" long, fold and attach with lark's head knot to corner points. Add a wrapped band at the top of each tassel by wrapping yarn tightly several times and knotting, trim ends evenly.
Round 53 :
For a padded feel, insert a foam or polyester cushion 1-2" smaller than cover to achieve a plump look without stretching the motif.
Round 54 :
Optional embroidered details: using tapestry needle and matching colors, secure small French knots in blush or cream at petal centers for added texture.
Info :
When joining cushion back, hide ends inside seam and weave them into the back panel to avoid lumps. For a cleaner finish, use a zipper sewn into the bottom seam before closing the last edge.
— Tassel & Corner Finishes (Rounds 55-64) :
Round 55 :
Create tassels for bedspread corners using 3 colors (lavender, cream, olive): wind yarn around a 3.5" template 30 times, tie at one end, cut at opposite end, fold and wrap 1.5" below the fold with matching yarn, attach with lark's head to corner picot, trim evenly. Repeat for all 4 corners.
Round 56 :
For tassel beads: string wooden beads onto top loop before knotting and secure with glue if desired. Make sure bead holes can accommodate yarn strands.
Info :
Alternating tassel colors creates a finished look that complements the motif colors. For heavier tassels, double the number of wraps to 60 and use thicker yarn for a fuller tassel.
Round 57 :
For scalloped corner drops: make small 3-round mini-motifs (ch6, join, 1 sc rounds, 3 dc shell) and attach below tassel to create the elongated corner seen in the photo.
Round 58 :
Secure all tassel attachments by sewing the top loop into the corner with several passes of yarn to ensure durability during washing and use.
Round 59 :
Info: If washing is required, remove tassels or secure them with a washable glue and test a sample tassel before full laundering. Air-dry flat after washing to maintain shape.
Round 60 :
Final check: weave in all loose ends into the back of motifs across at least 3-4 inches of yarn to prevent unravelling. Trim ends close but not flush (leave 1/8" inside for security).
— Finishing Touches, Blocking & Care (Rounds 61-72) :
Round 61 :
Info: Blocking is essential for this project to make all squares the same size and to flatten puff petals into place. Lay each square on a blocking mat, steam lightly or wet block following yarn instructions, pin edges to measurements (10.5" square if using suggested yarn), allow to fully dry before joining.
Round 62 :
Press petals gently with steam iron held above surface—do not press directly on textured puff clusters. Use a cloth over motif if pressing is necessary.
Round 63 :
Info: For long-term care, hand wash or use gentle cycle in cold water and lay flat to dry. Avoid tumble drying to maintain puff stitch integrity.
Round 64 :
Quality check: inspect joins for gaps; if a gap exists, secure by sewing an extra running stitch from back to front behind the scallop to tighten the join without showing through the RS.
Round 65 :
Optional: weave a cotton fabric backing to the entire bedspread for added warmth and stability. Cut fabric to size, pin to bedspread RS down, and stitch by hand or machine along the linen edge leaving a 1/4" seam allowance inside the outer border.
Info :
A fabric backing is ideal if the spread will be used frequently; it also hides any inconsistent joins and provides extra weight so the bedspread hangs well.
Round 66 :
Edge finishing: if a very crisp edge is desired, after backing is sewn, bind the raw fabric and crochet edge together with a final sc round in lavender for a professional finish.
Round 67 :
Final blocking: after all assembly, give the entire bedspread a last, light blocking to even border scallops and ensure flatness. Re-pin outer scallops so they fan uniformly down the mattress edge.
Round 68 :
Info: Photograph your finished spread in natural light to compare square consistency. Take notes on stitch counts if you plan to reproduce size variations for different bed sizes.
Round 69 :
Storing: fold along natural squares, avoid heavy stacking on top of motifs to preserve puff dimension. Use acid-free tissue between folds for long-term storage.
Round 70 :
Repair tips: to correct an unbalanced motif after joining, unpick only the joining round and re-join after adjusting the square's outer rounds. Minor shape corrections can often be accomplished with blocking.
Round 71 :
Info: If you prefer a lighter spread, substitute worsted weight (#4) yarn and a 4.5mm hook — expect smaller squares and more motifs required to cover a bed; re-gauge before committing to full bedspread.
Round 72 :
Final notes: This pattern encourages personalization. You can alter petal colors, add bead accents in petal centers, or substitute a cotton yarn for a cooler summer spread. Document your choices for future repeats.
Completing this Lavender Tulip Granny Square Bedspread is a labor of love that yields a stunning heirloom for any bedroom. Each square is a miniature work of art, and when joined together they create a lush field of tulips across your bed. The layered petals, sculpted leaves and scalloped edges combine to form a cozy, romantic centerpiece for your home. I can't wait to see the color variations you'll create — happy stitching! 🧶🌷