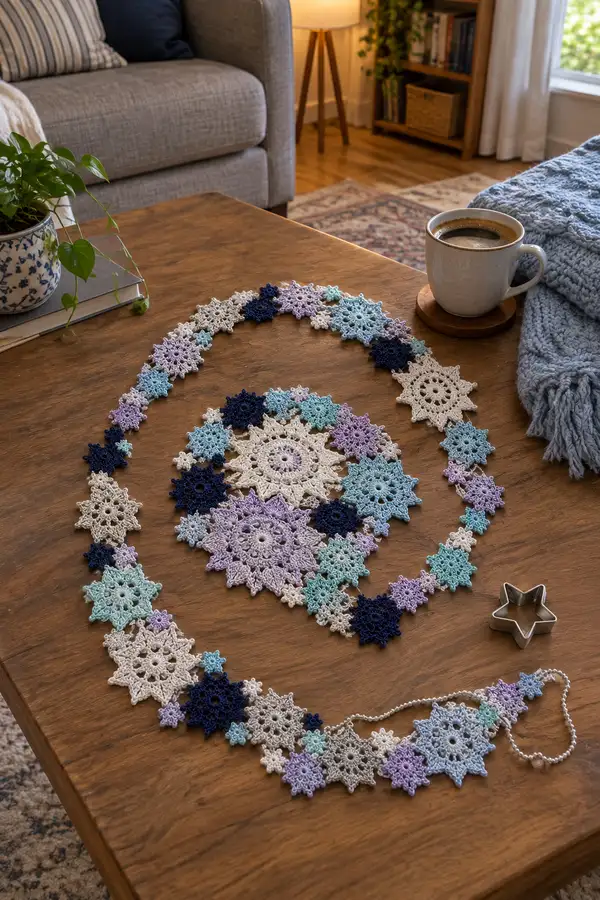
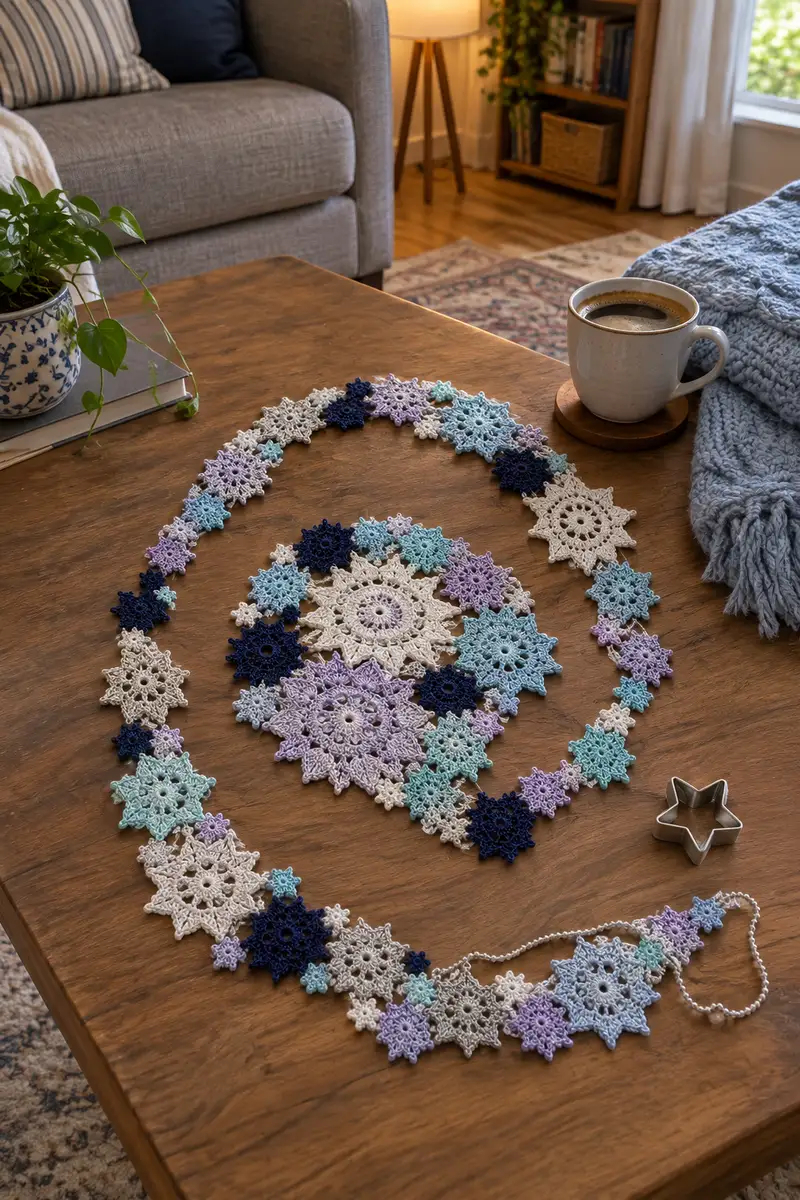
Create a delicate linked snowflake table runner made from a collection of small and large lace snowflake motifs. This pattern uses fine cotton yarn in cool winter tones—ivory, navy, lilac, mint and pale blue—and joins motifs into a graceful oval runner perfect for holiday centerpieces. Detailed step-by-step motif instructions and clear joining guidance let you mix sizes and colors for a custom length and shape.
Progress Tracker
0% Complete
— Overview :
Info :
This runner is built from a mix of six motif types (center medallion, large A, large B, medium, small, mini). Make as many of each as you like, then block and join them in the order you prefer. The pattern below gives complete round-by-round instructions for each motif type, plus joining and edging. Counts are exact; check your tension and change hook size if your motifs are significantly different in diameter.
— Center Medallion (Large Round Motif) :
Round 1 :
6 sc in magic ring (6)
Round 3 :
(1 sc, inc) x 6 (18)
Round 4 :
(2 sc, inc) x 6 (24)
Round 5 :
(3 sc, inc) x 6 (30)
Info :
Change to a lace-friendly stitch pattern: start alternating dc clusters and chain spaces to open the fabric. Use a slightly looser tension for lacy rounds to allow the later points to lie flat.
Round 6 :
*ch 3 (counts as dc), sk next st, dc in next st, ch 3, sl st into next sc* around to form 10 ch-3 loops and 10 dc clusters (30 visible foundation units)
Round 7 :
Work into ch-3 spaces: (sc, ch 3, 3 dc, ch 3, sc) in each ch-3 sp around (10 petals established). Count approx 10 clusters each consisting of 5 sts plus ch loops
Round 8 :
Into each petal: sl st to center base, ch 5, (dc, tr, dc) into petal tip, ch 5, sl st to base between petals (10 prominent points)
Round 9 :
Between each point: ch 4, sl st to tip of next petal to create small arches; around (10 arches)
Round 10 :
Work picot embellishment: in each arch (sl st, ch 3, picot, sc) to create small decorative loops (10 picots)
Info :
At this stage you should have a medallion about 10-12 cm across if using fingering cotton and 2.0mm hook. If it measures smaller or larger, adjust hook for the rest of motifs to keep consistent sizing across pieces.
Round 11 :
*sl st to next petal base, ch 6, (sc, ch 3, sc) in petal base, ch 6, sl st into next arch* repeat around to build secondary points (10 secondary star points)
Round 12 :
Into each ch-6 on outside: (sc, ch 3, 3 dc, ch 3, sc) to form pronounced lace points (10 large points). Count increases: each point forms 8 stitches; approximate total stitch count across working spaces ~100+ depending on tension
Round 13 :
Edge shaping: in each dc group work picot edging: (dc, ch 3, picot, dc) across the tip of each large point to make crisp snowflake tips (10 picots)
Round 14 :
Finish outermost lace scallops: sl st to base, *(ch 4, sc) x2, ch 4, sl st to tip* repeat around to create delicate scallops (10 scallops)
Round 15 :
Optional additional decorative round: work tiny 5-3 picot clusters in each scallop if you want denser lace. (sc, ch 3, picot, ch 3, sc) into each scallop (10 clusters)
Info :
Fasten off leaving a 20 cm tail for weaving if you plan to sew this medallion into the center cluster. Block flat so the outer points open fully; pin each point to the blocking mat evenly spaced.
— Large Snowflake A (8-Point Star) :
Round 1 :
6 sc in magic ring (6)
Round 3 :
(1 sc, inc) x 6 (18)
Round 4 :
(2 sc, inc) x 6 (24)
Round 5 :
Ch 3, *sk 1, dc in next, ch 3* around to create 8 ch-3 loops and a circumferential openwork (24 base units)
Round 6 :
In each ch-3 loop: (sc, ch 3, 4 dc, ch 3, sc) forming 8 petals (points) — each point totals approx 8 sts
Round 7 :
*sl st to petal midpoint, ch 5, (dc, tr, dc) into petal tip, ch 5, sl st to next base* repeat for 8 strong star points
Round 8 :
Work picots on each point tip: (sl st to tip, ch 3, picot, sl st back into tip) then sl st back to base (8 picots)
Round 9 :
Optional outer lace: between each large point ch 4, sc into next space to form small arches (8 arches)
Info :
This motif should measure ~6-8 cm across depending on yarn and hook. Make 6-8 of these large A motifs for a balanced runner when combined with other sizes.
Round 10 :
Reinforce outer edge: into each arch work (sc, ch 3, sc) and into each outer stitch of point work a tiny picot (8 picots total). Fasten off and weave in ends.
— Large Snowflake B (8-Point with Lacy Centers) :
Round 1 :
6 sc in magic ring (6)
Round 3 :
(1 sc, inc) x 6 (18)
Round 4 :
Ch 4, *dc in next, ch 2* repeat to create 6 small ch-2 loops and airy center ring (18 base stitches remain)
Round 5 :
Work into loops: (sc, ch 4, 5 dc, ch 4, sc) to create rounded petals (6 petals)
Round 6 :
Between petals create chain arches: ch 6, sl st into base between petals repeat around (6 arches)
Round 7 :
Into each arch work (sc, ch 3, 3 dc, ch 3, sc) to form secondary points (6 larger points)
Round 8 :
Round of decorative picots and small loops: (sl st, ch 3, picot, ch 3, sl st) into each arch tip and at base of points (12 small picots)
Info :
Large B has bolder center holes and fewer elongated points than Large A; it's a great visual companion when alternating motifs along the runner.
Round 9 :
Optional final scallop: along outer edge work (sc, ch 2, sc) between each tip to make an even rim. Fasten off and block.
— Medium Snowflake (6-Point Star) :
Round 1 :
6 sc in magic ring (6)
Round 3 :
(1 sc, inc) x 6 (18)
Round 4 :
Ch 3, *dc in next st, ch 3* around forming 6 ch-3 loops (18 base units)
Round 5 :
In each loop: (sc, ch 3, 3 dc, ch 3, sc) to create 6 petals (approx 6x7 sts)
Round 6 :
*sl st to petal tip, ch 4, (dc, tr, dc) into tip, ch 4, sl st to next base* repeat for 6 points
Round 7 :
Add small scallops: (sc, ch 2, sc) in outer arches between points (6 scallops)
Round 8 :
Picot finish on each outer stitch: (dc, ch 3, picot, dc) on each outer small cluster to enhance spikiness (6 picots)
Info :
Medium motifs are the workhorses of the runner. They are slightly smaller and provide spacing between larger snowflakes. Aim for 12-18 of these depending on desired runner length.
Round 9 :
Fasten off leaving a tail for sewing or joining-as-you-go; weave end through a yarn needle and block flat.
— Small Snowflake (Petite 6-Point) :
Round 1 :
6 sc in magic ring (6)
Round 3 :
*(ch 3, sc) x6 into ring to make 6 small loops around (12 foundations)
Round 4 :
Into each loop: (sc, ch 2, 3 dc, ch 2, sc) to make 6 tiny petals (approx 6x7 sts)
Round 5 :
Round of tiny picots at each tip: sl st to tip, ch 3, picot, sl st back — repeat around (6 picots)
Info :
Small motifs are quick to make and used as spacers. Make many small ones in several colors to scatter between medium and large snowflakes.
Round 6 :
Fasten off and weave in ends, block each motif flat to exact shape so points align when joined.
— Mini Connector Flower (Tiny 4-Point) :
Round 1 :
6 sc in magic ring (6)
Round 2 :
Ch 3, sl st into next st; repeat to make 3 little loops around the ring, sl st to join (6 small loops)
Round 3 :
Into each little loop: (sc, ch 2, 3 dc, ch 2, sc) to create 3 mini petals (use these as connectors between larger motifs)
Round 4 :
Fasten off leaving tail for sewing; these small flowers are glued sewn into gaps or joined-as-you-go to link motif corners without heavy seams.
Info :
Make dozens of these little connectors in accent colors to create airy chains between larger snowflakes. They are especially helpful to soften lines and add subtle color pops.
— Joining Motifs — Join-As-You-Go Slip Stitch Method :
Info :
We recommend joining motifs using a join-as-you-go (JAYG) slip stitch method to maintain a flat connection and preserve lace openings. Alternatively, you can block then sew motifs together with small whip stitches. Here are step-by-step JAYG rounds and guidance.
JAYG Round 1 :
Work motif until the final outer round is completed and you are at the placement point where two motifs meet. Join with a sl st into the corresponding stitch of the already-blocked motif to connect a single point (sl st into already-worked motif then continue pattern for current motif).
JAYG Round 2 :
When you reach the next junction point, sl st into corresponding loop of neighboring motif and then continue. Each time you join, use a single slip stitch to anchor; keep joins subtle and consistent by always joining at the same place in the outer round (for example, at the last picot of a point).
JAYG Round 3 :
If joining three motifs at a junction, insert the hook through all three motifs’ outer loops and sl st to secure; this creates a neat trifecta join without bulk.
Info :
Always pin motifs into the final layout before joining. Use blocking pins to hold distances and angles. Work slowly along the chain to avoid skewing motif orientation.
JAYG Round 4 :
When running out of yarn for a color, fasten off and weave ends through several stitches. Use a contrast connector motif here for a decorative join if you prefer visible seams.
— Alternative Joining — Invisible Whip Stitch :
Info :
For a hand-sewn join, pin motifs in position, then use a tapestry needle and matching yarn to whip stitch from the back: pick up the first loop on motif A and the second loop on motif B with small, evenly spaced stitches. Pull gently to close join with no puckering.
Step :
Stitch through the spaces formed by the ch loops rather than through dense clusters to keep the join flat and lacey.
— Runner Layout & Assembly Plan :
Info :
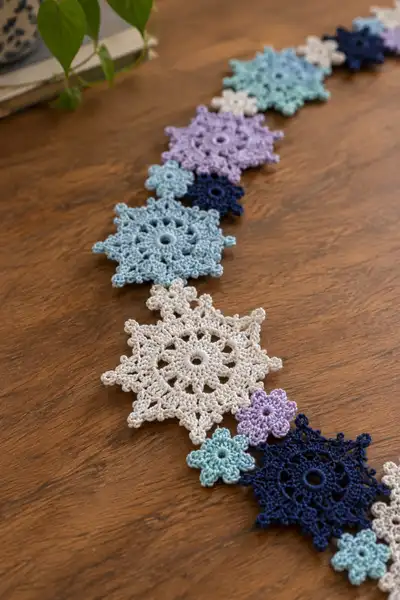
Sample layout in photos shows an oval/spiral arrangement of many motifs: a large center medallion surrounded by alternating large and medium motifs with small and mini connectors filling gaps. Use cream and navy as anchors with lavender, mint and pale blue scattered for variety. Decide on total runner length (sample is ~120 cm) and arrange motifs on a blocking board before joining.
Step :
Start by placing the center medallion, then place four large motifs around it, add medium motifs between the large ones, and fill spaces with small and mini connectors. Continue outward until you reach desired length and shape.
Info :
Count motifs as you go to keep balanced color distribution: for the pictured runner the maker used roughly 1 center medallion, 8 large motifs, 18 medium motifs, 24 small motifs and 40+ mini connectors. Adjust quantities to your table size.
— Decorative Edge and Final Border :
Round 1 :
Once all motifs are joined, work a continuous border around the entire outer edge by working sc into every other outer picot or loop to create a rim. Start at a convenient outer seam and work steadily around to the start point; count stitches as you go.
Round 2 :
Edge scallops: *(sc in next st, ch 3, sl st in third ch from hook to create picot) x2, sk 2* repeat around to create repeatable scallop units. Maintain symmetry across motifs by pinning the edge before crocheting the rim.
Round 3 :
Optional fringe of tiny loops: in each scallop ch 4, sl st back into base. This creates a light beaded looped fringe that hangs softly off the table edge.
Info :
Final border will change runner diameter slightly; be mindful to add or omit stitches to keep tension even. If the runner cups inside after border, remove a few border stitches or block again more aggressively to flatten.
Round 4 :
Fasten off securely with a long tail and weave through the back of fresh border stitches to hide the yarn end. Trim ends close and press lightly with a steam iron over a cloth if needed.
— Blocking and Finishing :
Info :
Blocking is essential. Wet-block each motif individually, pinning points evenly to a blocking mat. Let dry completely. Layout the motifs in final configuration and pin to the mat, rewet lightly if necessary, and allow to dry. Proper blocking ensures even points and flat joins.
Step :
Use rust-proof pins and measure spacing between motif centers to keep the runner symmetrical. For a firmer finish lightly starch the runner after blocking if you want it to lie very flat on the tabletop.
— Stitch Count Reference & Troubleshooting :
Info :
If any motif ends up too small, try a larger hook by 0.25-0.5mm for remaining motifs. If too large, switch down a size. Keep tension consistent and always block each piece the same way. Join-as-you-go sl st should not change stitch counts in your working motif; if it does, count the underlying motif's loops and work your join into those loops only.
Step :
Check edges for gaps after joining; fill small triangular gaps with tiny connector flowers sewn into place. For large gaps, add an extra small motif to that zone and re-pin the runner before final border.
— Color & Variation Ideas :
Info :
Try a monochrome ivory runner for an elegant holiday look, or use metallic thread for special occasion sparkle. You can also make a hanging garland or wall art by spacing motifs on a narrow cord and adding beads between motifs.
Step :
To adapt to a garland, make motifs slightly smaller by switching to a 1.5mm hook or thinner thread, then join with a single crochet chain through the motif centers to create a string.
— Extra Notes for Long Runs :
Info :
Plan your color repeats to avoid clustering similar colors in one area. Work in batches of motifs by color to stay organized and consistent in tension. Keep a spare skein of each color on hand to avoid dye lot differences.
Step :
Label your blocked motifs on the back with small pieces of paper to mark which color goes where if your layout is complex; re-pin as needed during joining.
— Final Encouragement :
Info :
This project is modular and forgiving; if you change your mind about layout mid-way you can unpick small joins without affecting the whole runner. Take your time blocking and joining — the blocking stage is where the magic happens and the snowflakes open into crisp stars.
Finishing this linked snowflake runner is such a satisfying moment — watching tiny motifs come together into a graceful, frosty centerpiece feels magical. Each star-shaped snowflake adds personality, and the delicate border ties the whole piece into a refined holiday accent. I hope this pattern brings a bit of handmade calm and sparkle to your table this season. 🧶❄️❤️