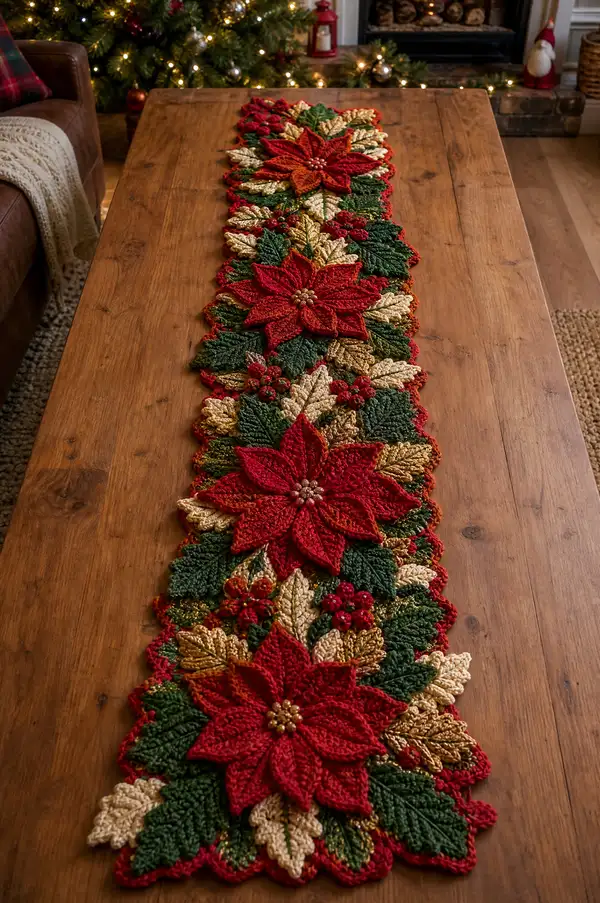
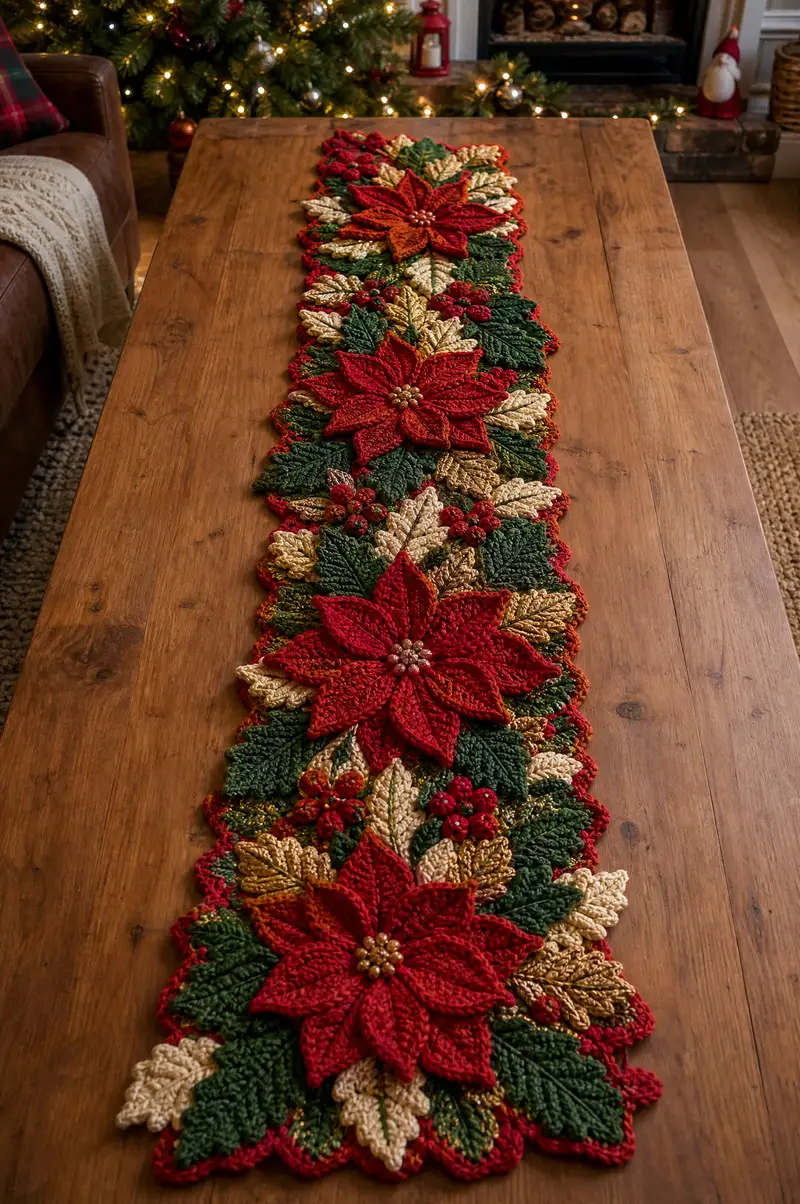
A richly textured holiday table runner featuring layered poinsettias, holly leaves, and berry clusters in classic Christmas colors. This design uses raised petals, sculpted leaves, and a scalloped border to create a luxurious centerpiece. Perfect for dining tables or sideboards, the runner combines stitch texture and colorwork for a festive, heirloom-quality piece.
Progress Tracker
0% Complete
— Overview :
Info :
This runner is made from repeat modules: Large Poinsettia Motifs (make 3 primary for the photo runner length shown), Medium Leaf Sprays (multiple per side), Small Leaf Sprays, Berry Clusters, and Joining Rounds to connect them into a continuous runner. Work motifs flat; block each motif to dimensions before joining. Use 4.0 mm hook for most work; switch to 3.5 mm for berries and small detail work if you want tighter clusters.
Info :
Gauge is not critical for overall length, but to achieve similar motif size, each large poinsettia motif should measure approximately 12-13 inches across after blocking. Adjust yarn or hook size if motifs differ significantly.
— Large Poinsettia Motif (make 3) :
Round 1 :
Using deep red, mr, ch1, 8 sc in ring, join with sl st to first sc (8)
Round 2 :
Ch1, inc around (2 sc in each st) (16)
Round 3 :
(1 sc, inc) x8 (24)
Round 4 :
(2 sc, inc) x8 (32)
Info :
These first rounds form a tight central disk that will anchor the petals. Keep stitches snug and even to avoid gaping holes in the center.
Round 5 :
(3 sc, inc) x8 (40)
Round 6 :
1 sc in each st (40)
Round 7 :
Ch3 (counts as dc), *skip next st, 1 dc in next st; ch1, sl st in skipped st (creates base loops for petals)* repeat across to last st, sl st to top of beginning ch3 (20 loops)
Info :
Round 7 creates 20 evenly spaced loops that become the base for 10 larger outer petals and 10 smaller inner petals. Use stitch markers on every other loop to mark starting points for consistent petal placement.
Round 8 - Outer Petal Base (repeat across 10 marked loops) :
At each marked loop: join with sl st, ch2, (2 hdc, 3 dc, 2 hdc) in loop, ch2, sl st to same loop. Finish outer petal bases on 10 loops (each petal base approx. 10 sts across)
Info :
Work petals one at a time and keep tension consistent. Place a stitch marker at the first st of each petal to help count rows evenly as petals grow.
Round 9 - Outer Petal Row 2 :
Working into petal foundation: ch1, sc across petal edge front loop only (approx. 10 sc across), sl st to base. Repeat for each of 10 outer petals.
Round 10 - Outer Petal Sculpting :
Into each outer petal: ch2, (hdc, dc) in same st, 3 dc in next 3 sts, (dc, hdc) in last st, ch1, sl st to base (creates gentle peak). Repeat for 10 petals.
Round 11 - Outer Petal Ridge :
Work 1 sc in each st around petal working through both loops to flatten and define (approx. 12 sc per petal). Repeat for all outer petals.
Round 12 - Outer Petal Texture :
Into center sts of each petal work (fpdc, fpdc, tr) to create raised center line on petal. Sl st to base to finish. Repeat for 10 petals.
Info :
Use front post stitches to pull the center line out so petals appear dimensional. If your fpdc/tension is very tight, use a larger hook for these rows only and switch back afterwards.
Round 13 - Inner Petal Foundation (remaining 10 loops) :
Join yarn at each of the remaining 10 loops, ch2, (1 hdc, 2 dc, 1 hdc) in loop, ch1, sl st to same loop. Repeat to make 10 inner petals (smaller than outer petals).
Round 14 :
1 sc in each petal st around inner petal to even edges (approx. 8 sc per inner petal)
Round 15 :
Into each inner petal center, work (fpdc, tr, fpdc) to form center ridge, sl st to base (repeat for 10 inner petals)
Info :
At this point the motif has two layers of petals. Ensure the inner petals tuck under the outer petals slightly; if they appear too forward, adjust by folding and blocking later.
Round 16 - Petal Edge Row :
With rusty/orange-red held together with deep red for subtle shading (optional), sc around entire motif edge placing 3 sc at petal tips to produce a gentle scallop. Total stitch count around motif edge approx. 140-160 depending on petal shaping.
Round 17 :
Ch3, *picot at the tip of every other petal: [ch3, sl st in first ch]*, sc between picots to stabilize. Repeat around and join.
Round 18 - Center Embellishment :
Using metallic gold, make a small central cluster: mr, ch1, 6 sc in ring (6), pull tight. Sl st to front of motif center and fasten off leaving 8-10in tail to sew. Optionally sew 6-8 small pearl beads evenly around center using matching thread.
Info :
Sew center cluster securely through both layers of petals. Reinforce beads by sewing each bead several times and knotting thread on reverse side under petals.
Round 19 - Backing Stabilizer :
Flip motif to back; with cream or same red, work 1 round sc in blo into rear base of motif to create a smooth backing and provide even join points (approx. 140 sc). Fasten off and weave in ends.
Info :
Block the large poinsettia flat with pins on blocking board, shaping petals upward slightly for three-dimensional look. Let dry fully before joining motifs.
— Medium Decorative Leaf (make approx. 24) :
Round 1 :
With dark green, ch6, sc in 2nd ch from hook, sc, hdc, dc, hdc, sc across to last ch, turn to work down opposite side: sc, hdc, dc, hdc, sc, sl st into first ch to form leaf loop. (approx. 12 sts around)
Round 2 :
Working around leaf edge: 1 sc in each st BLO to create textured edge (approx. 12 sc). Fasten off, weave in ends.
Round 3 - Vein Sculpting :
Using same green, from tip of leaf sl st to midline, ch1, work a raised central vein using fpdc down the center (6 fpdc), anchor with sl st. Fasten off. Repeat for all medium leaves.
Info :
For a fuller effect, make a mix of green and lightly variegated greens. Block leaves flat and pinch central vein up slightly for depth.
— Large Gold/Cream Accent Leaves (make approx. 20) :
Round 1 :
Using metallic gold or cream, mr, ch1, 8 sc in ring, join (8)
Round 2 :
(1 sc, inc) x4 (12)
Round 3 :
(2 sc, inc) x4 (16)
Round 4 :
Ch3, 1 dc in next 3 sts, ch2, 1 dc in next 3 sts, sl st around to create elongated oval (approx. 8 dc + chains)
Round 5 :
Working around whole leaf edge: sc in each st BLO, placing 3 sc at widest points (approx. 28 sc). Fasten off.
Round 6 - Vein :
With contrasting green or darker gold, sl st to tip, ch1, work 6 fpdc as a central raised vein, fasten off and weave in end.
Info :
These leaves add sparkle and contrast; metallic yarn should be handled gently to avoid shredding. Use a slightly larger hook if metallic strand feels tighter.
— Small Leaf and Filler Motifs (make approx. 40) :
Round 1 :
Ch5, sl st to first ch to form ring, ch1, 6 sc in ring (6)
Round 2 :
(1 sc, inc) x3 (9)
Round 3 :
Sc around to smooth edge (9). Fasten off; these are small filler leaves to tuck under petals.
Info :
Make small leaves in cream and green to add layers. These tuck between larger leaves and petals when assembling the runner.
— Berry Clusters (make approx. 24 clusters of 3-5 berries) :
Round 1 :
Using bright red and 3.5mm hook, mr, ch1, 6 sc in ring, pull tight (6)
Round 2 :
Work 1 round of sc in BLO to produce a small rounded berry shape (6). Fasten off leaving 6-8in tail to sew.
Info :
Make clusters by sewing 3-5 berries together at base with matching yarn. Add a tiny french knot with gold thread or work a small gold bead at cluster center for sparkle.
— Joining Motifs and Runner Assembly :
Info :
Layout all motifs on a large surface before joining: central axis with large poinsettias evenly spaced (approx. 10-12 inches apart center-to-center), tuck leaf sprays and filler leaves around petals alternating gold and green to create full coverage. Leave small gaps where berry clusters fit naturally.
Round 1 (Joining Preparation) :
With cream or matching join color, work a sl st border around each motif spaced evenly to create join points: sl st every 1/2 inch around motif edge, placing markers where joins will occur. Aim for approximately 14-18 join points per motif side depending on motif size.
Round 2 (Sample Join - connect two motifs) :
Place two motifs right sides together aligning join markers. Using whip stitch or invisible join, sew through corresponding sl st points creating a flat join. When joining large motifs, alternate joining with leaf and filler motifs to keep seams flexible and decorative.
Info :
Do a test join on two motifs first to ensure spacing and gauge match. If seams pucker, add a small filler leaf between the two motifs to ease tension and to create a layered effect.
Round 3 :
Continue joining motifs across the runner center, attaching medium and small leaves into gaps between larger motifs by whipstitching through the backing blo round to keep front appearance clean. Sew berry clusters into natural pockets where three or more leaves meet.
Round 4 (Reinforcing Joins) :
Once all motifs are joined, with a contrasting stitch color (rusty red), crochet a joining round across seams: working from front, sc into motif A, ch1, sc into motif B at corresponding point, ch1 to create a decorative ladder join. Repeat across all joins to stabilize runner (this adds a subtle decorative chain-like seam).
Info :
Check runner flatness as you join; adjust by adding or removing filler leaves and shifting join points. Use pins to secure placement before final sewing for an even, professional finish.
— Decorative Scalloped Border (work one continuous border around entire assembled runner) :
Round 1 :
With deep red, attach yarn to any outer point with sl st, ch1, sc around entire runner edge working approximately 1 sc per 1/4 inch of edge; place 3 sc at pronounced tips and 2 sc in shallow curves. This evens the perimeter and provides base for scallops (estimate 300-360 sc around full runner depending on assembly).
Round 2 :
Ch3 (counts as dc), *skip 2 sc, 5 dc in next sc (shell), skip 2 sc, sl st into next sc* repeat around to create scalloped shells. Space shells evenly; aim for 40-50 shells total.
Info :
Adjust shell spacing to fit runner perimeter—the shell should land centered on petal tips and leaf tips to emphasize shapes. Use stitch markers to divide perimeter into equal sections if needed.
Round 3 :
With metallic gold held together with red for shimmer, work picot edging on each shell tip: sl st to center of shell, ch3, sl st in first ch (picot), sl st back to base. Repeat across all shells for sparkling edge.
Round 4 :
Finish with 1 round sc in matching red across all previous rounds to tidy edges and hide join tails. Fasten off and weave in ends, pulling tails through adjacent stitches to hide securely.
Info :
Lightly steam-block final runner to ensure scallops sit nicely. Avoid heavy water if metallic yarn is used; instead, use steam and gentle shaping with fingers and pins.
— Optional: Additional Texture with Surface Crochet and Gold Thread :
Round 1 :
Using a single strand of metallic gold held with red, surface crochet a vein pattern across selected leaves: insert hook from front to back, pull up loop, sl st forward along leaf midline to create a fine metallic vein. Repeat for desired leaves.
Info :
Surface crochet should be done after joining but before final blocking to ensure lines are even and taut. Secure ends on the wrong side with knots and weave in thoroughly.
— Final Finishing Touches :
Info :
Sew any loose beads and add a few extra berry clusters in corners or spaces as desired. Trim all ends short and weave back into runner. If desired, add a thin fabric backing or interfacing to the underside to protect table surfaces from any bead edges or to increase stability during use.
Round 1 :
Do final inspection: check all joins, pull any loose stitches tight, and reinforce bead areas. Give runner a light steam and re-shape petals and leaves to their final position. Allow to cool and dry fully before decorating table.
Info :
For storage, wrap runner in tissue paper and store flat to protect dimensional petals. Spot clean gently using damp cloth and mild detergent; avoid machine washing if metallic yarn or beads are present.
Completing this Long Poinsettia and Holly Table Runner is a truly rewarding holiday project. Each layered petal and sculpted leaf builds into a striking centerpiece full of texture and festive color. The detailed finishing and optional metallic highlights make it special enough to display year after year. Enjoy the process and the beautiful table-ready result — your holiday table will glow with handmade warmth! 🎄✨